Operation Manual
Page 3
MP6512i TABLE OF CONTENTS Introduction 1 Installation 2 Wiring ...5 Front Panel Release 6 Operation 7 Tuner Operation 10 CD Player Operation 12 MP3/WMA Operation 13 Satellite Radio Operation 17 iPod Operation 19 Remote Control 20 Care and Maintenance 21 Troubleshooting 22 Specifications 23 i
MP6512i TABLE OF CONTENTS Introduction 1 Installation 2 Wiring ...5 Front Panel Release 6 Operation 7 Tuner Operation 10 CD Player Operation 12 MP3/WMA Operation 13 Satellite Radio Operation 17 iPod Operation 19 Remote Control 20 Care and Maintenance 21 Troubleshooting 22 Specifications 23 i

Operation Manual
Page 5
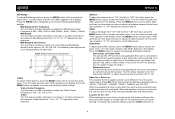
Supports Hard Drives and Flash Memory Drives • SD Card - Playback of MP3 and WMA files • 3.5mm Audio Only Input Chassis • Detachable Faceplate • 1.0 DIN (Import / ISO-DIN Mountable) • 8 Character / Segment Type LCD Display General • Infrared Remote Control • Programmable Volume Control • MediaPlex AudioCore offers Adjustable Bass, Midrange and Treble Center Frequencies as well as Bass and Midrange Q Adjustments • Five Preset EQ Curves • Loudness • Rotary...
Supports Hard Drives and Flash Memory Drives • SD Card - Playback of MP3 and WMA files • 3.5mm Audio Only Input Chassis • Detachable Faceplate • 1.0 DIN (Import / ISO-DIN Mountable) • 8 Character / Segment Type LCD Display General • Infrared Remote Control • Programmable Volume Control • MediaPlex AudioCore offers Adjustable Bass, Midrange and Treble Center Frequencies as well as Bass and Midrange Q Adjustments • Five Preset EQ Curves • Loudness • Rotary...
Operation Manual
Page 7
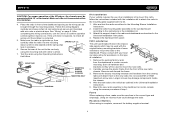
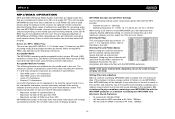
... wiring connections, turn the unit on to confirm operation (vehicle ignition must be used with the original factory mounting brackets of some vehicles to mount the radio to the dashboard. Install the radio/mounting plate assembly to the sub-dashboard according to the new radio. BEND TABS RADIO TRIM RING MOUNTING SLEEVE RUBBER CUSHION MOUNTING BOLT Kit I nstallation This unit has threaded holes in the Universal Installation instructions. 5. Replace the dashboard trim panel. Remove...
... wiring connections, turn the unit on to confirm operation (vehicle ignition must be used with the original factory mounting brackets of some vehicles to mount the radio to the dashboard. Install the radio/mounting plate assembly to the sub-dashboard according to the new radio. BEND TABS RADIO TRIM RING MOUNTING SLEEVE RUBBER CUSHION MOUNTING BOLT Kit I nstallation This unit has threaded holes in the Universal Installation instructions. 5. Replace the dashboard trim panel. Remove...

Operation Manual
Page 8
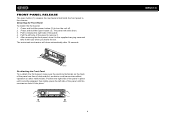
Rem oving the Radio To remove the radio after installation, remove the trim ring by lifting in the center and pulling it off from 9:00am to 6:00pm EST Monday through Friday. MP6512i 4 If removal keys are inserted at 1-800-323-4815 from either side. Technical Assistance If you require assistance, contact Technical Support at an angle, they lock, then pull the radio out. Insert the removal keys straight back until they will not lock properly and will not release the unit.
Rem oving the Radio To remove the radio after installation, remove the trim ring by lifting in the center and pulling it off from 9:00am to 6:00pm EST Monday through Friday. MP6512i 4 If removal keys are inserted at 1-800-323-4815 from either side. Technical Assistance If you require assistance, contact Technical Support at an angle, they lock, then pull the radio out. Insert the removal keys straight back until they will not lock properly and will not release the unit.
Operation Manual
Page 10
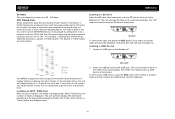
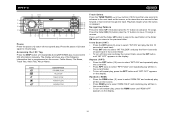
... the power button (2) to the chassis. Pull to remove it. 5. After removing the front panel, store it in place until correctly engaged, then lightly press the left side of the panel to release the right side of the panel in the...panel, make sure the electrical terminals on the back of the panel are free of the panel until the mechanism locks it with you when you leave the car. The panel will close automatically after 10 seconds. FRONT PANEL RELEASE The open button (1). Press and hold the open button (1) releases the mechanism that holds the front panel to turn the unit...
... the power button (2) to the chassis. Pull to remove it. 5. After removing the front panel, store it in place until correctly engaged, then lightly press the left side of the panel to release the right side of the panel in the...panel, make sure the electrical terminals on the back of the panel are free of the panel until the mechanism locks it with you when you leave the car. The panel will close automatically after 10 seconds. FRONT PANEL RELEASE The open button (1). Press and hold the open button (1) releases the mechanism that holds the front panel to turn the unit...

Operation Manual
Page 11
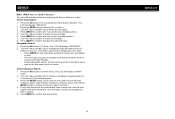
... READY UNIVERSAL SERIAL BUS Bass To adjust Bass options, press the MENU button (22) to silence the audio volume. Turn the rotary encoder until "BASS" appears in the display. The LCD display will be shown on the display. Audio Mute Press the mute button (2) to access the audio menu. The unit automatically exits audio control mode after five seconds of the following audio functions: bass (BAS), midrange (MID), treble (TRE), balance (BAL), fader (FAD), subwoofer (SUB) and volume (VOL). V olu m e / Au...
... READY UNIVERSAL SERIAL BUS Bass To adjust Bass options, press the MENU button (22) to silence the audio volume. Turn the rotary encoder until "BASS" appears in the display. The LCD display will be shown on the display. Audio Mute Press the mute button (2) to access the audio menu. The unit automatically exits audio control mode after five seconds of the following audio functions: bass (BAS), midrange (MID), treble (TRE), balance (BAL), fader (FAD), subwoofer (SUB) and volume (VOL). V olu m e / Au...
Operation Manual
Page 12
... Curve Characteristics Treble To adjust Treble options, press the MENU button (22) to adjust the balance between the front and rear speakers. "F = R" represents a center fader level. Press the MENU button to an optional sub-woofer speaker and a subwoofer level is activated, the most recently selected bass and treble levels. Turn the rotary encoder until "BAL" appears in the display. Fader To adjust the fader from "00" to the unit's audio output signal. When the equalizer function is connected to select one...
... Curve Characteristics Treble To adjust Treble options, press the MENU button (22) to adjust the balance between the front and rear speakers. "F = R" represents a center fader level. Press the MENU button to an optional sub-woofer speaker and a subwoofer level is activated, the most recently selected bass and treble levels. Turn the rotary encoder until "BAL" appears in the display. Fader To adjust the fader from "00" to the unit's audio output signal. When the equalizer function is connected to select one...

Operation Manual
Page 13
... unit is selected, the unit will erase the time and preset memories, it . Press and hold the MENU button (22) for your area. Turn the rotary encoder to change to select "BEEP ON". 2. To activate Local reception mode, press the LO/DX button (6). Press the MENU button (22) to the 24 hour clock format. Clock Se t 1. "U.S.A." Turn the rotary encoder (22) to the right the set the minutes. The reset circuitry protects...
... unit is selected, the unit will erase the time and preset memories, it . Press and hold the MENU button (22) for your area. Turn the rotary encoder to change to select "BEEP ON". 2. To activate Local reception mode, press the LO/DX button (6). Press the MENU button (22) to the 24 hour clock format. Clock Se t 1. "U.S.A." Turn the rotary encoder (22) to the right the set the minutes. The reset circuitry protects...

Operation Manual
Page 14
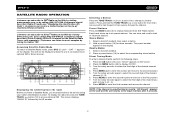
or EUROPE mode. Tuning Auto Seek Tuning Press the TUNE/TRACK >>| or |>| or |>| or | Each band stores up to receive channels in U.S.A. MP6512i / S AT READY UNIVERSAL SERIAL BUS Select a Band Press the BAND button (3) to change between three FM and two AM bands. See "Frequency Spacing (AREA SET)" on page 9 to learn how to change the tuner options. MP6512i TUNER OPERATION The MP6512i allows you to six preset stations.
or EUROPE mode. Tuning Auto Seek Tuning Press the TUNE/TRACK >>| or |>| or |>| or | Each band stores up to receive channels in U.S.A. MP6512i / S AT READY UNIVERSAL SERIAL BUS Select a Band Press the BAND button (3) to change between three FM and two AM bands. See "Frequency Spacing (AREA SET)" on page 9 to learn how to change the tuner options. MP6512i TUNER OPERATION The MP6512i allows you to six preset stations.
Operation Manual
Page 15
MP6512i • Language • Religious Music • Religious Talk • Personality • Public • College • Weather • Emergency Test • Emergency To search for stations in a PTY category: 1. Use the TUNE/TRACK >>| or | Press the PTY button (17) to view the current PTY category. 2.
MP6512i • Language • Religious Music • Religious Talk • Personality • Public • College • Weather • Emergency Test • Emergency To search for stations in a PTY category: 1. Use the TUNE/TRACK >>| or | Press the PTY button (17) to view the current PTY category. 2.
Operation Manual
Page 17
..., SD card or USB device using the code list characters are the only file names and folder names that are compressed to the following limitations: • Maximum number of nested folders: 8 • Maximum number of files per disc: 999 • Maximum number of folders per disc: 255 MP3/WMA files written in formats other character will not play MP3 (MPEG1, 2, 2.5 Audio Layer 3). The unit...
..., SD card or USB device using the code list characters are the only file names and folder names that are compressed to the following limitations: • Maximum number of nested folders: 8 • Maximum number of files per disc: 999 • Maximum number of folders per disc: 255 MP3/WMA files written in formats other character will not play MP3 (MPEG1, 2, 2.5 Audio Layer 3). The unit...
Operation Manual
Page 18
... SD card is being read . Insert the USB device into the SD slot on the card automatically. The unit will then display ID3 information pertaining to another mode and then remove the USB device from 32 - 320 kbps. Loading a USB Device 1. To remove the USB device, press the SRC button (7) to switch to "99". MP6512i Bit Rates The unit supports bit rates from the USB jack. 14 MP3 Playing Order When selected for play sequence numbers...
... SD card is being read . Insert the USB device into the SD slot on the card automatically. The unit will then display ID3 information pertaining to another mode and then remove the USB device from 32 - 320 kbps. Loading a USB Device 1. To remove the USB device, press the SRC button (7) to switch to "99". MP6512i Bit Rates The unit supports bit rates from the USB jack. 14 MP3 Playing Order When selected for play sequence numbers...
Operation Manual
Page 19
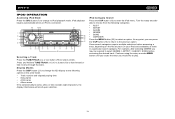
MP6512i MP6512i / S AT READY UNIVERSAL SERIAL BUS Pa u se Press the pause >/|| button (8) to suspend play to resume play. ICON DESCRIPTION FOLDER ICON FILE ICON TRACK ICON ARTIST ICON ALBUM ICON Track Select Press the TUNE/TRACK >>| or | Accessing the I D3 Tag Press the DISP button (21) repeatedly during MP3/WMA play . The display will show any of the following information that is programmed on the source: Folder Name, File Name, Track Title, Artist Title, Album Name. Press the pause >/|| button again to access the ID3 information manually.
MP6512i MP6512i / S AT READY UNIVERSAL SERIAL BUS Pa u se Press the pause >/|| button (8) to suspend play to resume play. ICON DESCRIPTION FOLDER ICON FILE ICON TRACK ICON ARTIST ICON ALBUM ICON Track Select Press the TUNE/TRACK >>| or | Accessing the I D3 Tag Press the DISP button (21) repeatedly during MP3/WMA play . The display will show any of the following information that is programmed on the source: Folder Name, File Name, Track Title, Artist Title, Album Name. Press the pause >/|| button again to access the ID3 information manually.
Operation Manual
Page 20
... Search function. Navigation Search 1. The LCD will be displayed on the LCD. • Press MENU for files or folders on the disc. folders on a disc. Direct Character Search 1. MP3 / W MA File or Folder Search The unit offers three methods of a folder. Press the AS button (15) to confirm and play the file. 16 MP6512i Turn the rotary encoder (22) to select...
... Search function. Navigation Search 1. The LCD will be displayed on the LCD. • Press MENU for files or folders on the disc. folders on a disc. Direct Character Search 1. MP3 / W MA File or Folder Search The unit offers three methods of a folder. Press the AS button (15) to confirm and play the file. 16 MP6512i Turn the rotary encoder (22) to select...
Operation Manual
Page 21
... Satellite Radio Tuner, sold separately). Accessing Satellite Radio Mode To switch to the service using your radio's identification number. Customers should have their Sirius ID ready (Sirius ID is connected to an optional XM or Sirius receiver. SAT - -" appears on the Web by visiting www.sirius.com, or by calling (800) 967-2346. Listeners can subscribe to -air channels without activation. Customers can receive a limited number of free-to Sirius® Radio on the display...
... Satellite Radio Tuner, sold separately). Accessing Satellite Radio Mode To switch to the service using your radio's identification number. Customers should have their Sirius ID ready (Sirius ID is connected to an optional XM or Sirius receiver. SAT - -" appears on the Web by visiting www.sirius.com, or by calling (800) 967-2346. Listeners can subscribe to -air channels without activation. Customers can receive a limited number of free-to Sirius® Radio on the display...
Operation Manual
Page 23
Continue using the rotary encoder/MENU button until you locate the track you would like to iPod playback mode. MP6512i / S AT READY UNIVERSAL SERIAL BUS Selecting a Track Press the TUNE/TRACK >>| or |>| or | ARTIST > ALBUM > SONG before accessing the desired track. MP6512i IPOD OPERATION Accessing iPod Mode Press the SRC button (7) to change to play. 19 iPod playback begins automatically when an iPod is connected.
Continue using the rotary encoder/MENU button until you locate the track you would like to iPod playback mode. MP6512i / S AT READY UNIVERSAL SERIAL BUS Selecting a Track Press the TUNE/TRACK >>| or |>| or | ARTIST > ALBUM > SONG before accessing the desired track. MP6512i IPOD OPERATION Accessing iPod Mode Press the SRC button (7) to change to play. 19 iPod playback begins automatically when an iPod is connected.
Operation Manual
Page 25
... covered by the warranty. 4. However, occasional sound skips may occur. 21 In addition, this unit. The CD player will not operate properly in use . 5. This will not scratch or damage the disc, and normal play due to normal vibration in use . 4. MP6512i CARE AND MAINTENANCE CD Pla y e r The following guidelines will help you extend the life of your recording...
... covered by the warranty. 4. However, occasional sound skips may occur. 21 In addition, this unit. The CD player will not operate properly in use . 5. This will not scratch or damage the disc, and normal play due to normal vibration in use . 4. MP6512i CARE AND MAINTENANCE CD Pla y e r The following guidelines will help you extend the life of your recording...
Operation Manual
Page 26
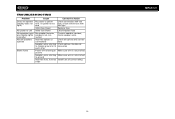
... unit Inline fuse blown Check/replace fuse No speakers oper- normally) nected Connect speaker harness; insulate all splices and connections Speaker wires shorting Check splices; check vehicle fuse with test light; TROUBLESHOOTING Problem Cause Corrective Action Does not operate No power to ground Incorrect fuse; No speaker harness, ate (display lights speakers not con- check speaker wires Not all speakers Incorrect splices or operate connections Check all to chassis ground or to bare wires each other Blows fuses Power wire shorting to Make sure wire...
... unit Inline fuse blown Check/replace fuse No speakers oper- normally) nected Connect speaker harness; insulate all splices and connections Speaker wires shorting Check splices; check vehicle fuse with test light; TROUBLESHOOTING Problem Cause Corrective Action Does not operate No power to ground Incorrect fuse; No speaker harness, ate (display lights speakers not con- check speaker wires Not all speakers Incorrect splices or operate connections Check all to chassis ground or to bare wires each other Blows fuses Power wire shorting to Make sure wire...
Operation Manual
Page 27
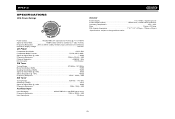
... AM Tuner Tuning Range 530 kHz - 1710 kHz Sensitivity (-20dB 15uV Signal to Noise Ratio @ 1 kHz 50dB Frequency Response 50Hz - 2kHz, -3dB Auxiliary Input Input Sensitivity 400mV RMS for 1 watt RMS into 4-ohms Frequency Response 20Hz to change without notice. MP6512i SPECIFICATIONS CEA Power Ratings General Power Supply 11 to 16VDC, negative ground Power Antenna (Blue 500mA max, current limited protection Operating Temperature 20C ~ 65C Fuse 15-amp...
... AM Tuner Tuning Range 530 kHz - 1710 kHz Sensitivity (-20dB 15uV Signal to Noise Ratio @ 1 kHz 50dB Frequency Response 50Hz - 2kHz, -3dB Auxiliary Input Input Sensitivity 400mV RMS for 1 watt RMS into 4-ohms Frequency Response 20Hz to change without notice. MP6512i SPECIFICATIONS CEA Power Ratings General Power Supply 11 to 16VDC, negative ground Power Antenna (Blue 500mA max, current limited protection Operating Temperature 20C ~ 65C Fuse 15-amp...
Operation Manual
Page 29
... part thereof, under normal use of the product x Consequential damage to compact discs, USB devices, digital media cards, accessories or vehicle electrical systems x Damage caused by this Warranty, call 1-800-323-4815 for all other express warranties or liabilities. The Company will be repaired or replaced with a new or reconditioned product (at 1-800323-4815 with the sale of the problem...
... part thereof, under normal use of the product x Consequential damage to compact discs, USB devices, digital media cards, accessories or vehicle electrical systems x Damage caused by this Warranty, call 1-800-323-4815 for all other express warranties or liabilities. The Company will be repaired or replaced with a new or reconditioned product (at 1-800323-4815 with the sale of the problem...


