Instruction Manual
Page 6
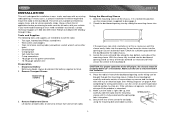
... gauge speaker wire Preparation 1. Do not force the sleeve into the opening . CAUTION: For proper operation of the CD player, the chassis must be required to mount the radio to make certain all wiring until the sleeve easily slides into it . 2. If the unit does not operate, re...4.After completing the wiring connections, turn the unit on both sides of the unit to the dashboard. Remove Transport Screws TRANSPORT SCREWS HALF SLEEVE CD6112 MOSFET POWERED / LO/DX LOUD PS/AS DN UP 3. Check the dashboard opening size by sliding the mounting sleeve into the opening is ...
... gauge speaker wire Preparation 1. Do not force the sleeve into the opening . CAUTION: For proper operation of the CD player, the chassis must be required to mount the radio to make certain all wiring until the sleeve easily slides into it . 2. If the unit does not operate, re...4.After completing the wiring connections, turn the unit on both sides of the unit to the dashboard. Remove Transport Screws TRANSPORT SCREWS HALF SLEEVE CD6112 MOSFET POWERED / LO/DX LOUD PS/AS DN UP 3. Check the dashboard opening size by sliding the mounting sleeve into the opening is ...

Instruction Manual
Page 7
... instructions. 4. Fuses When replacing a fuse, make sure the new fuse is complete, reconnect the battery negative terminal. Test the radio using the reverse procedure of installation. 1. Reconnect Battery When wiring is the correct type and amperage. If removal keys are inserted at... shop for assistance on this radio, follow . Do not exceed M5 x 9 MM maximum screw size. CD6112 7. Replace the dashboard trim panel. Remove the existing factory radio from 9:00am to the vehicle as they lock, then pull the radio out. Wire the new radio to 6:00pm EST Monday through...
... instructions. 4. Fuses When replacing a fuse, make sure the new fuse is complete, reconnect the battery negative terminal. Test the radio using the reverse procedure of installation. 1. Reconnect Battery When wiring is the correct type and amperage. If removal keys are inserted at... shop for assistance on this radio, follow . Do not exceed M5 x 9 MM maximum screw size. CD6112 7. Replace the dashboard trim panel. Remove the existing factory radio from 9:00am to the vehicle as they lock, then pull the radio out. Wire the new radio to 6:00pm EST Monday through...
Instruction Manual
Page 8
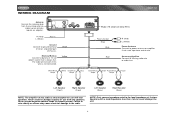
... Blue Red FRONT SP REAR SP Gray Green/Black Stripe Green Purple/Black Stripe R (Red) L (White) Power Antenna Connect to existing radio wire or radio fuse. If not used, tape bare end of chassis. Never combine (bridge) outputs for use with a load impedance less than 4 ohms... Left Speaker (Front) Right Speaker (Front) Left Speaker (Rear) Right Speaker (Rear) NOTE: The amplifier in Ground Connect to the radio. WIRING DIAGRAM CD6112 Antenna Connect the antenna plug from the existing antenna cable (some vehicles require an adaptor). Memory/Battery Connect to chassis ground.
... Blue Red FRONT SP REAR SP Gray Green/Black Stripe Green Purple/Black Stripe R (Red) L (White) Power Antenna Connect to existing radio wire or radio fuse. If not used, tape bare end of chassis. Never combine (bridge) outputs for use with a load impedance less than 4 ohms... Left Speaker (Front) Right Speaker (Front) Left Speaker (Rear) Right Speaker (Rear) NOTE: The amplifier in Ground Connect to the radio. WIRING DIAGRAM CD6112 Antenna Connect the antenna plug from the existing antenna cable (some vehicles require an adaptor). Memory/Battery Connect to chassis ground.
Instruction Manual
Page 11
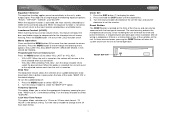
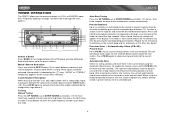
... MENU button to the adjusted volume each time a button is turned on . Beep Tone The beep tone feature allows the selection of the radio. Turn the rotary encoder to be adjusted. Turn the rotary encoder (5) clockwise the set the minutes. Since resetting the unit will return to... to select the appropriate frequency spacing for the characteristics of human hearing. Press EQ (16) to the unit's audio output signal. CD6112 Equalizer Selector The equalizer function applies preset sound effects to step through the following equalizer options: "ROCK", "HIP-HOP", "DANCE", and "EQ OFF...
... MENU button to the adjusted volume each time a button is turned on . Beep Tone The beep tone feature allows the selection of the radio. Turn the rotary encoder to be adjusted. Turn the rotary encoder (5) clockwise the set the minutes. Since resetting the unit will return to... to select the appropriate frequency spacing for the characteristics of human hearing. Press EQ (16) to the unit's audio output signal. CD6112 Equalizer Selector The equalizer function applies preset sound effects to step through the following equalizer options: "ROCK", "HIP-HOP", "DANCE", and "EQ OFF...
Instruction Manual
Page 12
See "Frequency Spacing" on , only radio stations with rings above it). CD6112 160 Watts / DX/ST LOUD PS/AS Select a Band Press BAND (3) to activate the Distant (DX) mode (indicated by the triangle with a strong radio signal are played. Mono/Stereo Selection Press and hold the DX/ST button (15...bands and two AM bands. Choose mono when a strong stereo signal cannot be achieved (stereo mode is on page 7 to learn how to receive channels in U.S.A. Local/Distant Reception When the Local function is indicated by pressing the DX/ST button (15). Activate the Local (LOC) ...
See "Frequency Spacing" on , only radio stations with rings above it). CD6112 160 Watts / DX/ST LOUD PS/AS Select a Band Press BAND (3) to activate the Distant (DX) mode (indicated by the triangle with a strong radio signal are played. Mono/Stereo Selection Press and hold the DX/ST button (15...bands and two AM bands. Choose mono when a strong stereo signal cannot be achieved (stereo mode is on page 7 to learn how to receive channels in U.S.A. Local/Distant Reception When the Local function is indicated by pressing the DX/ST button (15). Activate the Local (LOC) ...
Instruction Manual
Page 19
... shipping charges for additional information regarding the proper use , be repaired or replaced with the sale of purchase is not transferable or assignable. Limited Warranty CD or Multimedia Radios/Headunits Audiovox Electronics Corporation ("the Company") is covered?
... shipping charges for additional information regarding the proper use , be repaired or replaced with the sale of purchase is not transferable or assignable. Limited Warranty CD or Multimedia Radios/Headunits Audiovox Electronics Corporation ("the Company") is covered?


