Instruction Manual
Page 1
CDD66111122 Instruction Manual
CDD66111122 Instruction Manual
Instruction Manual
Page 3
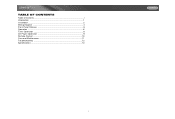
CD6112 TABLE OF CONTENTS Table of Contents i Introduction 1 Installation 2 Wiring Diagram 4 Front Panel Release 5 Operation 6 Tuner Operation 8 CD Player Operation 9 Remote Control 10 Care and Maintenance 11 Troubleshooting 12 Specifications 13 i
CD6112 TABLE OF CONTENTS Table of Contents i Introduction 1 Installation 2 Wiring Diagram 4 Front Panel Release 5 Operation 6 Tuner Operation 8 CD Player Operation 9 Remote Control 10 Care and Maintenance 11 Troubleshooting 12 Specifications 13 i
Instruction Manual
Page 5
...; Play, Pause, Stop, Next Track and Previous Track AM-FM • USA / Europe Frequency Spacing • 30 Station Presets (18 FM / 12 AM) • Stereo / Mono • Local / Distance • Auto Store / Preview Scan Chassis • Detachable Faceplate • 1.0 DIN (Import / ISO-DIN Mountable) • 8 Character / Segment Type LCD Display • Chassis Mounted Rear Auxiliary Inputs General • Infrared Remote Control • Media Adapter Cable (2 meter...
...; Play, Pause, Stop, Next Track and Previous Track AM-FM • USA / Europe Frequency Spacing • 30 Station Presets (18 FM / 12 AM) • Stereo / Mono • Local / Distance • Auto Store / Preview Scan Chassis • Detachable Faceplate • 1.0 DIN (Import / ISO-DIN Mountable) • 8 Character / Segment Type LCD Display • Chassis Mounted Rear Auxiliary Inputs General • Infrared Remote Control • Media Adapter Cable (2 meter...
Instruction Manual
Page 6
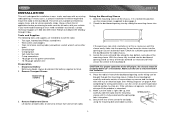
... tape. Disconnect Battery Before you have trouble locating a kit or need installation assistance, contact Technical Support at electronics supply stores and car stereo specialty shops. Remove Radio from Sleeve Lift latches on ). Check for sufficient space behind the dashboard for power connections • 16-18 gauge speaker wire Preparation 1. CAUTION: For proper operation of the CD player, the chassis must be mounted within this limitation. 4. INSTALLATION This unit is designed...
... tape. Disconnect Battery Before you have trouble locating a kit or need installation assistance, contact Technical Support at electronics supply stores and car stereo specialty shops. Remove Radio from Sleeve Lift latches on ). Check for sufficient space behind the dashboard for power connections • 16-18 gauge speaker wire Preparation 1. CAUTION: For proper operation of the CD player, the chassis must be mounted within this limitation. 4. INSTALLATION This unit is designed...

Instruction Manual
Page 7
... unit has threaded holes in the installation kit. 3. Wire the new radio to the instructions in the chassis side panels which may damage components inside the chassis. 4. If removal keys are inserted at 1-800-323-4815 from 9:00am to the dashboard or center console using the Operating Instructions that follow the instructions included with the kit. 1. CD6112 7. Install the radio/mounting plate assembly to the sub...
... unit has threaded holes in the installation kit. 3. Wire the new radio to the instructions in the chassis side panels which may damage components inside the chassis. 4. If removal keys are inserted at 1-800-323-4815 from 9:00am to the dashboard or center console using the Operating Instructions that follow the instructions included with the kit. 1. CD6112 7. Install the radio/mounting plate assembly to the sub...
Instruction Manual
Page 8
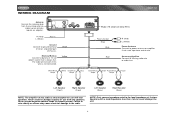
... damage the unit. 4 Memory/Battery Connect to chassis ground. White/Black Stripe Black Yellow White Gray/Black Stripe Rear Line out Gray Blue Red FRONT SP REAR SP Gray Green/Black Stripe Green Purple/Black Stripe R (Red) L (White) Power Antenna Connect to ground terminal or clean, unpainted part of chassis. WIRING DIAGRAM CD6112 Antenna Connect the antenna plug from the existing antenna cable (some vehicles require an adaptor). Fuse (15 amp fast...
... damage the unit. 4 Memory/Battery Connect to chassis ground. White/Black Stripe Black Yellow White Gray/Black Stripe Rear Line out Gray Blue Red FRONT SP REAR SP Gray Green/Black Stripe Green Purple/Black Stripe R (Red) L (White) Power Antenna Connect to ground terminal or clean, unpainted part of chassis. WIRING DIAGRAM CD6112 Antenna Connect the antenna plug from the existing antenna cable (some vehicles require an adaptor). Fuse (15 amp fast...
Instruction Manual
Page 9
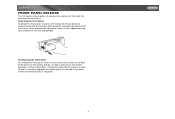
... the Front Panel To re-attach the front panel, make sure the electrical terminals on the back of the panel are free of the panel. After removing the front panel, store it in place so that holds the front panel to the chassis. CD6112 FRONT PANEL RELEASE The front panel release button (4) releases the...the panel until the mechanism locks it is correctly engaged, then lightly press the left side of dust and dirt, as debris could cause intermittent operation or other malfunctions. Detaching the Front Panel To detach the front panel, first press the front panel release button to protect ...
... the Front Panel To re-attach the front panel, make sure the electrical terminals on the back of the panel are free of the panel. After removing the front panel, store it in place so that holds the front panel to the chassis. CD6112 FRONT PANEL RELEASE The front panel release button (4) releases the...the panel until the mechanism locks it is correctly engaged, then lightly press the left side of dust and dirt, as debris could cause intermittent operation or other malfunctions. Detaching the Front Panel To detach the front panel, first press the front panel release button to protect ...
Instruction Manual
Page 10
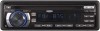
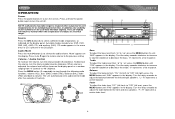
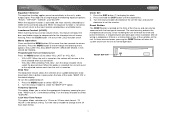
... unit automatically exits audio control mode after five seconds of the numbers on the display. Available modes include tuner (FM1, FM2, FM3, AM1, AM2), CD, and auxiliary (AUX). CD mode appears in the menu only if a CD is adjusted, the volume level will return to normal when the temperature increases to volume. Balance To adjust the balance from "-6" to "+6", press the MENU button (5) until "BAL" appears in the CD player. "L = R" represents a center balance. OPERATION Power Press the power button (2) to turn the...
... unit automatically exits audio control mode after five seconds of the numbers on the display. Available modes include tuner (FM1, FM2, FM3, AM1, AM2), CD, and auxiliary (AUX). CD mode appears in the menu only if a CD is adjusted, the volume level will return to normal when the temperature increases to volume. Balance To adjust the balance from "-6" to "+6", press the MENU button (5) until "BAL" appears in the CD player. "L = R" represents a center balance. OPERATION Power Press the power button (2) to turn the...
Instruction Manual
Page 11
... the switches on the unit. Since resetting the unit will erase the time and preset memories, it should only be adjusted. Clock Set 1. In these circumstances, pressing the RESET button will revert to the adjusted volume each time a button is the default display. RESET RESET BUTTON 7 When the equalizer function is turned on Volume Level Press the MENU button (5) to select "VOL LAST" or "VOL ADJ". • VOL LAST: When the unit is not active, the unit will boost the bass and treble...
... the switches on the unit. Since resetting the unit will erase the time and preset memories, it should only be adjusted. Clock Set 1. In these circumstances, pressing the RESET button will revert to the adjusted volume each time a button is the default display. RESET RESET BUTTON 7 When the equalizer function is turned on Volume Level Press the MENU button (5) to select "VOL LAST" or "VOL ADJ". • VOL LAST: When the unit is not active, the unit will boost the bass and treble...
Instruction Manual
Page 12
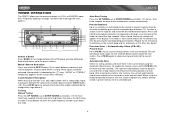
... with a strong radio signal are played. See "Frequency Spacing" on the screen when selected. Choose mono when a strong stereo signal cannot be achieved (stereo mode is on, only radio stations with rings above it). Tuning Manual Tuning Press the UP TUNING >>| or DOWN TUNING |>| or DOWN TUNING | Each band stores up to receive channels in U.S.A. TUNER OPERATION The CD6112 allows you to six preset stations. Local/Distant Reception When the Local function is indicated...
... with a strong radio signal are played. See "Frequency Spacing" on the screen when selected. Choose mono when a strong stereo signal cannot be achieved (stereo mode is on, only radio stations with rings above it). Tuning Manual Tuning Press the UP TUNING >>| or DOWN TUNING |>| or DOWN TUNING | Each band stores up to receive channels in U.S.A. TUNER OPERATION The CD6112 allows you to six preset stations. Local/Distant Reception When the Local function is indicated...
Instruction Manual
Page 13
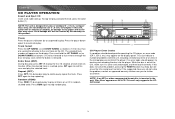
... damage to suspend disc play . CD6112 CD PLAYER OPERATION Insert and Eject CD Insert a CD, label side up. Press the pause button again to resume disc play . Pause Press the pause >/|| button (8) to the player and/or the disc may occur. NOTE: The unit is designed for play and eject the CD, press the eject button (1). To stop CD play of standard 5" (12 cm.) compact discs only. Track Select Press the UP TUNING >>| or DOWN TUNING |>| or DOWN...
... damage to suspend disc play . CD6112 CD PLAYER OPERATION Insert and Eject CD Insert a CD, label side up. Press the pause button again to resume disc play . Pause Press the pause >/|| button (8) to the player and/or the disc may occur. NOTE: The unit is designed for play and eject the CD, press the eject button (1). To stop CD play of standard 5" (12 cm.) compact discs only. Track Select Press the UP TUNING >>| or DOWN TUNING |>| or DOWN...
Instruction Manual
Page 14
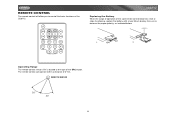
.... (CR 2025) 1 2 Operating Range The remote control sensor (19) is located to control the basic functions of the CD6112. REMOTE SENSOR 10 MUTE SEL MENU LOUD VOL DX/ST SRC PS/AS EQ BAND 1 234 / INT RPT RDM 5 6 DISP CD6112 Replacing the Battery When the range of operation of 3~5m. The remote control can operate within a distance of the card remote control becomes short or stops functioning, replace the battery with a new...
.... (CR 2025) 1 2 Operating Range The remote control sensor (19) is located to control the basic functions of the CD6112. REMOTE SENSOR 10 MUTE SEL MENU LOUD VOL DX/ST SRC PS/AS EQ BAND 1 234 / INT RPT RDM 5 6 DISP CD6112 Replacing the Battery When the range of operation of 3~5m. The remote control can operate within a distance of the card remote control becomes short or stops functioning, replace the battery with a new...
Instruction Manual
Page 15
... damage not covered by the warranty. 5. This unit does not support .MP3, .WMA, .WAV, .OGG or other than round 5" CDs into the player. Playing a defective or dusty CD can cause skips in the adapter or an irregularly shaped CD. Compact Discs CD-R and CD-RW Capability Depending on the unit. 2. CD6112 CARE AND MAINTENANCE CD Player The following guidelines will help you extend the life of your...
... damage not covered by the warranty. 5. This unit does not support .MP3, .WMA, .WAV, .OGG or other than round 5" CDs into the player. Playing a defective or dusty CD can cause skips in the adapter or an irregularly shaped CD. Compact Discs CD-R and CD-RW Capability Depending on the unit. 2. CD6112 CARE AND MAINTENANCE CD Player The following guidelines will help you extend the life of your...
Instruction Manual
Page 16
... light; TROUBLESHOOTING Problem Does not operate (display does not light) No power to unit Not all speakers operate Blows fuses Cause Corrective Action No power to ground Incorrect fuse; insulate all splices and connections Speaker wires shorting Check splices; no power to red wire Check connection with test light Inline fuse blown Replace fuse Inline fuse blown Check/replace fuse Incorrect splices or connections Check all to chassis ground or to bare wires each other Power wire shorting to Make sure wire...
... light; TROUBLESHOOTING Problem Does not operate (display does not light) No power to unit Not all speakers operate Blows fuses Cause Corrective Action No power to ground Incorrect fuse; insulate all splices and connections Speaker wires shorting Check splices; no power to red wire Check connection with test light Inline fuse blown Replace fuse Inline fuse blown Check/replace fuse Incorrect splices or connections Check all to chassis ground or to bare wires each other Power wire shorting to Make sure wire...
Instruction Manual
Page 17
CD6112 SPECIFICATIONS CEA Power Ratings Power Output 13 Watts RMS x 4 channels into 4-Ohms @ < 1% THD+N Signal to Noise Ratio 70dBA below reference (Reference: 1 Watt, 4-Ohms) Frequency Response 20 Hz - 20 kHz, -3dB (Aux Input used as reference input) Reference Supply Voltage 14.4VDC CD Player Compatible Disc Media CD-R / RW Compatible Media Formats CD-DA Signal to Noise Ratio @ 1 kHz 90dB Frequency Response 20Hz to 20 kHz, -3dB Channel Separation 60dB @ 1 kHz...
CD6112 SPECIFICATIONS CEA Power Ratings Power Output 13 Watts RMS x 4 channels into 4-Ohms @ < 1% THD+N Signal to Noise Ratio 70dBA below reference (Reference: 1 Watt, 4-Ohms) Frequency Response 20 Hz - 20 kHz, -3dB (Aux Input used as reference input) Reference Supply Voltage 14.4VDC CD Player Compatible Disc Media CD-R / RW Compatible Media Formats CD-DA Signal to Noise Ratio @ 1 kHz 90dB Frequency Response 20Hz to 20 kHz, -3dB Channel Separation 60dB @ 1 kHz...
Instruction Manual
Page 19
... PRODUCT. This Warranty is in cosmetic, decorative or non-operative structural parts x Correction of antenna problems x Costs incurred for installation, removal or reinstallation of the product x Consequential damage to compact discs, USB devices, digital media cards, accessories or vehicle electrical systems x Damage caused by this product or any part thereof, under normal use of all warranteed products returned to an address within...
... PRODUCT. This Warranty is in cosmetic, decorative or non-operative structural parts x Correction of antenna problems x Costs incurred for installation, removal or reinstallation of the product x Consequential damage to compact discs, USB devices, digital media cards, accessories or vehicle electrical systems x Damage caused by this product or any part thereof, under normal use of all warranteed products returned to an address within...
Instruction Manual
Page 24
Audiovox Electronics Corporation Hauppauge, NY 11788 Technical Assistance: 1-800-323-4815 www.jensen.com © 2007 Audiovox Ver. 013007 Printed in China
Audiovox Electronics Corporation Hauppauge, NY 11788 Technical Assistance: 1-800-323-4815 www.jensen.com © 2007 Audiovox Ver. 013007 Printed in China


