
Instructions
Page 2
... cable ground shall be determined by JVC could void the user's authority to operate the equipment. This equipment has been tested and found to comply with the instructions, may cause harmful interference to radio communications. However, there is connected. For Canada/pour le Canada THIS DIGITAL APPARATUS DOES NOT EXCEED THE CLASS B LIMITS FOR RADIO NOISE EMISSIONS FROM DIGITAL APPARATUS AS SET...
... cable ground shall be determined by JVC could void the user's authority to operate the equipment. This equipment has been tested and found to comply with the instructions, may cause harmful interference to radio communications. However, there is connected. For Canada/pour le Canada THIS DIGITAL APPARATUS DOES NOT EXCEED THE CLASS B LIMITS FOR RADIO NOISE EMISSIONS FROM DIGITAL APPARATUS AS SET...

Instructions
Page 3
..., assurez-vous que la fiche soit facilement accessible. Disconnect the mains plug to shut the power off completely (the STANDBY lamp goes off . The % button in any position does not disconnect the mains line. • When the system is on standby, the STANDBY lamp lights red. • When the system is turned on the bottom. L'alimentation peut être télécommand...
..., assurez-vous que la fiche soit facilement accessible. Disconnect the mains plug to shut the power off completely (the STANDBY lamp goes off . The % button in any position does not disconnect the mains line. • When the system is on standby, the STANDBY lamp lights red. • When the system is turned on the bottom. L'alimentation peut être télécommand...
Instructions
Page 6
... Remote Control 4 Step 3: Hook Up 5 Before Operating the System 7 Daily Operations-Playback 8 Listening to the Radio 9 Playing Back a Disc 10 Playing Back from the USB mass storage class device ... 10 Playing Back Other Equipment 11 Daily Operations-Sound & Other Adjustments 12 Adjusting the Volume 12 Adjusting the Sound 12 Setting the Clock 13 Turning Off the Power Automatically 13 Advanced Disc/USB mass strage class device Operations 14 Programming the Playing Order-Program Play 14 Playing at Random-Random Play 16 Playing...
... Remote Control 4 Step 3: Hook Up 5 Before Operating the System 7 Daily Operations-Playback 8 Listening to the Radio 9 Playing Back a Disc 10 Playing Back from the USB mass storage class device ... 10 Playing Back Other Equipment 11 Daily Operations-Sound & Other Adjustments 12 Adjusting the Volume 12 Adjusting the Sound 12 Setting the Clock 13 Turning Off the Power Automatically 13 Advanced Disc/USB mass strage class device Operations 14 Programming the Playing Order-Program Play 14 Playing at Random-Random Play 16 Playing...
Instructions
Page 7
... wall outlet, always pull on the plug, not the AC power cord. If anything goes wrong, unplug the AC power cord and consult your dealer before operation, to ensure your complete understanding and to get out. 2 DO NOT install the System in a location near heat sources, or in a location with wet hands. DO NOT disassemble the System since there are no user serviceable parts...
... wall outlet, always pull on the plug, not the AC power cord. If anything goes wrong, unplug the AC power cord and consult your dealer before operation, to ensure your complete understanding and to get out. 2 DO NOT install the System in a location near heat sources, or in a location with wet hands. DO NOT disassemble the System since there are no user serviceable parts...
Instructions
Page 8
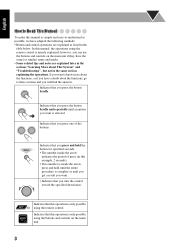
... more about the functions, or if you press the button briefly. however, you turn the control toward the specified direction(s). English How to Read This Manual To make this manual as simple and easy-to-understand as listed in the table below. Indicates that this operation is mainly explained; Remote ONLY Main Unit ONLY Indicates that this operation is selected. If you...
... more about the functions, or if you press the button briefly. however, you turn the control toward the specified direction(s). English How to Read This Manual To make this manual as simple and easy-to-understand as listed in the table below. Indicates that this operation is mainly explained; Remote ONLY Main Unit ONLY Indicates that this operation is selected. If you...
Instructions
Page 10
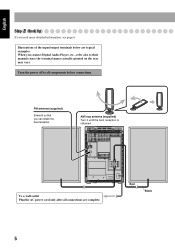
... on the rear may vary. FM antenna (supplied) Extend it until the best reception is obtained. Red Black 5 AM loop antenna (supplied) Turn it so that you can obtain the best reception. When you connect Digital Audio Player, etc., refer also to all connections are typical examples. To a wall outlet Plug the AC power cord only after all components before connections. English Step 3: Hook Up If you need more detailed...
... on the rear may vary. FM antenna (supplied) Extend it until the best reception is obtained. Red Black 5 AM loop antenna (supplied) Turn it so that you can obtain the best reception. When you connect Digital Audio Player, etc., refer also to all connections are typical examples. To a wall outlet Plug the AC power cord only after all components before connections. English Step 3: Hook Up If you need more detailed...

Instructions
Page 11
... black cord to (-), the red cord to an outdoor FM antenna using a 75 Ω wire with vinyl, remove the vinyl to expose the tip of the System, connecting cords, and the AC power cord. Also, keep the antennas away from metallic parts of the antenna wire or speaker cords by twisting the vinyl. English To connect the AM loop antenna Make sure to connect the wire correctly. 1 Hold 3 Release 2 Insert To connect the speaker cords Make sure...
... black cord to (-), the red cord to an outdoor FM antenna using a 75 Ω wire with vinyl, remove the vinyl to expose the tip of the System, connecting cords, and the AC power cord. Also, keep the antennas away from metallic parts of the antenna wire or speaker cords by twisting the vinyl. English To connect the AM loop antenna Make sure to connect the wire correctly. 1 Hold 3 Release 2 Insert To connect the speaker cords Make sure...
Instructions
Page 12
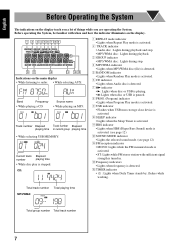
... mode is activated. • ST: Lights while FM stereo station with when and how the indicator illuminates on the display. 1 2 3 4 56789 REPEAT1 GROUP RANDOM PROG. flashes while working. English Before Operating the System The indications on the main display • While listening to radio: • While selecting AUX: MHz Band Frequency • While playing a CD: TRACK CD Source name • While playing an MP3: TRACK MP3 Track number...
... mode is activated. • ST: Lights while FM stereo station with when and how the indicator illuminates on the display. 1 2 3 4 56789 REPEAT1 GROUP RANDOM PROG. flashes while working. English Before Operating the System The indications on the main display • While listening to radio: • While selecting AUX: MHz Band Frequency • While playing a CD: TRACK CD Source name • While playing an MP3: TRACK MP3 Track number...
Instructions
Page 13
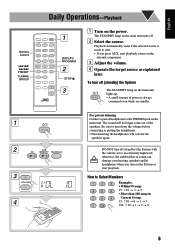
... " # $ 15: => 10 → 1 → 5 • More than 100 songs in % & ' Current Group. 15: => 10 → 0 → 1 → 5 150: => 10 → 1 → 5 → 0 8 English Numeric buttons 4/1/ Á/¢ PRESET TUNING/ GROUP Daily Operations-Playback 1 DISPLAY/ PROGRAM 2 STOP 7 3 1 Turn on standby. 1 2 USB CD MEMORY FM/AM/AUX 3 VOLUME TRACK CD 4 For private listening Connect a pair of headphones to an extremely high level; Be sure to Select Numbers !
... " # $ 15: => 10 → 1 → 5 • More than 100 songs in % & ' Current Group. 15: => 10 → 0 → 1 → 5 150: => 10 → 1 → 5 → 0 8 English Numeric buttons 4/1/ Á/¢ PRESET TUNING/ GROUP Daily Operations-Playback 1 DISPLAY/ PROGRAM 2 STOP 7 3 1 Turn on standby. 1 2 USB CD MEMORY FM/AM/AUX 3 VOLUME TRACK CD 4 For private listening Connect a pair of headphones to an extremely high level; Be sure to Select Numbers !
Instructions
Page 14
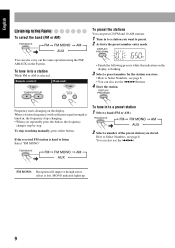
... MONO AM AUX 2 Select a number of the preset station you stored. MONO indicator lights up. 9 PROGRAM kHz • Finish the following process while the indication on the display is flashing. 3 Select a preset number for the station you store. • How to Select Numbers, see page 8. If the received FM station is tuned in, the frequency stops changing. • When you repeatedly press the button, the frequency changes step by step. How to Select Numbers, see...
... MONO AM AUX 2 Select a number of the preset station you stored. MONO indicator lights up. 9 PROGRAM kHz • Finish the following process while the indication on the display is flashing. 3 Select a preset number for the station you store. • How to Select Numbers, see page 8. If the received FM station is tuned in, the frequency stops changing. • When you repeatedly press the button, the frequency changes step by step. How to Select Numbers, see...
Instructions
Page 15
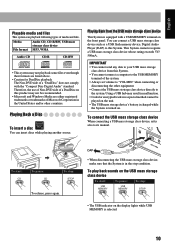
... a USB flash memory device, Digital Audio Player (DAP) to this System. Using a USB hub may result in malfunction. • Coded or encrypted tracks in a special method cannot be recommended. • Microsoft and Windows Media are listed above. • Caution for DualDisc playback The Non-DVD side of the system. • Always set volume to "VOL MIN" when connecting or disconnecting the other countries. Playing Back...
... a USB flash memory device, Digital Audio Player (DAP) to this System. Using a USB hub may result in malfunction. • Coded or encrypted tracks in a special method cannot be recommended. • Microsoft and Windows Media are listed above. • Caution for DualDisc playback The Non-DVD side of the system. • Always set volume to "VOL MIN" when connecting or disconnecting the other countries. Playing Back...
Instructions
Page 16
... audio output on the other equipment. To select AUX FM/AM/AUX To display ID3 tag Press DISPLAY/PROGRAM while playing MP3/WMA disc. IMPORTANT • Always set , ID3 tag is displayed after the source is not stereo mini plug type, Use a plug adapter to convert the stereo mini plug to "VOL MIN" when connecting or disconnecting the other equipment is indicated. 11 Decreases the group numbers. To locate a track directly and Remote start play...
... audio output on the other equipment. To select AUX FM/AM/AUX To display ID3 tag Press DISPLAY/PROGRAM while playing MP3/WMA disc. IMPORTANT • Always set , ID3 tag is displayed after the source is not stereo mini plug type, Use a plug adapter to convert the stereo mini plug to "VOL MIN" when connecting or disconnecting the other equipment is indicated. 11 Decreases the group numbers. To locate a track directly and Remote start play...

Instructions
Page 17
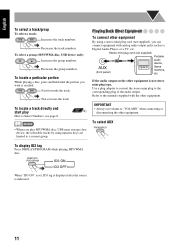
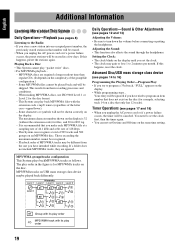
... frequencies for vocal music. Adjusting the Sound Remote ONLY To reinforce the bass sound -HBS You can adjust the volume level from level 0 (VOL MIN) to level 31 (VOL MAX). English Daily Operations-Sound & Other Adjustments Remote control CLOCK/ SLEEP Adjusting the Volume You can enjoy powerful bass sound with the Hyper-Bass Sound effect. No sound effect applies. 12 HBS CLOCK/ SLEEP VOLUME +/- You can select one of 4 SEA (Sound Effect Amplifier) modes. Good for playback. Remote control: Main unit: VOLUME 4/¢ SOUND MODE...
... frequencies for vocal music. Adjusting the Sound Remote ONLY To reinforce the bass sound -HBS You can adjust the volume level from level 0 (VOL MIN) to level 31 (VOL MAX). English Daily Operations-Sound & Other Adjustments Remote control CLOCK/ SLEEP Adjusting the Volume You can enjoy powerful bass sound with the Hyper-Bass Sound effect. No sound effect applies. 12 HBS CLOCK/ SLEEP VOLUME +/- You can select one of 4 SEA (Sound Effect Amplifier) modes. Good for playback. Remote control: Main unit: VOLUME 4/¢ SOUND MODE...

Instructions
Page 18
...). 1 Turn off when the selected count down time is a power failure The clock loses its settings and blinks. You need to set the clock again. 13 CLOCK/ SLEEP 2 Specify the time (in minutes). To check the current time during play CLOCK/ SLEEP Display clock a few seconds to set . CLOCK/ SLEEP To check the time remaining until the shut-off the System after...
...). 1 Turn off when the selected count down time is a power failure The clock loses its settings and blinks. You need to set the clock again. 13 CLOCK/ SLEEP 2 Specify the time (in minutes). To check the current time during play CLOCK/ SLEEP Display clock a few seconds to set . CLOCK/ SLEEP To check the time remaining until the shut-off the System after...
Instructions
Page 22
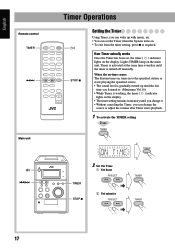
... Timer is turned off manually. TIMER TIMER STOP 7 2 Set On Time 1 Set hour PRESET 2 Set minutes PRESET TIMER MHz TIMER TIMER 17 When the on-time comes The System turns on, tunes in memory until you change the source or adjust the volume after Timer starts playback. 1 To activate the TIMER setting 2 sec. English Remote control TIMER 4/¢ Main unit % 4/¢ Timer Operations STOP 7 Setting the Timer Using Timer, you...
... Timer is turned off manually. TIMER TIMER STOP 7 2 Set On Time 1 Set hour PRESET 2 Set minutes PRESET TIMER MHz TIMER TIMER 17 When the on-time comes The System turns on, tunes in memory until you change the source or adjust the volume after Timer starts playback. 1 To activate the TIMER setting 2 sec. English Remote control TIMER 4/¢ Main unit % 4/¢ Timer Operations STOP 7 Setting the Timer Using Timer, you...
Instructions
Page 23
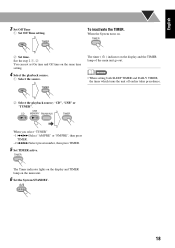
... TIMER. TIMER The Timer indicator lights on the display and TIMER lamp on . When the System turns on the main unit. 6 Set the System STANDBY. 18 English 3 Set Off Time 1 Set Off Time setting. "CD", "USB" or "TUNER". TIMER 2 Set time. USB CD MEMORY FM/AM/AUX TIMER When you select "TUNER" -1 4/¢ Select "AM PRE" or "FM PRE", then press TIMER. -2 4/¢ Select preset number, then press TIMER. 5 Set TIMER active.
... TIMER. TIMER The Timer indicator lights on the display and TIMER lamp on . When the System turns on the main unit. 6 Set the System STANDBY. 18 English 3 Set Off Time 1 Set Off Time setting. "CD", "USB" or "TUNER". TIMER 2 Set time. USB CD MEMORY FM/AM/AUX TIMER When you select "TUNER" -1 4/¢ Select "AM PRE" or "FM PRE", then press TIMER. -2 4/¢ Select preset number, then press TIMER. 5 Set TIMER active.
Instructions
Page 24
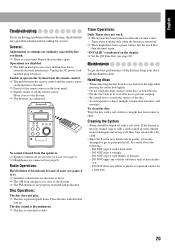
... 500 groups on the display. The maximum character number shown on the disc. If this happens, preset the stations again. Adjusting the Sound: • This function also affects the sound through the headphones. The play "packet write" discs. • For MP3/WMA playback... - Advanced Disc/USB mass storage class device (see pages 12 and 13) Adjusting the Volume: • Be sure to set the clock first...
... 500 groups on the display. The maximum character number shown on the disc. If this happens, preset the stations again. Adjusting the Sound: • This function also affects the sound through the headphones. The play "packet write" discs. • For MP3/WMA playback... - Advanced Disc/USB mass storage class device (see pages 12 and 13) Adjusting the Volume: • Be sure to set the clock first...
Instructions
Page 25
... calling for a long time. 20 General: Adjustments or settings are exhausted. Unplug the AC power cord and then plug it . - Radio Operations: Hard to listen to broadcasts because of the disc. • Avoid exposure to it back in contact for service. Timer Operations: Daily Timer does not work. ] The System has been turned on when the on the display. ] Set the Off Time first (see page 8).
... calling for a long time. 20 General: Adjustments or settings are exhausted. Unplug the AC power cord and then plug it . - Radio Operations: Hard to listen to broadcasts because of the disc. • Avoid exposure to it back in contact for service. Timer Operations: Daily Timer does not work. ] The System has been turned on when the on the display. ] Set the Off Time first (see page 8).

Instructions
Page 26
English Specifications Amplifier section Output Power: Speakers/Impedance: 8 W per channel, min. RMS, driven into 4 Ω at 1 kHz with no more than 10% total harmonic distortion. 4 Ω - 8 Ω Terminals AUX IN Input sensitivity/Impedance (250mV/50kΩ) USB Ver.2.0 (Full Speed) Compatible device: Mass Storage Class Compatible File System: FAT16, FAT32 Bus Power supply: Max 5V/500mA Tuner section FM tuning range: 87.5 MHz - 108.0 MHz AM...
English Specifications Amplifier section Output Power: Speakers/Impedance: 8 W per channel, min. RMS, driven into 4 Ω at 1 kHz with no more than 10% total harmonic distortion. 4 Ω - 8 Ω Terminals AUX IN Input sensitivity/Impedance (250mV/50kΩ) USB Ver.2.0 (Full Speed) Compatible device: Mass Storage Class Compatible File System: FAT16, FAT32 Bus Power supply: Max 5V/500mA Tuner section FM tuning range: 87.5 MHz - 108.0 MHz AM...

Instructions
Page 54
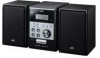
EN © 2007 Victor Company of Japan, Limited 1207KMMCREMTS UX-G28 MICRO COMPONENT SYSTEM
EN © 2007 Victor Company of Japan, Limited 1207KMMCREMTS UX-G28 MICRO COMPONENT SYSTEM

