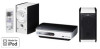
Instruction Manual
Page 5
...fications...27 Parts Index...28 1 Playback 9 Listening to Read This Manual ...3 Getting Started ...4 Step 1: Unpack ...4 Step 2: Prepare the Remote Control ...4 Step 3: Hook Up...5 To assemble and connect the AM loop antenna 7 To connect the speaker cords...7 Before Operating the System 8 Daily ...Back from the PC...15 Playing Back from Other Equipment...16 Daily Operations- DIMMER Remote ONLY 18 Setting the Clock Remote ONLY ...18 Turning Off the Power Automatically Remote ONLY 19 Advanced Disc/USB mass storage class device Operations 20 Programming the Playing ...
...fications...27 Parts Index...28 1 Playback 9 Listening to Read This Manual ...3 Getting Started ...4 Step 1: Unpack ...4 Step 2: Prepare the Remote Control ...4 Step 3: Hook Up...5 To assemble and connect the AM loop antenna 7 To connect the speaker cords...7 Before Operating the System 8 Daily ...Back from the PC...15 Playing Back from Other Equipment...16 Daily Operations- DIMMER Remote ONLY 18 Setting the Clock Remote ONLY ...18 Turning Off the Power Automatically Remote ONLY 19 Advanced Disc/USB mass storage class device Operations 20 Programming the Playing ...
Instruction Manual
Page 7
...are not going to know more about This System" and "Troubleshooting," but not in this manual, the operations using the remote control. 3 however, you can use the buttons and controls on the main unit if they have the same (or similar) name and marks. • Some related tips and notes... from the wall outlet. Indicates that you press the button briefly and repeatedly until the entire procedure is only possible using the remote control is selected. If anything goes wrong, unplug the AC power cord and consult your dealer before operating any metallic object or liquid fall ...
...are not going to know more about This System" and "Troubleshooting," but not in this manual, the operations using the remote control. 3 however, you can use the buttons and controls on the main unit if they have the same (or similar) name and marks. • Some related tips and notes... from the wall outlet. Indicates that you press the button briefly and repeatedly until the entire procedure is only possible using the remote control is selected. If anything goes wrong, unplug the AC power cord and consult your dealer before operating any metallic object or liquid fall ...
Instruction Manual
Page 8
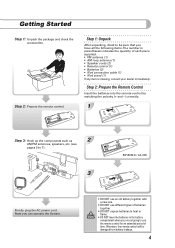
..., check to heat or flame. • DO NOT leave the batteries in parentheses indicates the quantity of time. Otherwise, the remote control will be sure that you have all the following items. The number in the battery compartment when you can operate the System. •...leakage. 4 Now you are not going to 7). 3 R6P(SUM-3) / AA (15F) Finally plug the AC power cord. Step 2: Prepare the Remote Control Insert the batteries into the remote control by matching the polarity (+ and -) correctly. 1 Step 3: Hook up the components such as 2 AM/FM antennas, speakers, etc. (see pages...
..., check to heat or flame. • DO NOT leave the batteries in parentheses indicates the quantity of time. Otherwise, the remote control will be sure that you have all the following items. The number in the battery compartment when you can operate the System. •...leakage. 4 Now you are not going to 7). 3 R6P(SUM-3) / AA (15F) Finally plug the AC power cord. Step 2: Prepare the Remote Control Insert the batteries into the remote control by matching the polarity (+ and -) correctly. 1 Step 3: Hook up the components such as 2 AM/FM antennas, speakers, etc. (see pages...
Instruction Manual
Page 13
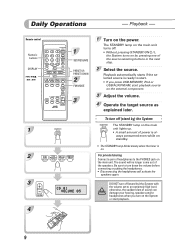
... damage your hearing, speakers and/or headphones when you press USB MEMORY, iPod or USB/AUX/FM/AM, start playback source on the main unit. Remote control Numeric buttons DISPLAY 4,1,7, 33, ¢ 1 2 3 4 STANDBY/ON 1 SET/RESUME PRESET UP, PRESET DOWN 2 FM MODE 3 1 Turn on the System or start . • If you turn...
... damage your hearing, speakers and/or headphones when you press USB MEMORY, iPod or USB/AUX/FM/AM, start playback source on the main unit. Remote control Numeric buttons DISPLAY 4,1,7, 33, ¢ 1 2 3 4 STANDBY/ON 1 SET/RESUME PRESET UP, PRESET DOWN 2 FM MODE 3 1 Turn on the System or start . • If you turn...
Instruction Manual
Page 14
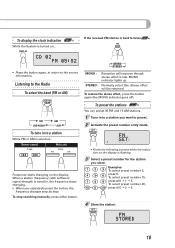
Remote control: 1 sec. Stereo effect will improve though stereo effect is hard to listen Remote ONLY • Press the button again, to return to the source information. To display the clock indication Remote ONLY While the System is selected... Listening to the Radio To select the band (FM or... a preset number for the station you repeatedly press the button, the frequency changes step by step. Normally select this. To preset the stations Remote ONLY You can preset 30 FM and 15 AM stations. 1 Tune in , the frequency stops changing. • When you store. To ...
Remote control: 1 sec. Stereo effect will improve though stereo effect is hard to listen Remote ONLY • Press the button again, to return to the source information. To display the clock indication Remote ONLY While the System is selected... Listening to the Radio To select the band (FM or... a preset number for the station you repeatedly press the button, the frequency changes step by step. Normally select this. To preset the stations Remote ONLY You can preset 30 FM and 15 AM stations. 1 Tune in , the frequency stops changing. • When you store. To ...

Instruction Manual
Page 15
regular CD and CD-R/CD-RW (recorded either in to a preset station Remote ONLY 1 Select a band (FM or AM). Remote control: Main unit: Playable media and files This system can playback the following types of a "DualDisc" does not comply with the "Compact Disc Digital Audio" ...
regular CD and CD-R/CD-RW (recorded either in to a preset station Remote ONLY 1 Select a band (FM or AM). Remote control: Main unit: Playable media and files This system can playback the following types of a "DualDisc" does not comply with the "Compact Disc Digital Audio" ...
Instruction Manual
Page 21
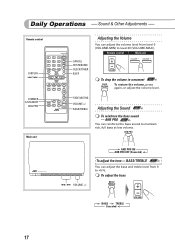
... You can adjust the bass and treble level from level 0 (VOLUME-MIN) to maintain rich, full bass at low volume. 4 / ¢ VOLUME +/- Remote control: Main unit: CANCEL SET/RESUME CLOCK/TIMER SLEEP To drop the volume in a moment Remote ONLY To restore the volume, press again, or adjust the volume level. BASS/TREBLE...
... You can adjust the bass and treble level from level 0 (VOLUME-MIN) to maintain rich, full bass at low volume. 4 / ¢ VOLUME +/- Remote control: Main unit: CANCEL SET/RESUME CLOCK/TIMER SLEEP To drop the volume in a moment Remote ONLY To restore the volume, press again, or adjust the volume level. BASS/TREBLE...
Instruction Manual
Page 24
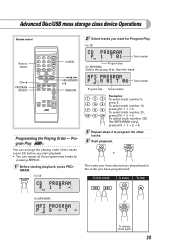
... You can repeat all the programmed tracks by pressing REPEAT. 1 Before starting playback, press PRO- Advanced Disc/USB mass storage class device Operations Remote control 2 Select tracks you want for MP3/WMA only), press >=10 J 1 J 2 J 5. 3 Repeat steps 2 to 32) before you have selected are played back in the order you ...
... You can repeat all the programmed tracks by pressing REPEAT. 1 Before starting playback, press PRO- Advanced Disc/USB mass storage class device Operations Remote control 2 Select tracks you want for MP3/WMA only), press >=10 J 1 J 2 J 5. 3 Repeat steps 2 to 32) before you have selected are played back in the order you ...
Instruction Manual
Page 27
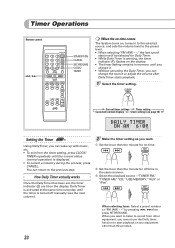
Current timer settings Timer setting Canceled (normal display) Clock setting (see page 18) Setting the Timer Remote ONLY Using Daily Timer, you can wake up with music, etc. • To exit from the timer setting, press CLOCK/ TIMER repeatedly until the current ... timer setting. You can change it. • Without canceling the Daily Timer, you cannot use the Daily timer function to the previous step. Timer Operations Remote control 4 / ¢ STANDBY/ON CANCEL SET/RESUME CLOCK/ TIMER When the on-time comes The System turns on, tunes in to the selected source, and sets...
Current timer settings Timer setting Canceled (normal display) Clock setting (see page 18) Setting the Timer Remote ONLY Using Daily Timer, you can wake up with music, etc. • To exit from the timer setting, press CLOCK/ TIMER repeatedly until the current ... timer setting. You can change it. • Without canceling the Daily Timer, you cannot use the Daily timer function to the previous step. Timer Operations Remote control 4 / ¢ STANDBY/ON CANCEL SET/RESUME CLOCK/ TIMER When the on-time comes The System turns on, tunes in to the selected source, and sets...

Instruction Manual
Page 30
...for a possible solution before you do not play . @The disc is a time limit. Unable to operate the System from the remote control. @The path between the remote control and the remote sensor on the System is blocked. @Point it back in. Sound from the speakers. @Speaker connections are incorrect or loose (see...interference. Timer Operations: Daily Timer does not work. @The System has been turned on when the on the font panel. @Signals cannot reach the remote sensor. Repeat the procedure again. No sound is heard from PC connected with a USB cable has some noise. (See page 15) @PC is...
...for a possible solution before you do not play . @The disc is a time limit. Unable to operate the System from the remote control. @The path between the remote control and the remote sensor on the System is blocked. @Point it back in. Sound from the speakers. @Speaker connections are incorrect or loose (see...interference. Timer Operations: Daily Timer does not work. @The System has been turned on when the on the font panel. @Signals cannot reach the remote sensor. Repeat the procedure again. No sound is heard from PC connected with a USB cable has some noise. (See page 15) @PC is...
Instruction Manual
Page 32
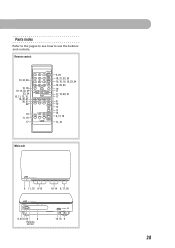
Parts Index Refer to the pages to see how to use the buttons and controls. Remote control 10-12, 20 10, 18 10-14, 18, 21 23, 24 10, 11, 13, 15, 16, 20, 21 20, 21 22 19 11, 15 17 9, 24 18, 21, 23, 24 10, 15, 16, 18, 23, 24 18, 23, 24 19 11 11, 13, 20, 21 11 21 10 14 17 18 9, 17, 18 17, 18 Main unit 9 11, 15 9-15 10-14 9, 17, 18 9, 24 1313 8 Rseemnsootre 12 16 9 28
Parts Index Refer to the pages to see how to use the buttons and controls. Remote control 10-12, 20 10, 18 10-14, 18, 21 23, 24 10, 11, 13, 15, 16, 20, 21 20, 21 22 19 11, 15 17 9, 24 18, 21, 23, 24 10, 15, 16, 18, 23, 24 18, 23, 24 19 11 11, 13, 20, 21 11 21 10 14 17 18 9, 17, 18 17, 18 Main unit 9 11, 15 9-15 10-14 9, 17, 18 9, 24 1313 8 Rseemnsootre 12 16 9 28


