Instruction Manual
Page 5
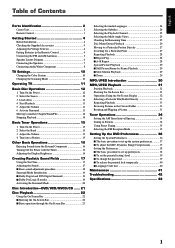
... Batteries in the Remote Control 4 Connecting the FM and AM Antennas 5 Speaker Layout Diagram 6 Connecting the Speakers 7 Connecting Audio/Video Component 8 TV Settings 10 Changing the Color System 10 Changing the Scanning Mode 10 Operating TV 11 Basic Disc Operations 12 1 Turn On the Power 12 2 Select the Source 12 3 Load a Disc 12 4 Start Playback 13 5 Adjust the Volume 13 6 Activate Surround 13 Moving to Another Chapter/Track/File 14 Stopping Playback 14 Basic Tuner Operations 15 1 Turn On the Power 15 2 Select the Band 15 3 Adjust...
... Batteries in the Remote Control 4 Connecting the FM and AM Antennas 5 Speaker Layout Diagram 6 Connecting the Speakers 7 Connecting Audio/Video Component 8 TV Settings 10 Changing the Color System 10 Changing the Scanning Mode 10 Operating TV 11 Basic Disc Operations 12 1 Turn On the Power 12 2 Select the Source 12 3 Load a Disc 12 4 Start Playback 13 5 Adjust the Volume 13 6 Activate Surround 13 Moving to Another Chapter/Track/File 14 Stopping Playback 14 Basic Tuner Operations 15 1 Turn On the Power 15 2 Select the Band 15 3 Adjust...

Instruction Manual
Page 6
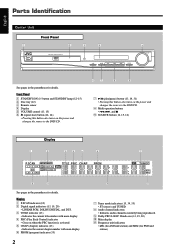
...-15) 2 Disc tray (12) 3 Remote sensor 4 Display 5 VOLUME control (13, 15) 6 0 (open/close) button (12, 14) • Pressing this button also turns on the power and changes the source to the DVD/CD. 8 Multi operation buttons • 4, ¢, and 7 9 SOURCE button (12, 15, 16) Display 1 2 345 6 7 P.SCAN LINEAR PCM LCR SW LS S RS TITLE PBC CHAP PRGM ST TUNED k Hz MHz 8 9 See pages in the parentheses for details. Display 1 P.SCAN indicator (10) 2 Digital signal indicators...
...-15) 2 Disc tray (12) 3 Remote sensor 4 Display 5 VOLUME control (13, 15) 6 0 (open/close) button (12, 14) • Pressing this button also turns on the power and changes the source to the DVD/CD. 8 Multi operation buttons • 4, ¢, and 7 9 SOURCE button (12, 15, 16) Display 1 2 345 6 7 P.SCAN LINEAR PCM LCR SW LS S RS TITLE PBC CHAP PRGM ST TUNED k Hz MHz 8 9 See pages in the parentheses for details. Display 1 P.SCAN indicator (10) 2 Digital signal indicators...

Instruction Manual
Page 14
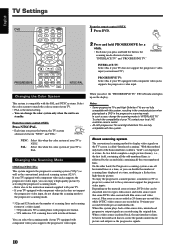
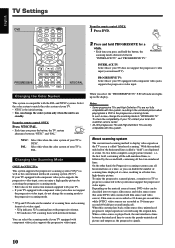
... source format, DVD video can double the number of your TV equipped with component video jacks does not support the progressive video input, do not change the scanning mode to the system must support the progressive video inputs. English TV Settings DVD DVD FM/AM AUX SOUND TV CH TV VOL CONTROL TESTTONE TV TV/VIDEO MUTING TOP MENU AUDIO VOL MENU ENTER CHOICE/TIME ON SCREEN / STEP DOWN - DVD 2 Press and hold the button, the scanning mode alternates between "NTSC" and "PAL." Changing the Color...
... source format, DVD video can double the number of your TV equipped with component video jacks does not support the progressive video input, do not change the scanning mode to the system must support the progressive video inputs. English TV Settings DVD DVD FM/AM AUX SOUND TV CH TV VOL CONTROL TESTTONE TV TV/VIDEO MUTING TOP MENU AUDIO VOL MENU ENTER CHOICE/TIME ON SCREEN / STEP DOWN - DVD 2 Press and hold the button, the scanning mode alternates between "NTSC" and "PAL." Changing the Color...
Instruction Manual
Page 19
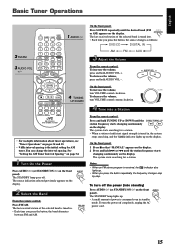
.... English Basic Tuner Operations TV AUDIO DIMMER SLEEP 1 AUDIO 1 2 3 4 5 6 7 8 2 FM/AM 9 0 MEMORY CANCEL DVD FM/AM AUX SOUND 3 AUDIO VOL +/- UP AUDIO SUBTITLE ANGLE ZOOM SLOW RETURN PL REPEAT PROGRESSIVE NTSC/PAL FM MODE RM-STHA25U DVD CINEMA SYSTEM 4 TUNING UP/DOWN • For in . • Each time you press the button, the band alternates between FM and AM. AUDIO 2 Select the Band From the remote control: Press FM/AM. To turn VOLUME control...
.... English Basic Tuner Operations TV AUDIO DIMMER SLEEP 1 AUDIO 1 2 3 4 5 6 7 8 2 FM/AM 9 0 MEMORY CANCEL DVD FM/AM AUX SOUND 3 AUDIO VOL +/- UP AUDIO SUBTITLE ANGLE ZOOM SLOW RETURN PL REPEAT PROGRESSIVE NTSC/PAL FM MODE RM-STHA25U DVD CINEMA SYSTEM 4 TUNING UP/DOWN • For in . • Each time you press the button, the band alternates between FM and AM. AUDIO 2 Select the Band From the remote control: Press FM/AM. To turn VOLUME control...
Instruction Manual
Page 25
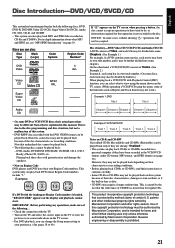
... the TV screen. (While operating a VCD/SVCD using the menu, some of the functions such as Repeat and Track Search may not work.) Example 1: DVD Audio CD COMPACT DIGITAL AUDIO • On some discs, each title may be authorized by method claims of the disc characteristics or recording conditions. This system only can also play : Disc Type Mark (Logo) Color System Region Code Number* DVD 3 Video ALL Video CD Super Video CD NTSC PAL If " " appears...
... the TV screen. (While operating a VCD/SVCD using the menu, some of the functions such as Repeat and Track Search may not work.) Example 1: DVD Audio CD COMPACT DIGITAL AUDIO • On some discs, each title may be authorized by method claims of the disc characteristics or recording conditions. This system only can also play : Disc Type Mark (Logo) Color System Region Code Number* DVD 3 Video ALL Video CD Super Video CD NTSC PAL If " " appears...

Instruction Manual
Page 34
... making a JPEG disc, select ISO 9660 Level 1, Level 2 or Joliet as the disc format. • This system supports "multi-session" discs (up to arranging files and folder/directories of their disc characteristics or recording conditions. NOTES on page 21. For in PC terminology. Disc structure-How are usually grouped into a folder. Files are MP3 files recorded and played back? Fixed to the root. You can read or play MP3 files...
... making a JPEG disc, select ISO 9660 Level 1, Level 2 or Joliet as the disc format. • This system supports "multi-session" discs (up to arranging files and folder/directories of their disc characteristics or recording conditions. NOTES on page 21. For in PC terminology. Disc structure-How are usually grouped into a folder. Files are MP3 files recorded and played back? Fixed to the root. You can read or play MP3 files...

Instruction Manual
Page 43
... cleared after entering the right new password. • The entered passwords in the "OLD PASSWORD" box. To clear the password entry, press ENTER. To erase the setup menu Press CHOICE/TIME. Repeat steps 1 to 4 to change the password 1 Repeat steps 1 to 5 of the language you select "OTHERS," the "INPUT LANGUAGE CODE" page appears. Select the audio language in the "NEW PASSWORD" box. Press the number buttons to enter the code (4 digits) of "The basic procedure to...
... cleared after entering the right new password. • The entered passwords in the "OLD PASSWORD" box. To clear the password entry, press ENTER. To erase the setup menu Press CHOICE/TIME. Repeat steps 1 to 4 to change the password 1 Repeat steps 1 to 5 of the language you select "OTHERS," the "INPUT LANGUAGE CODE" page appears. Select the audio language in the "NEW PASSWORD" box. Press the number buttons to enter the code (4 digits) of "The basic procedure to...

Instruction Manual
Page 46
...; Connect the cord properly. (See page 8.) • TV input selection is any obstacles. • Press DVD, FM/AM, or AUX to operate the system. (See page 11.) • Replace the battery. • Insert the battery correctly. • Shade the remote sensor from only one speaker. No video. "WRONG DISC" appears on . The edge is inserted. the unit inside the • Switch power off , and remove...
...; Connect the cord properly. (See page 8.) • TV input selection is any obstacles. • Press DVD, FM/AM, or AUX to operate the system. (See page 11.) • Replace the battery. • Insert the battery correctly. • Shade the remote sensor from only one speaker. No video. "WRONG DISC" appears on . The edge is inserted. the unit inside the • Switch power off , and remove...

Instruction Manual
Page 53
... Batteries in the Remote Control 4 Connecting the FM and AM Antennas 5 Speaker Layout Diagram 6 Connecting the Speakers 7 Connecting Audio/Video Component 8 TV Settings 10 Changing the Color System 10 Changing the Scanning Mode 10 Operating TV 11 Basic Disc Operations 12 1 Turn On the Power 12 2 Select the Source 12 3 Load a Disc 12 4 Start Playback 13 5 Adjust the Volume 13 6 Activate Surround 13 Moving to Another Chapter/Track/File 14 Stopping Playback 14 Basic Tuner Operations 15 1 Turn On the Power 15 2 Select the Band 15 3 Adjust...
... Batteries in the Remote Control 4 Connecting the FM and AM Antennas 5 Speaker Layout Diagram 6 Connecting the Speakers 7 Connecting Audio/Video Component 8 TV Settings 10 Changing the Color System 10 Changing the Scanning Mode 10 Operating TV 11 Basic Disc Operations 12 1 Turn On the Power 12 2 Select the Source 12 3 Load a Disc 12 4 Start Playback 13 5 Adjust the Volume 13 6 Activate Surround 13 Moving to Another Chapter/Track/File 14 Stopping Playback 14 Basic Tuner Operations 15 1 Turn On the Power 15 2 Select the Band 15 3 Adjust...
Instruction Manual
Page 54
... Panel 1 STANDBY/ON button and STANDBY lamp (12-15) 2 Disc tray (12) 3 Remote sensor 4 Display 5 VOLUME control (13, 15) 6 0 (open/close) button (12, 14) • Pressing this button also turns on the power and changes the source to the DVD/CD. 67 8 9 7 3/8 (play/pause) button (13, 14, 31) • Pressing this button also turns on when the PBC function is activated. 5 CHAP (chapter) indicator (13) • Indicates the current chapter number with main display. 4 PBC (Play...
... Panel 1 STANDBY/ON button and STANDBY lamp (12-15) 2 Disc tray (12) 3 Remote sensor 4 Display 5 VOLUME control (13, 15) 6 0 (open/close) button (12, 14) • Pressing this button also turns on the power and changes the source to the DVD/CD. 67 8 9 7 3/8 (play/pause) button (13, 14, 31) • Pressing this button also turns on when the PBC function is activated. 5 CHAP (chapter) indicator (13) • Indicates the current chapter number with main display. 4 PBC (Play...
Instruction Manual
Page 62
...-numbered lines, is called a "field") are recorded as the conventional interlaced scanning system (525i*). TUNING - UP PROGRESSIVE AUDIO SUBTITLE ANGLE ZOOM SLOW RETURN PL REPEAT PROGRESSIVE NTSC/PAL FM MODE NTSC/PAL From the remote control ONLY: 1 Press DVD. Depending on the display. So two fields complete a single picture (frame); You can be classified into two types; Changing the Color System When you can change the scanning mode to display video signals on the TV screen...
...-numbered lines, is called a "field") are recorded as the conventional interlaced scanning system (525i*). TUNING - UP PROGRESSIVE AUDIO SUBTITLE ANGLE ZOOM SLOW RETURN PL REPEAT PROGRESSIVE NTSC/PAL FM MODE NTSC/PAL From the remote control ONLY: 1 Press DVD. Depending on the display. So two fields complete a single picture (frame); You can be classified into two types; Changing the Color System When you can change the scanning mode to display video signals on the TV screen...

Instruction Manual
Page 73
.... For in the VCD/SVCD format, audio CD format, MP3 format, and JPEG format (see "MP3/JPEG Introduction" on the display and playback cannot start. Playing back these discs will generate noise and damage the speakers. * Note on the TV screen. (While operating a VCD/SVCD using the menu shown on Region Code DVD players and DVD have been recorded in -depth information about what is loaded, "REGION ERR" appears on page...
.... For in the VCD/SVCD format, audio CD format, MP3 format, and JPEG format (see "MP3/JPEG Introduction" on the display and playback cannot start. Playing back these discs will generate noise and damage the speakers. * Note on the TV screen. (While operating a VCD/SVCD using the menu shown on Region Code DVD players and DVD have been recorded in -depth information about what is loaded, "REGION ERR" appears on page...

Instruction Manual
Page 91
.... I To set the parental (rating) level Using this function, you want to verify the password. The "PASSWORD CHANGE PAGE" appears. You can play such a disc unless this case. 6 Press ENTER. To erase the setup menu Press CHOICE/TIME. Repeat steps 1 to 4 to change after entering the last digit. 3 Press the number button to select the desired setting. The "PASSWORD VERIFY PAGE" appears. The preferences page appears again 9 0 and the selected parental level...
.... I To set the parental (rating) level Using this function, you want to verify the password. The "PASSWORD CHANGE PAGE" appears. You can play such a disc unless this case. 6 Press ENTER. To erase the setup menu Press CHOICE/TIME. Repeat steps 1 to 4 to change after entering the last digit. 3 Press the number button to select the desired setting. The "PASSWORD VERIFY PAGE" appears. The preferences page appears again 9 0 and the selected parental level...
Instruction Manual
Page 94
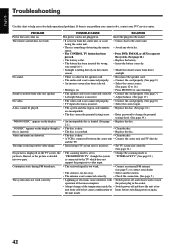
... one speaker. No sound. Sound is inserted. No video. Insert the plug into two parts. The remote control does not work correctly. No picture is displayed on the video image. The system does not work . POSSIBLE CAUSE SOLUTION The power cord is any obstacles. • Press DVD, FM/AM, or AUX to operate the system. (See page 11.) • Replace the battery. • Insert the battery correctly. •...
... one speaker. No sound. Sound is inserted. No video. Insert the plug into two parts. The remote control does not work correctly. No picture is displayed on the video image. The system does not work . POSSIBLE CAUSE SOLUTION The power cord is any obstacles. • Press DVD, FM/AM, or AUX to operate the system. (See page 11.) • Replace the battery. • Insert the battery correctly. •...

Instruction Manual
Page 101
... Batteries in the Remote Control 4 Connecting the FM and AM Antennas 5 Speaker Layout Diagram 6 Connecting the Speakers 7 Connecting Audio/Video Component 8 TV Settings 10 Changing the Color System 10 Changing the Scanning Mode 10 Operating TV 11 Basic Disc Operations 12 1 Turn On the Power 12 2 Select the Source 12 3 Load a Disc 12 4 Start Playback 13 5 Adjust the Volume 13 6 Activate Surround 13 Moving to Another Chapter/Track/File 14 Stopping Playback 14 Basic Tuner Operations 15 1 Turn On the Power 15 2 Select the Band 15 3 Adjust...
... Batteries in the Remote Control 4 Connecting the FM and AM Antennas 5 Speaker Layout Diagram 6 Connecting the Speakers 7 Connecting Audio/Video Component 8 TV Settings 10 Changing the Color System 10 Changing the Scanning Mode 10 Operating TV 11 Basic Disc Operations 12 1 Turn On the Power 12 2 Select the Source 12 3 Load a Disc 12 4 Start Playback 13 5 Adjust the Volume 13 6 Activate Surround 13 Moving to Another Chapter/Track/File 14 Stopping Playback 14 Basic Tuner Operations 15 1 Turn On the Power 15 2 Select the Band 15 3 Adjust...

Instruction Manual
Page 102
... Panel 1 STANDBY/ON button and STANDBY lamp (12-15) 2 Disc tray (12) 3 Remote sensor 4 Display 5 VOLUME control (13, 15) 6 0 (open/close) button (12, 14) • Pressing this button also turns on the power and changes the source to the DVD/CD. 67 8 9 7 3/8 (play/pause) button (13, 14, 31) • Pressing this button also turns on when the PBC function is activated. 5 CHAP (chapter) indicator (13) • Indicates the current chapter number with main display. 4 PBC (Play...
... Panel 1 STANDBY/ON button and STANDBY lamp (12-15) 2 Disc tray (12) 3 Remote sensor 4 Display 5 VOLUME control (13, 15) 6 0 (open/close) button (12, 14) • Pressing this button also turns on the power and changes the source to the DVD/CD. 67 8 9 7 3/8 (play/pause) button (13, 14, 31) • Pressing this button also turns on when the PBC function is activated. 5 CHAP (chapter) indicator (13) • Indicates the current chapter number with main display. 4 PBC (Play...
Instruction Manual
Page 110
... progressive output signals are fully compatible with this when the color system of your local JVC customer service center. • All JVC progressive TVs and High-Definition TVs are created using the original data. English TV Settings DVD DVD FM/AM AUX SOUND TV CH TV VOL CONTROL TESTTONE TV TV/VIDEO MUTING TOP MENU AUDIO VOL MENU ENTER CHOICE/TIME ON SCREEN / STEP DOWN - UP PROGRESSIVE AUDIO SUBTITLE ANGLE ZOOM SLOW RETURN PL REPEAT PROGRESSIVE NTSC/PAL...
... progressive output signals are fully compatible with this when the color system of your local JVC customer service center. • All JVC progressive TVs and High-Definition TVs are created using the original data. English TV Settings DVD DVD FM/AM AUX SOUND TV CH TV VOL CONTROL TESTTONE TV TV/VIDEO MUTING TOP MENU AUDIO VOL MENU ENTER CHOICE/TIME ON SCREEN / STEP DOWN - UP PROGRESSIVE AUDIO SUBTITLE ANGLE ZOOM SLOW RETURN PL REPEAT PROGRESSIVE NTSC/PAL...

Instruction Manual
Page 121
... screen. (While operating a VCD/SVCD using the menu, some of the functions such as Repeat and Track Search may not work.) Example 1: DVD Audio CD COMPACT DIGITAL AUDIO • On some cases, without showing " ," operations will generate noise and damage the speakers. * Note on Region Code DVD players and DVD have been recorded in lens is dirty. • CD-RWs may not be played back because of the following discs...
... screen. (While operating a VCD/SVCD using the menu, some of the functions such as Repeat and Track Search may not work.) Example 1: DVD Audio CD COMPACT DIGITAL AUDIO • On some cases, without showing " ," operations will generate noise and damage the speakers. * Note on Region Code DVD players and DVD have been recorded in lens is dirty. • CD-RWs may not be played back because of the following discs...

Instruction Manual
Page 139
... current password (4 digits) in the "CONFIRM PWD" box to select "CHANGE" then press ENTER. To erase the setup menu Press CHOICE/TIME. The "PASSWORD CHANGE PAGE" appears. PASSWORD VERIFY PAGE INPUT PASSWORD: 2 Press the number button to select the desired setting. Four asterisks appear in the box after entering the last digit. Start from the factory, the password is automatically cleared after entering the new password. 4 Press the number button to set the parental (rating) level Using...
... current password (4 digits) in the "CONFIRM PWD" box to select "CHANGE" then press ENTER. To erase the setup menu Press CHOICE/TIME. The "PASSWORD CHANGE PAGE" appears. PASSWORD VERIFY PAGE INPUT PASSWORD: 2 Press the number button to select the desired setting. Four asterisks appear in the box after entering the last digit. Start from the factory, the password is automatically cleared after entering the new password. 4 Press the number button to set the parental (rating) level Using...

Instruction Manual
Page 142
...; Switch power off , and remove and re-insert operation of the microcomputer. English Troubleshooting Use this chart to help you solve daily operational problems. If there is any obstacles. • Press DVD, FM/AM, or AUX to operate the system. (See page 11.) • Replace the battery. • Insert the battery correctly. • Shade the remote sensor from direct sunlight. • There is a short in the speaker cord...
...; Switch power off , and remove and re-insert operation of the microcomputer. English Troubleshooting Use this chart to help you solve daily operational problems. If there is any obstacles. • Press DVD, FM/AM, or AUX to operate the system. (See page 11.) • Replace the battery. • Insert the battery correctly. • Shade the remote sensor from direct sunlight. • There is a short in the speaker cord...


