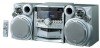

Instruction Manual
Page 2
.... There are blocked by a newspaper or cloth, etc., the heat may result in ) CAUTION 1. Use of controls adjustments or performance of these batteries must be remote controlled. Maintain an adequate air path for ventilation by the dimensions below. 3 Bottom: Place on a stand with liquids, such as lighted candles, on the apparatus...
.... There are blocked by a newspaper or cloth, etc., the heat may result in ) CAUTION 1. Use of controls adjustments or performance of these batteries must be remote controlled. Maintain an adequate air path for ventilation by the dimensions below. 3 Bottom: Place on a stand with liquids, such as lighted candles, on the apparatus...
Instruction Manual
Page 3
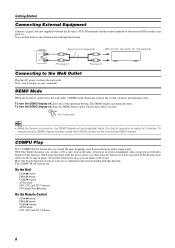
...8226; Do not insert any metallic object into your home, giving you will be omitted. • System functions are written with a single touch. ❏ The great SEA (Sound Effect Amplifier) effects Rock...8226; With JVC's COMPU PLAY you for many features built into the System. 1 Use the table of contents to look up and use the system. is the same for purchasing the JVC Compact Component System. We hope... it serves you require. Features Here are the same, the description on the Unit and the Remote Control are some of enjoyment. e.g. FM/AM, "NO DISC". • If the button ...
...8226; Do not insert any metallic object into your home, giving you will be omitted. • System functions are written with a single touch. ❏ The great SEA (Sound Effect Amplifier) effects Rock...8226; With JVC's COMPU PLAY you for many features built into the System. 1 Use the table of contents to look up and use the system. is the same for purchasing the JVC Compact Component System. We hope... it serves you require. Features Here are the same, the description on the Unit and the Remote Control are some of enjoyment. e.g. FM/AM, "NO DISC". • If the button ...
Instruction Manual
Page 4
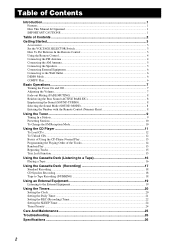
... CAUTIONS...1 Table of Contents ...2 Getting Started...3 Accessories ...3 Set the VOLTAGE SELECTOR Switch 3 How To Put Batteries In the Remote Control 3 Using the Remote Control ...4 Connecting the FM Antenna ...4 Connecting the AM Antenna...5 Connecting the Speakers ...5 Connecting External Equipment...6 Connecting to the ...Sound (ACTIVE BASS EX 8 Emphasizing the Sound (SOUND TURBO 8 Selecting the Sound Mode (SOUND MODE 8 Entering the Number with the Remote Control (Numeric Keys 8 Using the Tuner ...9 Tuning In a Station ...9 Presetting Stations ...10 To Change the FM Reception Mode ...10...
... CAUTIONS...1 Table of Contents ...2 Getting Started...3 Accessories ...3 Set the VOLTAGE SELECTOR Switch 3 How To Put Batteries In the Remote Control 3 Using the Remote Control ...4 Connecting the FM Antenna ...4 Connecting the AM Antenna...5 Connecting the Speakers ...5 Connecting External Equipment...6 Connecting to the ...Sound (ACTIVE BASS EX 8 Emphasizing the Sound (SOUND TURBO 8 Selecting the Sound Mode (SOUND MODE 8 Entering the Number with the Remote Control (Numeric Keys 8 Using the Tuner ...9 Tuning In a Station ...9 Presetting Stations ...10 To Change the FM Reception Mode ...10...

Instruction Manual
Page 5
...the VOLTAGE SELECTOR Switch To avoid damaging the System, set the voltage before plugging the System into an AC power outlet. How To Put Batteries In the Remote Control Match the polarity (+ and -) on the back of the Unit. markings in the System. Voltage mark CAUTION: • Make all.... ❏ To avoid battery leakage or explosion: • Remove batteries when the Remote Control will not be used for you area with the VOLTAGE SELECTOR switch on the batteries with the System. Getting Started Accessories Make sure that you have all connections before plugging in the battery...
...the VOLTAGE SELECTOR Switch To avoid damaging the System, set the voltage before plugging the System into an AC power outlet. How To Put Batteries In the Remote Control Match the polarity (+ and -) on the back of the Unit. markings in the System. Voltage mark CAUTION: • Make all.... ❏ To avoid battery leakage or explosion: • Remove batteries when the Remote Control will not be used for you area with the VOLTAGE SELECTOR switch on the batteries with the System. Getting Started Accessories Make sure that you have all connections before plugging in the battery...
Instruction Manual
Page 6
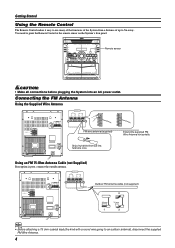
... kind with a round wire going to point the Remote Control at the remote sensor on the System's fron panel. Remote sensor CAUTION: • Make all connections before plugging the System into an AC power outlet. Getting Started Using the Remote Control The Remote Control makes it easy to use many of the ...functions of the System from cut line, twist wire core. Using an FM 75-Ohm Antenna Cable (not ...
... kind with a round wire going to point the Remote Control at the remote sensor on the System's fron panel. Remote sensor CAUTION: • Make all connections before plugging the System into an AC power outlet. Getting Started Using the Remote Control The Remote Control makes it easy to use many of the ...functions of the System from cut line, twist wire core. Using an FM 75-Ohm Antenna Cable (not ...
Instruction Manual
Page 8
...the radio, or listen to the wall outlet, a DEMO mode displaying some of the operation buttons. COMPU Play JVC's COMPU PLAY feature lets you have specified. How One Touch Operation works in the section dealing with a single ... turns the power on the Unit for you, then starts the function you control the most frequently used System functions with that function. To turn the DEMO display on, press the DEMO button on for more than..., CD2 and CD 3 buttons CD Open/Close 0 button On the Remote Control CD 6 button FM/AM button TAPE 3 button AUX button CD1, CD2 and CD 3 buttons 6
...the radio, or listen to the wall outlet, a DEMO mode displaying some of the operation buttons. COMPU Play JVC's COMPU PLAY feature lets you have specified. How One Touch Operation works in the section dealing with a single ... turns the power on the Unit for you, then starts the function you control the most frequently used System functions with that function. To turn the DEMO display on, press the DEMO button on for more than..., CD2 and CD 3 buttons CD Open/Close 0 button On the Remote Control CD 6 button FM/AM button TAPE 3 button AUX button CD1, CD2 and CD 3 buttons 6
Instruction Manual
Page 9
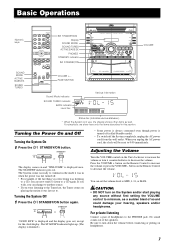
The System comes on the Remote Control to the Tuner last, the Tuner comes on and "WELCOME" is turned off... blast of sound could damage your hearing, speakers and/or headphones. Turning the Power On and Off Turning the System On 1 Press the % STANDBY/ON button. The STANDBY indicator goes out. Basic Operations ) Numeric keys % ... Mode indicator SOUND TURBO indicator BASS indicator Level bar Various information Status bar (Indicates various statuses.) * When the System is displayed and the display goes out, except for the clock display. PHONES STANDBY indicator % STANDBY/ON VOLUME...
The System comes on the Remote Control to the Tuner last, the Tuner comes on and "WELCOME" is turned off... blast of sound could damage your hearing, speakers and/or headphones. Turning the Power On and Off Turning the System On 1 Press the % STANDBY/ON button. The STANDBY indicator goes out. Basic Operations ) Numeric keys % ... Mode indicator SOUND TURBO indicator BASS indicator Level bar Various information Status bar (Indicates various statuses.) * When the System is displayed and the display goes out, except for the clock display. PHONES STANDBY indicator % STANDBY/ON VOLUME...
Instruction Manual
Page 10
...press the currently selected mode button again. For example, if the current Sound Mode is canceled, the Sound Mode indicator stays lit. On the Remote Control Press the SOUND MODE button until "OFF" appears on the display. To muting the output, press the FADE MUTING button on the display... the display. • Selecting the Sound Turbo function turns the Active Bass EX. sponds to enter numbers for wide and dynamic sound stereo systems. OFF No sound effect applies. When the effect is ROCK, press the ROCK button again. The Sound Mode indicator that corresponds to the ...
...press the currently selected mode button again. For example, if the current Sound Mode is canceled, the Sound Mode indicator stays lit. On the Remote Control Press the SOUND MODE button until "OFF" appears on the display. To muting the output, press the FADE MUTING button on the display... the display. • Selecting the Sound Turbo function turns the Active Bass EX. sponds to enter numbers for wide and dynamic sound stereo systems. OFF No sound effect applies. When the effect is ROCK, press the ROCK button again. The Sound Mode indicator that corresponds to the ...
Instruction Manual
Page 11
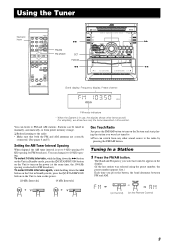
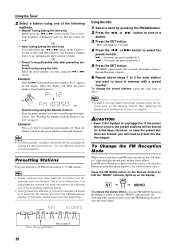
... Spacing When shipped, the AM tuner interval is selected for FM broadcast). To select 10 kHz intervals, while holding down the ¢ button on the Remote Control) 9 You can listen to FM and AM stations. Using the Tuner Numeric keys ¢ ¡ X FM/AM FM MODE SET FM/AM 4 22 A ...B Band display, Frequency display, Preset channel FM mode indicators * When the System is in Standby mode, press the % STANDBY/ON button on the Unit to turn on the System and start playing the station you press the button, the band alternates between FM and AM. You...
... Spacing When shipped, the AM tuner interval is selected for FM broadcast). To select 10 kHz intervals, while holding down the ¢ button on the Remote Control) 9 You can listen to FM and AM stations. Using the Tuner Numeric keys ¢ ¡ X FM/AM FM MODE SET FM/AM 4 22 A ...B Band display, Frequency display, Preset channel FM mode indicators * When the System is in Standby mode, press the % STANDBY/ON button on the Unit to turn on the System and start playing the station you press the button, the band alternates between FM and AM. You...
Instruction Manual
Page 12
... by 1. 5 Press the SET button. Using the Unit 1 Select a band by turning the AM loop antenna. CAUTION: • Even if the System is hard to frequency until you find the station you can select Monaural mode. To Change the FM Reception Mode When you are erased, you...frequency display. 6 Repeat above . • In step 4, you hold down the 22 or ¡ button on the display. See "Entering the Number with the Remote Control" on the display. Example: Press +10, then 2 to shipment. Presetting Stations You can hear stereo effects. OR • Preset Tuning (Possible only after...
... by 1. 5 Press the SET button. Using the Unit 1 Select a band by turning the AM loop antenna. CAUTION: • Even if the System is hard to frequency until you find the station you can select Monaural mode. To Change the FM Reception Mode When you are erased, you...frequency display. 6 Repeat above . • In step 4, you hold down the 22 or ¡ button on the display. See "Entering the Number with the Remote Control" on the display. Example: Press +10, then 2 to shipment. Presetting Stations You can hear stereo effects. OR • Preset Tuning (Possible only after...
Instruction Manual
Page 15
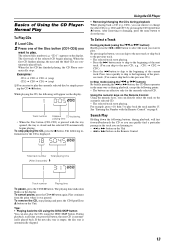
... the CD, the following points. • The buttons are continuously played back. To stop playing and press the CD Open/Close 0 button on the Remote Control Total track number Total playing time (After 3 seconds) Track number Playing time To pause, press the CD 6 button. CD1), you want to ... pressing the CD Open/Close 0 button. During playback, each time you can remove or change the other CDs (e.g. Using the numeric keys on the Remote Control: Using the numeric keys, you press the button, the next CD is playing. To Select a Track During playback (using the DISC SKIP button...
... the CD, the following points. • The buttons are continuously played back. To stop playing and press the CD Open/Close 0 button on the Remote Control Total track number Total playing time (After 3 seconds) Track number Playing time To pause, press the CD 6 button. CD1), you want to ... pressing the CD Open/Close 0 button. During playback, each time you can remove or change the other CDs (e.g. Using the numeric keys on the Remote Control: Using the numeric keys, you press the button, the next CD is playing. To Select a Track During playback (using the DISC SKIP button...
Instruction Manual
Page 16
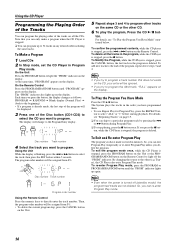
... = RANDOM = Blank display (Normal Play) = (back to the beginning) • If a program is stopped, press the 4 or ¢ button on the Remote Control. The System plays the tracks in the order you want to program. ton to light the "PRGM" indicator on the display. Tuner), the CD Player also... 15. ❏ You can program up to program other tracks on the display. or PRESET Disc number Track number SET Program order number Using the Remote Control Press the numeric keys to a particular program track by pressing the 4 or ¢ button during Program Play. ❏ To stop playing,...
... = RANDOM = Blank display (Normal Play) = (back to the beginning) • If a program is stopped, press the 4 or ¢ button on the Remote Control. The System plays the tracks in the order you want to program. ton to light the "PRGM" indicator on the display. Tuner), the CD Player also... 15. ❏ You can program up to program other tracks on the display. or PRESET Disc number Track number SET Program order number Using the Remote Control Press the numeric keys to a particular program track by pressing the 4 or ¢ button during Program Play. ❏ To stop playing,...
Instruction Manual
Page 17
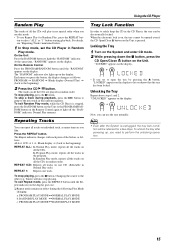
...the CDs. PROGRAM PLAY MODEÔNORMAL PLAY MODE b. When the electronic lock is on the Remote Control again to light off the "RANDOM" indicator. To unlock the tray after the System is unplugged, the tray lock condition will also stop playing. Press the REPEAT button. Now,... you need to perform the unlocking operation. 15 On the Remote Control Press the PROGRAM/RANDOM button until the Repeat indicator ...
...the CDs. PROGRAM PLAY MODEÔNORMAL PLAY MODE b. When the electronic lock is on the Remote Control again to light off the "RANDOM" indicator. To unlock the tray after the System is unplugged, the tray lock condition will also stop playing. Press the REPEAT button. Now,... you need to perform the unlocking operation. 15 On the Remote Control Press the PROGRAM/RANDOM button until the Repeat indicator ...
Instruction Manual
Page 18
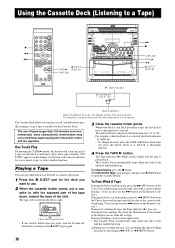
...Listening to a Tape) 7 4 ¢ 0 EJECT TAPE 3 (Deck A) TAPE A/B ¡ 7 TAPE A/B TAPE 3 22 0 EJECT (Deck B) 3: Tape indicator Deck indicators * When the System is in use of tapes longer than 120 minutes is not recommended, since characteristic deterioration may occur and these tapes easily jam in the pinch.... The Cassette Deck allows you to have a tape inserted is played back. One Touch Play By pressing the TAPE 3 button, the System will come on the Remote Control.) During fast-winding the tape, the Tape indicator (3) goes out. For example, when the Deck A is alternately selected. 4 ...
...Listening to a Tape) 7 4 ¢ 0 EJECT TAPE 3 (Deck A) TAPE A/B ¡ 7 TAPE A/B TAPE 3 22 0 EJECT (Deck B) 3: Tape indicator Deck indicators * When the System is in use of tapes longer than 120 minutes is not recommended, since characteristic deterioration may occur and these tapes easily jam in the pinch.... The Cassette Deck allows you to have a tape inserted is played back. One Touch Play By pressing the TAPE 3 button, the System will come on the Remote Control.) During fast-winding the tape, the Tape indicator (3) goes out. For example, when the Deck A is alternately selected. 4 ...

Instruction Manual
Page 26
... off by itself rather than play before setting the Sleep Timer. The System is now set the Sleep Timer when the System is displayed. This means that your System will use the settings from the DAILY Timer. Using the Remote Control 1 During playback a source, press the SLEEP button. Timer Priority... and remains lit, and the display returns to the original display. To Cancel the SLEEP Timer Setting: Press the SLEEP button on the Remote Control until the display returns to the original one before shutting off after a certain number of time you want the source to play all...
... off by itself rather than play before setting the Sleep Timer. The System is now set the Sleep Timer when the System is displayed. This means that your System will use the settings from the DAILY Timer. Using the Remote Control 1 During playback a source, press the SLEEP button. Timer Priority... and remains lit, and the display returns to the original display. To Cancel the SLEEP Timer Setting: Press the SLEEP button on the Remote Control until the display returns to the original one before shutting off after a certain number of time you want the source to play all...
Instruction Manual
Page 28
Poor radio reception The disc tray does not open. Unable to operate the Remote Control. Cover holes on the Unit is not prop- Operations are connected. • The antenna is disconnected. • The AM Loop Antenna is too close to the System. • The FM Wire Antenna is blocked. • The batteries have...
Poor radio reception The disc tray does not open. Unable to operate the Remote Control. Cover holes on the Unit is not prop- Operations are connected. • The antenna is disconnected. • The AM Loop Antenna is too close to the System. • The FM Wire Antenna is blocked. • The batteries have...


