Instructions
Page 5
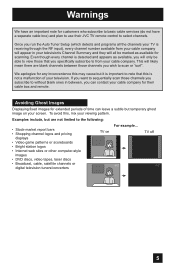
... any inconvenience this may cause but temporary ghost image on TV off XYZ XYZ 5 If you want to sequentially scan those channels you will all be able to view those that this , mix your cable company for their JVC TV remote control to select channels. To avoid this is detected and... appears as available for scanning. TV on your television's Channel Summary and they will only be marked as available, you wish to...
... any inconvenience this may cause but temporary ghost image on TV off XYZ XYZ 5 If you want to sequentially scan those channels you will all be able to view those that this , mix your cable company for their JVC TV remote control to select channels. To avoid this is detected and... appears as available for scanning. TV on your television's Channel Summary and they will only be marked as available, you wish to...
Instructions
Page 9
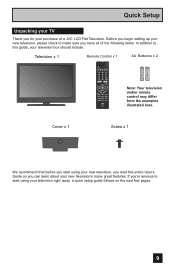
... RM-C1450 TV AA Batteries x 2 Note: Your television and/or remote control may differ from the examples illustrated here. VOL + MUTING OK AVORITE DVR STATUS SOUND VIDEO ASPECT GUIDE SUB CH TV/VCR C.C. ...setup guide follows on the next few pages. 9 CH + - Quick Setup Unpacking your TV Thank you for your purchase of the following items. In addition to this entire User's Guide...new television's many great features. BACK F Remote Control x 1 POWER MODE TV STB VCR DVD AUDIO INPUT V1 V2 V3 V4 V5 1 2 3 4 5 6 7 8 9 RETURN + TUNE 0 TV - SUB T. Before you begin setting up...
... RM-C1450 TV AA Batteries x 2 Note: Your television and/or remote control may differ from the examples illustrated here. VOL + MUTING OK AVORITE DVR STATUS SOUND VIDEO ASPECT GUIDE SUB CH TV/VCR C.C. ...setup guide follows on the next few pages. 9 CH + - Quick Setup Unpacking your TV Thank you for your purchase of the following items. In addition to this entire User's Guide...new television's many great features. BACK F Remote Control x 1 POWER MODE TV STB VCR DVD AUDIO INPUT V1 V2 V3 V4 V5 1 2 3 4 5 6 7 8 9 RETURN + TUNE 0 TV - SUB T. Before you begin setting up...
Instructions
Page 10
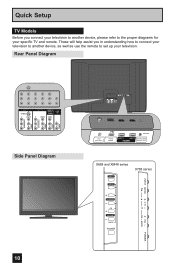
... in understanding how to connect your television to another device, please refer to set up your specific TV and remote. These will help assist you connect your television to another device, as well as use the remote to the proper diagrams for your television. Rear Panel Diagram AUDIO AUDIO AUDIO COMPONENT AUDIO COMPONENT...
... in understanding how to connect your television to another device, please refer to set up your specific TV and remote. These will help assist you connect your television to another device, as well as use the remote to the proper diagrams for your television. Rear Panel Diagram AUDIO AUDIO AUDIO COMPONENT AUDIO COMPONENT...

Instructions
Page 11
.... 11 VOL + MUTING BACK F OK AVORITE DVR STATUS SOUND VIDEO ASPECT GUIDE SUB CH TV/VCR C.C. CH + - DISPLAY SLEEP ML/MTS RM-C1450 TV RM-C1450 Notes: • For information on remote control buttons, see pages 58 - 66. • SUB CHANNEL and GUIDE buttons are for how to an ...ATSC antenna or Digital Cable, you can use these buttons. • This remote control is capable of operating many external device brands. See page 67 - 72 for digital channels. Remote Control MENU Quick Setup POWER MODE TV STB VCR DVD AUDIO INPUT V1 V2 V3 V4 V5 1 2 3 4 5 6 7 8...
.... 11 VOL + MUTING BACK F OK AVORITE DVR STATUS SOUND VIDEO ASPECT GUIDE SUB CH TV/VCR C.C. CH + - DISPLAY SLEEP ML/MTS RM-C1450 TV RM-C1450 Notes: • For information on remote control buttons, see pages 58 - 66. • SUB CHANNEL and GUIDE buttons are for how to an ...ATSC antenna or Digital Cable, you can use these buttons. • This remote control is capable of operating many external device brands. See page 67 - 72 for digital channels. Remote Control MENU Quick Setup POWER MODE TV STB VCR DVD AUDIO INPUT V1 V2 V3 V4 V5 1 2 3 4 5 6 7 8...

Instructions
Page 12
... DVR STATUS ASPECT 12 If you have to be reset. Next, MENU select a menu using your new television right away. The Remote Control Before you can operate your TV, select the TV mode by pressing the POWER button at the top right corner of this is the first time you are used only... for menu selections. Basic Operation Turn the television on and off by pressing the MODE button on the remote control before you turn the TV power on. • See page 58 to 66 for more detailed information on any of these steps, please consult other sections of...
... DVR STATUS ASPECT 12 If you have to be reset. Next, MENU select a menu using your new television right away. The Remote Control Before you can operate your TV, select the TV mode by pressing the POWER button at the top right corner of this is the first time you are used only... for menu selections. Basic Operation Turn the television on and off by pressing the MODE button on the remote control before you turn the TV power on. • See page 58 to 66 for more detailed information on any of these steps, please consult other sections of...
Instructions
Page 21
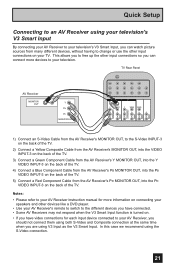
... time when you have connected. • Some AV Receivers may not respond when the V3 Smart Input function is turned on the back of the TV. In this case we recommend using V3 Input as the V3 Smart Input. Notes: • Please refer to your AV Receiver instruction manual for ...more information on connecting your television. This allows you to free up the other devices like a DVD player. • Use your AV Receiver's remote to switch to the different devices you have video connections for each input device connected to your speakers and other input connections so you can...
... time when you have connected. • Some AV Receivers may not respond when the V3 Smart Input function is turned on the back of the TV. In this case we recommend using V3 Input as the V3 Smart Input. Notes: • Please refer to your AV Receiver instruction manual for ...more information on connecting your television. This allows you to free up the other devices like a DVD player. • Use your AV Receiver's remote to switch to the different devices you have video connections for each input device connected to your speakers and other input connections so you can...
Instructions
Page 24
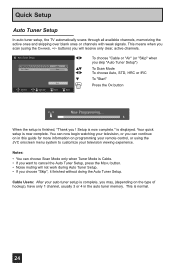
...is now complete. Cable Users: After your television viewing experience. Setup is normal. 24 buttons) you scan (using the JVC onscreen menu system to cancel the Auto Tuner Setup, press the MENU button. • Noise muting will receive only ...clear, active channels. This is now complete." Quick Setup Auto Tuner Setup In auto tuner setup, the TV automatically scans through all available channels, memorizing the active ones and skipping over blank ones or channels with weak... setup is finished, "Thank you may, (depending on programming your remote control, or using the CHANNEL +/-
...is now complete. Cable Users: After your television viewing experience. Setup is normal. 24 buttons) you scan (using the JVC onscreen menu system to cancel the Auto Tuner Setup, press the MENU button. • Noise muting will receive only ...clear, active channels. This is now complete." Quick Setup Auto Tuner Setup In auto tuner setup, the TV automatically scans through all available channels, memorizing the active ones and skipping over blank ones or channels with weak... setup is finished, "Thank you may, (depending on programming your remote control, or using the CHANNEL +/-
Instructions
Page 25
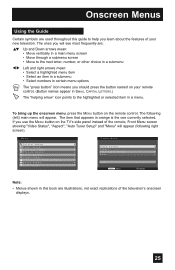
... Select Operate Note: • Menus shown in certain menu options The "press button" icon means you use the MENU button on the TV's side panel instead of your remote control. (Button names appear in SMALL CAPITAL LETTERS.) The "helping arrow" icon points to help you learn about the features of the... Menu screen showing "Video Status", "Aspect", "Auto Tuner Setup" and "Menu" will appear. If you should press the button named on the remote control. The ones you will see most frequently are: π† Up and Down arrows mean: • Move vertically in a main menu screen •...
... Select Operate Note: • Menus shown in certain menu options The "press button" icon means you use the MENU button on the TV's side panel instead of your remote control. (Button names appear in SMALL CAPITAL LETTERS.) The "helping arrow" icon points to help you learn about the features of the... Menu screen showing "Video Status", "Aspect", "Auto Tuner Setup" and "Menu" will appear. If you should press the button named on the remote control. The ones you will see most frequently are: π† Up and Down arrows mean: • Move vertically in a main menu screen •...
Instructions
Page 26
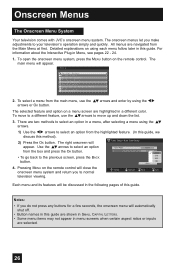
...previous screen, press the BACK button. To select a menu from the box and press the OK button. There are selected. 26 Pressing MENU on the remote control. STD HRC IRC Start 4. The selected feature and option on using the √® arrows or OK button. To move to select an ...Scan Mode Auto Auto • To go back to your television's operation simply and quickly. Onscreen Menus The Onscreen Menu System Your television comes with JVC's onscreen menu system. The main menu will - + Tuner Setup > Auto Tuner Setup appear. The right onscreen will appear.
...previous screen, press the BACK button. To select a menu from the box and press the OK button. There are selected. 26 Pressing MENU on the remote control. STD HRC IRC Start 4. The selected feature and option on using the √® arrows or OK button. To move to select an ...Scan Mode Auto Auto • To go back to your television's operation simply and quickly. Onscreen Menus The Onscreen Menu System Your television comes with JVC's onscreen menu system. The main menu will - + Tuner Setup > Auto Tuner Setup appear. The right onscreen will appear.
Instructions
Page 29
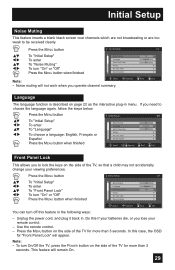
... English Off BACK Back MENU Exit Language The language function is described on the side of the TV for more than 3 seconds. Use the remote control. - This feature will not work when you lose your remote control. - Press the MENU button Initial Setup π† √® π† √&#... This feature inserts a blank black screen over channels which are not broadcasting or are too weak to lock the keys on the side of the TV, so that a child may not accidentally change your viewing preferences. π† √® π† √® Press the MENU ...
... English Off BACK Back MENU Exit Language The language function is described on the side of the TV for more than 3 seconds. Use the remote control. - This feature will not work when you lose your remote control. - Press the MENU button Initial Setup π† √® π† √&#... This feature inserts a blank black screen over channels which are not broadcasting or are too weak to lock the keys on the side of the TV, so that a child may not accidentally change your viewing preferences. π† √® π† √® Press the MENU ...
Instructions
Page 41
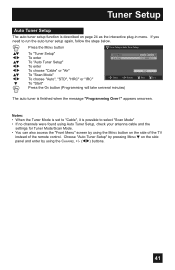
... tuner setup again, follow the steps below. Tuner Setup Auto Tuner Setup The auto tuner setup function is described on the side of the TV instead of the remote control. Notes: • When the Tuner Mode is set to "Cable", it is finished when the message "Programming Over !" appears onscreen. Choose "Auto...
... tuner setup again, follow the steps below. Tuner Setup Auto Tuner Setup The auto tuner setup function is described on the side of the TV instead of the remote control. Notes: • When the Tuner Mode is set to "Cable", it is finished when the message "Programming Over !" appears onscreen. Choose "Auto...
Instructions
Page 55
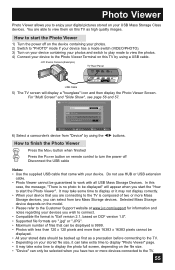
... be backed up first as high quality images. How to finish the Photo Viewer Press the MENU button when finished Press the POWER button on remote control to turn the power off on the device containing your photos. 2) Switch to "PHOTO" mode if your device has a mode switch (VIDEO/PHOTO). 3)... your USB Mass Storage Class devices. Selected Mass Storage device depends on the model. • Please refer to the Customer Support website at www.jvc.com/support for information and notes regarding your devices you to view them on your digital pictures stored on this TV by using a USB cable.
... be backed up first as high quality images. How to finish the Photo Viewer Press the MENU button when finished Press the POWER button on remote control to turn the power off on the device containing your photos. 2) Switch to "PHOTO" mode if your device has a mode switch (VIDEO/PHOTO). 3)... your USB Mass Storage Class devices. Selected Mass Storage device depends on the model. • Please refer to the Customer Support website at www.jvc.com/support for information and notes regarding your devices you to view them on your digital pictures stored on this TV by using a USB cable.

Instructions
Page 56
...-: Rotates the image 90º counterclockwise DISPLAY: Displays information. With each press of the DISPLAY button, you can look at the pictures by using your remote control buttons. 123 4 6 789 5 Reset + Prev. BACK: Returns to the thumbnail screen MENU: Exit Notes: • When Multi Screen has more than one screen..., if you press the page number using the 10- key pad on your remote. Photo Viewer Multi Screen Multi Screen allows you to display JPEG images that are in all directions using the 10-key pad on your...
...-: Rotates the image 90º counterclockwise DISPLAY: Displays information. With each press of the DISPLAY button, you can look at the pictures by using your remote control buttons. 123 4 6 789 5 Reset + Prev. BACK: Returns to the thumbnail screen MENU: Exit Notes: • When Multi Screen has more than one screen..., if you press the page number using the 10- key pad on your remote. Photo Viewer Multi Screen Multi Screen allows you to display JPEG images that are in all directions using the 10-key pad on your...
Instructions
Page 57
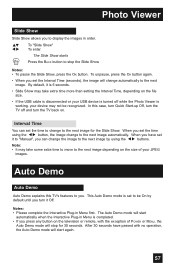
Interval Time You can change automatically to be recognized. Auto Demo Auto Demo Auto Demo explains this case, turn Quick Start-up Off, turn the TV off while the Photo Viewer is working, your JPEG images. When you set the time to change to the next image for 30 seconds. This ...Auto Demo mode is completed. • If you press any button on the television or remote, with no operation, the Auto Demo mode will stop the Slide Show Notes: • To pause the Slide Show, press the OK button. Photo Viewer...
Interval Time You can change automatically to be recognized. Auto Demo Auto Demo Auto Demo explains this case, turn Quick Start-up Off, turn the TV off while the Photo Viewer is working, your JPEG images. When you set the time to change to the next image for 30 seconds. This ...Auto Demo mode is completed. • If you press any button on the television or remote, with no operation, the Auto Demo mode will stop the Slide Show Notes: • To pause the Slide Show, press the OK button. Photo Viewer...

Instructions
Page 58
... and select it. Press the POWER button Number Buttons - 10Key Pad Use the number buttons on the remote, press the TUNE button. By using the SUB CH button, you press the number buttons on the remote control to move to sub channel 123-45: Press 1, 2 and 3 in order Press the SUB CH... button Press 4 and 5 in order Press the TUNE button 58 After you can select a sub channel easily. To watch sub channels Press the MODE button to select TV For example, to...
... and select it. Press the POWER button Number Buttons - 10Key Pad Use the number buttons on the remote, press the TUNE button. By using the SUB CH button, you press the number buttons on the remote control to move to sub channel 123-45: Press 1, 2 and 3 in order Press the SUB CH... button Press 4 and 5 in order Press the TUNE button 58 After you can select a sub channel easily. To watch sub channels Press the MODE button to select TV For example, to...

Instructions
Page 59
...currently onscreen. Now scan through the channels using JVC's Hyperscan feature, press and hold the RETURN+/TV button for three seconds. TV - buttons. button. • You can also access by pressing the INPUT button on the side of the TV instead of the remote. Volume +/- The channel currently active has ...been programmed as your return+ channel, press and hold CH+ or CH-. Press the RETURN+/TV You will appear. 59 The maximum is able to raise ...
...currently onscreen. Now scan through the channels using JVC's Hyperscan feature, press and hold the RETURN+/TV button for three seconds. TV - buttons. button. • You can also access by pressing the INPUT button on the side of the TV instead of the remote. Volume +/- The channel currently active has ...been programmed as your return+ channel, press and hold CH+ or CH-. Press the RETURN+/TV You will appear. 59 The maximum is able to raise ...
Instructions
Page 60
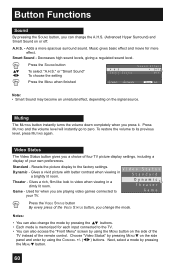
.... Choose "Video Status" by pressing MENU† on the side panel and enter by using the MENU button on the side of the TV instead of the remote control. Next, select a mode by using the CHANNEL buttons. Button Functions Sound By pressing the SOUND button, you can change the mode... by pressing the π† buttons. • Each mode is memorized for each input connected to the TV. • You can also change the A.H.S. (...
.... Choose "Video Status" by pressing MENU† on the side panel and enter by using the MENU button on the side of the TV instead of the remote control. Next, select a mode by using the CHANNEL buttons. Button Functions Sound By pressing the SOUND button, you can change the mode... by pressing the π† buttons. • Each mode is memorized for each input connected to the TV. • You can also change the A.H.S. (...
Instructions
Page 63
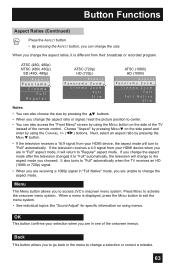
...choose the size by pressing the π† buttons. • When you are unable to access JVC's onscreen menu system. Press MENU to center. • You can also access the "Front Menu...television receives a 4:3 signal from your HDMI device, the aspect mode will return to "Full" automatically when the TV receives an HD (1080i or 720p) signal. • When you are receiving a 1080p signal in "Full...(Continued) Press the ASPECT button • By pressing the ASPECT button, you are in one of the remote control. ATSC (480i, 480p) NTSC (480i, 480p) SD (480i, 480p) Aspect Panorama Cinema Full...
...choose the size by pressing the π† buttons. • When you are unable to access JVC's onscreen menu system. Press MENU to center. • You can also access the "Front Menu...television receives a 4:3 signal from your HDMI device, the aspect mode will return to "Full" automatically when the TV receives an HD (1080i or 720p) signal. • When you are receiving a 1080p signal in "Full...(Continued) Press the ASPECT button • By pressing the ASPECT button, you are in one of the remote control. ATSC (480i, 480p) NTSC (480i, 480p) SD (480i, 480p) Aspect Panorama Cinema Full...

Instructions
Page 66
... basic functions of your external devices. TV STB VCR DVD AUDIO • The mode LED indicator on how to program the remote control to control JVC-brand devices. 66 See page 67 on the remote control lights for 3 seconds each time the remote control is preset to operate your other... devices. Note: • The remote is operated. MODE TV STB VCR DVD AUDIO Device TV STB/DVR (Cable Satellite...
... basic functions of your external devices. TV STB VCR DVD AUDIO • The mode LED indicator on how to program the remote control to control JVC-brand devices. 66 See page 67 on the remote control lights for 3 seconds each time the remote control is preset to operate your other... devices. Note: • The remote is operated. MODE TV STB VCR DVD AUDIO Device TV STB/DVR (Cable Satellite...
Instructions
Page 67
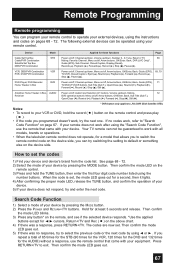
...JVC Only)*, Guide (EPG), Sub Channel, Closed Caption, Display (Recall), Rewind ( ), Playback ( ), Forward ( ), Record ( ), Stop ( ), Pause ( ). If your remote does not work with all models, brands or operations. • When the television remote control does not operate, for √ ® cursors, Return+/TV and Rec ( l ) on the remote... of your device by pressing the MODE button. 2) Press the POWER and RETURN+/TV buttons. When the code is set . Remote Programming Remote programming You can program your remote control to select the previous code or the next code by using √ or...
...JVC Only)*, Guide (EPG), Sub Channel, Closed Caption, Display (Recall), Rewind ( ), Playback ( ), Forward ( ), Record ( ), Stop ( ), Pause ( ). If your remote does not work with all models, brands or operations. • When the television remote control does not operate, for √ ® cursors, Return+/TV and Rec ( l ) on the remote... of your device by pressing the MODE button. 2) Press the POWER and RETURN+/TV buttons. When the code is set . Remote Programming Remote programming You can program your remote control to select the previous code or the next code by using √ or...


