Instructions
Page 13
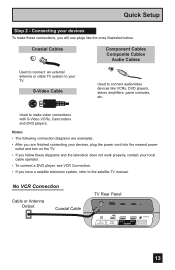
... consoles, etc. Quick Setup Step 2 - No VCR Connection Cable or Antenna Output Coaxial Cable TV Rear Panel 75 Ω (VHF/UHF) PHOTO VIEWER INPUT 1 SERVICE INPUT 2 DIGITAL AUDIO OPTICAL OUT 13 S-Video Cable Used to the satellite TV manual. Connecting your devices To make video connections with S-Video VCRs, Camcorders and DVD players. Notes...
... consoles, etc. Quick Setup Step 2 - No VCR Connection Cable or Antenna Output Coaxial Cable TV Rear Panel 75 Ω (VHF/UHF) PHOTO VIEWER INPUT 1 SERVICE INPUT 2 DIGITAL AUDIO OPTICAL OUT 13 S-Video Cable Used to the satellite TV manual. Connecting your devices To make video connections with S-Video VCRs, Camcorders and DVD players. Notes...
Instructions
Page 14
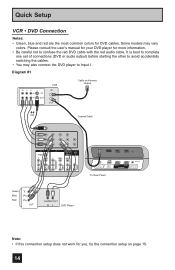
... INPUT 3 S-VIDEO Y VIDEO PB L PR R INPUT 4 INPUT 5 / INPUT 1 AUDIO AUDIO OUT Y VIDEO VIDEO PB L L L PR R R R 75 Ω (VHF/UHF) PHOTO VIEWER INPUT 1 SERVICE INPUT 2 DIGITAL AUDIO OPTICAL OUT TV Rear Panel Green Blue Red Y PB PR OUT AUDIO OUT R L DVD Player Note: • If this connection setup does not work for DVD...
... INPUT 3 S-VIDEO Y VIDEO PB L PR R INPUT 4 INPUT 5 / INPUT 1 AUDIO AUDIO OUT Y VIDEO VIDEO PB L L L PR R R R 75 Ω (VHF/UHF) PHOTO VIEWER INPUT 1 SERVICE INPUT 2 DIGITAL AUDIO OPTICAL OUT TV Rear Panel Green Blue Red Y PB PR OUT AUDIO OUT R L DVD Player Note: • If this connection setup does not work for DVD...
Instructions
Page 20
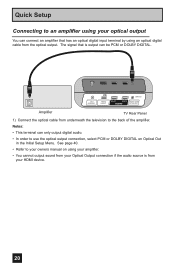
... Optical Output connection if the audio source is output can be PCM or DOLBY DIGITAL. 75 Ω (VHF/UHF) PHOTO VIEWER INPUT 1 SERVICE INPUT 2 DIGITAL AUDIO OPTICAL OUT Amplifier TV Rear Panel 1) Connect the optical cable from your optical output You can connect an amplifier that is from underneath the television to...
... Optical Output connection if the audio source is output can be PCM or DOLBY DIGITAL. 75 Ω (VHF/UHF) PHOTO VIEWER INPUT 1 SERVICE INPUT 2 DIGITAL AUDIO OPTICAL OUT Amplifier TV Rear Panel 1) Connect the optical cable from your optical output You can connect an amplifier that is from underneath the television to...
Instructions
Page 37
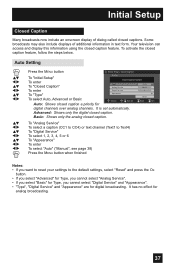
... select a caption (CC1 to CC4) or text channel (Text1 to Text4) To "Digital Service" To select 1, 2, 3, 4, 5 or 6 To "Appearance" To enter To select "Auto" ("Manual", see page 38) Press the MENU button when finished Notes: • If you want to reset your settings to the default settings, select "...Reset" and press the OK button. • If you select "Advanced" for Type, you cannot select "Analog Service". • If you select...
... select a caption (CC1 to CC4) or text channel (Text1 to Text4) To "Digital Service" To select 1, 2, 3, 4, 5 or 6 To "Appearance" To enter To select "Auto" ("Manual", see page 38) Press the MENU button when finished Notes: • If you want to reset your settings to the default settings, select "...Reset" and press the OK button. • If you select "Advanced" for Type, you cannot select "Analog Service". • If you select...


