Instructions
Page 18
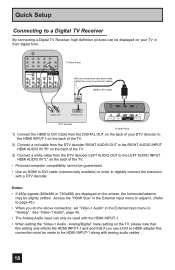
... (Refer to page 45.) • When you use a DVI to HDMI adapter this connection must be made , tighten the screw to "Analog". Quick Setup Connecting to a Digital TV Receiver By connecting a Digital TV Receiver, high definition pictures can only be used with analog audio cables....PB L PR R INPUT 4 INPUT 5 / INPUT 1 AUDIO AUDIO OUT Y VIDEO VIDEO PB L L L PR R R R TV Rear Panel After the connections have been made to the HDMI INPUT-1 along with the HDMI INPUT-1. • When setting the "Video-1 Audio - Notes: • If 480p signals (640x480 or 720x480) are displayed on...
... (Refer to page 45.) • When you use a DVI to HDMI adapter this connection must be made , tighten the screw to "Analog". Quick Setup Connecting to a Digital TV Receiver By connecting a Digital TV Receiver, high definition pictures can only be used with analog audio cables....PB L PR R INPUT 4 INPUT 5 / INPUT 1 AUDIO AUDIO OUT Y VIDEO VIDEO PB L L L PR R R R TV Rear Panel After the connections have been made to the HDMI INPUT-1 along with the HDMI INPUT-1. • When setting the "Video-1 Audio - Notes: • If 480p signals (640x480 or 720x480) are displayed on...
Instructions
Page 19
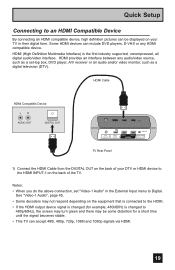
...(for a short time until the signal becomes stable. • This TV can be displayed on the back of your DTV or HDMI device to the HDMI INPUT-1 on your TV in the External Input menu to Digital. HDMI Cable HDMI Compatible Device LR AUDIO OUT DIGITAL OUT 75 Ω (VHF/UHF)... PHOTO VIEWER INPUT 1 SERVICE INPUT 2 DIGITAL AUDIO OPTICAL OUT TV Rear Panel 1) Connect the HDMI Cable from the DIGITAL OUT on the back of the TV. Quick Setup Connecting to an HDMI Compatible Device By connecting an HDMI compatible device, high definition pictures can accept 480i, 480p, 720p, 1080i ...
...(for a short time until the signal becomes stable. • This TV can be displayed on the back of your DTV or HDMI device to the HDMI INPUT-1 on your TV in the External Input menu to Digital. HDMI Cable HDMI Compatible Device LR AUDIO OUT DIGITAL OUT 75 Ω (VHF/UHF)... PHOTO VIEWER INPUT 1 SERVICE INPUT 2 DIGITAL AUDIO OPTICAL OUT TV Rear Panel 1) Connect the HDMI Cable from the DIGITAL OUT on the back of the TV. Quick Setup Connecting to an HDMI Compatible Device By connecting an HDMI compatible device, high definition pictures can accept 480i, 480p, 720p, 1080i ...
Instructions
Page 20
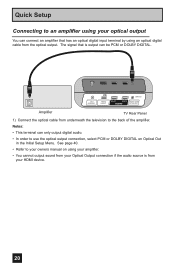
... DOLBY DIGITAL. 75 Ω (VHF/UHF) PHOTO VIEWER INPUT 1 SERVICE INPUT 2 DIGITAL AUDIO OPTICAL OUT Amplifier TV Rear Panel 1) Connect the optical cable from the optical output. Quick Setup Connecting to an amplifier using your HDMI device. 20 The signal that has an optical digital input terminal by using an optical digital...
... DOLBY DIGITAL. 75 Ω (VHF/UHF) PHOTO VIEWER INPUT 1 SERVICE INPUT 2 DIGITAL AUDIO OPTICAL OUT Amplifier TV Rear Panel 1) Connect the optical cable from the optical output. Quick Setup Connecting to an amplifier using your HDMI device. 20 The signal that has an optical digital input terminal by using an optical digital...

Instructions
Page 27
... Tuner Setup Channel Summary Find Channel Digital Antenna Level Tuner Diagnostic (Service Use Only) Select OK BACK MENU Operate Back Exit Tuner Setup External Input HDMI Size Video-1 Audio Video Input Label Auto Auto Select Operate Back Back Menu Exit External Input Picture Adjust Tint [ 00 ] R Color [+06 ] Picture[+10 ] ... Back Menu Exit Picture Adjust 1/3 Select Operate Back Back Menu Exit Picture Adjust 2/3 Select Operate Back Back Menu Exit Picture Adjust 3/3 Note: • The HDMI Size menu can only be displayed when a 480p picture signal is input to the...
... Tuner Setup Channel Summary Find Channel Digital Antenna Level Tuner Diagnostic (Service Use Only) Select OK BACK MENU Operate Back Exit Tuner Setup External Input HDMI Size Video-1 Audio Video Input Label Auto Auto Select Operate Back Back Menu Exit External Input Picture Adjust Tint [ 00 ] R Color [+06 ] Picture[+10 ] ... Back Menu Exit Picture Adjust 1/3 Select Operate Back Back Menu Exit Picture Adjust 2/3 Select Operate Back Back Menu Exit Picture Adjust 3/3 Note: • The HDMI Size menu can only be displayed when a 480p picture signal is input to the...

Instructions
Page 40
... DIGITAL decoder. If you have DOLBY DIGITAL decoder, select PCM. Quick Start-up Quick Start-up allows you to lessen the time for the TV to turn on . "Dolby", and the double-D symbol are trademarks of Dolby Laboratories. This only effects digital channels. Initial Setup Optical Out...digital broadcasts. If you select DOLBY DIGITAL, you can select the optical digital sound output, either PCM or DOLBY DIGITAL when your TV is from your HDMI device. Initial Setup Auto Shut Off Software Version Power Indicator Optical Out Quick Start-up Off Select Operate BACK Back MENU Exit ...
... DIGITAL decoder. If you have DOLBY DIGITAL decoder, select PCM. Quick Start-up Quick Start-up allows you to lessen the time for the TV to turn on . "Dolby", and the double-D symbol are trademarks of Dolby Laboratories. This only effects digital channels. Initial Setup Optical Out...digital broadcasts. If you select DOLBY DIGITAL, you can select the optical digital sound output, either PCM or DOLBY DIGITAL when your TV is from your HDMI device. Initial Setup Auto Shut Off Software Version Power Indicator Optical Out Quick Start-up Off Select Operate BACK Back MENU Exit ...
Instructions
Page 45
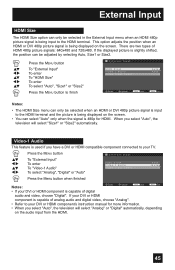
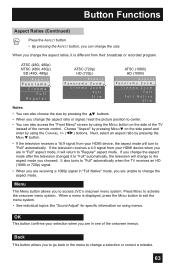
.... There are two types of digital audio and video, choose "Digital". Video-1 Audio This feature is used if you have a DVI or HDMI compatible component connected to your TV. π† √® π† √® Press the MENU button To "External Input" To enter To "Video-1 ...Audio" To select "Analog", "Digital" or "Auto" External Input HDMI Size Video-1 Audio Video Input Label Auto Auto Press the Menu button when &#...
.... There are two types of digital audio and video, choose "Digital". Video-1 Audio This feature is used if you have a DVI or HDMI compatible component connected to your TV. π† √® π† √® Press the MENU button To "External Input" To enter To "Video-1 ...Audio" To select "Analog", "Digital" or "Auto" External Input HDMI Size Video-1 Audio Video Input Label Auto Auto Press the Menu button when &#...

Instructions
Page 46
... enter To select the desired video input To select the desired preset input label (see chart below) Press the MENU button when finished External Input HDMI Size Video-1 Audio Video Input Label Select Operate Back Back Video Input Label Video-1 Video-2 Video-3 Video-4 Video-5 Reset Select Operate Back Back Auto Auto...
... enter To select the desired video input To select the desired preset input label (see chart below) Press the MENU button when finished External Input HDMI Size Video-1 Audio Video Input Label Select Operate Back Back Video Input Label Video-1 Video-2 Video-3 Video-4 Video-5 Reset Select Operate Back Back Auto Auto...
Instructions
Page 63
... to center. • You can change the size. Back This button allows you to access JVC's onscreen menu system. If the television receives a 4:3 signal from your selection when you can ...• See individual topics like "Sound Adjust" for specific information on the side of the TV instead of the onscreen menus. Button Functions Aspect Ratios (Continued) Press the ASPECT button •...turn to the aspect mode you change to "Full" automatically. OK This button confirms your HDMI device, the aspect mode will change the aspect mode after the television changed it is displayed...
... to center. • You can change the size. Back This button allows you to access JVC's onscreen menu system. If the television receives a 4:3 signal from your selection when you can ...• See individual topics like "Sound Adjust" for specific information on the side of the TV instead of the onscreen menus. Button Functions Aspect Ratios (Continued) Press the ASPECT button •...turn to the aspect mode you change to "Full" automatically. OK This button confirms your HDMI device, the aspect mode will change the aspect mode after the television changed it is displayed...
Instructions
Page 64
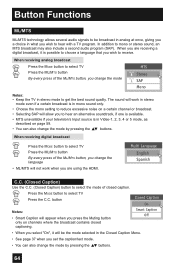
...pressing the π† buttons. Multi Language English Spanish C.C. (Closed Caption) Use the C.C. (Closed Caption) button to receive. In addition to select TV Press the C.C. The sound will work in stereo mode even if a certain broadcast is in Video-1, 2, 3, 4 or 5 mode, as described on...broadcast. • Selecting SAP will not work when you are receiving a digital broadcast, it will appear when you are using the HDMI. When you press the Muting button only on channels where the broadcast contains closed caption. When receiving digital broadcast Press the MODE ...
...pressing the π† buttons. Multi Language English Spanish C.C. (Closed Caption) Use the C.C. (Closed Caption) button to receive. In addition to select TV Press the C.C. The sound will work in stereo mode even if a certain broadcast is in Video-1, 2, 3, 4 or 5 mode, as described on...broadcast. • Selecting SAP will not work when you are receiving a digital broadcast, it will appear when you are using the HDMI. When you press the Muting button only on channels where the broadcast contains closed caption. When receiving digital broadcast Press the MODE ...
Instructions
Page 74
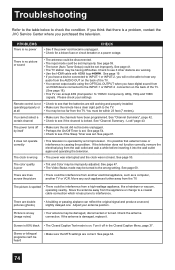
...TV. See page 59. • The tuner (Auto Tuner Setup) could be damaged, disconnected or turned. You cannot select a certain channel The power turns off in the Closed Caption Menu, page 37. It is possible that external noise or interference is a problem, contact the JVC...41. • The TV station may be heard • Make sure the MTS settings are still working . • Use the HDMI cable with HDMI logo . See "Channel ... and wait a while before inserting it . See "Channel Summary", page 42. • Check to interference. Check the antenna connection. Turn it off...
...TV. See page 59. • The tuner (Auto Tuner Setup) could be damaged, disconnected or turned. You cannot select a certain channel The power turns off in the Closed Caption Menu, page 37. It is possible that external noise or interference is a problem, contact the JVC...41. • The TV station may be heard • Make sure the MTS settings are still working . • Use the HDMI cable with HDMI logo . See "Channel ... and wait a while before inserting it . See "Channel Summary", page 42. • Check to interference. Check the antenna connection. Turn it off...

Instructions
Page 75
... make a creaking sound if the temperature of the room or the temperature of the inside of the TV simultaneously for a few seconds. You hear occasional • It is from the HDMI disappears except for the TV to feel static electricity if you select a digital menu when your external device to worry. • Although...
... make a creaking sound if the temperature of the room or the temperature of the inside of the TV simultaneously for a few seconds. You hear occasional • It is from the HDMI disappears except for the TV to feel static electricity if you select a digital menu when your external device to worry. • Although...
Instructions
Page 76
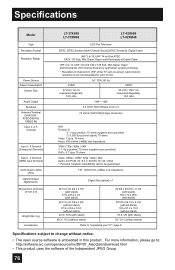
....jvc.com/opensource/lnx/DP/07_AtscQam/download.html • This product uses the software of the TV set . 210W 37 inch / 94 cm measured diagonally, 16:9 ratio AC 120V, 60 Hz 250W 42 ... ATSC/DIGITAL CABLE IN) Input 3, 4, 5 Terminal Input 3, 4 Terminal (Component Terminal) Input 1, 2 Terminal (HDMI Input Terminal) Audio Output Jacks (FIX) Optical Output Digital Audio Dimensions (inch/cm) W X H X D Weight ...(lbs / kg) Accessories LT-37X688 LT-37XM48 LT-42X688 LT-42XM48 LCD Flat Television NTSC, BTSC System (Multi-Channel Sound) ATSC Terrestrial, Digital Cable VHF 2 to 13, ...
....jvc.com/opensource/lnx/DP/07_AtscQam/download.html • This product uses the software of the TV set . 210W 37 inch / 94 cm measured diagonally, 16:9 ratio AC 120V, 60 Hz 250W 42 ... ATSC/DIGITAL CABLE IN) Input 3, 4, 5 Terminal Input 3, 4 Terminal (Component Terminal) Input 1, 2 Terminal (HDMI Input Terminal) Audio Output Jacks (FIX) Optical Output Digital Audio Dimensions (inch/cm) W X H X D Weight ...(lbs / kg) Accessories LT-37X688 LT-37XM48 LT-42X688 LT-42XM48 LCD Flat Television NTSC, BTSC System (Multi-Channel Sound) ATSC Terrestrial, Digital Cable VHF 2 to 13, ...
Instructions
Page 77
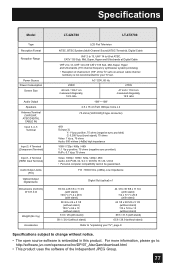
For more information, please go to: http://software.jvc.com/opensource/lnx/DP/07_AtscQam/download.html • This product uses the software of the TV set . 250W 42 inch / 106.7 cm measured diagonally, 16:9 ratio AC 120V, 60 Hz 275W 47 inch / 119.3 cm measured ...) Input 3, 4, 5 Terminal Input 3, 4 Terminal (Component Terminal) Input 1, 2 Terminal (HDMI Input Terminal) Audio Output Jacks (FIX) Optical Output Digital Audio Dimensions (inch/cm) W X H X D Weight (lbs / kg) Accessories LCD Flat Television NTSC, BTSC System (Multi-Channel Sound) ATSC Terrestrial, Digital Cable VHF 2 to ...
For more information, please go to: http://software.jvc.com/opensource/lnx/DP/07_AtscQam/download.html • This product uses the software of the TV set . 250W 42 inch / 106.7 cm measured diagonally, 16:9 ratio AC 120V, 60 Hz 275W 47 inch / 119.3 cm measured ...) Input 3, 4, 5 Terminal Input 3, 4 Terminal (Component Terminal) Input 1, 2 Terminal (HDMI Input Terminal) Audio Output Jacks (FIX) Optical Output Digital Audio Dimensions (inch/cm) W X H X D Weight (lbs / kg) Accessories LCD Flat Television NTSC, BTSC System (Multi-Channel Sound) ATSC Terrestrial, Digital Cable VHF 2 to ...


