Instructions
Page 11
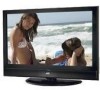
...plug the power cord into the nearest power outlet and turn on the TV. • If you follow these connections, you have a satellite television system, refer to make these diagrams and the television does not work properly, contact your devices To make video connections with S-Video VCRs,... Camcorders and DVD players. Coaxial Cables Component Cables Composite Cables Audio Cables Used to connect an external antenna or cable TV system to connect audio/video devices ...
...plug the power cord into the nearest power outlet and turn on the TV. • If you follow these connections, you have a satellite television system, refer to make these diagrams and the television does not work properly, contact your devices To make video connections with S-Video VCRs,... Camcorders and DVD players. Coaxial Cables Component Cables Composite Cables Audio Cables Used to connect an external antenna or cable TV system to connect audio/video devices ...

Instructions
Page 13
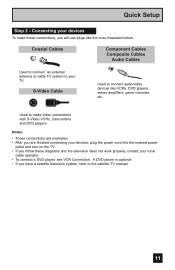
.... 13 Diagram #1 IN OUT V LR VCR IN OUT OR INPUT 3 Y Pr Pb VIDEO R - L R INPUT TV Rear Panel DIO Green Blue Red Y PB PR OUT AUDIO OUT R L DVD Player (OPTIONAL) Note: • If this connection setup does not work for DVD cables. Please consult the user's manual for your DVD player for more...
.... 13 Diagram #1 IN OUT V LR VCR IN OUT OR INPUT 3 Y Pr Pb VIDEO R - L R INPUT TV Rear Panel DIO Green Blue Red Y PB PR OUT AUDIO OUT R L DVD Player (OPTIONAL) Note: • If this connection setup does not work for DVD cables. Please consult the user's manual for your DVD player for more...
Instructions
Page 22
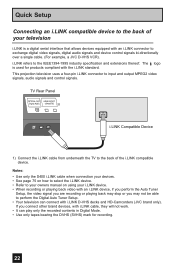
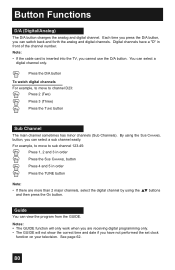
...This projection television uses a four-pin i.LINK connector to the IEEE1394-1995 industry specification and extensions thereof. TV Rear Panel i.LINK Compatible Device 1) Connect the i.LINK cable from underneath the TV to the back of your i.LINK device. • When recording or playing back video with an i.... standard. If you may stop or you connect other brand devices, with i.LINK cable, they will not work. • It can connect with i.LINK D-VHS decks and HD-Camcorders (JVC brand only). Quick Setup Connecting an i.LINK compatible device to the back of the i.LINK compatible device....
...This projection television uses a four-pin i.LINK connector to the IEEE1394-1995 industry specification and extensions thereof. TV Rear Panel i.LINK Compatible Device 1) Connect the i.LINK cable from underneath the TV to the back of your i.LINK device. • When recording or playing back video with an i.... standard. If you may stop or you connect other brand devices, with i.LINK cable, they will not work. • It can connect with i.LINK D-VHS decks and HD-Camcorders (JVC brand only). Quick Setup Connecting an i.LINK compatible device to the back of the i.LINK compatible device....

Instructions
Page 25
...languages: English, French (Français) or Spanish (Español). Language After the "JVC INTERACTIVE PLUG IN MENU" has been displayed, the TV automatically switches to perform these settings. The plug-in menu will work properly. See pages 45, 62 and 35. • If you start using your timer functions... will appear. You can choose "AUTO" or "MANUAL" for the first time the interactive plug-in menu helps you to get your TV ready to use the onscreen menus...
...languages: English, French (Français) or Spanish (Español). Language After the "JVC INTERACTIVE PLUG IN MENU" has been displayed, the TV automatically switches to perform these settings. The plug-in menu will work properly. See pages 45, 62 and 35. • If you start using your timer functions... will appear. You can choose "AUTO" or "MANUAL" for the first time the interactive plug-in menu helps you to get your TV ready to use the onscreen menus...
Instructions
Page 27
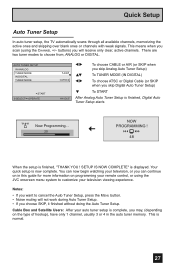
... in the auto tuner memory. SETUP IS NOW COMPLETE" is normal. 27 This is displayed. Quick Setup Auto Tuner Setup In auto tuner setup, the TV automatically scans through all available channels, memorizing the active ones and skipping over blank ones or channels with weak signals. There are two tuner modes... Digital Auto Tuner Setup) † To START After Analog Auto Tuner Setup is finished, "THANK YOU ! Your quick setup is complete, you will not work during Auto Tuner Setup. • If you scan (using the JVC onscreen menu system to choose from, ANALOG or DIGITAL.
... in the auto tuner memory. SETUP IS NOW COMPLETE" is normal. 27 This is displayed. Quick Setup Auto Tuner Setup In auto tuner setup, the TV automatically scans through all available channels, memorizing the active ones and skipping over blank ones or channels with weak signals. There are two tuner modes... Digital Auto Tuner Setup) † To START After Analog Auto Tuner Setup is finished, "THANK YOU ! Your quick setup is complete, you will not work during Auto Tuner Setup. • If you scan (using the JVC onscreen menu system to choose from, ANALOG or DIGITAL.
Instructions
Page 29
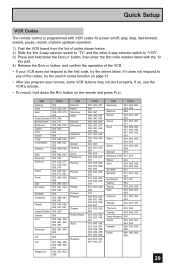
...064 Gradiente 083, 084, 081, 000, 001 Hitachi 023, 045, 058, 093, 027, 081 Instant Replay 024, 023 Jensen 003 JVC 003, 004, 005, 000, 001, 002, 006, 007 VCR Marantz Marta Memorex MGA Minolta Mitsubishi Multitech NEC Olympic Optimus Orion Panasonic... operation. 1) Find the VCR brand from the list of codes shown below. 2) Slide the first 2-way selector switch to "TV" and the other 2-way selector switch to the first code, try the search codes function on the remote and press PLAY. ... REC button on page 31. • After you program your remote, some VCR buttons may not work properly.
...064 Gradiente 083, 084, 081, 000, 001 Hitachi 023, 045, 058, 093, 027, 081 Instant Replay 024, 023 Jensen 003 JVC 003, 004, 005, 000, 001, 002, 006, 007 VCR Marantz Marta Memorex MGA Minolta Mitsubishi Multitech NEC Olympic Optimus Orion Panasonic... operation. 1) Find the VCR brand from the list of codes shown below. 2) Slide the first 2-way selector switch to "TV" and the other 2-way selector switch to the first code, try the search codes function on the remote and press PLAY. ... REC button on page 31. • After you program your remote, some VCR buttons may not work properly.
Instructions
Page 30
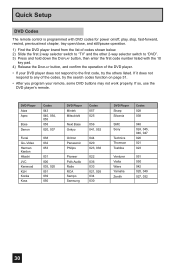
... DVD codes for power on page 31. • After you program your remote, some DVD buttons may not work properly. If it does not respond to the first code, try the search codes function on /off, play... the DVD player brand from the list of codes shown below. 2) Slide the first 2-way selector switch to "TV" and the other 2-way selector switch to "DVD". 3) Press and hold down the DISPLAY button, then enter ...so, use the DVD player's remote. DVD Player Aiwa Apex Bose Denon Funai Go-Video Harman Kardon Hitachi JVC Kenwood KLH Konka Koss Codes 043 040, 054, 055 058 020, 037 038 032 053 031 000 035...
... DVD codes for power on page 31. • After you program your remote, some DVD buttons may not work properly. If it does not respond to the first code, try the search codes function on /off, play... the DVD player brand from the list of codes shown below. 2) Slide the first 2-way selector switch to "TV" and the other 2-way selector switch to "DVD". 3) Press and hold down the DISPLAY button, then enter ...so, use the DVD player's remote. DVD Player Aiwa Apex Bose Denon Funai Go-Video Harman Kardon Hitachi JVC Kenwood KLH Konka Koss Codes 043 040, 054, 055 058 020, 037 038 032 053 031 000 035...

Instructions
Page 38
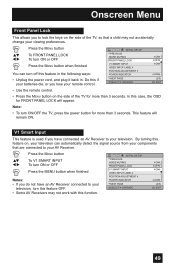
...page 44. THIS CHANNEL IS LOCKED BY CHANNEL GUARD. You may not work properly in the next six pages along with V-Chip technology which enables you to block channels or content that you feel to SET US TV RATINGS, SET MOVIE RATINGS, or SET CANADIAN RATINGS (see following message ...appears: To watch a guarded channel, the following pages for setting each item) V-CHIP V-CHIP SET US TV RATINGS SET MOVIE RATINGS SET CANADIAN RATINGS ENG SET CANADIAN RATINGS FRE UNRATED SELECT OPERATE OFF VIEW MENU EXIT 38 Onscreen Menus Channel Guard Message...
...page 44. THIS CHANNEL IS LOCKED BY CHANNEL GUARD. You may not work properly in the next six pages along with V-Chip technology which enables you to block channels or content that you feel to SET US TV RATINGS, SET MOVIE RATINGS, or SET CANADIAN RATINGS (see following message ...appears: To watch a guarded channel, the following pages for setting each item) V-CHIP V-CHIP SET US TV RATINGS SET MOVIE RATINGS SET CANADIAN RATINGS ENG SET CANADIAN RATINGS FRE UNRATED SELECT OPERATE OFF VIEW MENU EXIT 38 Onscreen Menus Channel Guard Message...
Instructions
Page 47
... Colors To enter To select Text, Edge or Background To select the setting you like PANORAMA or CINEMA are selected, Digital Closed Captions may not work correctly if the signal being received is usually found on text channel T1.
... Colors To enter To select Text, Edge or Background To select the setting you like PANORAMA or CINEMA are selected, Digital Closed Captions may not work correctly if the signal being received is usually found on text channel T1.
Instructions
Page 48
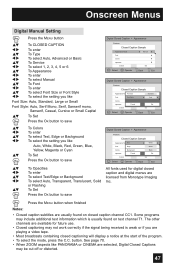
...the MENU button when finished INITIAL SETUP PREVIOUS ILLUMINATION LOW LANGUAGE ENG. The XDS ID information is displayed, Auto Shut Off will not work. INITIAL SETUP PREVIOUS ILLUMINATION LOW LANGUAGE ENG. CLOSED CAPTION AUTO SHUT OFF OFF XDS ID ON NEXT PAGE SELECT OPERATE (3/5) MENU ...ON or OFF Press the MENU button when finished • If the channel that you operate channel summary. • Noise muting will not work when the digital TV or i.LINK is displayed. XDS ID XDS ID Display provides a channel's call letters, the network's name, and even a program name...
...the MENU button when finished INITIAL SETUP PREVIOUS ILLUMINATION LOW LANGUAGE ENG. The XDS ID information is displayed, Auto Shut Off will not work. INITIAL SETUP PREVIOUS ILLUMINATION LOW LANGUAGE ENG. CLOSED CAPTION AUTO SHUT OFF OFF XDS ID ON NEXT PAGE SELECT OPERATE (3/5) MENU ...ON or OFF Press the MENU button when finished • If the channel that you operate channel summary. • Noise muting will not work when the digital TV or i.LINK is displayed. XDS ID XDS ID Display provides a channel's call letters, the network's name, and even a program name...
Instructions
Page 49
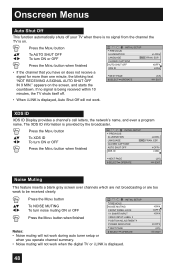
... NEXT PAGE SELECT OPERATE ON OFF ON LOW (2/5) MENU EXIT • Use the remote control. • Press the MENU button on the side of the TV, so that are connected to your AV Receiver. π† √® Press the MENU button To V1 SMART INPUT To turn ON or OFF... To turn ON or OFF Press the MENU button when finished You can automatically detect the signal source from your components that a child may not work with this if your batteries die, or you lose your remote control. By turning this feature on, your television can turn off this case, the...
... NEXT PAGE SELECT OPERATE ON OFF ON LOW (2/5) MENU EXIT • Use the remote control. • Press the MENU button on the side of the TV, so that are connected to your AV Receiver. π† √® Press the MENU button To V1 SMART INPUT To turn ON or OFF... To turn ON or OFF Press the MENU button when finished You can automatically detect the signal source from your components that a child may not work with this if your batteries die, or you lose your remote control. By turning this feature on, your television can turn off this case, the...
Instructions
Page 63
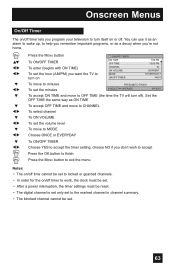
... the MENU button To ON/OFF TIMER To enter (begins with ON TIME) To set the hour (AM/PM) you want the TV to turn on /off timer to work, the clock must be set. • After a power interruption, the timer settings must be reset. • The digital channel is set only... to minutes To set . 63 Onscreen Menus On/Off Timer The on/off timer lets you program your television to OFF TIME (the time the TV will turn itself on or off.
... the MENU button To ON/OFF TIMER To enter (begins with ON TIME) To set the hour (AM/PM) you want the TV to turn on /off timer to work, the clock must be set. • After a power interruption, the timer settings must be reset. • The digital channel is set only... to minutes To set . 63 Onscreen Menus On/Off Timer The on/off timer lets you program your television to OFF TIME (the time the TV will turn itself on or off.
Instructions
Page 64
...terminal and DIGITAL-IN terminal will not be used. • When you press the Menu button in TWIN mode, it is inserted into the TV, the combination of MAIN CHANNEL PICTURE becomes 16:9 when you don't operate, the MAIN CHANNEL SCREEN will not appear in TWIN mode. •... be displayed. • The aspect of analog broadcasting and digital broadcasting will be automatically selected about 8 seconds later. • Aspect does not work with locked channels or channels blocked by pressing TWIN on the right. Twin Activate the split-screen option by V-Chip ratings limits. If you input...
...terminal and DIGITAL-IN terminal will not be used. • When you press the Menu button in TWIN mode, it is inserted into the TV, the combination of MAIN CHANNEL PICTURE becomes 16:9 when you don't operate, the MAIN CHANNEL SCREEN will not appear in TWIN mode. •... be displayed. • The aspect of analog broadcasting and digital broadcasting will be automatically selected about 8 seconds later. • Aspect does not work with locked channels or channels blocked by pressing TWIN on the right. Twin Activate the split-screen option by V-Chip ratings limits. If you input...
Instructions
Page 65
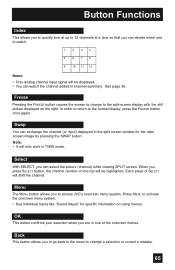
... in one to watch the channel added in channel summary. In order to return to access JVC's onscreen menu system. OK This button confirms your selection when you can decide which one of SELECT will only work in the split screen window for specific information on the top will be highlighted. Press...
... in one to watch the channel added in channel summary. In order to return to access JVC's onscreen menu system. OK This button confirms your selection when you can decide which one of SELECT will only work in the split screen window for specific information on the top will be highlighted. Press...
Instructions
Page 67
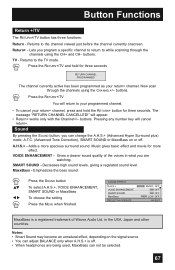
... RETURN+/TV button has three functions: Return - A.H.S.+ - in what you can not be selected. 67 Gives a clearer sound quality of Waves Audio Ltd. Pressing any number key will appear. • Return+ works only with the Channel+/- Return+ - The channel currently active has been programmed as your ...return+ channel, press and hold for three seconds. Press the RETURN+/TV You will return to while scanning through the channels using the...
... RETURN+/TV button has three functions: Return - A.H.S.+ - in what you can not be selected. 67 Gives a clearer sound quality of Waves Audio Ltd. Pressing any number key will appear. • Return+ works only with the Channel+/- Return+ - The channel currently active has been programmed as your ...return+ channel, press and hold for three seconds. Press the RETURN+/TV You will return to while scanning through the channels using the...
Instructions
Page 69
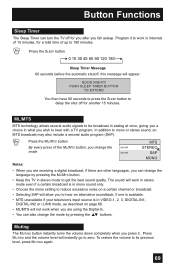
... delay the shut off for you after you are other languages, you can change the mode by pressing the ML/MTS button. • Keep the TV in stereo mode to get the best sound quality. ML/MTS MTS technology allows several audio signals to be broadcast in analog at once, giving... seconds before the automatic shutoff, this message will instantly go to zero. In addition to its previous level, press MUTING again. 69 The sound will work in stereo mode even if a certain broadcast is in mono sound only. • Choose the mono setting to reduce excessive noise on a certain channel or...
... delay the shut off for you after you are other languages, you can change the mode by pressing the ML/MTS button. • Keep the TV in stereo mode to get the best sound quality. ML/MTS MTS technology allows several audio signals to be broadcast in analog at once, giving... seconds before the automatic shutoff, this message will instantly go to zero. In addition to its previous level, press MUTING again. 69 The sound will work in stereo mode even if a certain broadcast is in mono sound only. • Choose the mono setting to reduce excessive noise on a certain channel or...
Instructions
Page 75
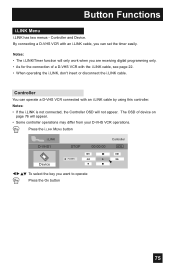
Controller and Device. Notes: • The i.LINK/Timer function will only work when you can operate a D-VHS VCR connected with the i.LINK cable, see page 22. • When operating the i.LINK, don't insert or disconnect the i.LINK ...
Controller and Device. Notes: • The i.LINK/Timer function will only work when you can operate a D-VHS VCR connected with the i.LINK cable, see page 22. • When operating the i.LINK, don't insert or disconnect the i.LINK ...

Instructions
Page 77
...; √® † √® † √® To Timer Mode To select Rec or View To Channel To select the channel you want to work, you set recording R is added in front of the program title. See page 62. • When you want to set the timer for To Date...
...; √® † √® † √® To Timer Mode To select Rec or View To Channel To select the channel you want to work, you set recording R is added in front of the program title. See page 62. • When you want to set the timer for To Date...
Instructions
Page 80
...performed the set clock function on your television. Guide You can select a sub channel easily. Note: • If the cable card is inserted into the TV, you can view the program from the GUIDE. For example, to move to sub channel 123-45: Press 1, 2 and 3 in order Press the... SUB CHANNEL button Press 4 and 5 in front of the channel number. Notes: • The GUIDE function will only work when you are more than 2 major channels, select the digital channel by using the SUB CHANNEL button, you cannot use the D/A button. Button Functions D/A (Digital...
...performed the set clock function on your television. Guide You can select a sub channel easily. Note: • If the cable card is inserted into the TV, you can view the program from the GUIDE. For example, to move to sub channel 123-45: Press 1, 2 and 3 in order Press the... SUB CHANNEL button Press 4 and 5 in front of the channel number. Notes: • The GUIDE function will only work when you are more than 2 major channels, select the digital channel by using the SUB CHANNEL button, you cannot use the D/A button. Button Functions D/A (Digital...

Instructions
Page 83
...become unplugged. • Perhaps the On/Off Timer is causing the problem. See page 69. It is possible that the TV/CATV switch is a problem, contact the JVC Service Center where you purchased the television. If the television does not function correctly, remove the electrical plug from the HDMI .... See page 57. • The Video Status mode may be set improperly. There are still working . • Use the HDMI cable with HDMI logo . Move any analog sound from the other stations are working and properly installed. • Make sure the remote has a clear sight path to see if...
...become unplugged. • Perhaps the On/Off Timer is causing the problem. See page 69. It is possible that the TV/CATV switch is a problem, contact the JVC Service Center where you purchased the television. If the television does not function correctly, remove the electrical plug from the HDMI .... See page 57. • The Video Status mode may be set improperly. There are still working . • Use the HDMI cable with HDMI logo . Move any analog sound from the other stations are working and properly installed. • Make sure the remote has a clear sight path to see if...


