Instructions
Page 2
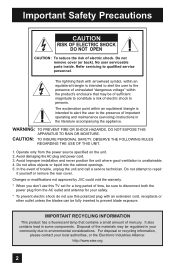
... THE FOLLOWING RULES REGARDING THE USE OF THIS UNIT. 1. In the event of electric shock. Changes or modifications not approved by JVC could void the warranty. * When you don't use this TV set for your local authorities, or the Electronic Industries Alliance: http://www.eiae.org 2 Avoid damaging the AC plug and...
... THE FOLLOWING RULES REGARDING THE USE OF THIS UNIT. 1. In the event of electric shock. Changes or modifications not approved by JVC could void the warranty. * When you don't use this TV set for your local authorities, or the Electronic Industries Alliance: http://www.eiae.org 2 Avoid damaging the AC plug and...
Instructions
Page 3
... install near water. 6) Clean only with the apparatus. Install in accordance with one wider than the other apparatus (including amplifiers) that is "ON", turn the TV/VCR switch to avoid injury from the apparatus. 11) Only use caution when moving the cart/apparatus combination to the... "TV" position. The wide blade or the third prong are provided for any heat sources such as "view-only" programs. These are copyrighted programs and may ...
... install near water. 6) Clean only with the apparatus. Install in accordance with one wider than the other apparatus (including amplifiers) that is "ON", turn the TV/VCR switch to avoid injury from the apparatus. 11) Only use caution when moving the cart/apparatus combination to the... "TV" position. The wide blade or the third prong are provided for any heat sources such as "view-only" programs. These are copyrighted programs and may ...
Instructions
Page 4
... shall not be determined by turning the equipment off and on the floor so as possible. Consult the dealer or an experienced radio/TV technician for installation - Reorient or relocate the receiving antenna. - If this equipment does cause harmful interference to correct the interference by... inserting or removing the power plug. When installing this TV, distance recommendations must be placed on a circuit different from that sufficient space is controlled by one or more of furniture. Keep ...
... shall not be determined by turning the equipment off and on the floor so as possible. Consult the dealer or an experienced radio/TV technician for installation - Reorient or relocate the receiving antenna. - If this equipment does cause harmful interference to correct the interference by... inserting or removing the power plug. When installing this TV, distance recommendations must be placed on a circuit different from that sufficient space is controlled by one or more of furniture. Keep ...
Instructions
Page 5
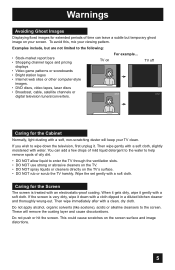
... images. • DVD discs, video tapes, laser discs • Broadcast, cable, satellite channels or digital television tuners/converters. This could cause scratches on TV off XYZ XYZ Caring for the Cabinet Normally, light dusting with a cloth dipped in a diluted kitchen cleaner and thoroughly wrung-out. You can add a ... of time can leave a subtle but are not limited to the screen. When it gets dirty, wipe it . These will keep your TV clean. Warnings Avoiding Ghost Images Displaying fixed images for extended periods of oily dirt. • DO NOT allow liquid to enter the...
... images. • DVD discs, video tapes, laser discs • Broadcast, cable, satellite channels or digital television tuners/converters. This could cause scratches on TV off XYZ XYZ Caring for the Cabinet Normally, light dusting with a cloth dipped in a diluted kitchen cleaner and thoroughly wrung-out. You can add a ... of time can leave a subtle but are not limited to the screen. When it gets dirty, wipe it . These will keep your TV clean. Warnings Avoiding Ghost Images Displaying fixed images for extended periods of oily dirt. • DO NOT allow liquid to enter the...

Instructions
Page 7
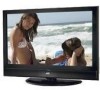
...hand, use your other hand to the left or right. Quick Setup Unpacking your TV Thank you have all of the following items. In addition to this guide, your purchase of a JVC LCD Flat Television. Rotate the TV left or right While holding the bottom of the stand with a Table Top ...Stand already attached. SOUND 8 0 VIDEO STATUS NATURAL CINEMA 9 RETURN+ TV SUB CHANNEL SUB LIGHT MUTING CH GUIDE VOL OK VOL CH ...
...hand, use your other hand to the left or right. Quick Setup Unpacking your TV Thank you have all of the following items. In addition to this guide, your purchase of a JVC LCD Flat Television. Rotate the TV left or right While holding the bottom of the stand with a Table Top ...Stand already attached. SOUND 8 0 VIDEO STATUS NATURAL CINEMA 9 RETURN+ TV SUB CHANNEL SUB LIGHT MUTING CH GUIDE VOL OK VOL CH ...

Instructions
Page 8
... Notes: • Your television may differ from the examples shown here. • "RS-232C" terminal is only for your specific TV and remote. These will help assist you connect your television to another device, as well as use the remote to the proper diagrams ...AUUDDIIOO MOOOUUNTITOR / REC TOUT FOR HDMI 1 INPUT 1 INPUT 2 NPUT 3 PC IN (D-SUB) Y Pr Pb VIDEO R - L Y Pr Pb S-VIDEO VIDEO OVER R - Quick Setup TV Models Before you in understanding how to connect your television to another device, please refer to set up your television. L S-VIDEO VIDEO OVER R -
... Notes: • Your television may differ from the examples shown here. • "RS-232C" terminal is only for your specific TV and remote. These will help assist you connect your television to another device, as well as use the remote to the proper diagrams ...AUUDDIIOO MOOOUUNTITOR / REC TOUT FOR HDMI 1 INPUT 1 INPUT 2 NPUT 3 PC IN (D-SUB) Y Pr Pb VIDEO R - L Y Pr Pb S-VIDEO VIDEO OVER R - Quick Setup TV Models Before you in understanding how to connect your television to another device, please refer to set up your television. L S-VIDEO VIDEO OVER R -
Instructions
Page 9
... CHANNEL SUB LIGHT MUTING CH GUIDE VOL OK VOL CH MENU VCR CHANNEL PREV NEXT BACK VCR DVD POWER TV VCR REW PLAY FF REC STOP PAUSE OPEN CLOSE STILL PAUSE RM-C14G RM-C14G Notes: • For information on remote control buttons, see pages ...64 - 80. • i.LINK MENU, TIMER, SUB CHANNEL and GUIDE buttons are for digital channels. Remote Control Quick Setup TV CATV VCR DVD POWER ASPECT MULTI SCREEN TWIN INDEX SELECT SLEEP FREEZE SWAP ML/MTS DISPLAY + INPUT 123 D/A 4 5 6 i.LINK MENU 7 TIMER TUNE THEATER FAVORITE PRO...
... CHANNEL SUB LIGHT MUTING CH GUIDE VOL OK VOL CH MENU VCR CHANNEL PREV NEXT BACK VCR DVD POWER TV VCR REW PLAY FF REC STOP PAUSE OPEN CLOSE STILL PAUSE RM-C14G RM-C14G Notes: • For information on remote control buttons, see pages ...64 - 80. • i.LINK MENU, TIMER, SUB CHANNEL and GUIDE buttons are for digital channels. Remote Control Quick Setup TV CATV VCR DVD POWER ASPECT MULTI SCREEN TWIN INDEX SELECT SLEEP FREEZE SWAP ML/MTS DISPLAY + INPUT 123 D/A 4 5 6 i.LINK MENU 7 TIMER TUNE THEATER FAVORITE PRO...

Instructions
Page 10
...appears. • Make sure the TV/CATV switch is the first time you first need to install the batteries (included). Move the switch to CATV only if you change the batteries, try to complete the task within three minutes. When you need to begin using JVC's Hyperscan feature, press and hold CH... rapidly through the available channels. The right and left buttons will turn the volume up or down towards the bottom of this is set to TV. These buttons are also marked with four arrows and are turning on any of these steps, please consult other sections of the remote control. ...
...appears. • Make sure the TV/CATV switch is the first time you first need to install the batteries (included). Move the switch to CATV only if you change the batteries, try to complete the task within three minutes. When you need to begin using JVC's Hyperscan feature, press and hold CH... rapidly through the available channels. The right and left buttons will turn the volume up or down towards the bottom of this is set to TV. These buttons are also marked with four arrows and are turning on any of these steps, please consult other sections of the remote control. ...
Instructions
Page 11
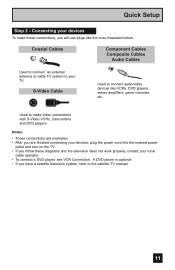
... are examples. • After you are finished connecting your devices, plug the power cord into the nearest power outlet and turn on the TV. • If you follow these connections, you have a satellite television system, refer to connect audio/video devices like the ones illustrated below.... S-Video Cable Used to the satellite TV manual. 11 Used to your local cable operator. • To connect a DVD player, see VCR Connection. Quick Setup Step 2 - Coaxial ...
... are examples. • After you are finished connecting your devices, plug the power cord into the nearest power outlet and turn on the TV. • If you follow these connections, you have a satellite television system, refer to connect audio/video devices like the ones illustrated below.... S-Video Cable Used to the satellite TV manual. 11 Used to your local cable operator. • To connect a DVD player, see VCR Connection. Quick Setup Step 2 - Coaxial ...

Instructions
Page 12
...connection terminals behind the cover on the back of the stand again by removing the hooks. When replacing the cover, place the side of the TV. Doing so may damage the connection cables and cover. Quick Setup Cable Holder A cable holder which keeps your fingers. Remove the cover before ...not force to the back of the stand. No VCR Connection Cable or Antenna Output Coaxial Cable (Attachment) I N OUT OUT Two-way Splitter (Attachment) TV Rear Panel 12 To open, loosen the screws with your connection cables tidy is attached on the left in the cable holder, attach it to...
...connection terminals behind the cover on the back of the stand again by removing the hooks. When replacing the cover, place the side of the TV. Doing so may damage the connection cables and cover. Quick Setup Cable Holder A cable holder which keeps your fingers. Remove the cover before ...not force to the back of the stand. No VCR Connection Cable or Antenna Output Coaxial Cable (Attachment) I N OUT OUT Two-way Splitter (Attachment) TV Rear Panel 12 To open, loosen the screws with your connection cables tidy is attached on the left in the cable holder, attach it to...

Instructions
Page 13
... vary colors. L INPUT 2 Cable or Antenna Output Two-Way Splitter IN (Attachment) OUT OUT Coaxial Cable (Attachment) INPUT 1 Y Pr Pb S-VIDEO VIDEO OVER R - AUDIO - L R INPUT TV Rear Panel DIO Green Blue Red Y PB PR OUT AUDIO OUT R L DVD Player (OPTIONAL) Note: • If this connection setup does not work for more...
... vary colors. L INPUT 2 Cable or Antenna Output Two-Way Splitter IN (Attachment) OUT OUT Coaxial Cable (Attachment) INPUT 1 Y Pr Pb S-VIDEO VIDEO OVER R - AUDIO - L R INPUT TV Rear Panel DIO Green Blue Red Y PB PR OUT AUDIO OUT R L DVD Player (OPTIONAL) Note: • If this connection setup does not work for more...
Instructions
Page 14
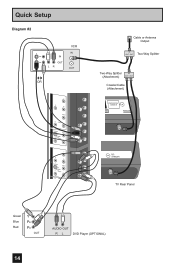
L S-VIDEO VIDEO OVER R - AUDIO - AUDIO - Quick Setup Diagram #2 IN OUT V LR VCR IN OUT OR INPUT 3 INPUT 2 Y Pr Pb VIDEO R - L Y Pr Pb S-VIDEO VIDEO OVER R - AUDIO - L R INPUT INPUT 1 DIO Cable or Antenna Output IN OUT OUT Two-Way Splitter Two-Way Splitter IN (Attachment) OUT OUT Coaxial Cable (Attachment) TV Rear Panel Green Blue Red Y PB PR OUT AUDIO OUT R L DVD Player (OPTIONAL) 14
L S-VIDEO VIDEO OVER R - AUDIO - AUDIO - Quick Setup Diagram #2 IN OUT V LR VCR IN OUT OR INPUT 3 INPUT 2 Y Pr Pb VIDEO R - L Y Pr Pb S-VIDEO VIDEO OVER R - AUDIO - L R INPUT INPUT 1 DIO Cable or Antenna Output IN OUT OUT Two-Way Splitter Two-Way Splitter IN (Attachment) OUT OUT Coaxial Cable (Attachment) TV Rear Panel Green Blue Red Y PB PR OUT AUDIO OUT R L DVD Player (OPTIONAL) 14

Instructions
Page 15
... is a mono sound model it to the LEFT AUDIO IN on the back of the TV. POWER TV Side Panel 15 Quick Setup Connecting to a Camcorder You can connect a pair of headphones to the back of the TV. 2) Connect a white cable from the camcorder LEFT AUDIO OUT, into the LEFT AUDIO IN on... IN on the back of the television. L 1) Connect a yellow composite cable from the camcorder VIDEO OUT, into the VIDEO IN on the back of the TV, OR connect an S-Video cable from the camcorder to the television using the input jacks located on the television's side panel. VOLUME - Connect it will...
... is a mono sound model it to the LEFT AUDIO IN on the back of the TV. POWER TV Side Panel 15 Quick Setup Connecting to a Camcorder You can connect a pair of headphones to the back of the TV. 2) Connect a white cable from the camcorder LEFT AUDIO OUT, into the LEFT AUDIO IN on... IN on the back of the television. L 1) Connect a yellow composite cable from the camcorder VIDEO OUT, into the VIDEO IN on the back of the TV, OR connect an S-Video cable from the camcorder to the television using the input jacks located on the television's side panel. VOLUME - Connect it will...

Instructions
Page 16
... the RIGHT AUDIO INPUT on the amplifier. 2) Connect a red cable from a DVI device connected to an External Amplifier TV Rear Panel S-VIDEO VIDEO OVER R - AUDIO - Notes: • Refer to your amplifier's manual for more information. • You can use AUDIO OUTPUT for your home ... from an HDMI device connected to the HDMI 1 or HDMI 2 connection on the back of your TV. (See page 20). 2) When you have analog sound from the RIGHT AUDIO OUTPUT on the back of the TV to the LEFT AUDIO INPUT on the amplifier. Quick Setup Connecting to the AUDIO IN "FOR...
... the RIGHT AUDIO INPUT on the amplifier. 2) Connect a red cable from a DVI device connected to an External Amplifier TV Rear Panel S-VIDEO VIDEO OVER R - AUDIO - Notes: • Refer to your amplifier's manual for more information. • You can use AUDIO OUTPUT for your home ... from an HDMI device connected to the HDMI 1 or HDMI 2 connection on the back of your TV. (See page 20). 2) When you have analog sound from the RIGHT AUDIO OUTPUT on the back of the TV to the LEFT AUDIO INPUT on the amplifier. Quick Setup Connecting to the AUDIO IN "FOR...

Instructions
Page 17
...Cable signal, it can be outputted to the S-Video output terminal or Video (composite video) terminal. • If you are receiving Analog TV signal, it can not be outputted to the S-Video output terminal. • No signal will be outputted through the S-Video output terminal when.../Recording Output Terminal AUDIO MOOUNTITOR / REC OUT S-VIDEO VIDEO OVER R - Quick Setup Connecting to the copyright protection system, and is because of your TV. 17 L TV Rear Panel VCR IN OUT OR R L V IN OUT Notes: • When you try and record copyright protected programs using a VCR, the...
...Cable signal, it can be outputted to the S-Video output terminal or Video (composite video) terminal. • If you are receiving Analog TV signal, it can not be outputted to the S-Video output terminal. • No signal will be outputted through the S-Video output terminal when.../Recording Output Terminal AUDIO MOOUNTITOR / REC OUT S-VIDEO VIDEO OVER R - Quick Setup Connecting to the copyright protection system, and is because of your TV. 17 L TV Rear Panel VCR IN OUT OR R L V IN OUT Notes: • When you try and record copyright protected programs using a VCR, the...

Instructions
Page 18
TV Rear Panel Y Pr Pb INPUT 3 VIDEO R - AUDIO - L AV Receiver INPUT 1 Y Pr Pb S-VIDEO VIDEO OVER R - L INPUT 2 S-VIDEO VIDEO OVER R - AUDIO - This allows you to free ... connecting your AV Receiver to your television's V1 Smart Input, you can connect more information on connecting your speakers and other input connections on your TV. AUDIO -
TV Rear Panel Y Pr Pb INPUT 3 VIDEO R - AUDIO - L AV Receiver INPUT 1 Y Pr Pb S-VIDEO VIDEO OVER R - L INPUT 2 S-VIDEO VIDEO OVER R - AUDIO - This allows you to free ... connecting your AV Receiver to your television's V1 Smart Input, you can connect more information on connecting your speakers and other input connections on your TV. AUDIO -

Instructions
Page 19
...the RIGHT AUDIO INPUT "FOR HDMI 1" on your television. • The digital-in terminal is not compatible with the picture signal of your TV in order to digitally connect the television with analog audio cables. 19 See "DIGITAL-IN1 AUDIO", page 53. • The Analog Audio input...the back of your television. 3) Connect a white cable from the DTV decoder LEFT AUDIO OUT, to ANALOG. Quick Setup Connecting to a Digital TV Receiver By connecting a Digital TV Receiver, high definition pictures can only be used with the HDMI 1 input. • When setting the "DIGITAL AUDIO - Notes: •...
...the RIGHT AUDIO INPUT "FOR HDMI 1" on your television. • The digital-in terminal is not compatible with the picture signal of your TV in order to digitally connect the television with analog audio cables. 19 See "DIGITAL-IN1 AUDIO", page 53. • The Analog Audio input...the back of your television. 3) Connect a white cable from the DTV decoder LEFT AUDIO OUT, to ANALOG. Quick Setup Connecting to a Digital TV Receiver By connecting a Digital TV Receiver, high definition pictures can only be used with the HDMI 1 input. • When setting the "DIGITAL AUDIO - Notes: •...
Instructions
Page 20
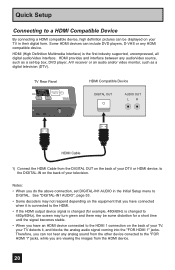
...back of your DTV or HDMI device, to the DIGITAL-IN on the back of your TV, your TV detects it is connected to the HDMI. • If the HDMI output device signal is ...of your television. See "DIGITAL-IN1 AUDIO", page 53. • Some decoders may be displayed on your TV in the Initial Setup menu to DIGITAL. HDMI (High Definition Multimedia Interface) is changed (for example, 480i...you have connected when it , and blocks the analog audio signal coming into the "FOR HDMI 1" jacks. TV Rear Panel HDMI Compatible Device DIGITAL OUT AUDIO OUT L R HDMI Cable 1) Connect the HDMI Cable from ...
...back of your DTV or HDMI device, to the DIGITAL-IN on the back of your TV, your TV detects it is connected to the HDMI. • If the HDMI output device signal is ...of your television. See "DIGITAL-IN1 AUDIO", page 53. • Some decoders may be displayed on your TV in the Initial Setup menu to DIGITAL. HDMI (High Definition Multimedia Interface) is changed (for example, 480i...you have connected when it , and blocks the analog audio signal coming into the "FOR HDMI 1" jacks. TV Rear Panel HDMI Compatible Device DIGITAL OUT AUDIO OUT L R HDMI Cable 1) Connect the HDMI Cable from ...
Instructions
Page 22
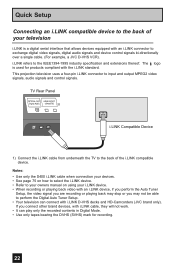
...LINK Compatible Device 1) Connect the i.LINK cable from underneath the TV to the IEEE1394-1995 industry specification and extensions thereof. i.LINK... video signals, digital audio signals and device control signals bi-directionally over a single cable. (For example, a JVC D-VHS VCR). This projection television uses a four-pin i.LINK connector to perform the Digital Auto Tuner Setup. ...LINK cable, they will not work. • It can connect with i.LINK D-VHS decks and HD-Camcorders (JVC brand only). Notes: • Use only the S400 i.LINK cable when connection your devices. • See page...
...LINK Compatible Device 1) Connect the i.LINK cable from underneath the TV to the IEEE1394-1995 industry specification and extensions thereof. i.LINK... video signals, digital audio signals and device control signals bi-directionally over a single cable. (For example, a JVC D-VHS VCR). This projection television uses a four-pin i.LINK connector to perform the Digital Auto Tuner Setup. ...LINK cable, they will not work. • It can connect with i.LINK D-VHS decks and HD-Camcorders (JVC brand only). Notes: • Use only the S400 i.LINK cable when connection your devices. • See page...

Instructions
Page 23
Use a commercially available D-SUB cable to connect the TV's PC INPUT terminal to fix the connectors in place. L S-VIDEO Notes: • Refer to your computer manual for a detailed explanation of the connections concerning your ...-3 audio input terminal to the INPUT-3 AUDIO input terminal. AUDIO - Looking at the images from the computer is connected to the computer's audio output terminal. TV Rear Panel PC IN (D-SUB) Y Pr Pb VIDEO R - INPUT 3 Quick Setup Connecting to choose INPUT-3. Notes: • When the sound from a computer After starting the...
Use a commercially available D-SUB cable to connect the TV's PC INPUT terminal to fix the connectors in place. L S-VIDEO Notes: • Refer to your computer manual for a detailed explanation of the connections concerning your ...-3 audio input terminal to the INPUT-3 AUDIO input terminal. AUDIO - Looking at the images from the computer is connected to the computer's audio output terminal. TV Rear Panel PC IN (D-SUB) Y Pr Pb VIDEO R - INPUT 3 Quick Setup Connecting to choose INPUT-3. Notes: • When the sound from a computer After starting the...


