

Instructions
Page 2
...plug and power cord. 3. Disposal of electric shock to prevent blade exposure. Do not attempt to qualified service personnel. WARNING: TO PREVENT FIRE OR SHOCK HAZARDS, DO NOT EXPOSE THIS TV SET TO RAIN OR MOISTURE. No user serviceable parts inside. Changes or modifications not approved by JVC could void the warranty. * When you don't use this polarized plug... of important operating and maintenance (servicing) instructions in the literature accompanying the appliance. The exclamation point within the product's enclosure that contains a small amount of trouble, unplug the...
...plug and power cord. 3. Disposal of electric shock to prevent blade exposure. Do not attempt to qualified service personnel. WARNING: TO PREVENT FIRE OR SHOCK HAZARDS, DO NOT EXPOSE THIS TV SET TO RAIN OR MOISTURE. No user serviceable parts inside. Changes or modifications not approved by JVC could void the warranty. * When you don't use this polarized plug... of important operating and maintenance (servicing) instructions in the literature accompanying the appliance. The exclamation point within the product's enclosure that contains a small amount of trouble, unplug the...
Instructions
Page 3
.../accessories specified by the manufacturer. 12) Use only with a cart, stand, tripod, bracket, or table specified by the manufacturer, or sold with the manufacturer's instructions. 8) Do not install near water. 6) Clean only with one wider than the other apparatus (including amplifiers) that this apparatus near any ventilation openings. A polarized plug has two blades with dry cloth. 7) Do...
.../accessories specified by the manufacturer. 12) Use only with a cart, stand, tripod, bracket, or table specified by the manufacturer, or sold with the manufacturer's instructions. 8) Do not install near water. 6) Clean only with one wider than the other apparatus (including amplifiers) that this apparatus near any ventilation openings. A polarized plug has two blades with dry cloth. 7) Do...
Instructions
Page 7
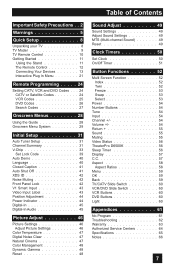
... 5 Quick Setup 8 Unpacking your TV 8 TV Model 9 TV Remote Control 10 Getting Started 11 Using the Stand 11 The Remote Control 12 Connecting Your Devices 13 Interactive Plug In Menu 21 Remote Programming . . . . . 24 Setting CATV, VCR and DVD Codes . . . 24 CATV or Satellite Codes 24 VCR Codes 25 DVD Codes 26 Search Codes 27 Onscreen Menus 28 Using the Guide 28 Onscreen Menu System 29 Initial Setup 31 Auto Tuner Setup 31 Channel Summary 31 V-Chip 33 Set Lock Code 39 Auto Demo 40 Language 40 Closed Caption 41 Auto Shut...
... 5 Quick Setup 8 Unpacking your TV 8 TV Model 9 TV Remote Control 10 Getting Started 11 Using the Stand 11 The Remote Control 12 Connecting Your Devices 13 Interactive Plug In Menu 21 Remote Programming . . . . . 24 Setting CATV, VCR and DVD Codes . . . 24 CATV or Satellite Codes 24 VCR Codes 25 DVD Codes 26 Search Codes 27 Onscreen Menus 28 Using the Guide 28 Onscreen Menu System 29 Initial Setup 31 Auto Tuner Setup 31 Channel Summary 31 V-Chip 33 Set Lock Code 39 Auto Demo 40 Language 40 Closed Caption 41 Auto Shut...

Instructions
Page 8
... INPUT DISPLAY 123 SLEEP TIMER 4 5 6 SOUND 7 VIDEO STATUS TUNE 89 0 RETURN+ THEATER PRO ASPECT LIGHT MUTING OK CH + VOL - S-Video Cable Component Cables Composite Cables Audio Cables Used to your TV. To make video connections with your television. Coaxial Cables Used to connect an external antenna or cable TV system to connect audio/ video devices like the ones illustrated below. We recommend that before you start using your new television, you read your entire User's Guide so you will use with S-Video VCRs, Camcorders and DVD players. MENU...
... INPUT DISPLAY 123 SLEEP TIMER 4 5 6 SOUND 7 VIDEO STATUS TUNE 89 0 RETURN+ THEATER PRO ASPECT LIGHT MUTING OK CH + VOL - S-Video Cable Component Cables Composite Cables Audio Cables Used to your TV. To make video connections with your television. Coaxial Cables Used to connect an external antenna or cable TV system to connect audio/ video devices like the ones illustrated below. We recommend that before you start using your new television, you read your entire User's Guide so you will use with S-Video VCRs, Camcorders and DVD players. MENU...

Instructions
Page 9
... R - These will help assist you connect your television to another device, as well as use the remote to the proper diagrams for your television. AUDIO - AUDIO - AUDIO - L S-VIDEO VIDEO R - L VIDEO R - Quick Setup TV Model NOTE: Before you in understanding how to connect your television to another device, please refer to set up your specific TV and remote. AUDIO - L R L 75Ω (UHF/VHF) DIGITAL-IN (7U5HΩF/VHF) DIGITAL-IN INPUT 3 INPUT 1 COMPONENT DIGITAL IN AUDIO R L AUDIO OUT Side Panel Diagram INPUT MENU POWER + CHANNEL OPERATE + VOLUME -
... R - These will help assist you connect your television to another device, as well as use the remote to the proper diagrams for your television. AUDIO - AUDIO - AUDIO - L S-VIDEO VIDEO R - L VIDEO R - Quick Setup TV Model NOTE: Before you in understanding how to connect your television to another device, please refer to set up your specific TV and remote. AUDIO - L R L 75Ω (UHF/VHF) DIGITAL-IN (7U5HΩF/VHF) DIGITAL-IN INPUT 3 INPUT 1 COMPONENT DIGITAL IN AUDIO R L AUDIO OUT Side Panel Diagram INPUT MENU POWER + CHANNEL OPERATE + VOLUME -

Instructions
Page 10
FREEZE SWAP SELECT INPUT DISPLAY 1 2 3 SLEEP TIMER 4 5 6 SOUND 7 VIDEO STATUS TUNE 89 0 RETURN+ THEATER PRO ASPECT LIGHT MUTING OK CH + VOL - VOL + CH - MENU BACK VCR CHANNEL VCR/DVD PREV NEXT POWER TV/VCR REW REC PLAY FF STOP PAUSE OPEN/CLOSE STILL/PAUSE RM-C1257G TV RM-C1257G Note: • For information on remote control buttons, see pages 52 - 60. 10 Quick Setup TV Remote Control TV CATV VCR DVD POWER MULTI SCREEN TWIN INDEX C.C.
FREEZE SWAP SELECT INPUT DISPLAY 1 2 3 SLEEP TIMER 4 5 6 SOUND 7 VIDEO STATUS TUNE 89 0 RETURN+ THEATER PRO ASPECT LIGHT MUTING OK CH + VOL - VOL + CH - MENU BACK VCR CHANNEL VCR/DVD PREV NEXT POWER TV/VCR REW REC PLAY FF STOP PAUSE OPEN/CLOSE STILL/PAUSE RM-C1257G TV RM-C1257G Note: • For information on remote control buttons, see pages 52 - 60. 10 Quick Setup TV Remote Control TV CATV VCR DVD POWER MULTI SCREEN TWIN INDEX C.C.
Instructions
Page 12
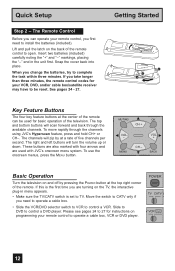
.... • Make sure the TV/CATV switch is the first time you take longer than three minutes, the remote control codes for instructions on the back of the television. To move rapidly through the available channels. When you can be reset. To use the onscreen menus, press the MENU button. The Remote Control Before you change the batteries, try to control a DVD player. If this is set to operate a cable box, VCR or DVD player.
.... • Make sure the TV/CATV switch is the first time you take longer than three minutes, the remote control codes for instructions on the back of the television. To move rapidly through the available channels. When you can be reset. To use the onscreen menus, press the MENU button. The Remote Control Before you change the batteries, try to control a DVD player. If this is set to operate a cable box, VCR or DVD player.
Instructions
Page 15
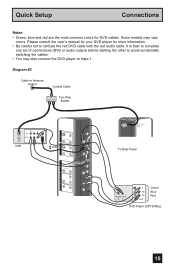
...'s manual for your DVD player for DVD cables. L S-VIDEO VIDEO R - L INPUT 3 INPUT 1 COMPONENT VIDEO R - AUDIO - Quick Setup Connections Notes: • Green, blue and red are the most common colors for more information. • Be careful not to confuse the red DVD cable with the red audio cable. L DIGITAL IN AUDIO R L (7U5HΩF/VHF) TV Rear Panel DIGITAL-IN AUDIO OUT R L Y Green PB Blue PR Red OUT DVD Player (OPTIONAL) UDIO OUT 15 It is best to complete one set of connections (DVD or audio output) before starting the other to Input 1. AUDIO - Some models...
...'s manual for your DVD player for DVD cables. L S-VIDEO VIDEO R - L INPUT 3 INPUT 1 COMPONENT VIDEO R - AUDIO - Quick Setup Connections Notes: • Green, blue and red are the most common colors for more information. • Be careful not to confuse the red DVD cable with the red audio cable. L DIGITAL IN AUDIO R L (7U5HΩF/VHF) TV Rear Panel DIGITAL-IN AUDIO OUT R L Y Green PB Blue PR Red OUT DVD Player (OPTIONAL) UDIO OUT 15 It is best to complete one set of connections (DVD or audio output) before starting the other to Input 1. AUDIO - Some models...
Instructions
Page 18
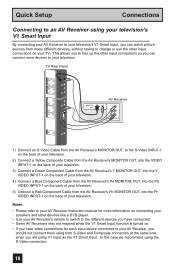
... television. Quick Setup Connections Connecting to an AV Receiver using the S-Video connection. 18 L S-VIDEO VIDEO R - Notes: • Please refer to your AV Receiver instruction manual for more devices to change or use the other input connections so you can watch picture sources from the AV Receiver's PB MONITOR OUT, into the Y VIDEO INPUT-1 on the back of your television. 4) Connect a Blue Component Cable from many different devices, without having to your TV. L Y Pr Pb R - AUDIO - L VIDEO R - This allows you to free...
... television. Quick Setup Connections Connecting to an AV Receiver using the S-Video connection. 18 L S-VIDEO VIDEO R - Notes: • Please refer to your AV Receiver instruction manual for more devices to change or use the other input connections so you can watch picture sources from the AV Receiver's PB MONITOR OUT, into the Y VIDEO INPUT-1 on the back of your television. 4) Connect a Blue Component Cable from many different devices, without having to your TV. L Y Pr Pb R - AUDIO - L VIDEO R - This allows you to free...

Instructions
Page 19
... digitally connect the television with a DTV decoder. AUDIO - Quick Setup Connections Connecting to a Digital TV Receiver By connecting a Digital TV Receiver, high definition pictures can be slightly shifted. See "DIGITAL-IN AUDIO", page 45. 19 L VIDEO R - AUDIO - Notes: • If 480p signals (640x480 or 720x480) are displayed on the screen, the horizontal balance may be displayed on the back of a personal computer. • Use a HDMI to DVI cable (commercially available) in the Initial Setup menu to ANALOG. AUDIO - INPUT (7U5HΩF/VHF) TV Rear Panel DIGITAL...
... digitally connect the television with a DTV decoder. AUDIO - Quick Setup Connections Connecting to a Digital TV Receiver By connecting a Digital TV Receiver, high definition pictures can be slightly shifted. See "DIGITAL-IN AUDIO", page 45. 19 L VIDEO R - AUDIO - Notes: • If 480p signals (640x480 or 720x480) are displayed on the screen, the horizontal balance may be displayed on the back of a personal computer. • Use a HDMI to DVI cable (commercially available) in the Initial Setup menu to ANALOG. AUDIO - INPUT (7U5HΩF/VHF) TV Rear Panel DIGITAL...

Instructions
Page 20
... audio/video source, such as a set DIGITAL-IN AUDIO in their digital form. HDMI Compatible Device (7U5HΩF/VHF) DIGITAL OUT AUDIO OUT LR DIGITAL-IN HDMI Cable 1) Connect the HDMI Cable from the DIGITAL OUT on the back of your television. HDMI provides and interface between any HDMI compatible device. Quick Setup Connections Connecting to the DIGITAL-IN on your TV in the Initial Setup menu to DIGITAL. Note: • When you do the above connection, set -top box, DVD player, A/V receiver or an audio and/or video monitor...
... audio/video source, such as a set DIGITAL-IN AUDIO in their digital form. HDMI Compatible Device (7U5HΩF/VHF) DIGITAL OUT AUDIO OUT LR DIGITAL-IN HDMI Cable 1) Connect the HDMI Cable from the DIGITAL OUT on the back of your television. HDMI provides and interface between any HDMI compatible device. Quick Setup Connections Connecting to the DIGITAL-IN on your TV in the Initial Setup menu to DIGITAL. Note: • When you do the above connection, set -top box, DVD player, A/V receiver or an audio and/or video monitor...

Instructions
Page 22
... the first Sunday in October. • You will have to reset the clock after a power interruption. SET CLOCK MODE TIME TIME ZONE D.S.T. Quick Setup Plug-In Menu Auto Clock Set Before you use any of your TV's timer functions, you must first set your clock using the XDS time signal broadcast by most public broadcasting stations. You may precisely set the clock. If you do not have this in your...
... the first Sunday in October. • You will have to reset the clock after a power interruption. SET CLOCK MODE TIME TIME ZONE D.S.T. Quick Setup Plug-In Menu Auto Clock Set Before you use any of your TV's timer functions, you must first set your clock using the XDS time signal broadcast by most public broadcasting stations. You may precisely set the clock. If you do not have this in your...

Instructions
Page 28
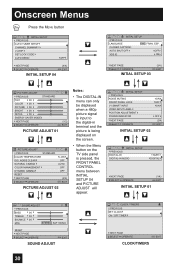
... AUTO TUNER SETUP CHANNEL SUMMARY V-CHIP SET LOCK CODE AUTO DEMO OFF NEXT PAGE SELECT OPERATE (4/4) MENU EXIT Note: • Menus shown in a menu screen) The "press button" icon means you use the Menu button on the TV's front panel instead of your new television. To bring up the onscreen menu, press the MENU button on your remote control. (Button names appear in SMALL CAPITAL LETTERS.) The "helping arrow" icon points to correct an error • Scan through a submenu screen...
... AUTO TUNER SETUP CHANNEL SUMMARY V-CHIP SET LOCK CODE AUTO DEMO OFF NEXT PAGE SELECT OPERATE (4/4) MENU EXIT Note: • Menus shown in a menu screen) The "press button" icon means you use the Menu button on the TV's front panel instead of your new television. To bring up the onscreen menu, press the MENU button on your remote control. (Button names appear in SMALL CAPITAL LETTERS.) The "helping arrow" icon points to correct an error • Scan through a submenu screen...
Instructions
Page 30
... MENU button INITIAL SETUP PREVIOUS AUTO TUNER SETUP CHANNEL SUMMARY V-CHIP SET LOCK CODE AUTO DEMO OFF NEXT PAGE SELECT OPERATE (4/4) MENU EXIT INITIAL SETUP 04 INITIAL SETUP PREVIOUS LANGUAGE ENG. FRAN. NOISE CLEAR NATURAL CINEMA COLOR MANAGEMENT DYNAMIC GAMMA RESET NEXT PAGE SELECT OPERATE LOW OFF AUTO OFF OFF (2/2) MENU EXIT PICTURE ADJUST 02 Notes: • The DIGITAL-IN menu can only be displayed when a 480p picture signal is input to the digital-in terminal and the picture is being displayed...
... MENU button INITIAL SETUP PREVIOUS AUTO TUNER SETUP CHANNEL SUMMARY V-CHIP SET LOCK CODE AUTO DEMO OFF NEXT PAGE SELECT OPERATE (4/4) MENU EXIT INITIAL SETUP 04 INITIAL SETUP PREVIOUS LANGUAGE ENG. FRAN. NOISE CLEAR NATURAL CINEMA COLOR MANAGEMENT DYNAMIC GAMMA RESET NEXT PAGE SELECT OPERATE LOW OFF AUTO OFF OFF (2/2) MENU EXIT PICTURE ADJUST 02 Notes: • The DIGITAL-IN menu can only be displayed when a 480p picture signal is input to the digital-in terminal and the picture is being displayed...

Instructions
Page 32
Press the MENU button π† To CHANNEL SUMMARY √® To operate π†√® To the Lock Column ( ) Press the ZERO button to set the channel label. Initial Setup How to lock or unlock that channel Press the MENU button when finished 32 Press the MENU button π† √® π† To CHANNEL SUMMARY To operate To the ID column √® π†...
Press the MENU button π† To CHANNEL SUMMARY √® To operate π†√® To the Lock Column ( ) Press the ZERO button to set the channel label. Initial Setup How to lock or unlock that channel Press the MENU button when finished 32 Press the MENU button π† √® π† To CHANNEL SUMMARY To operate To the ID column √® π†...

Instructions
Page 33
... the V-Chip settings of your television to match your V-Chip settings You can use any or all of the settings (US V-Chip, Canada V-Chip, Movie ratings). NO. - - - - V-Chip Your TV is turned off. • See also "Set Lock Code", page 39. To access the rating categories: Press the MENU button π† √® To V-CHIP To operate (Lock icon will flash on video signals from Canada), and...
... the V-Chip settings of your television to match your V-Chip settings You can use any or all of the settings (US V-Chip, Canada V-Chip, Movie ratings). NO. - - - - V-Chip Your TV is turned off. • See also "Set Lock Code", page 39. To access the rating categories: Press the MENU button π† √® To V-CHIP To operate (Lock icon will flash on video signals from Canada), and...

Instructions
Page 56
... by using the CHANNEL +/- Press the THEATERPRO button Sleep Timer The Sleep Timer can also access the FRONT PANEL CONTROL screen by using the MENU button on the side panel and choose a mode by pressing MENU† on the side of the TV instead of the VIDEO STATUS button, you change the mode. Program it to work in intervals of 15 minutes, for when you are playing video games connected to the factory settings. Gives a vivid picture with better contrast when viewing...
... by using the CHANNEL +/- Press the THEATERPRO button Sleep Timer The Sleep Timer can also access the FRONT PANEL CONTROL screen by using the MENU button on the side panel and choose a mode by pressing MENU† on the side of the TV instead of the VIDEO STATUS button, you change the mode. Program it to work in intervals of 15 minutes, for when you are playing video games connected to the factory settings. Gives a vivid picture with better contrast when viewing...

Instructions
Page 60
... lower part of your remote for information on for the TV/CATV slide switch, VCR/DVD slide switch and Light button. Notes: • The remote is preset with the code 000 to control JVC-brand DVD players. Button Functions TV/CATV Slide Switch Use either the television's own tuner or a cable box to operate the television's built-in tuner. Set this remote control to turn the illumination on programming your VCR. VCR/DVD Slide Switch You can use this switch to TV to select channels. VCR Buttons...
... lower part of your remote for information on for the TV/CATV slide switch, VCR/DVD slide switch and Light button. Notes: • The remote is preset with the code 000 to control JVC-brand DVD players. Button Functions TV/CATV Slide Switch Use either the television's own tuner or a cable box to operate the television's built-in tuner. Set this remote control to turn the illumination on programming your VCR. VCR/DVD Slide Switch You can use this switch to TV to select channels. VCR Buttons...
Instructions
Page 62
... 56. Adjust your antenna position. Screen is 40% black • The Closed Caption Text mode is on or off in the proper position. • You may be too far from the TV. See "MTS" on page 49. • It is normal to the wrong setting. The AUTO DEMO • The On Timer that the TV/CATV switch is in the Closed Caption Menu, page 41. See "Channel Summary...
... 56. Adjust your antenna position. Screen is 40% black • The Closed Caption Text mode is on or off in the proper position. • You may be too far from the TV. See "MTS" on page 49. • It is normal to the wrong setting. The AUTO DEMO • The On Timer that the TV/CATV switch is in the Closed Caption Menu, page 41. See "Channel Summary...
Instructions
Page 65
...) C: 0.286 Vp-p (burst signal), 75 ohms Audio Output Jacks (FIX) FIX: 500mVrms (-4dBs) Low impedance (1000 Hz when modulated 100%) Digital-In Headphone Jack Dimensions (in) W x H x D (cm) HDMI jack x 1 Note: The Digital-In terminal is not recommended for your TV set 's on-screen cable channel numbers) is not compatible with picture signals of the TV set . 65 Specifications Model Type Reception Format Reception Range Power Source LT-26X585 LT-26X575 LT-32X585 LT-32X575 LCD Flat Television NTSC, BTSC System (Multi-Channel Sound) HDTV digital broadcast ready VHF...
...) C: 0.286 Vp-p (burst signal), 75 ohms Audio Output Jacks (FIX) FIX: 500mVrms (-4dBs) Low impedance (1000 Hz when modulated 100%) Digital-In Headphone Jack Dimensions (in) W x H x D (cm) HDMI jack x 1 Note: The Digital-In terminal is not recommended for your TV set 's on-screen cable channel numbers) is not compatible with picture signals of the TV set . 65 Specifications Model Type Reception Format Reception Range Power Source LT-26X585 LT-26X575 LT-32X585 LT-32X575 LCD Flat Television NTSC, BTSC System (Multi-Channel Sound) HDTV digital broadcast ready VHF...


