
Instructions
Page 2
...good ventilation is intended to alert the user to persons. Do not attempt to prevent blade exposure. Changes or modifications not approved by JVC could void the warranty. * When you don't use this polarized plug with arrowhead symbol, within an equilateral triangle is intended to alert... due to qualified service personnel. For disposal or recycling information, please contact your safety. * To prevent electric shock do not use this TV set for your local authorities, or the Electronic Industries Alliance: http://www.eiae.org 2 Operate only from the AC outlet and antenna for...
...good ventilation is intended to alert the user to persons. Do not attempt to prevent blade exposure. Changes or modifications not approved by JVC could void the warranty. * When you don't use this polarized plug with arrowhead symbol, within an equilateral triangle is intended to alert... due to qualified service personnel. For disposal or recycling information, please contact your safety. * To prevent electric shock do not use this TV set for your local authorities, or the Electronic Industries Alliance: http://www.eiae.org 2 Operate only from the AC outlet and antenna for...

Instructions
Page 4
...damaged in a corner on the apparatus. 16) Avoid improper installation and never position the unit where good ventilation is available around the TV to qualified service personnel. Keep to keep cords out of heat during lightning storms or when unused for long periods of furniture. POWER... mm INPUT MENU + CHANNEL - When installing this apparatus during operation. Ensure that sufficient space is impossible. OPERATE + VOLUME - Install the TV in any way, such as power-supply cord or plug is damaged, liquid has been spilled or objects have fallen into the apparatus, the...
...damaged in a corner on the apparatus. 16) Avoid improper installation and never position the unit where good ventilation is available around the TV to qualified service personnel. Keep to keep cords out of heat during lightning storms or when unused for long periods of furniture. POWER... mm INPUT MENU + CHANNEL - When installing this apparatus during operation. Ensure that sufficient space is impossible. OPERATE + VOLUME - Install the TV in any way, such as power-supply cord or plug is damaged, liquid has been spilled or objects have fallen into the apparatus, the...

Instructions
Page 5
... organic solvents (like acetone), acidic or alkaline cleansers to the screen. This could cause scratches on TV off XYZ XYZ Caring for the Cabinet Normally, light dusting with an electrostatic-proof coating. TV on the screen surface and image distortions. 5 You can add a few drops of mild liquid ...out. Wipe the set gently with water. When it gets dirty, wipe it . Do not push or hit the screen. These will keep your TV clean. Then wipe immediately after with a soft cloth. To avoid this, mix your screen. Examples include, but temporary ghost image on your viewing ...
... organic solvents (like acetone), acidic or alkaline cleansers to the screen. This could cause scratches on TV off XYZ XYZ Caring for the Cabinet Normally, light dusting with an electrostatic-proof coating. TV on the screen surface and image distortions. 5 You can add a few drops of mild liquid ...out. Wipe the set gently with water. When it gets dirty, wipe it . Do not push or hit the screen. These will keep your TV clean. Then wipe immediately after with a soft cloth. To avoid this, mix your screen. Examples include, but temporary ghost image on your viewing ...

Instructions
Page 6
Hold the bottom of the stand with your hand and tilt the TV up or down . 6 The TV may become trapped under the TV, causing injuries. Warnings (Continued...) How to tilt up or down . Hold the TV at the bottom in the middle, and do not allow the TV to move the cabinet Your fingers may fall causing injuries.
Hold the bottom of the stand with your hand and tilt the TV up or down . 6 The TV may become trapped under the TV, causing injuries. Warnings (Continued...) How to tilt up or down . Hold the TV at the bottom in the middle, and do not allow the TV to move the cabinet Your fingers may fall causing injuries.

Instructions
Page 7
Table of Contents Important Safety Precautions . . 2 Warnings 5 Quick Setup 8 Unpacking your TV 8 TV Model 9 TV Remote Control 10 Getting Started 11 Using the Stand 11 The Remote Control 12 Connecting Your Devices 13 Auto Tuner Setup 18 Remote Programming . . . . . 19 ... 45 Input 45 Display 46 Sleep Timer 46 Sound 47 Video Status 47 TheaterPro D6500K 47 OK 47 Back 47 Aspect 48 Aspect Ratios 48 TV/CATV Slide Switch 49 VCR/DVD Slide Switch 49 VCR Buttons 49 DVD Buttons 49 Appendices 50 No Program 50 Troubleshooting 51 Warranty 52 Authorized...
Table of Contents Important Safety Precautions . . 2 Warnings 5 Quick Setup 8 Unpacking your TV 8 TV Model 9 TV Remote Control 10 Getting Started 11 Using the Stand 11 The Remote Control 12 Connecting Your Devices 13 Auto Tuner Setup 18 Remote Programming . . . . . 19 ... 45 Input 45 Display 46 Sleep Timer 46 Sound 47 Video Status 47 TheaterPro D6500K 47 OK 47 Back 47 Aspect 48 Aspect Ratios 48 TV/CATV Slide Switch 49 VCR/DVD Slide Switch 49 VCR Buttons 49 DVD Buttons 49 Appendices 50 No Program 50 Troubleshooting 51 Warranty 52 Authorized...

Instructions
Page 8
...S-Video Cable Component Cables Composite Cables Audio Cables Used to make these connections you want to your television box should include: 1 Television 1 Remote Control TV CATV VCR DVD POWER INPUT DISPLAY 1 SLEEP TIMER 4 SOUND 7 VIDEO STATUS 100+ THEATER PRO ASPECT 23 56 89 0 RETURN+ MUTING OK CH...DVD players. MENU BACK VCR CHANNEL VCR/DVD PREV NEXT POWER TV/VCR REW REC PLAY FF STOP PAUSE STILL/PAUSE RM-C1271G TV AA Alkaline AA Alkaline Two AA Batteries Once you have all of a JVC LCD Flat Television. To make video connections with your new television's ...
...S-Video Cable Component Cables Composite Cables Audio Cables Used to make these connections you want to your television box should include: 1 Television 1 Remote Control TV CATV VCR DVD POWER INPUT DISPLAY 1 SLEEP TIMER 4 SOUND 7 VIDEO STATUS 100+ THEATER PRO ASPECT 23 56 89 0 RETURN+ MUTING OK CH...DVD players. MENU BACK VCR CHANNEL VCR/DVD PREV NEXT POWER TV/VCR REW REC PLAY FF STOP PAUSE STILL/PAUSE RM-C1271G TV AA Alkaline AA Alkaline Two AA Batteries Once you have all of a JVC LCD Flat Television. To make video connections with your new television's ...

Instructions
Page 9
Rear Panel Diagram AUDIO OUT INPUT 3 INPUT 2 L - R L I VIDEO AUDIO I R VIDEO SVIDEO L I AUDIO I R VIDEO SVIDEO L I AUDIO I R INPUT 1 Y Pb Pr 75Ω (VHF/UHF) In the rear cover Side Panel Diagram INPUT MENU + CHANNEL - + VOLUME - These will help assist you connect your television to another device, as well as use the remote to the proper diagrams for your television. Quick Setup TV Model NOTE: Before you in understanding how to connect your television to another device, please refer to set up your specific TV and remote. POWER OPERATE 9 AUDIO -
Rear Panel Diagram AUDIO OUT INPUT 3 INPUT 2 L - R L I VIDEO AUDIO I R VIDEO SVIDEO L I AUDIO I R VIDEO SVIDEO L I AUDIO I R INPUT 1 Y Pb Pr 75Ω (VHF/UHF) In the rear cover Side Panel Diagram INPUT MENU + CHANNEL - + VOLUME - These will help assist you connect your television to another device, as well as use the remote to the proper diagrams for your television. Quick Setup TV Model NOTE: Before you in understanding how to connect your television to another device, please refer to set up your specific TV and remote. POWER OPERATE 9 AUDIO -

Instructions
Page 10
VOL + CH - MENU BACK VCR CHANNEL VCR/DVD PREV NEXT POWER TV/VCR REW REC PLAY FF STOP PAUSE STILL/PAUSE RM-C1271G TV RM-C1271G Note: • For information on remote control buttons, see pages 44 - 49. 10 Quick Setup TV Remote Control TV CATV VCR DVD POWER INPUT DISPLAY 1 SLEEP TIMER 4 SOUND 7 VIDEO STATUS 100+ THEATER PRO ASPECT 23 56 89 0 RETURN+ MUTING OK CH + VOL -
VOL + CH - MENU BACK VCR CHANNEL VCR/DVD PREV NEXT POWER TV/VCR REW REC PLAY FF STOP PAUSE STILL/PAUSE RM-C1271G TV RM-C1271G Note: • For information on remote control buttons, see pages 44 - 49. 10 Quick Setup TV Remote Control TV CATV VCR DVD POWER INPUT DISPLAY 1 SLEEP TIMER 4 SOUND 7 VIDEO STATUS 100+ THEATER PRO ASPECT 23 56 89 0 RETURN+ MUTING OK CH + VOL -
Instructions
Page 11
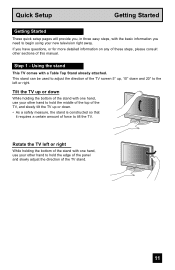
... or right. Step 1 - This stand can be used to adjust the direction of the TV screen 5° up or down While holding the bottom of the stand with one hand,... to begin using your other hand to hold the middle of the top of the TV, and slowly tilt the TV up or down and 20° to tilt the TV. Tilt the TV up , 10° down . • As a safety measure, the stand ... one hand, use your other hand to hold the edge of the panel and slowly adjust the direction of the TV stand. 11 Quick Setup Getting Started Getting Started These quick setup pages will provide you, in three easy steps, ...
... or right. Step 1 - This stand can be used to adjust the direction of the TV screen 5° up or down While holding the bottom of the stand with one hand,... to begin using your other hand to hold the middle of the top of the TV, and slowly tilt the TV up or down and 20° to tilt the TV. Tilt the TV up , 10° down . • As a safety measure, the stand ... one hand, use your other hand to hold the edge of the panel and slowly adjust the direction of the TV stand. 11 Quick Setup Getting Started Getting Started These quick setup pages will provide you, in three easy steps, ...

Instructions
Page 12
... remote control codes for your remote control to operate a cable box, VCR or DVD player. To use the onscreen menus, press the MENU button. POWER TV CATV V V VCR DVD 12 Insert two batteries (included) carefully noting the "+" and "-" markings, placing the "-" end in the unit first. Getting Started... the batteries (included). The right and left buttons will scan forward and back through the channels using JVC's Hyperscan feature, press and hold CH+ or CH-. These buttons are also marked with JVC's onscreen menu system. VOL + CH - Lift and pull the latch on and off by at ...
... remote control codes for your remote control to operate a cable box, VCR or DVD player. To use the onscreen menus, press the MENU button. POWER TV CATV V V VCR DVD 12 Insert two batteries (included) carefully noting the "+" and "-" markings, placing the "-" end in the unit first. Getting Started... the batteries (included). The right and left buttons will scan forward and back through the channels using JVC's Hyperscan feature, press and hold CH+ or CH-. These buttons are also marked with JVC's onscreen menu system. VOL + CH - Lift and pull the latch on and off by at ...
Instructions
Page 13
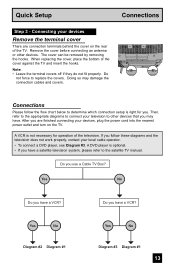
...the television does not work properly, contact your devices, plug the power cord into the nearest power outlet and turn on the rear of the TV. Then, refer to the appropriate diagrams to connect your television to determine which connection setup is not necessary for you have a VCR? A VCR... television system, please refer to replace the covers. After you may damage the connection cables and covers. Do not force to the satellite TV manual. Remove the cover before connecting an antenna or other devices that you are connection terminals behind the cover on the...
...the television does not work properly, contact your devices, plug the power cord into the nearest power outlet and turn on the rear of the TV. Then, refer to the appropriate diagrams to connect your television to determine which connection setup is not necessary for you have a VCR? A VCR... television system, please refer to replace the covers. After you may damage the connection cables and covers. Do not force to the satellite TV manual. Remove the cover before connecting an antenna or other devices that you are connection terminals behind the cover on the...

Instructions
Page 14
... Setup Diagram #1 Cable or Antenna Output Coaxial Cable OR Connections 75Ω (VHF/UHF) IN OUT Cable Box TV Rear Panel Note: • If you do not have only one audio out jack. Diagram #2 Cable or Antenna Output Coaxial Cable Cable Box OUT IN ...; (VHF/UHF) L I DEO AUDIO I R INPUT 2 VIDEO SVIDEO L I AUDIO I R VIDEO SVIDEO L I AUDIO I R INPUT 1 Y Pb Pr IN 75Ω OUT (VHF/UHF) VCR IN OUT V LR OR TV Rear Panel TV Rear Panel Notes: • If your VCR is a mono sound unit, it to view premium cable channels. 14
... Setup Diagram #1 Cable or Antenna Output Coaxial Cable OR Connections 75Ω (VHF/UHF) IN OUT Cable Box TV Rear Panel Note: • If you do not have only one audio out jack. Diagram #2 Cable or Antenna Output Coaxial Cable Cable Box OUT IN ...; (VHF/UHF) L I DEO AUDIO I R INPUT 2 VIDEO SVIDEO L I AUDIO I R VIDEO SVIDEO L I AUDIO I R INPUT 1 Y Pb Pr IN 75Ω OUT (VHF/UHF) VCR IN OUT V LR OR TV Rear Panel TV Rear Panel Notes: • If your VCR is a mono sound unit, it to view premium cable channels. 14

Instructions
Page 15
... red DVD cable with the red audio cable. Diagram #3 Cable or Antenna Output Coaxial Cable Two-Way IN OUT OUT Splitter 75Ω (VHF/UHF) TV Rear Panel L I AUDIO I R INPUT 2 VIDEO SVIDEO L I AUDIO I R VIDEO SVIDEO L I AUDIO I R INPUT 1 Y Pb Pr IN 75Ω (VHOF/UUHTF) VCR IN OUT ...V LR OR TV Rear Panel AUDIO OUT L R Y PB PR OUT DVD Player (OPTIONAL) Green Blue Red 15 Quick Setup Connections Notes: • Green, blue and red are the ...
... red DVD cable with the red audio cable. Diagram #3 Cable or Antenna Output Coaxial Cable Two-Way IN OUT OUT Splitter 75Ω (VHF/UHF) TV Rear Panel L I AUDIO I R INPUT 2 VIDEO SVIDEO L I AUDIO I R VIDEO SVIDEO L I AUDIO I R INPUT 1 Y Pb Pr IN 75Ω (VHOF/UUHTF) VCR IN OUT ...V LR OR TV Rear Panel AUDIO OUT L R Y PB PR OUT DVD Player (OPTIONAL) Green Blue Red 15 Quick Setup Connections Notes: • Green, blue and red are the ...

Instructions
Page 16
... television's side panel. UME - Note: • If your camcorder is a mono sound model it to the LEFT AUDIO IN on the back of the TV. Headphone Connection You can connect a camcorder to you televison by using the headphone jack located on the side of the television. 1) Plug a headphone jack into... the RIGHT AUDIO IN on the back of the TV. Quick Setup Connections Connecting to a Camcorder You can connect a pair of headphones to the television using the input jacks located on the back of ...
... television's side panel. UME - Note: • If your camcorder is a mono sound model it to the LEFT AUDIO IN on the back of the TV. Headphone Connection You can connect a camcorder to you televison by using the headphone jack located on the side of the television. 1) Plug a headphone jack into... the RIGHT AUDIO IN on the back of the TV. Quick Setup Connections Connecting to a Camcorder You can connect a pair of headphones to the television using the input jacks located on the back of ...
Instructions
Page 17
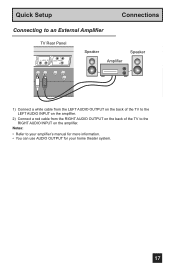
... I VIDEO R INPUT 1 Pb Pr AUDIO OUT INPUT 3 INPUT 2 75Ω (VHF/UHF) 1) Connect a white cable from the LEFT AUDIO OUTPUT on the back of the TV to the LEFT AUDIO INPUT on the amplifier. 2) Connect a red cable from the RIGHT AUDIO OUTPUT on the back of the... TV to the RIGHT AUDIO INPUT on the amplifier. Notes: • Refer to an External Amplifier TV Rear Panel L - Quick Setup Connections Connecting to your amplifier's manual for more information. • You can use...
... I VIDEO R INPUT 1 Pb Pr AUDIO OUT INPUT 3 INPUT 2 75Ω (VHF/UHF) 1) Connect a white cable from the LEFT AUDIO OUTPUT on the back of the TV to the LEFT AUDIO INPUT on the amplifier. 2) Connect a red cable from the RIGHT AUDIO OUTPUT on the back of the... TV to the RIGHT AUDIO INPUT on the amplifier. Notes: • Refer to an External Amplifier TV Rear Panel L - Quick Setup Connections Connecting to your amplifier's manual for more information. • You can use...

Instructions
Page 20
... 037, 051, 049, 050, 089 064 Gradiente 083, 084, 081, 000, 001 Hitachi 023, 045, 058, 027, 081, 093 Instant Replay 024, 023 Jensen 003 JVC 000, 001, 002, 003, 004, 005 Kenwood LXI 003, 004, 064, 005 027, 064, 058, 065, 066, 063, 067 Magnavox 031, 023, 024, 086 VCRs..., rewind, pause, record, channel up/down operation. 1) Find the VCR brand from the list of codes shown below. 2) Slide the first 2-way selector switch to "TV" and the other 2-way selector switch to "VCR". 3) Press and hold down the DISPLAY button, then enter the first code number listed with the 10...
... 037, 051, 049, 050, 089 064 Gradiente 083, 084, 081, 000, 001 Hitachi 023, 045, 058, 027, 081, 093 Instant Replay 024, 023 Jensen 003 JVC 000, 001, 002, 003, 004, 005 Kenwood LXI 003, 004, 064, 005 027, 064, 058, 065, 066, 063, 067 Magnavox 031, 023, 024, 086 VCRs..., rewind, pause, record, channel up/down operation. 1) Find the VCR brand from the list of codes shown below. 2) Slide the first 2-way selector switch to "TV" and the other 2-way selector switch to "VCR". 3) Press and hold down the DISPLAY button, then enter the first code number listed with the 10...

Instructions
Page 21
... the 10 key pad. 4) Release the DISPLAY button, and confirm the operation of the codes, try the others listed. DVD Player Aiwa Apex Denon Hitachi JVC Kenwood Konka Mitsubishi Onkyo Oritron Panasonic Philips Pioneer Raite CODES 043 040 020, 037 030, 031 000 035 039 025 041 044 020 023, 036... open/close, and still/pause operation. 1) Find the DVD player brand from the list of codes shown below. 2) Slide the first 2-way selector switch to "TV" and the other 2-way selector switch to any of the DVD player. • If your remote, some DVD buttons may not work properly.
... the 10 key pad. 4) Release the DISPLAY button, and confirm the operation of the codes, try the others listed. DVD Player Aiwa Apex Denon Hitachi JVC Kenwood Konka Mitsubishi Onkyo Oritron Panasonic Philips Pioneer Raite CODES 043 040 020, 037 030, 031 000 035 039 025 041 044 020 023, 036... open/close, and still/pause operation. 1) Find the DVD player brand from the list of codes shown below. 2) Slide the first 2-way selector switch to "TV" and the other 2-way selector switch to any of the DVD player. • If your remote, some DVD buttons may not work properly.

Instructions
Page 22
If there was a response, press RETURN+. VCR/DVD Search Codes Function 1) Slide the first 2-way selector switch to "TV" and the other 2-way selector switch to CATV. 2) Press the POWER and RETURN+ buttons. The codes are now set . Hold for the DVD player), and ...
If there was a response, press RETURN+. VCR/DVD Search Codes Function 1) Slide the first 2-way selector switch to "TV" and the other 2-way selector switch to CATV. 2) Press the POWER and RETURN+ buttons. The codes are now set . Hold for the DVD player), and ...
Instructions
Page 23
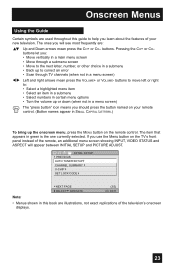
.... buttons let you use the Menu button on your new television. If you : • Move vertically in a main menu screen • Move through TV channels (when not in a submenu • Back up the onscreen menu, press the MENU button on the remote control. The item that appears in this... Turn the volume up or down (when not in a menu screen) The "press button" icon means you should press the button named on the TV's front panel instead of the remote, an additional menu screen showing INPUT, VIDEO STATUS and ASPECT will see most frequently are illustrations, not exact replications...
.... buttons let you use the Menu button on your new television. If you : • Move vertically in a main menu screen • Move through TV channels (when not in a submenu • Back up the onscreen menu, press the MENU button on the remote control. The item that appears in this... Turn the volume up or down (when not in a menu screen) The "press button" icon means you should press the button named on the TV's front panel instead of the remote, an additional menu screen showing INPUT, VIDEO STATUS and ASPECT will see most frequently are illustrations, not exact replications...

Instructions
Page 25
... RESET NEXT PAGE SELECT OPERATE MENU EXIT SOUND ADJUST 25 NOISE CLEAR NATURAL CINEMA LOW OFF AUTO Note: • When the Menu button on the TV side panel is pressed, the FRONT PANEL CONTROL menu between INITIAL SETUP 03 and PICTURE ADJUST will appear. ESP.
... RESET NEXT PAGE SELECT OPERATE MENU EXIT SOUND ADJUST 25 NOISE CLEAR NATURAL CINEMA LOW OFF AUTO Note: • When the Menu button on the TV side panel is pressed, the FRONT PANEL CONTROL menu between INITIAL SETUP 03 and PICTURE ADJUST will appear. ESP.


