
Instructions
Page 18
... INPUT 4 INPUT 5 / INPUT 1 AUDIO AUDIO OUT Y VIDEO VIDEO PB L L L PR R R R TV Rear Panel After the connections have been made to the HDMI INPUT-1 along with the HDMI INPUT-1. • When setting the "Video-1 Audio - Access the "HDMI Size" in the External Input menu to adjust it. (Refer to page 44.) •...menu to "Analog". See "Video-1 Audio", page 44. • The Analog Audio input can be displayed on the TV, please note that this setting only effects the HDMI INPUT-1 jack and that if you do the above connection, set "Video-1 Audio" in order to digitally connect the...
... INPUT 4 INPUT 5 / INPUT 1 AUDIO AUDIO OUT Y VIDEO VIDEO PB L L L PR R R R TV Rear Panel After the connections have been made to the HDMI INPUT-1 along with the HDMI INPUT-1. • When setting the "Video-1 Audio - Access the "HDMI Size" in the External Input menu to adjust it. (Refer to page 44.) •...menu to "Analog". See "Video-1 Audio", page 44. • The Analog Audio input can be displayed on the TV, please note that this setting only effects the HDMI INPUT-1 jack and that if you do the above connection, set "Video-1 Audio" in order to digitally connect the...

Instructions
Page 19
... (VHF/UHF) DIGITAL AUDIO INPUT 1 OPTICAL OUT INPUT 2 PHOTO VIEWER / SERVICE TV Rear Panel 1) Connect the HDMI Cable from the DIGITAL OUT on the back of your DTV or HDMI device, to the HDMI INPUT-1 on the back of your TV in the External Input menu to Digital. See "Video-1 Audio", page 44. ...turn green and there may not respond depending on the equipment that is connected to the HDMI. • If the HDMI output device signal is changed (for a short time until the signal becomes stable. • This TV can include DVD players, D-VHS or any audio/video source, such as a digital television...
... (VHF/UHF) DIGITAL AUDIO INPUT 1 OPTICAL OUT INPUT 2 PHOTO VIEWER / SERVICE TV Rear Panel 1) Connect the HDMI Cable from the DIGITAL OUT on the back of your DTV or HDMI device, to the HDMI INPUT-1 on the back of your TV in the External Input menu to Digital. See "Video-1 Audio", page 44. ...turn green and there may not respond depending on the equipment that is connected to the HDMI. • If the HDMI output device signal is changed (for a short time until the signal becomes stable. • This TV can include DVD players, D-VHS or any audio/video source, such as a digital television...

Instructions
Page 20
Amplifier 75 Ω (VHF/UHF) DIGITAL AUDIO INPUT 1 OPTICAL OUT INPUT 2 PHOTO VIEWER / SERVICE TV Rear Panel 1) Connect the optical cable from your optical output You can be PCM or DOLBY DIGITAL. See page 50. • Refer to your owners ...manual on Optical Out in the Sound Adjust Menu. The signal that has an optical digital input terminal by using your HDMI device. 20 Quick Setup Connecting to an amplifier using an optical digital cable from the optical output. Notes: • This terminal can only output digital...
Amplifier 75 Ω (VHF/UHF) DIGITAL AUDIO INPUT 1 OPTICAL OUT INPUT 2 PHOTO VIEWER / SERVICE TV Rear Panel 1) Connect the optical cable from your optical output You can be PCM or DOLBY DIGITAL. See page 50. • Refer to your owners ...manual on Optical Out in the Sound Adjust Menu. The signal that has an optical digital input terminal by using your HDMI device. 20 Quick Setup Connecting to an amplifier using an optical digital cable from the optical output. Notes: • This terminal can only output digital...

Instructions
Page 26
... Initial Setup 2/2 - + Tuner Setup Auto Tuner Setup Channel Summary Find Channel Digital Antenna Level Select BACK Operate Back MENU Exit Tuner Setup External Input HDMI Size Video-1 Audio Video Input Label Auto Digital Select BACK Operate Back MENU Exit External Input Picture Adjust 1/2 Video Status Standard Tint 0 Color 0 Picture... Off Noise Reduction Off Natural Cinema Off Position Adjustment Reset Select OK BACK Operate Back MENU Exit Picture Adjust 2/2 Note: • The HDMI Size menu can only be displayed when a 480p picture signal is input to the...
... Initial Setup 2/2 - + Tuner Setup Auto Tuner Setup Channel Summary Find Channel Digital Antenna Level Select BACK Operate Back MENU Exit Tuner Setup External Input HDMI Size Video-1 Audio Video Input Label Auto Digital Select BACK Operate Back MENU Exit External Input Picture Adjust 1/2 Video Status Standard Tint 0 Color 0 Picture... Off Noise Reduction Off Natural Cinema Off Position Adjustment Reset Select OK BACK Operate Back MENU Exit Picture Adjust 2/2 Note: • The HDMI Size menu can only be displayed when a 480p picture signal is input to the...

Instructions
Page 44
When you have a DVI or HDMI compatible component connected to your TV. π† √® π† √® Press the MENU button To "External Input" To enter To "Video-1 Audio" To select "Analog", "Digital" or "Auto" External Input HDMI Size Video-1 Audio Video Input Label Auto Digital ... picture signals: 640x480 and 720x480. There are two types of analog audio and digital video, choose "Analog". • Refer to the HDMI terminal. If the displayed picture is slightly shifted, the position can be adjusted by selecting Auto, Size1 or Size2. π† √&#...
When you have a DVI or HDMI compatible component connected to your TV. π† √® π† √® Press the MENU button To "External Input" To enter To "Video-1 Audio" To select "Analog", "Digital" or "Auto" External Input HDMI Size Video-1 Audio Video Input Label Auto Digital ... picture signals: 640x480 and 720x480. There are two types of analog audio and digital video, choose "Analog". • Refer to the HDMI terminal. If the displayed picture is slightly shifted, the position can be adjusted by selecting Auto, Size1 or Size2. π† √&#...

Instructions
Page 45
... enter To select the desired video input To select the desired preset input label (see chart below) Press the MENU button when finished External Input HDMI Size Video-1 Audio Video Input Label Auto Digital Select BACK Operate Back MENU Exit External Input > Video Input Label Video-1 Video-2 Video-3 Video-4 Video-5 PVR...
... enter To select the desired video input To select the desired preset input label (see chart below) Press the MENU button when finished External Input HDMI Size Video-1 Audio Video Input Label Auto Digital Select BACK Operate Back MENU Exit External Input > Video Input Label Video-1 Video-2 Video-3 Video-4 Video-5 PVR...

Instructions
Page 50
... finished Bass 0 Treble 0 Balance 0 Optical Out Turn On Volume Volume Limit PCM Current 30 Reset Select BACK Operate Back MENU Exit Notes: • If your TV's audio. You can reset all sound adjustments you set at once as the default setting when you don't select PCM, it cannot output the sound... Dolby Laboratories. 50 Sound Adjust Sound Settings These settings allow you can select the optical digital sound output, either PCM or DOLBY DIGITAL when your TV is from your HDMI device.
... finished Bass 0 Treble 0 Balance 0 Optical Out Turn On Volume Volume Limit PCM Current 30 Reset Select BACK Operate Back MENU Exit Notes: • If your TV's audio. You can reset all sound adjustments you set at once as the default setting when you don't select PCM, it cannot output the sound... Dolby Laboratories. 50 Sound Adjust Sound Settings These settings allow you can select the optical digital sound output, either PCM or DOLBY DIGITAL when your TV is from your HDMI device.

Instructions
Page 62
... to change the aspect mode after the televison changed it will turn to access JVC's onscreen menu system. buttons ( √ OPERATE ® ). • If the televison receives a 16:9 signal from your HDMI device when you are in one of the remote control. Button Functions Aspect Ratios... the TV instead of the onscreen menus. If you change a selection or correct a mistake. 62 If the television receives a 4:3 signal from your selection when you to "Full" automatically. It has "Video Status", "Aspect", "Auto Tuner Setup" and "Menu". OK This button confirms your HDMI device,...
... to change the aspect mode after the televison changed it will turn to access JVC's onscreen menu system. buttons ( √ OPERATE ® ). • If the televison receives a 16:9 signal from your HDMI device when you are in one of the remote control. Button Functions Aspect Ratios... the TV instead of the onscreen menus. If you change a selection or correct a mistake. 62 If the television receives a 4:3 signal from your selection when you to "Full" automatically. It has "Video Status", "Aspect", "Auto Tuner Setup" and "Menu". OK This button confirms your HDMI device,...

Instructions
Page 63
...MTS button, you change the mode by pressing the π† buttons. By using the HDMI. When receiving analog broadcast Press the ML/MTS button By every press of the ML/MTS ...on page 57. • You can also change the mode MTS Stereo SAP Mono Notes: • Keep the TV in mono sound only. • Choose the mono setting to reduce excessive noise on a certain channel or broadcast.... in order Press the SUB CH button Press 4 and 5 in what you wish to hear with a TV program. Button Functions ML/MTS ML/MTS technology allows several audio signals to be broadcast in analog at once...
...MTS button, you change the mode by pressing the π† buttons. By using the HDMI. When receiving analog broadcast Press the ML/MTS button By every press of the ML/MTS ...on page 57. • You can also change the mode MTS Stereo SAP Mono Notes: • Keep the TV in mono sound only. • Choose the mono setting to reduce excessive noise on a certain channel or broadcast.... in order Press the SUB CH button Press 4 and 5 in what you wish to hear with a TV program. Button Functions ML/MTS ML/MTS technology allows several audio signals to be broadcast in analog at once...

Instructions
Page 66
...• There could be having difficulties. Move the antenna away from the TV. If the television does not function correctly, remove the electrical plug from an HDMI device connected to the wrong setting. Screen is 80% black •... 52. The picture is set . Picture is possible that the batteries are still working . • Use the HDMI cable with HDMI logo . You must be damaged, disconnected or turned. See page 46. • The Video Status mode may ...and the clock was set . If the antenna is a problem, contact the JVC Service Center where you have been programmed.
...• There could be having difficulties. Move the antenna away from the TV. If the television does not function correctly, remove the electrical plug from an HDMI device connected to the wrong setting. Screen is 80% black •... 52. The picture is set . Picture is possible that the batteries are still working . • Use the HDMI cable with HDMI logo . You must be damaged, disconnected or turned. See page 46. • The Video Status mode may ...and the clock was set . If the antenna is a problem, contact the JVC Service Center where you have been programmed.
Instructions
Page 68
...13.5 (without stand) Refer to "unpacking your TV set 's on-screen cable channel numbers) is not recommended for your TV", page 9 Specifications subject to change without notice. ...Terminal (HDMI Input Terminal) Audio Output Jacks (FIX) Optical Output Digital Audio Dimensions (inch/cm) W X H X D Weight (lbs / kg) Accessories LT-32E488 LT-32E478 LT-32EX38 LCD Flat Television...("95" of the Independent JPEG Group. 68 AC 120V, 60 Hz 159W 32 inch / 80 cm measured diagonally, 16:9 ratio 10W + 10W 5 x...1080i / 720p / 480p / 480i Audio: 2ch PCM, 32 / 44.1 / 48 KHz 16 / 20 / 24 bit • Personal ...
...13.5 (without stand) Refer to "unpacking your TV set 's on-screen cable channel numbers) is not recommended for your TV", page 9 Specifications subject to change without notice. ...Terminal (HDMI Input Terminal) Audio Output Jacks (FIX) Optical Output Digital Audio Dimensions (inch/cm) W X H X D Weight (lbs / kg) Accessories LT-32E488 LT-32E478 LT-32EX38 LCD Flat Television...("95" of the Independent JPEG Group. 68 AC 120V, 60 Hz 159W 32 inch / 80 cm measured diagonally, 16:9 ratio 10W + 10W 5 x...1080i / 720p / 480p / 480i Audio: 2ch PCM, 32 / 44.1 / 48 KHz 16 / 20 / 24 bit • Personal ...

Instructions
Page 69
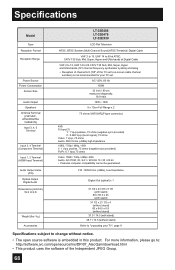
... Terminal) Input 1, 2 Terminal (HDMI Input Terminal) Audio Output Jacks (FIX) Optical Output Digital Audio Dimensions (inch/cm) W X H X D Weight (lbs / kg) Accessories LT-37E488 LT-37E478 LT-37EX38 LCD Flat Television LT-42E488 LT-42E478 LT-42EX38 NTSC, BTSC System (Multi-... information, please go to: http://software.jvc.com/opensource/lnx/DP/07_AtscQam/download.html • This product uses the software of the TV set . 172W 37 inch / 94 cm...Video: 1080i / 720p / 480p / 480i Audio: 2ch PCM, 32 / 44.1 / 48 KHz 16 / 20 / 24 bit • Personal computer compatibility cannot be guaranteed.
... Terminal) Input 1, 2 Terminal (HDMI Input Terminal) Audio Output Jacks (FIX) Optical Output Digital Audio Dimensions (inch/cm) W X H X D Weight (lbs / kg) Accessories LT-37E488 LT-37E478 LT-37EX38 LCD Flat Television LT-42E488 LT-42E478 LT-42EX38 NTSC, BTSC System (Multi-... information, please go to: http://software.jvc.com/opensource/lnx/DP/07_AtscQam/download.html • This product uses the software of the TV set . 172W 37 inch / 94 cm...Video: 1080i / 720p / 480p / 480i Audio: 2ch PCM, 32 / 44.1 / 48 KHz 16 / 20 / 24 bit • Personal computer compatibility cannot be guaranteed.


