DLA-L20U User instruction manual (2.6MB)
Page 1
... No de série situé sur le panneau latéral du coffret de l'appareil. No de série DLA-L20U OPERATE COMPUTER VIDEO VOL. which is located on the side panel of the cabinet. PROJECTOR MANUEL D'INSTRUCTIONS : PROJECTEUR DLA-L20U INSTRUCTIONS ENGLISH FRANÇAIS For customer Use: Enter below the Serial No.
... No de série situé sur le panneau latéral du coffret de l'appareil. No de série DLA-L20U OPERATE COMPUTER VIDEO VOL. which is located on the side panel of the cabinet. PROJECTOR MANUEL D'INSTRUCTIONS : PROJECTEUR DLA-L20U INSTRUCTIONS ENGLISH FRANÇAIS For customer Use: Enter below the Serial No.

DLA-L20U User instruction manual (2.6MB)
Page 3
...23-5/8"). This projector is not sturdy enough, the projector could void the user's authority to qualified service personnel. Operation of the projector's capabilities. The safety and operating instructions should be adhered to the D-ILA device. Do not use this projector. It should ..."Important Safeguards" carefully before cleaning. About the installation place Do not install the projector in a commercial environment. Unplug this product on a screen. Do not use a mount recommended by JVC could fall , causing serious injury to a child or adult, and serious damage...
...23-5/8"). This projector is not sturdy enough, the projector could void the user's authority to qualified service personnel. Operation of the projector's capabilities. The safety and operating instructions should be adhered to the D-ILA device. Do not use this projector. It should ..."Important Safeguards" carefully before cleaning. About the installation place Do not install the projector in a commercial environment. Unplug this product on a screen. Do not use a mount recommended by JVC could fall , causing serious injury to a child or adult, and serious damage...

DLA-L20U User instruction manual (2.6MB)
Page 4
... a grounded power outlet. If you are unable to the strong light can result in impaired eyesight. - Do not "ceiling-mount" the projector to dangerous voltages and other products (including amplifiers) that could result in damage and will often require extensive work by items placed upon or ... are not likely to be walked on or pinched by a qualified technician to restore the product to this unit through openings as this projector. c) If the product has been exposed to lightning and power line surges. - This product is used replacement parts specified by the...
... a grounded power outlet. If you are unable to the strong light can result in impaired eyesight. - Do not "ceiling-mount" the projector to dangerous voltages and other products (including amplifiers) that could result in damage and will often require extensive work by items placed upon or ... are not likely to be walked on or pinched by a qualified technician to restore the product to this unit through openings as this projector. c) If the product has been exposed to lightning and power line surges. - This product is used replacement parts specified by the...
DLA-L20U User instruction manual (2.6MB)
Page 5
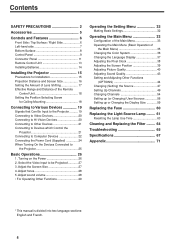
... Panel 9 Connector Panel 11 Remote Control Unit 13 Installing Batteries 14 Installing the Projector 15 Precautions for Ceiling Mounting 18 Connecting to Various Devices 19 Signals that Can Be Input to the Projector .......... 19 Connecting to Video Devices 20 Connecting to Hi-Vision Devices 20 Connecting... to Other Devices 21 Connecting to Devices which Control the Projector 21 Connecting to Computer Devices 22 Connecting the Power Cord...
... Panel 9 Connector Panel 11 Remote Control Unit 13 Installing Batteries 14 Installing the Projector 15 Precautions for Ceiling Mounting 18 Connecting to Various Devices 19 Signals that Can Be Input to the Projector .......... 19 Connecting to Video Devices 20 Connecting to Hi-Vision Devices 20 Connecting... to Other Devices 21 Connecting to Devices which Control the Projector 21 Connecting to Computer Devices 22 Connecting the Power Cord...

DLA-L20U User instruction manual (2.6MB)
Page 6
Check for checking operation) Power cord [approx. 2.5 m (8.2 ft)] Personal computer connection cable [approx. 2 m (6.56 ft)] (D-sub, 3-row 15 pin) AV connection cable [approx. 1.5 m (4.92 ft)] Audio cable [approx. 3 m (9.84 ft)] (3.5 mm dia. Remote control unit (RM-M10G) AAA/R03-size dry cell battery (×2) (for them; stereo mini plug) Conversion adapter for Mac (for Macintosh) BNC-RCA conversion plug Hex wrench ENGLISH 5 Accessories The following accessories are included with this projector. if any item is missing, please contact your dealer.
Check for checking operation) Power cord [approx. 2.5 m (8.2 ft)] Personal computer connection cable [approx. 2 m (6.56 ft)] (D-sub, 3-row 15 pin) AV connection cable [approx. 1.5 m (4.92 ft)] Audio cable [approx. 3 m (9.84 ft)] (3.5 mm dia. Remote control unit (RM-M10G) AAA/R03-size dry cell battery (×2) (for them; stereo mini plug) Conversion adapter for Mac (for Macintosh) BNC-RCA conversion plug Hex wrench ENGLISH 5 Accessories The following accessories are included with this projector. if any item is missing, please contact your dealer.

DLA-L20U User instruction manual (2.6MB)
Page 7
... / Right Side EMERGENCTYEMPLAMOPPERATE STAND BY q 1 p 9 87 6 5 43 2 1 Exhaust vents Vents for horizontal angle adjustment) By extending the feet, the projector angle can be fitted on to +7°. CAUTION • Do not block the exhaust vents, or heat builds up to prevent the lens becoming dirty... zoom lens for 2.9:1 to keep its balance. • Do not carry it is the main power switch. CAUTIONS • When carrying the projector, do not touch the vents, or this could cause personal injury. Be careful to 5.5:1) with manual shift function. To retract the foot, pushing...
... / Right Side EMERGENCTYEMPLAMOPPERATE STAND BY q 1 p 9 87 6 5 43 2 1 Exhaust vents Vents for horizontal angle adjustment) By extending the feet, the projector angle can be fitted on to +7°. CAUTION • Do not block the exhaust vents, or heat builds up to prevent the lens becoming dirty... zoom lens for 2.9:1 to keep its balance. • Do not carry it is the main power switch. CAUTIONS • When carrying the projector, do not touch the vents, or this could cause personal injury. Be careful to 5.5:1) with manual shift function. To retract the foot, pushing...

DLA-L20U User instruction manual (2.6MB)
Page 8
r Adjustable foot (for horizontal angle adjustment) It is set at the shortest position when shipped from approx. 30% to make the projector level. Turn the foot to 55%. The amount of + 1.5° and - 1.5° from the horizontal position. Extend Shorten 7 K -2 + SETTINGCOMPUTER 3 VIDEEMOERGENCY ...lens shift can range from the factory. e Connector panel For details, refer to "Control Panel" on the rear While raising the projector, turn the adjustable foot to the right to be made in position. Use this adjustment when you use a different installation configuration which...
r Adjustable foot (for horizontal angle adjustment) It is set at the shortest position when shipped from approx. 30% to make the projector level. Turn the foot to 55%. The amount of + 1.5° and - 1.5° from the horizontal position. Extend Shorten 7 K -2 + SETTINGCOMPUTER 3 VIDEEMOERGENCY ...lens shift can range from the factory. e Connector panel For details, refer to "Control Panel" on the rear While raising the projector, turn the adjustable foot to the right to be made in position. Use this adjustment when you use a different installation configuration which...

DLA-L20U User instruction manual (2.6MB)
Page 9
... expertise and technique are necessary. i Fixing foot o Position selecting screw for ceiling mounting When using the projector in an upside-down, ceilingmounted position (inverted top-to-bottom and right-to-left), the "position selecting screw for replacing the light-source lamp For ... area (filter) Air is taken in through this area is blocked or if something that obstructs taking in or exhausting air is placed around the projector, heat may build up and could cause a fire. • Clean the filter periodically. Be sure to ask your dealer or a specialist to build up inside...
... expertise and technique are necessary. i Fixing foot o Position selecting screw for ceiling mounting When using the projector in an upside-down, ceilingmounted position (inverted top-to-bottom and right-to-left), the "position selecting screw for replacing the light-source lamp For ... area (filter) Air is taken in through this area is blocked or if something that obstructs taking in or exhausting air is placed around the projector, heat may build up and could cause a fire. • Clean the filter periodically. Be sure to ask your dealer or a specialist to build up inside...

DLA-L20U User instruction manual (2.6MB)
Page 10
... then stand-by heat from the heated lamp as well as the cool-down mode: If you press the OPERATE button, the projector is referred to as to light. Make sure the lamp-replacement cover and the air filter are correctly installed. ENGLISH 9 This feature... • When an emergency mode is shown (with the EMERGENCY indicator blinking). 8 6 EMERGENCY indicator Blinking: Something abnormal has occurred with the projector (the EMERGENCY indicator blinks). In the emergency mode, projection is automatically interrupted and the cooling fans operate for about 20 seconds. • When...
... then stand-by heat from the heated lamp as well as the cool-down mode: If you press the OPERATE button, the projector is referred to as to light. Make sure the lamp-replacement cover and the air filter are correctly installed. ENGLISH 9 This feature... • When an emergency mode is shown (with the EMERGENCY indicator blinking). 8 6 EMERGENCY indicator Blinking: Something abnormal has occurred with the projector (the EMERGENCY indicator blinks). In the emergency mode, projection is automatically interrupted and the cooling fans operate for about 20 seconds. • When...
DLA-L20U User instruction manual (2.6MB)
Page 11
... goes off automatically. Y/C VIDEO YPBPR 8 COMPUTER button Use this button to the COMPUTER -1 or -2 terminals. For details, refer to the AV IN terminal of the projector. CAUTION • Automatic adjustment with this button to select a device such as follows: COMP 1 COMP 2 9 SETTING button Use this function is shown, use this button...
... goes off automatically. Y/C VIDEO YPBPR 8 COMPUTER button Use this button to the COMPUTER -1 or -2 terminals. For details, refer to the AV IN terminal of the projector. CAUTION • Automatic adjustment with this button to select a device such as follows: COMP 1 COMP 2 9 SETTING button Use this function is shown, use this button...

DLA-L20U User instruction manual (2.6MB)
Page 12
...reproduced by connecting it to be adjusted using the VOL. (+/-) buttons on the remote control or VOLUME on the screen is output. That way, the projector's speakers and the AUDIO OUT terminal produce the same sound from both L and R. * Signals from a monaural device should be switched with this unit...) Of devices connected to the video input terminals, such as a VCR, etc., the audio output terminals of the device to this terminal. This projector can be connected to these terminals. The signal is connected to only L. When a cable is connected to this jack, no audio sound is produced...
...reproduced by connecting it to be adjusted using the VOL. (+/-) buttons on the remote control or VOLUME on the screen is output. That way, the projector's speakers and the AUDIO OUT terminal produce the same sound from both L and R. * Signals from a monaural device should be switched with this unit...) Of devices connected to the video input terminals, such as a VCR, etc., the audio output terminals of the device to this terminal. This projector can be connected to these terminals. The signal is connected to only L. When a cable is connected to this jack, no audio sound is produced...

DLA-L20U User instruction manual (2.6MB)
Page 13
...720p)". In that case, use separate sync signals for vertical sync (V) and horizontal sync (H). row 15 pin) This is reproduced by the projector's speakers. In that case, use separate sync signals for vertical sync (V) and horizontal sync (H). Connect the audio output signal of the ...IN (computer input) -2 terminal. Also, signals can be input. Devices which have analog RGB signal output terminals can be output from 12 the projector's speakers.) q COMPUTER IN (computer input) -1 terminal (D-sub 3- For setting the source, refer to AUDIO OUT (audio output) terminal, ...
...720p)". In that case, use separate sync signals for vertical sync (V) and horizontal sync (H). row 15 pin) This is reproduced by the projector's speakers. In that case, use separate sync signals for vertical sync (V) and horizontal sync (H). Connect the audio output signal of the ...IN (computer input) -2 terminal. Also, signals can be input. Devices which have analog RGB signal output terminals can be output from 12 the projector's speakers.) q COMPUTER IN (computer input) -1 terminal (D-sub 3- For setting the source, refer to AUDIO OUT (audio output) terminal, ...

DLA-L20U User instruction manual (2.6MB)
Page 14
...the selection changes as follows: COMP 1 COMP 2 3 VIDEO button Use this button to reset the setting of the selected item to the projector's AV IN (AV input) terminal. POS. If adjustment with manual shift function.) T : The screen size decreases. POS. q PAGE... temporarily. AV MUTING 2 3 4 5 6 7 8 ENGLISH 1 Remote control's signal transmitter 2 COMPUTER button Use this button to go back to the projector's COMPUTER IN (computer input) -1 and -2 input terminals. POS. CAUTION • Automatic adjustment with details settings. 7 Cursor (5/∞/2/3) buttons While the ...
...the selection changes as follows: COMP 1 COMP 2 3 VIDEO button Use this button to reset the setting of the selected item to the projector's AV IN (AV input) terminal. POS. If adjustment with manual shift function.) T : The screen size decreases. POS. q PAGE... temporarily. AV MUTING 2 3 4 5 6 7 8 ENGLISH 1 Remote control's signal transmitter 2 COMPUTER button Use this button to go back to the projector's COMPUTER IN (computer input) -1 and -2 input terminals. POS. CAUTION • Automatic adjustment with details settings. 7 Cursor (5/∞/2/3) buttons While the ...

DLA-L20U User instruction manual (2.6MB)
Page 16
...temperature inside becomes equal to direct sunlight. • Temperature is high or humidity is much water, humidity or dust. • The projector may be subjected to oil smoke or cigarette smoke. • On a soft surface such as a carpet or cushion. • The... a space of the following places: • There is low. Allow sufficient space around the projector. Avoid using the projector placed on its side. Do not use the projector placed on its side. Allowable minimum space required 30cm (11 - 13/16") 20cm (7 - 7/8") 60cm (23 - 5/8") ENGLISH 30cm (11 - 13/16") 20cm (7 -...
...temperature inside becomes equal to direct sunlight. • Temperature is high or humidity is much water, humidity or dust. • The projector may be subjected to oil smoke or cigarette smoke. • On a soft surface such as a carpet or cushion. • The... a space of the following places: • There is low. Allow sufficient space around the projector. Avoid using the projector placed on its side. Do not use the projector placed on its side. Allowable minimum space required 30cm (11 - 13/16") 20cm (7 - 7/8") 60cm (23 - 5/8") ENGLISH 30cm (11 - 13/16") 20cm (7 -...
DLA-L20U User instruction manual (2.6MB)
Page 17
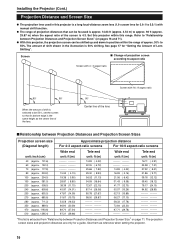
...Distances and Projection Screen Sizes" (on page 71. See page 17 for "Setting the Amount of shift shown in position within this range. q With this projector, the projection screen can be focused is approx. 14.83 ft (approx. 4.52 m) to approx. 98 ft (approx. 29.87 m) when the...guide. The amount of Lens Shifting". Refer to "Relationship between Projection Distances and Projection Screen Size" on pages 16 and 71). Set this projector within the range of approx. 30% to 55%. Screen s Change of projection screen according to aspect ratio Screen with manual shift function. Installing ...
...Distances and Projection Screen Sizes" (on page 71. See page 17 for "Setting the Amount of shift shown in position within this range. q With this projector, the projection screen can be focused is approx. 14.83 ft (approx. 4.52 m) to approx. 98 ft (approx. 29.87 m) when the...guide. The amount of Lens Shifting". Refer to "Relationship between Projection Distances and Projection Screen Size" on pages 16 and 71). Set this projector within the range of approx. 30% to 55%. Screen s Change of projection screen according to aspect ratio Screen with manual shift function. Installing ...

DLA-L20U User instruction manual (2.6MB)
Page 18
...or lamp light strikes the projection screen directly, the picture tends to 55%. Set the projector horizontally on a surface that of a 4:3 aspect-ratio screen. Setting the Amount of Lens Shifting This projector features a lens shifting function which a 4:3 aspect-ratio picture is projected.) • The... projection screen. Depending on installation conditions, you to shift the projection screen up and down in an up /down direction. Installing the Projector (Cont.) CAUTIONS and NOTES • When installing a screen, use a 4:3 aspect-ratio picture. (A 16:9 aspect-ratio picture is...
...or lamp light strikes the projection screen directly, the picture tends to 55%. Set the projector horizontally on a surface that of a 4:3 aspect-ratio screen. Setting the Amount of Lens Shifting This projector features a lens shifting function which a 4:3 aspect-ratio picture is projected.) • The... projection screen. Depending on installation conditions, you to shift the projection screen up and down in an up /down direction. Installing the Projector (Cont.) CAUTIONS and NOTES • When installing a screen, use a 4:3 aspect-ratio picture. (A 16:9 aspect-ratio picture is...

DLA-L20U User instruction manual (2.6MB)
Page 19
...down , ceiling-mounting: Turn counterclockwise. Position selecting screw for ceiling mounting" back to the initial position (factoryshipped). [When using the projector in ceiling mounting. The effective range and distance of the remote control unit A EMERGENCTYEMPLAMOPPERATE STAND BY 15˚ 15˚ Remote... control unit 50˚ 50˚ Projector DLA-L20U Notes • Operate the remote control unit aiming signal transmitter of the remote control unit is turning idly). [To again use...
...down , ceiling-mounting: Turn counterclockwise. Position selecting screw for ceiling mounting" back to the initial position (factoryshipped). [When using the projector in ceiling mounting. The effective range and distance of the remote control unit A EMERGENCTYEMPLAMOPPERATE STAND BY 15˚ 15˚ Remote... control unit 50˚ 50˚ Projector DLA-L20U Notes • Operate the remote control unit aiming signal transmitter of the remote control unit is turning idly). [To again use...

DLA-L20U User instruction manual (2.6MB)
Page 20
Note • DTV-format signals (480i, 480p, 720p, 1080i) can be sure to turn off the projector and connected devices. * Read the manual which comes with each color system. But they require adjustment. Y, PB/B-Y, PR/R-Y ‡*2 ‡*2 ‡*2 ‡*2 ...COMPUTER IN-2 (G, B, R, H/Cs, V). (The following signals can be input to the projector: s Video signals (1) Response to signals whose horizontal scanning frequency is available. *2 : Signifies that Can Be Input to the Projector The following signals are preset.) Screen resolution (standard name) 640 × 400 (PC-...
Note • DTV-format signals (480i, 480p, 720p, 1080i) can be sure to turn off the projector and connected devices. * Read the manual which comes with each color system. But they require adjustment. Y, PB/B-Y, PR/R-Y ‡*2 ‡*2 ‡*2 ‡*2 ...COMPUTER IN-2 (G, B, R, H/Cs, V). (The following signals can be input to the projector: s Video signals (1) Response to signals whose horizontal scanning frequency is available. *2 : Signifies that Can Be Input to the Projector The following signals are preset.) Screen resolution (standard name) 640 × 400 (PC-...

DLA-L20U User instruction manual (2.6MB)
Page 21
...AV device to be used . Connecting to Various Devices (Cont.) Connecting to Video Devices Before connection, be sure to turn off both the projector and video device. • Read the manual which comes with each Hi-Vision device thoroughly. • Use separately available BNC cables and... audio cables to connect Hi-Vision devices. Connecting to Hi-Vision Devices Before connection, be sure to turn off both the projector and Hi-Vision devices. • Read the manual which comes with each video device thoroughly. • Use the supplied AV connection cable...
...AV device to be used . Connecting to Various Devices (Cont.) Connecting to Video Devices Before connection, be sure to turn off both the projector and video device. • Read the manual which comes with each Hi-Vision device thoroughly. • Use separately available BNC cables and... audio cables to connect Hi-Vision devices. Connecting to Hi-Vision Devices Before connection, be sure to turn off both the projector and Hi-Vision devices. • Read the manual which comes with each video device thoroughly. • Use the supplied AV connection cable...
DLA-L20U User instruction manual (2.6MB)
Page 22
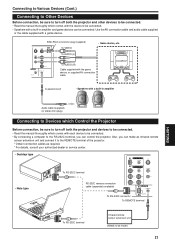
...VIDEO • Game device, etc. Connecting to Various Devices (Cont.) Connecting to Other Devices Before connection, be sure to turn off both the projector and other devices to be connected. • Read the manual thoroughly which comes with each device to be connected. • By connecting a... computer to the RS-232C terminal, you can make an infrared remote sensor extension unit and connect it to the REMOTE terminal of the projector. * Obtain connection cables as required. * For details, consult your authorized dealer or service center. • Desktop type Y/C AUDIO PC To...
...VIDEO • Game device, etc. Connecting to Various Devices (Cont.) Connecting to Other Devices Before connection, be sure to turn off both the projector and other devices to be connected. • Read the manual thoroughly which comes with each device to be connected. • By connecting a... computer to the RS-232C terminal, you can make an infrared remote sensor extension unit and connect it to the REMOTE terminal of the projector. * Obtain connection cables as required. * For details, consult your authorized dealer or service center. • Desktop type Y/C AUDIO PC To...


