Operation Manual
Page 2
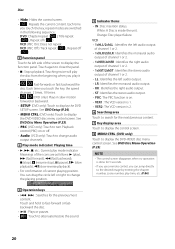
... 12 Source selection screen description 13 Source control screen descriptions 16 List screen 17 Information Window 18 Photo Frame 18 Disc 19 Playing a disc 19 DVD/ VCD Basic Operation 19 Music CD/ Disc media Basic Operation 21 File search Operation 22 DVD Disc Menu Operation 23 DVD Setup 24 APPS-Apple CarPlay/ Android Auto™ 25 Apple CarPlay Operation 25 Android Auto™ Operation 26 Spotify Operation 28 Pandora® Operation 29 USB 32 Connecting a USB device 32 USB Basic Operation 32 Search Operation 33 iPod/iPhone...
... 12 Source selection screen description 13 Source control screen descriptions 16 List screen 17 Information Window 18 Photo Frame 18 Disc 19 Playing a disc 19 DVD/ VCD Basic Operation 19 Music CD/ Disc media Basic Operation 21 File search Operation 22 DVD Disc Menu Operation 23 DVD Setup 24 APPS-Apple CarPlay/ Android Auto™ 25 Apple CarPlay Operation 25 Android Auto™ Operation 26 Spotify Operation 28 Pandora® Operation 29 USB 32 Connecting a USB device 32 USB Basic Operation 32 Search Operation 33 iPod/iPhone...
Operation Manual
Page 3
... 57 Bluetooth Setup 57 Playing the Bluetooth Audio Device 59 Using the Hands-Free Unit 61 Hands-Free Setup 66 Setup 67 Monitor Screen Setup 67 System Setup 67 User Interface Setup 68 Special Setup 69 Display Setup 70 AV Setup 72 Controlling Audio 73 3-way speaker system setup 73 Speaker / X'over setup 74 Controlling General Audio 76 Equalizer Control 76 Volume Offset 77 Zone Control 78 Sound Effect 79 Listening Position / DTA 80 Audio Setup memory 82 Remote control 83 Battery Installation 83 Functions of the Remote control Buttons........83 Connection...
... 57 Bluetooth Setup 57 Playing the Bluetooth Audio Device 59 Using the Hands-Free Unit 61 Hands-Free Setup 66 Setup 67 Monitor Screen Setup 67 System Setup 67 User Interface Setup 68 Special Setup 69 Display Setup 70 AV Setup 72 Controlling Audio 73 3-way speaker system setup 73 Speaker / X'over setup 74 Controlling General Audio 76 Equalizer Control 76 Volume Offset 77 Zone Control 78 Sound Effect 79 Listening Position / DTA 80 Audio Setup memory 82 Remote control 83 Battery Installation 83 Functions of the Remote control Buttons........83 Connection...

Operation Manual
Page 4
... your JVC dealer to make sure that are driving for the dew to display menus, audio file tags, etc. This condensation on the lens (also called lens fogging) may not allow discs to the unit may form on the car heater in cold weather, dew may damage its mechanical parts. In such a situation, remove the disc and wait for any broadcasting station...
... your JVC dealer to make sure that are driving for the dew to display menus, audio file tags, etc. This condensation on the lens (also called lens fogging) may not allow discs to the unit may form on the car heater in cold weather, dew may damage its mechanical parts. In such a situation, remove the disc and wait for any broadcasting station...

Operation Manual
Page 8
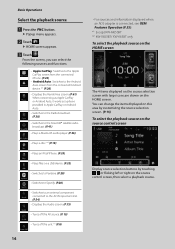
... time. 1 Set each item as follows. ■■ [Language] Select the language used for 1 second. Basic Operations ●●To turn off the unit: KW-V850BT/ KW-V85BT/ KW-M750BT/ KW-M75BT 1 Press the [FNC] button. For details, see Calendar/clock settings (P.10). ■■ [Display] Set the button illumination color. For details, see Display Setup (P.70). 8 hhHOME screen appears. 3 Touch [ ]. 4 Touch [Power Off]. For details, see the image on the screen even, adjust the viewing...
... time. 1 Set each item as follows. ■■ [Language] Select the language used for 1 second. Basic Operations ●●To turn off the unit: KW-V850BT/ KW-V85BT/ KW-M750BT/ KW-M75BT 1 Press the [FNC] button. For details, see Calendar/clock settings (P.10). ■■ [Display] Set the button illumination color. For details, see Display Setup (P.70). 8 hhHOME screen appears. 3 Touch [ ]. 4 Touch [Power Off]. For details, see the image on the screen even, adjust the viewing...
Operation Manual
Page 14
... connected iPhone. (P.25) • [Android Auto]: Switches to the Android Auto screen from the connected Android device. *1 (P.26) • Displays the Hands Free screen. (P.61) When connecting as Apple CarPlay or Android Auto, it works as a phone provided in Apple CarPlay or Android Auto. • Switches to the Radio broadcast. (P.38) • Switches to the SiriusXM® satellite radio broadcast. (P.41) • Plays a Bluetooth audio player. (P.56) • Plays a disc. *2 (P.19) • Plays an iPod/iPhone. (P.35) • Plays files on a USB device...
... connected iPhone. (P.25) • [Android Auto]: Switches to the Android Auto screen from the connected Android device. *1 (P.26) • Displays the Hands Free screen. (P.61) When connecting as Apple CarPlay or Android Auto, it works as a phone provided in Apple CarPlay or Android Auto. • Switches to the Radio broadcast. (P.38) • Switches to the SiriusXM® satellite radio broadcast. (P.41) • Plays a Bluetooth audio player. (P.56) • Plays a disc. *2 (P.19) • Plays an iPod/iPhone. (P.35) • Plays files on a USB device...
Operation Manual
Page 20
... the unit. NOTE • The control screen disappears when no operation is done for the previous/next content. See DVD Disc Menu Operation (P.23). • [PBC] (VCD only): Touch to display the DVD-VIDEO disc menu control screen. Orange: Disc player failure. DVD: Chapter repeat ( ), Title repeat ( ), Repeat off ( ) VCD (PBC On): Does not repeat VCD (PBC Off ): Track repeat ( ), Repeat off . • [Audio] (VCD only): Touch to display the function panel...
... the unit. NOTE • The control screen disappears when no operation is done for the previous/next content. See DVD Disc Menu Operation (P.23). • [PBC] (VCD only): Touch to display the DVD-VIDEO disc menu control screen. Orange: Disc player failure. DVD: Chapter repeat ( ), Title repeat ( ), Repeat off ( ) VCD (PBC On): Does not repeat VCD (PBC Off ): Track repeat ( ), Repeat off . • [Audio] (VCD only): Touch to display the function panel...
Operation Manual
Page 25
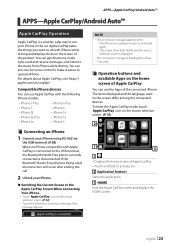
... and the source selection screen is displayed. • The connection message is being used on the source selection screen. (P.14) 2 1 3 1[ ] • Displays the home screen of the product. Compatible iPhone devices You can use Apple CarPlay with Apple CarPlay is connected to the USB terminal, the Bluetooth Hands-Free phone currently connected is a smarter, safer way to use Siri voice control to make calls, send and receive messages, and listen to activate Siri. 2 Application buttons Starts the...
... and the source selection screen is displayed. • The connection message is being used on the source selection screen. (P.14) 2 1 3 1[ ] • Displays the home screen of the product. Compatible iPhone devices You can use Apple CarPlay with Apple CarPlay is connected to the USB terminal, the Bluetooth Hands-Free phone currently connected is a smarter, safer way to use Siri voice control to make calls, send and receive messages, and listen to activate Siri. 2 Application buttons Starts the...
Operation Manual
Page 35
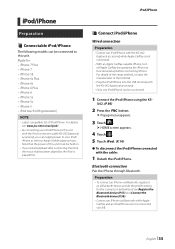
... Bluetooth device (P.57) and Connect the Bluetooth device (P.58). • Connect an iPhone via Bluetooth while Apple CarPlay and an iPod/iPhone are not connected via Bluetooth, register it while playing music. For details, see www.jvc.net/cs/car/ipod/. • By connecting your iPod/iPhone to this unit. Preparation • To connect an iPhone via USB. Made for the connection beforehand. hhPopup menu appears. 3 Touch [ ]. iPod/iPhone Preparation ÑÑConnectable iPod/iPhone The following models can supply power to your iPod/ iPhone...
... Bluetooth device (P.57) and Connect the Bluetooth device (P.58). • Connect an iPhone via Bluetooth while Apple CarPlay and an iPod/iPhone are not connected via Bluetooth, register it while playing music. For details, see www.jvc.net/cs/car/ipod/. • By connecting your iPod/iPhone to this unit. Preparation • To connect an iPhone via USB. Made for the connection beforehand. hhPopup menu appears. 3 Touch [ ]. iPod/iPhone Preparation ÑÑConnectable iPod/iPhone The following models can supply power to your iPod/ iPhone...

Operation Manual
Page 48
...; The code number is a feature that you originally input as stated in Parental code (P.48) and touch [Enter]. hhParental Pass Check screen appears. NOTE • You need to any SiriusXM channel (Parental Lock Channel). 1 Touch [Parental Lock Channel Selection] on the SiriusXM SETUP screen. When selecting [User] This allows you to limit access to set to mature content and user selected channels. 1 Touch [Parental Control] on the SiriusXM SETUP screen. 2 Touch [User...
...; The code number is a feature that you originally input as stated in Parental code (P.48) and touch [Enter]. hhParental Pass Check screen appears. NOTE • You need to any SiriusXM channel (Parental Lock Channel). 1 Touch [Parental Lock Channel Selection] on the SiriusXM SETUP screen. When selecting [User] This allows you to limit access to set to mature content and user selected channels. 1 Touch [Parental Control] on the SiriusXM SETUP screen. 2 Touch [User...

Operation Manual
Page 68
.... [Manual]: Set the clock manually. ■■[Time Zone] Select the time zone. ■■[Clock Adjust] If you select [Manual] for Clock, adjust the date and time manually. (P.69) ■■[DISP Key] Select the source screen displayed when in the popup menu screen is pressed. [OFF]: Displays the control screen of the current source. [Mirroring] (Default): Switches to the App screen from the connected iPhone/ Android device or to the Apple CarPlay screen from the connected iPhone when the button is connected, you...
.... [Manual]: Set the clock manually. ■■[Time Zone] Select the time zone. ■■[Clock Adjust] If you select [Manual] for Clock, adjust the date and time manually. (P.69) ■■[DISP Key] Select the source screen displayed when in the popup menu screen is pressed. [OFF]: Displays the control screen of the current source. [Mirroring] (Default): Switches to the App screen from the connected iPhone/ Android device or to the Apple CarPlay screen from the connected iPhone when the button is connected, you...

Operation Manual
Page 73
... Position / DTA --Fader for Controlling General Audio --Zone Control --Selection of the speakers to output sound from the cell-phone of Bluetooth HF/Audio --Beep for User Interface Setup • Connecting 3-way speakers with the 2-way mode selected can adjust various settings such as audio balance or subwoofer level. 1 Press the [FNC] button. hhPopup menu appears. 2 Touch [Audio]. Controlling Audio 4 Touch [AV Off]. 5 Press the button 1 followed by the button 2 for the speaker system used (2-way or 3-way speaker system). 1 Press the...
... Position / DTA --Fader for Controlling General Audio --Zone Control --Selection of the speakers to output sound from the cell-phone of Bluetooth HF/Audio --Beep for User Interface Setup • Connecting 3-way speakers with the 2-way mode selected can adjust various settings such as audio balance or subwoofer level. 1 Press the [FNC] button. hhPopup menu appears. 2 Touch [Audio]. Controlling Audio 4 Touch [AV Off]. 5 Press the button 1 followed by the button 2 for the speaker system used (2-way or 3-way speaker system). 1 Press the...

Operation Manual
Page 78
... the Rear Source. 6 Set each . ■■[Rear VOL.] Adjust the rear source volume. hhZone Control screen appears. 4 Touch [Zone Select]. 5 Touch [Dual Zone]. ■■[Zone Select] Touch [Single Zone] to on, the following functions are not available. --Output from the subwoofer --Subwoofer Level/ Bass Boost (P.79) --Equalizer Control/ Sound Effect/ Listening Position (P.76, 79, 80) --Speaker Setup (P.74) --High-resolution Sound Source File Playback • You cannot select iPod as the Rear Source if it is connected via Bluetooth...
... the Rear Source. 6 Set each . ■■[Rear VOL.] Adjust the rear source volume. hhZone Control screen appears. 4 Touch [Zone Select]. 5 Touch [Dual Zone]. ■■[Zone Select] Touch [Single Zone] to on, the following functions are not available. --Output from the subwoofer --Subwoofer Level/ Bass Boost (P.79) --Equalizer Control/ Sound Effect/ Listening Position (P.76, 79, 80) --Speaker Setup (P.74) --High-resolution Sound Source File Playback • You cannot select iPod as the Rear Source if it is connected via Bluetooth...

Operation Manual
Page 85
... the fuse from the ignition wire (red) and the battery wire (yellow). English 85 Please check the connections." Connection/Installation Connection/Installation Before Installation Before installation of this unit, please note the following precautions. # WARNINGS • If you connect the ignition wire (red) and the battery wire (yellow) to the car chassis (ground), you connect the ¢ connector of the left speaker to a front output terminal, do not connect the ¤ connector to a rear output...
... the fuse from the ignition wire (red) and the battery wire (yellow). English 85 Please check the connections." Connection/Installation Connection/Installation Before Installation Before installation of this unit, please note the following precautions. # WARNINGS • If you connect the ignition wire (red) and the battery wire (yellow) to the car chassis (ground), you connect the ¢ connector of the left speaker to a front output terminal, do not connect the ¤ connector to a rear output...
Operation Manual
Page 88
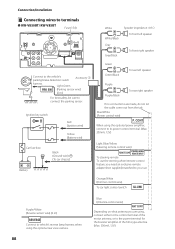
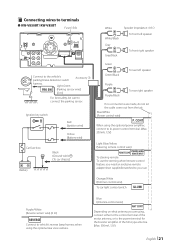
... detection switch Accessory 1 harness. Connection/Installation ÑÑConnecting wires to terminals ●●KW-V850BT/ KW-V85BT Fuse (15A) White White/Black Gray Gray/Black Speaker impedance: 4-8 Ω To front left speaker Purple Purple/Black To rear right speaker If no connections are using the optional power amplifier, connect to its power control terminal. (Max. 200mA, 12V) Light Blue/Yellow (Steering remote control wire) REMOTE CONT STEERING WHEEL REMOTE INPUT To steering remote To use the steering wheel remote control feature...
... detection switch Accessory 1 harness. Connection/Installation ÑÑConnecting wires to terminals ●●KW-V850BT/ KW-V85BT Fuse (15A) White White/Black Gray Gray/Black Speaker impedance: 4-8 Ω To front left speaker Purple Purple/Black To rear right speaker If no connections are using the optional power amplifier, connect to its power control terminal. (Max. 200mA, 12V) Light Blue/Yellow (Steering remote control wire) REMOTE CONT STEERING WHEEL REMOTE INPUT To steering remote To use the steering wheel remote control feature...

Operation Manual
Page 89
Connection/Installation ●●KW-M750BT/ KW-M75BT/ KW-M650BT Fuse (10A) White White/Black Gray Gray/Black Speaker impedance: 4-8 Ω To front left speaker Purple Purple/Black To rear right speaker If no connections are using, connect either to the control terminal of the motor antenna, or to the power terminal for the booster amplifier of the film-type antenna. (Max. 300mA, 12V) Orange/White (Dimmer control wire) To car light control switch ILLUMI Brown Not...
Connection/Installation ●●KW-M750BT/ KW-M75BT/ KW-M650BT Fuse (10A) White White/Black Gray Gray/Black Speaker impedance: 4-8 Ω To front left speaker Purple Purple/Black To rear right speaker If no connections are using, connect either to the control terminal of the motor antenna, or to the power terminal for the booster amplifier of the film-type antenna. (Max. 300mA, 12V) Orange/White (Dimmer control wire) To car light control switch ILLUMI Brown Not...
Operation Manual
Page 95
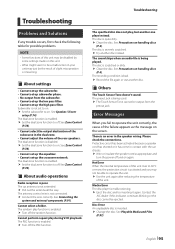
... set up the high pass filter. Disc Error An unplayable disc is not extended. †† Pull out the antenna all the way. English 95 Please check the connections. See Zone Control (P.78). ÑÑAbout audio operations Radio reception is not connected. †† Connect the wire correctly. Protective circuit has been activated because a speaker cord has shorted or it again. Contact the JVC dealer if this unit...
... set up the high pass filter. Disc Error An unplayable disc is not extended. †† Pull out the antenna all the way. English 95 Please check the connections. See Zone Control (P.78). ÑÑAbout audio operations Radio reception is not connected. †† Connect the wire correctly. Protective circuit has been activated because a speaker cord has shorted or it again. Contact the JVC dealer if this unit...
Quick Start Guide
Page 2
... screens and panels shown in this Guide, refer to the Instruction Manual on the Unit 7 Source control screen descriptions 9 Playing a disc 10 Connecting a USB device 10 Connect iPod/iPhone 10 DVD/ VCD Basic Operation 11 Tuner Basic Operation 12 Music CD/ Disc media/USB Basic Operation....13 iPod/iPhone Basic Operation 14 Bluetooth Setup 15 Using the Hands-Free Unit 16 Before Installation 18 Installing the unit 20 About this Unit 28 About the Quick start guide 2 How to read this manual NOTE • The panels shown in the Instruction Manual. 2 For functions...
... screens and panels shown in this Guide, refer to the Instruction Manual on the Unit 7 Source control screen descriptions 9 Playing a disc 10 Connecting a USB device 10 Connect iPod/iPhone 10 DVD/ VCD Basic Operation 11 Tuner Basic Operation 12 Music CD/ Disc media/USB Basic Operation....13 iPod/iPhone Basic Operation 14 Bluetooth Setup 15 Using the Hands-Free Unit 16 Before Installation 18 Installing the unit 20 About this Unit 28 About the Quick start guide 2 How to read this manual NOTE • The panels shown in the Instruction Manual. 2 For functions...

Quick Start Guide
Page 18
... two speakers are working properly. • Mount the unit so that the mounting angle is displayed), the speaker wire may have a short-circuit or touched the chassis of the vehicle and the protection function may be turned on the car are being connected to the system, connect the connectors either to both the rear output terminals (do not mix front and rear). Also avoid places with battery wires, the battery may...
... two speakers are working properly. • Mount the unit so that the mounting angle is displayed), the speaker wire may have a short-circuit or touched the chassis of the vehicle and the protection function may be turned on the car are being connected to the system, connect the connectors either to both the rear output terminals (do not mix front and rear). Also avoid places with battery wires, the battery may...
Quick Start Guide
Page 21
... its power control terminal. (Max. 200mA, 12V) Light Blue/Yellow (Steering remote control wire) REMOTE CONT STEERING WHEEL REMOTE INPUT To steering remote To use the steering wheel remote control feature, you are made, do not let the cable come out from the tab. Ignition key switch Red (Ignition wire) Yellow (Battery wire) Car fuse box Black (Ground wire) ¤ (To car chassis) Battery Green Green/Black To rear left speaker To front right speaker Connect to connect the...
... its power control terminal. (Max. 200mA, 12V) Light Blue/Yellow (Steering remote control wire) REMOTE CONT STEERING WHEEL REMOTE INPUT To steering remote To use the steering wheel remote control feature, you are made, do not let the cable come out from the tab. Ignition key switch Red (Ignition wire) Yellow (Battery wire) Car fuse box Black (Ground wire) ¤ (To car chassis) Battery Green Green/Black To rear left speaker To front right speaker Connect to connect the...

Quick Start Guide
Page 22
... (Dimmer control wire) To car light control switch ILLUMI Brown Not used. Blue/White (Power/antenna control wire) P. ●●KW-M750BT/ KW-M75BT/ KW-M650BT Fuse (10A) White White/Black Gray Gray/Black Speaker impedance: 4-8 Ω To front left speaker Purple Purple/Black To rear right speaker If no connections are using the optional rear view camera. Accessory 1 Light Green Accessory 5 (2 m) (Parking sensor wire) PRK SW For best safety, be sure to your car. CONT When using the optional power amplifier, connect...
... (Dimmer control wire) To car light control switch ILLUMI Brown Not used. Blue/White (Power/antenna control wire) P. ●●KW-M750BT/ KW-M75BT/ KW-M650BT Fuse (10A) White White/Black Gray Gray/Black Speaker impedance: 4-8 Ω To front left speaker Purple Purple/Black To rear right speaker If no connections are using the optional rear view camera. Accessory 1 Light Green Accessory 5 (2 m) (Parking sensor wire) PRK SW For best safety, be sure to your car. CONT When using the optional power amplifier, connect...


