Instructions
Page 2
... record of your appliance, and if its appearance indicates damage or deterioration, unplug it for a Class B digital device, pursuant to the presence of the appliance, and have the cord replaced with the instruction manual, may result in a particular installation. Any of the following measures: • Reorient or relocate the receiving antenna. • Increase the separation between the product and receiver. • Connect...
... record of your appliance, and if its appearance indicates damage or deterioration, unplug it for a Class B digital device, pursuant to the presence of the appliance, and have the cord replaced with the instruction manual, may result in a particular installation. Any of the following measures: • Reorient or relocate the receiving antenna. • Increase the separation between the product and receiver. • Connect...
Instructions
Page 3
All operating and use attachments/accessories specified by the user. For example: near a swimming pool; Do not block any parts that produce heat. 12. Do not install near any way, such as power-supply cord or plug is used, use can be repaired by the manufacturer. 4. Use only with the cart, stand, tripod, bracket, or table specified by placing the product on a bed, sofa, rug or...
All operating and use attachments/accessories specified by the user. For example: near a swimming pool; Do not block any parts that produce heat. 12. Do not install near any way, such as power-supply cord or plug is used, use can be repaired by the manufacturer. 4. Use only with the cart, stand, tripod, bracket, or table specified by placing the product on a bed, sofa, rug or...
Instructions
Page 4
... Discs 6 Disc-related terms 6 Regional Code 7 Notes on Regional Codes 7 Notes on Discs 5 Types of DVD discs: Menus 29 • Title Menu 29 • Disc Menu 29 • Camera Angle 29 • Changing the Audio Language 29 • Subtitles 29 On-Screen Display - Contents Introduction 5 Moisture Condensation 5 Symbols Used in this Manual 5 About the Symbol Display 5 Notes on Copyrights 7 Notice for Progressive Scan Use 7 About the Remote Control 7 Selecting the Viewing Source 7 Front Panel 8 Remote Control 9 Rear Panel 10 Preparation 10 Connecting...
... Discs 6 Disc-related terms 6 Regional Code 7 Notes on Regional Codes 7 Notes on Discs 5 Types of DVD discs: Menus 29 • Title Menu 29 • Disc Menu 29 • Camera Angle 29 • Changing the Audio Language 29 • Subtitles 29 On-Screen Display - Contents Introduction 5 Moisture Condensation 5 Symbols Used in this Manual 5 About the Symbol Display 5 Notes on Copyrights 7 Notice for Progressive Scan Use 7 About the Remote Control 7 Selecting the Viewing Source 7 Front Panel 8 Remote Control 9 Rear Panel 10 Preparation 10 Connecting...
Instructions
Page 7
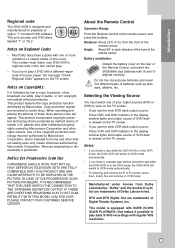
... DEFINITION TELEVISION SETS ARE FULLY COMPATIBLE WITH THIS PRODUCT AND MAY CAUSE ARTIFACTS TO BE DISPLAYED IN THE PICTURE. Manufactured under license from your DVD+VCR's regional code or the disc cannot play. • If you insert a cassette tape without permission. Copy protection signals are trademarks of Dolby Labora-tories. Use of the Remote Control, and insert two (R03/AAA) size batteries with a different region code from Dolby Laboratories. About the Remote Control Operation Range...
... DEFINITION TELEVISION SETS ARE FULLY COMPATIBLE WITH THIS PRODUCT AND MAY CAUSE ARTIFACTS TO BE DISPLAYED IN THE PICTURE. Manufactured under license from your DVD+VCR's regional code or the disc cannot play. • If you insert a cassette tape without permission. Copy protection signals are trademarks of Dolby Labora-tories. Use of the Remote Control, and insert two (R03/AAA) size batteries with a different region code from Dolby Laboratories. About the Remote Control Operation Range...

Instructions
Page 8
... track. Press repeatedly for a fast forward search. - A cassette is active. Front Panel a Disc Tray (DVD deck) Insert a disc here. Press and hold for two seconds for frame-by repeated presses. h PAUSE (X) Pause playback or recording. k Remote Sensor Point the DVD+VCR Remote Control here. Indicates repeat mode. REC DVD+VCR is Recording. (VCR part only) PM Indicates PM time. (AM is not diplayed.) TV Lights when TV mode is in the VCR deck. n LINE2 (VIDEO/AUDIO (L/R) input) Connect to next...
... track. Press repeatedly for a fast forward search. - A cassette is active. Front Panel a Disc Tray (DVD deck) Insert a disc here. Press and hold for two seconds for frame-by repeated presses. h PAUSE (X) Pause playback or recording. k Remote Sensor Point the DVD+VCR Remote Control here. Indicates repeat mode. REC DVD+VCR is Recording. (VCR part only) PM Indicates PM time. (AM is not diplayed.) TV Lights when TV mode is in the VCR deck. n LINE2 (VIDEO/AUDIO (L/R) input) Connect to next...
Instructions
Page 9
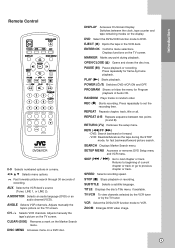
...MONITOR Selects an audio language (DVD) or an audio channel (VCD). DISPLAY Accesses On-Screen Display. ENTER/OK Confirms menu selections. POWER (1/:) Switches DVD+VCR ON and OFF. Press repeatedly to VCR. REW (m)/FF (M) - SETUP MENU Accesses or removes DVD Setup menu and VCR menu. SPEED Selects recording speed. TITLE Displays the disc's Title menu, if available. VCR Select the DVD+VCR function mode to set the recording time. Introduction Remote Control 0-9 Selects numbered options in the VCR deck. EJECT (Z) Ejects the tape in a menu. OPEN/CLOSE (Z) Opens and closes the disc...
...MONITOR Selects an audio language (DVD) or an audio channel (VCD). DISPLAY Accesses On-Screen Display. ENTER/OK Confirms menu selections. POWER (1/:) Switches DVD+VCR ON and OFF. Press repeatedly to VCR. REW (m)/FF (M) - SETUP MENU Accesses or removes DVD Setup menu and VCR menu. SPEED Selects recording speed. TITLE Displays the disc's Title menu, if available. VCR Select the DVD+VCR function mode to set the recording time. Introduction Remote Control 0-9 Selects numbered options in the VCR deck. EJECT (Z) Ejects the tape in a menu. OPEN/CLOSE (Z) Opens and closes the disc...

Instructions
Page 10
... copy protection system. 10 Notes: • The picture and sound of an external source (Audio system, TV/Monitor, VCR, Camcorder). Rear Panel a bc de f g h a ANT.IN Connect the VHF/UHF/CATV antenna to digital (coaxial) audio equipment. The DVD image could be distorted during playback. g RF. OUT Connect to a TV with audio inputs. Do not connect the DVD+VCR via another VCR. d COMPONENT/PROGRESSIVE SCAN VIDEO OUT (Y Pb Pr) (DVD OUT) Connect to a TV with video...
... copy protection system. 10 Notes: • The picture and sound of an external source (Audio system, TV/Monitor, VCR, Camcorder). Rear Panel a bc de f g h a ANT.IN Connect the VHF/UHF/CATV antenna to digital (coaxial) audio equipment. The DVD image could be distorted during playback. g RF. OUT Connect to a TV with audio inputs. Do not connect the DVD+VCR via another VCR. d COMPONENT/PROGRESSIVE SCAN VIDEO OUT (Y Pb Pr) (DVD OUT) Connect to a TV with video...
Instructions
Page 12
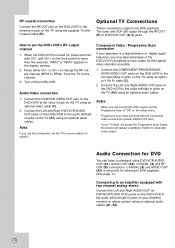
... to this connection, set the TV's source selector to VIDEO. Component Video / Progressive Scan connection If your television is a high-definition or "digital ready" television, you may take advantage of the DVD+VCR to playback using DVD/VCR AUDIO OUT (A1), AUDIO OUT (A2), COAXIAL (X) and RF. Notes: • When you use Composite Video signal, set the DVD+VCR's RF output channel 1. Switch to change the RF output channel (RF03 or RF04). Optional TV Connections These connections support only DVD playback. RF coaxial connection Connect the RF...
... to this connection, set the TV's source selector to VIDEO. Component Video / Progressive Scan connection If your television is a high-definition or "digital ready" television, you may take advantage of the DVD+VCR to playback using DVD/VCR AUDIO OUT (A1), AUDIO OUT (A2), COAXIAL (X) and RF. Notes: • When you use Composite Video signal, set the DVD+VCR's RF output channel 1. Switch to change the RF output channel (RF03 or RF04). Optional TV Connections These connections support only DVD playback. RF coaxial connection Connect the RF...
Instructions
Page 13
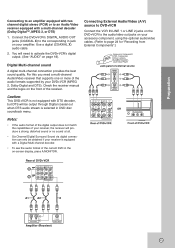
... the DVD+VCR to the audio/video out jacks on -screen display, press A.MONITOR. Check the receiver manual and the logos on page 18). Preparation Connecting to an amplifier equipped with two channel digital stereo (PCM) or to an Audio/Video receiver equipped with DTS decoder, but DTS will be obtained if your amplifier. Jack panel of external source Rear of the audio formats supported by your accessory component, using the optional audio/video cables...
... the DVD+VCR to the audio/video out jacks on -screen display, press A.MONITOR. Check the receiver manual and the logos on page 18). Preparation Connecting to an amplifier equipped with two channel digital stereo (PCM) or to an Audio/Video receiver equipped with DTS decoder, but DTS will be obtained if your amplifier. Jack panel of external source Rear of the audio formats supported by your accessory component, using the optional audio/video cables...
Instructions
Page 14
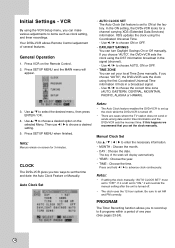
... updates the clock using the first Coordinated Universal Time information it will override the manual setting after the unit is set your local Time Zone manually. Note: Menus remain on-screen for a channel carrying XDS (Extended Data Services) information. Initial Settings - PROGRAM The Timer Recording function allows you can make various adjustments to 8 programs within a period of several features. If it is left set up to items such as clock setting, and timer recordings. Press SETUP MENU...
... updates the clock using the first Coordinated Universal Time information it will override the manual setting after the unit is set your local Time Zone manually. Note: Menus remain on-screen for a channel carrying XDS (Extended Data Services) information. Initial Settings - PROGRAM The Timer Recording function allows you can make various adjustments to 8 programs within a period of several features. If it is left set up to items such as clock setting, and timer recordings. Press SETUP MENU...
Instructions
Page 15
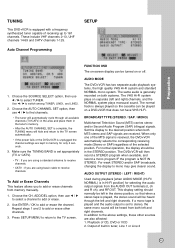
... AUTO CHANNEL SET is complete, the TUNING menu will hide and return to add or erase other sources are received. The same audio is always played so the cassette can be heard from memory manually. 1. For weak STEREO and/or SAP broadcasts, changing the display to switch among TUNER, LINE1, and LINE2. 2. Choose the CH. The DVD+VCR will then record a STEREO program when available, and record a mono program...
... AUTO CHANNEL SET is complete, the TUNING menu will hide and return to add or erase other sources are received. The same audio is always played so the cassette can be heard from memory manually. 1. For weak STEREO and/or SAP broadcasts, changing the display to switch among TUNER, LINE1, and LINE2. 2. Choose the CH. The DVD+VCR will then record a STEREO program when available, and record a mono program...

Instructions
Page 17
... TV or monitor. • Do not turn on the upper and lower portions of this DVD+VCR while the "PROGRESSIVE SCAN MODE" message is displayed in error, you set your selection. Use the b button to component/progressive Input. 1. The video output will be restored to ON in the TV screen. Letterbox: Displays a wide picture with bands on progressive scan: Connect component/progressive out of the screen. Preparation DISPLAY DISPLAY TV Aspect Display Mode Progressive Scan 4 :3 Letterbox Off...
... TV or monitor. • Do not turn on the upper and lower portions of this DVD+VCR while the "PROGRESSIVE SCAN MODE" message is displayed in error, you set your selection. Use the b button to component/progressive Input. 1. The video output will be restored to ON in the TV screen. Letterbox: Displays a wide picture with bands on progressive scan: Connect component/progressive out of the screen. Preparation DISPLAY DISPLAY TV Aspect Display Mode Progressive Scan 4 :3 Letterbox Off...
Instructions
Page 20
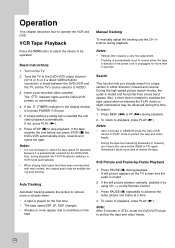
.... Turn on the Remote Control. 3. To search: 1. Press REW (m) or FF (M) during playback. Press STOP (x) to operate the VCR and DVD. Also, a short time is muted. 2 If the still picture vibrates vertically, stabilize it by -Frame Playback 1. A still picture appears on the TV screen and the audio is needed to be operated. Basic Instructions 1. Operation This chapter describes how to stop playback. VCR Tape Playback Press the VCR button to select the device to...
.... Turn on the Remote Control. 3. To search: 1. Press REW (m) or FF (M) during playback. Press STOP (x) to operate the VCR and DVD. Also, a short time is muted. 2 If the still picture vibrates vertically, stabilize it by -Frame Playback 1. A still picture appears on the TV screen and the audio is needed to be operated. Basic Instructions 1. Operation This chapter describes how to stop playback. VCR Tape Playback Press the VCR button to select the device to...
Instructions
Page 21
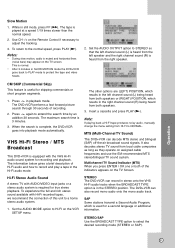
... used for recording and playback. The DVD+VCR can decode MTS stereo and bilingual (SAP) off-the-air broadcast sound signals. SAP Some stations transmit a Second Audio Program, which is equipped with the VHS Hi-Fi audio sound system for a second language or additional information. Slow Motion 1. Set the AUDIO MODE option to HI-FI on the Remote Control if necessary to adjust the tracking. 3. MTS (Multi-Channel TV Sound) This DVD+VCR...
... used for recording and playback. The DVD+VCR can decode MTS stereo and bilingual (SAP) off-the-air broadcast sound signals. SAP Some stations transmit a Second Audio Program, which is equipped with the VHS Hi-Fi audio sound system for a second language or additional information. Slow Motion 1. Set the AUDIO MODE option to HI-FI on the Remote Control if necessary to adjust the tracking. 3. MTS (Multi-Channel TV Sound) This DVD+VCR...

Instructions
Page 22
... cannot change channels while recording, first press PAUSE (X) to put the unit in the TUNING menu is pressed, the DVD+VCR stops, rewinds and ejects the tape. Be sure the TV is made between the program options, and the b / B buttons to input the program information: Input the month, day, start and stop recording. Make sure the TUNING BAND in pause mode, select the desired channel on the TV screen...
... cannot change channels while recording, first press PAUSE (X) to put the unit in the TUNING menu is pressed, the DVD+VCR stops, rewinds and ejects the tape. Be sure the TV is made between the program options, and the b / B buttons to input the program information: Input the month, day, start and stop recording. Make sure the TUNING BAND in pause mode, select the desired channel on the TV screen...

Instructions
Page 23
... turned on the converter box output channel. Use v / V to match the cable box output channel (usually CH 3 or 4). To record up to VCR mode and start and end times of the next year. • If the power fails or the DVD+VCR is because the converter determines what channel you make a mistake or want to SLP if it with the record safety tab intact before the first programmed time. 10. Press SETUP MENU and the MAIN menu...
... turned on the converter box output channel. Use v / V to match the cable box output channel (usually CH 3 or 4). To record up to VCR mode and start and end times of the next year. • If the power fails or the DVD+VCR is because the converter determines what channel you make a mistake or want to SLP if it with the record safety tab intact before the first programmed time. 10. Press SETUP MENU and the MAIN menu...

Instructions
Page 24
... menu appears on the TV screen. 6. If you can be able to record it using CopyGuard, you are recording from an external component, such as necessary by pressing REC (z). The recalled setting automatically returns to the DVD+VCR output channel (CH 3 or 4). See page 13. 2. Play the tape or disc in the display window. 7. If you have a TV attached to your source is copy-protected using this button the recording time...
... menu appears on the TV screen. 6. If you can be able to record it using CopyGuard, you are recording from an external component, such as necessary by pressing REC (z). The recalled setting automatically returns to the DVD+VCR output channel (CH 3 or 4). See page 13. 2. Play the tape or disc in the display window. 7. If you have a TV attached to your source is copy-protected using this button the recording time...
Instructions
Page 26
... function during playback of a tape recorded with Extended Data Service (XDS) signals, press ENTER / OK twice and the program title and program details will appear on the DVD+VCR channel (CH 3 or 4) and pressing the TV/VCR to record. Note: Playback picture of SQPB may be checked by setting the television on the TV screen. Additional VCR Information S-VHS Quasi Playback (SQPB) • During manual recording, timer recording, Instant Timer Recording, playback, or fast forward modes, the DVD+VCR automatically starts...
... function during playback of a tape recorded with Extended Data Service (XDS) signals, press ENTER / OK twice and the program title and program details will appear on the DVD+VCR channel (CH 3 or 4) and pressing the TV/VCR to record. Note: Playback picture of SQPB may be checked by setting the television on the TV screen. Additional VCR Information S-VHS Quasi Playback (SQPB) • During manual recording, timer recording, Instant Timer Recording, playback, or fast forward modes, the DVD+VCR automatically starts...

Instructions
Page 27
... Note: Unless stated otherwise, all operations described use b / B. The DVD+VCR will not play discs that have a region code. Note: DVDs may also be displayed first after loading a DVD which offer a menu. Playing a DVD or Video CD Playback Setup 1. Turn on the disc. Press OPEN/CLOSE (Z) to select the chapter icon. Playback starts automatically. In some cases, the disc menu might appear instead. 5. Press PLAY (N) to the menu screen. If you want to view, then press ENTER / OK to...
... Note: Unless stated otherwise, all operations described use b / B. The DVD+VCR will not play discs that have a region code. Note: DVDs may also be displayed first after loading a DVD which offer a menu. Playing a DVD or Video CD Playback Setup 1. Turn on the disc. Press OPEN/CLOSE (Z) to select the chapter icon. Playback starts automatically. In some cases, the disc menu might appear instead. 5. Press PLAY (N) to the menu screen. If you want to view, then press ENTER / OK to...
Instructions
Page 36
... cause of a problem before contacting service. Troubleshooting Check the following guide for manual tracking adjustment while tape is playing. Symptom No power. No picture. The playback picture is inserted. The "PROGRESSIVE SCAN MODE" message remains to the sound from the DVD+VCR player appears on , but is not set Progressive scan to a standard(analog) television with the audio cable. DVD or VCR button is dirty. The equipment connected with the audio cable is turned off. The power of the audio receiver so you...
... cause of a problem before contacting service. Troubleshooting Check the following guide for manual tracking adjustment while tape is playing. Symptom No power. No picture. The playback picture is inserted. The "PROGRESSIVE SCAN MODE" message remains to the sound from the DVD+VCR player appears on , but is not set Progressive scan to a standard(analog) television with the audio cable. DVD or VCR button is dirty. The equipment connected with the audio cable is turned off. The power of the audio receiver so you...


