
Instruction Manual
Page 6
... Time Code Operation Mode 46 Presetting the User's Bit 48 Setting Time Code Without Opening the Menu . . . . . .48 Setting User's Bit Without Opening the Menu 49 Recording Time Code in Continuation of the Recorded Time Code on SDHC card 49 Setting Zebra Pattern 50 Setting Spot Meter 51 Viewing Recorded Videos Immediately (Clip Review) . . . .52 Assigning Functions to User Buttons 53 Protecting Important Scenes (OK Mark Function 54 Special Recording 54 Pre REC 54 Clip Continuous REC 55 Variable Frame REC 56 Playback Playing Back Recorded Clips 57 Thumbnail Screen...
... Time Code Operation Mode 46 Presetting the User's Bit 48 Setting Time Code Without Opening the Menu . . . . . .48 Setting User's Bit Without Opening the Menu 49 Recording Time Code in Continuation of the Recorded Time Code on SDHC card 49 Setting Zebra Pattern 50 Setting Spot Meter 51 Viewing Recorded Videos Immediately (Clip Review) . . . .52 Assigning Functions to User Buttons 53 Protecting Important Scenes (OK Mark Function 54 Special Recording 54 Pre REC 54 Clip Continuous REC 55 Variable Frame REC 56 Playback Playing Back Recorded Clips 57 Thumbnail Screen...
Instruction Manual
Page 7
... reserved by JVC. Item 84 Status Display... Item 83 Marker Setting... Menu Display and Detailed Settings Basic Operations in this manual are subject to use this manual Ⅵ Symbols used in Menu Screen 66 Display and Description of the Menu Screen 66 Text Input with Software Keyboard 67 Menu Screen Hierarchical Chart 68 Main Menu Screen 70 Record Set Menu 71 Record Format Menu 71 Rec Mode Menu 71 Clip Set Menu 72 Audio Set Menu 72 Camera Function Menu 73 Switch Set... Item 80 TC/UB Menu 82 LCD/VF Menu 82 Shooting Assist...
... reserved by JVC. Item 84 Status Display... Item 83 Marker Setting... Menu Display and Detailed Settings Basic Operations in this manual are subject to use this manual Ⅵ Symbols used in Menu Screen 66 Display and Description of the Menu Screen 66 Text Input with Software Keyboard 67 Menu Screen Hierarchical Chart 68 Main Menu Screen 70 Record Set Menu 71 Record Format Menu 71 Rec Mode Menu 71 Clip Set Menu 72 Audio Set Menu 72 Camera Function Menu 73 Switch Set... Item 80 TC/UB Menu 82 LCD/VF Menu 82 Shooting Assist...
Instruction Manual
Page 9
...; Make use a clean cloth to the camera body. Check and replace the fan after the power is not a malfunction. Ⅵ When the video signal output terminals are for the European market and will be displayed every time you turn cloudy. Transportation Do not drop or hit this device at the periphery of the camera recorder. Heavy batteries may adhere to remove the detergent. Using this device against penetration...
...; Make use a clean cloth to the camera body. Check and replace the fan after the power is not a malfunction. Ⅵ When the video signal output terminals are for the European market and will be displayed every time you turn cloudy. Transportation Do not drop or hit this device at the periphery of the camera recorder. Heavy batteries may adhere to remove the detergent. Using this device against penetration...
Instruction Manual
Page 11
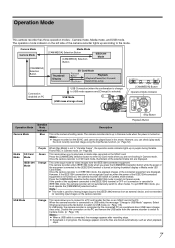
... three operation modes - Camera mode, Media mode, and USB mode. The camera recorder starts up according to USB ModeB appears. However, you can check (play back or delete clips recorded on during IEEE1394 mode to switch to other modes. If the power of the equipment connected to a PC and transfer the files on the camera recorder. Note : ● This mode is the input mode for recording input images on an SDHC card to Camera mode instead. When the camera recorder is turned on PC Thumbnail Display SD Card Mode Playback Button Playback (Playback/Pause...
... three operation modes - Camera mode, Media mode, and USB mode. The camera recorder starts up according to USB ModeB appears. However, you can check (play back or delete clips recorded on during IEEE1394 mode to switch to other modes. If the power of the equipment connected to a PC and transfer the files on the camera recorder. Note : ● This mode is the input mode for recording input images on an SDHC card to Camera mode instead. When the camera recorder is turned on PC Thumbnail Display SD Card Mode Playback Button Playback (Playback/Pause...
Instruction Manual
Page 18
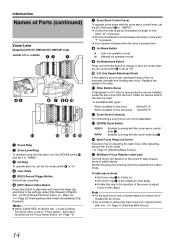
... be installed inside the lens hood from the front. M [ZOOM] Zoom Switch SERVO : Enables zooming with the zoom servo control lever, set too fast, opening/closing of the arrow to AMANU.B. D Lens Cable E [REC] Record Trigger Button Starts/stops recording. F [RET] Return Video Button Press this button to change to the settings under [Clip Review] of [Switch Set...] in the [Camera Function] menu. (A Page 74) ( A Page 52 [Viewing Recorded Videos Immediately (Clip Review)]) Memo : ● When [LENS RET] of [Switch Set...] in the direction of view when...
... be installed inside the lens hood from the front. M [ZOOM] Zoom Switch SERVO : Enables zooming with the zoom servo control lever, set too fast, opening/closing of the arrow to AMANU.B. D Lens Cable E [REC] Record Trigger Button Starts/stops recording. F [RET] Return Video Button Press this button to change to the settings under [Clip Review] of [Switch Set...] in the [Camera Function] menu. (A Page 74) ( A Page 52 [Viewing Recorded Videos Immediately (Clip Review)]) Memo : ● When [LENS RET] of [Switch Set...] in the direction of view when...
Instruction Manual
Page 25
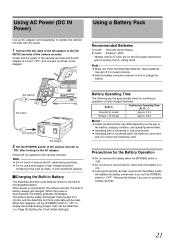
... DC cable when the battery is disconnected, the battery gradually discharges. Remove the battery if you set the [POWER] switch to AOFFB. Check that the power of high voltage fluctuation, containing noise such as shown in cold environment. ● Operating time is shortened when the electronic zoom lens and LCD screen are not using the camera recorder. 21 When power is turned AOFFB and connect as ripple, or with insufficient capacity. ⅥCharging...
... DC cable when the battery is disconnected, the battery gradually discharges. Remove the battery if you set the [POWER] switch to AOFFB. Check that the power of high voltage fluctuation, containing noise such as shown in cold environment. ● Operating time is shortened when the electronic zoom lens and LCD screen are not using the camera recorder. 21 When power is turned AOFFB and connect as ripple, or with insufficient capacity. ⅥCharging...
Instruction Manual
Page 28
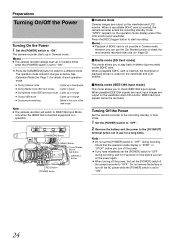
... [CAM/MEDIA] button to switch to play back or delete clips recorded on the power again. ● When turning off the AC power while the [POWER] switch is inserted, the camera recorder enters the recording standby mode. Press the [REC] trigger button to start up in use the Clip Review function to AOFFB. When a recordable SDHC card is set the [POWER] switch of the LCD monitor and viewfinder. Turning Off the Power Set the camera recorder to the recording standby or stop mode. 1 Set the [POWER] switch to...
... [CAM/MEDIA] button to switch to play back or delete clips recorded on the power again. ● When turning off the AC power while the [POWER] switch is inserted, the camera recorder enters the recording standby mode. Press the [REC] trigger button to start up in use the Clip Review function to AOFFB. When a recordable SDHC card is set the [POWER] switch of the LCD monitor and viewfinder. Turning Off the Power Set the camera recorder to the recording standby or stop mode. 1 Set the [POWER] switch to...

Instruction Manual
Page 38
... recently captured images (Clip Review) Press the [RET] button on the power of the LCD monitor and viewfinder. (A Page 28) Shooting 1 Configure the video and audio input settings. After playback, the camera recorder returns to standby mode (STBY). * When [Main Menu]B[Camera Function]B[Switch Set...]B[LENS RET] is ready for audio recording. ● Adjusting the Iris (A Page 37) ● Setting Gain (A Page 37) ● Setting the Electronic Shutter (A Page 38) ● Adjusting the White Balance (A Page 40) ● Adjusting the White Shading...
... recently captured images (Clip Review) Press the [RET] button on the power of the LCD monitor and viewfinder. (A Page 28) Shooting 1 Configure the video and audio input settings. After playback, the camera recorder returns to standby mode (STBY). * When [Main Menu]B[Camera Function]B[Switch Set...]B[LENS RET] is ready for audio recording. ● Adjusting the Iris (A Page 37) ● Setting Gain (A Page 37) ● Setting the Electronic Shutter (A Page 38) ● Adjusting the White Balance (A Page 40) ● Adjusting the White Shading...

Instruction Manual
Page 39
... images, audio and accompanying data which is assigned in the recording order. Clips may be made on the lens. * Set [Main Menu]B[Camera Function]B[Switch Set...]B[LENS RET] to the file size. Memo : ● Before recording starts, you can set any 4 alphanumeric characters) This is set to stop are recorded from start to AxxxGB (AxxxB denotes the last 3 digits of the serial number) by default. However, they can be reset in the menu. * [Clip Set]B[Reset...
... images, audio and accompanying data which is assigned in the recording order. Clips may be made on the lens. * Set [Main Menu]B[Camera Function]B[Switch Set...]B[LENS RET] to the file size. Memo : ● Before recording starts, you can set any 4 alphanumeric characters) This is set to stop are recorded from start to AxxxGB (AxxxB denotes the last 3 digits of the serial number) by default. However, they can be reset in the menu. * [Clip Set]B[Reset...
Instruction Manual
Page 48
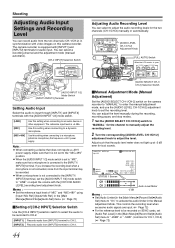
...-1/CH-2) in the [Main Menu]B[Record Set]B[Audio Set] menu. (A Page 72) ⅥSetting of AMICB and AMIC+48VB using [Input1 Mic Ref.]/[Input2 Mic Ref.] in synchronization with video images on this camera recorder. You can select a recording channel and the adjustment mode (manual/ automatic). [CH-2 INPUT] Selection Switch Adjusting Audio Recording Level You can adjust the level manually during the recording, recording pause, and stop modes. 1 Set the [AUDIO SELECT CH-1/CH-2] switch to a dynamic microphone. Note : ● When connecting a device that does not require a +48...
...-1/CH-2) in the [Main Menu]B[Record Set]B[Audio Set] menu. (A Page 72) ⅥSetting of AMICB and AMIC+48VB using [Input1 Mic Ref.]/[Input2 Mic Ref.] in synchronization with video images on this camera recorder. You can select a recording channel and the adjustment mode (manual/ automatic). [CH-2 INPUT] Selection Switch Adjusting Audio Recording Level You can adjust the level manually during the recording, recording pause, and stop modes. 1 Set the [AUDIO SELECT CH-1/CH-2] switch to a dynamic microphone. Note : ● When connecting a device that does not require a +48...

Instruction Manual
Page 49
... Level] in the [Camera Function]B[FULL AUTO...] menu is set the volume of the monitor audio with the [MONITOR SELECT] switch. [CH-1] [BOTH] [CH-2] Outputs audio from [INPUT1] terminal. Alarm tone is also output when the SDHC card is full or when the battery is disabled. Memo : ● When [Audio] in the [Main Menu]B[Others] menu. (AOffB/ALowB/AMiddleB/ AHighB) (A Page 87) Audio Monitor During Recording You can check the input audio with...
... Level] in the [Camera Function]B[FULL AUTO...] menu is set the volume of the monitor audio with the [MONITOR SELECT] switch. [CH-1] [BOTH] [CH-2] Outputs audio from [INPUT1] terminal. Alarm tone is also output when the SDHC card is full or when the battery is disabled. Memo : ● When [Audio] in the [Main Menu]B[Others] menu. (AOffB/ALowB/AMiddleB/ AHighB) (A Page 87) Audio Monitor During Recording You can check the input audio with...
Instruction Manual
Page 53
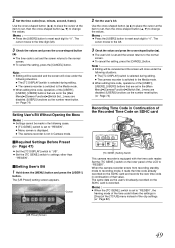
... [TC DISPLAY] switch is selected during editing. ● The camera recorder is switched to the Media mode. ● When editing time code, operations of the [USER1], [USER2], [USER3] buttons that are set in the [Main Menu]B[Camera Function]B[Switch Set...] menu are disabled. [USER2] functions as the number reset button. (A Page 74) Recording Time Code in Continuation of the Recorded Time Code on the SDHC card and records the new time code in continuation of the LCD to change the values. Use the cross-shaped button (H, I ) to...
... [TC DISPLAY] switch is selected during editing. ● The camera recorder is switched to the Media mode. ● When editing time code, operations of the [USER1], [USER2], [USER3] buttons that are set in the [Main Menu]B[Camera Function]B[Switch Set...] menu are disabled. [USER2] functions as the number reset button. (A Page 74) Recording Time Code in Continuation of the Recorded Time Code on the SDHC card and records the new time code in continuation of the LCD to change the values. Use the cross-shaped button (H, I ) to...

Instruction Manual
Page 60
... set to AAE LEVEL/VFRB, you to select the frame rate during recording. Using different frame rate settings for recording and playback., videos captured at normal speed can use the cross-shaped button (HI) to obtain smooth slow motion or quick motion videos. Variable Frame REC is only enabled under the following situations. ● [Camera Resolution] in the [Record Format] menu is set to A1280x720B. ● [Frame & Bit Rate] in the [Main Menu]B[Camera Function]B[Switch Set...] menu is set...
... set to AAE LEVEL/VFRB, you to select the frame rate during recording. Using different frame rate settings for recording and playback., videos captured at normal speed can use the cross-shaped button (HI) to obtain smooth slow motion or quick motion videos. Variable Frame REC is only enabled under the following situations. ● [Camera Resolution] in the [Record Format] menu is set to A1280x720B. ● [Frame & Bit Rate] in the [Main Menu]B[Camera Function]B[Switch Set...] menu is set...

Instruction Manual
Page 74
... during shooting. These items are displayed in Media mode. (A Page 82) A/V Out Item for specifying connection settings with external devices. (A Page 86) Others Media Menu screen for specifying video or audio settings during recording or in Camera mode. (A Page 73) Camera Process Menu screen for specifying settings related to this item only in Media mode. (A Page 71) Camera Function Menu screen for setting time code and user's bit. The cursor moves to the Focus Assist mode, zebra pattern display, screen size, marker, and safety zone. Settings of camera images...
... during shooting. These items are displayed in Media mode. (A Page 82) A/V Out Item for specifying connection settings with external devices. (A Page 86) Others Media Menu screen for specifying video or audio settings during recording or in Camera mode. (A Page 73) Camera Process Menu screen for specifying settings related to this item only in Media mode. (A Page 71) Camera Function Menu screen for setting time code and user's bit. The cursor moves to the Focus Assist mode, zebra pattern display, screen size, marker, and safety zone. Settings of camera images...

Instruction Manual
Page 91
Mix : Outputs mixed sound (outputs mixed sound of the camera recorder's tally lamps (front/back). Low : Outputs alarm tone at a high volume level. Operation Mode Color Camera Mode Blue/Purple Media Mode (SD Card Mode) Green Media Mode (IEEE1394 Mode) Orange USB Mode Orange Studio Ext Int On Blink Off On Blink Off For setting the display conditions of CH-1 and CH-2 to both L and R). Studio : Displays according to the operation mode. (A Page 7) Off : Turns off the tally lamp. 87 For specifying...
Mix : Outputs mixed sound (outputs mixed sound of the camera recorder's tally lamps (front/back). Low : Outputs alarm tone at a high volume level. Operation Mode Color Camera Mode Blue/Purple Media Mode (SD Card Mode) Green Media Mode (IEEE1394 Mode) Orange USB Mode Orange Studio Ext Int On Blink Off On Blink Off For setting the display conditions of CH-1 and CH-2 to both L and R). Studio : Displays according to the operation mode. (A Page 7) Off : Turns off the tally lamp. 87 For specifying...

Instruction Manual
Page 93
... Set button to different shooting conditions. Setup File Manage Menu Menu settings and button operations ([SHUTTER], [AE LEVEL], etc.) can be restored. Item Setting Values Function Load File... ^ Loads the settings. (A Page 110) Store File... ^ Saves the settings. (A Page 109) Reset File... ^ Restores the saved settings to be saved. However, it is useful to save settings according to format (initialize) the card. ( A Page 32 [Formatting (Initializing) SDHC Cards]) For restoring an SDHC card. It is not selectable when recording in bold characters. Media Menu...
... Set button to different shooting conditions. Setup File Manage Menu Menu settings and button operations ([SHUTTER], [AE LEVEL], etc.) can be restored. Item Setting Values Function Load File... ^ Loads the settings. (A Page 110) Store File... ^ Saves the settings. (A Page 109) Reset File... ^ Restores the saved settings to be saved. However, it is useful to save settings according to format (initialize) the card. ( A Page 32 [Formatting (Initializing) SDHC Cards]) For restoring an SDHC card. It is not selectable when recording in bold characters. Media Menu...

Instruction Manual
Page 103
... of the power supply in the [LCD/ VF] menu. (A Page 85) I B 123 min OK 67.8min STBY STOP REC REVIEW E FG H Item A Audio Level Meter Description Displays the audio levels of the connected external device. Enlarged Status Display on LCD Monitor You can be displayed in red) : Clip Continuous recording pause (A Page 55) STOP : Unable to record to the instruction manual of the corresponding external device. Displays the video format that is set using [Battery Info] of [Status Display...] in use. Currently powered by an...
... of the power supply in the [LCD/ VF] menu. (A Page 85) I B 123 min OK 67.8min STBY STOP REC REVIEW E FG H Item A Audio Level Meter Description Displays the audio levels of the connected external device. Enlarged Status Display on LCD Monitor You can be displayed in red) : Clip Continuous recording pause (A Page 55) STOP : Unable to record to the instruction manual of the corresponding external device. Displays the video format that is set using [Battery Info] of [Status Display...] in use. Currently powered by an...

Instruction Manual
Page 112
... cursor. Use the crossshaped button (JKHI) to input the selected character at the current position of the character cursor B. Cursor [Store File...] Menu Screen Memo : ● Files cannot be written in the following cases. (Displayed in gray, selection disabled) ● The inserted SDHC card is not supported (those other than SDHC Class 6 cards, or unformatted cards). (File name appears as A---B.) ● Write-protect switch of...
... cursor. Use the crossshaped button (JKHI) to input the selected character at the current position of the character cursor B. Cursor [Store File...] Menu Screen Memo : ● Files cannot be written in the following cases. (Displayed in gray, selection disabled) ● The inserted SDHC card is not supported (those other than SDHC Class 6 cards, or unformatted cards). (File name appears as A---B.) ● Write-protect switch of...

Instruction Manual
Page 116
... 3 seconds. ⅥChecking Videos Recorded on the External Device (IEEE1394 Input mode of Media mode) When images are appropriate, video images will be stream output from an external device, and not intended for the [Frame & Bit Rate] setting. 4 Perform the following settings on the camera recorder (master device). Refer to [Status Screen in Media mode (SD Card mode) and power of the device connected to the [IEEE1394] terminal is turned on, pressing the [CAM/MEDIA] selection button displays the playback images of this mode is to...
... 3 seconds. ⅥChecking Videos Recorded on the External Device (IEEE1394 Input mode of Media mode) When images are appropriate, video images will be stream output from an external device, and not intended for the [Frame & Bit Rate] setting. 4 Perform the following settings on the camera recorder (master device). Refer to [Status Screen in Media mode (SD Card mode) and power of the device connected to the [IEEE1394] terminal is turned on, pressing the [CAM/MEDIA] selection button displays the playback images of this mode is to...

Instruction Manual
Page 126
... megapixels (852 x 480 x 3) Lens Section (GY-HM700U/GY-HM700E only) Lens Filter diameter : Canon F/1.6, 14x, f = 4.4-61.6 mm (35 mm conversion: 32-448 mm) : 82 mm 122 Storage Section Supported media Slots : SDHC (Class 6) : x2 Video/Audio Recording time : Video HQ mode SP mode : Audio Video frame rate : NTSC settings HQ mode SP mode : PAL setting HQ mode SP mode : Approx. 25 minutes (8 GB SDHC card, 35 Mbps, VBR mode) : MPEG-2 Long GOP : VBR...
... megapixels (852 x 480 x 3) Lens Section (GY-HM700U/GY-HM700E only) Lens Filter diameter : Canon F/1.6, 14x, f = 4.4-61.6 mm (35 mm conversion: 32-448 mm) : 82 mm 122 Storage Section Supported media Slots : SDHC (Class 6) : x2 Video/Audio Recording time : Video HQ mode SP mode : Audio Video frame rate : NTSC settings HQ mode SP mode : PAL setting HQ mode SP mode : Approx. 25 minutes (8 GB SDHC card, 35 Mbps, VBR mode) : MPEG-2 Long GOP : VBR...


