Instructions
Page 2
WARNING: THIS APPARATUS MUST BE EARTHED. If you are unable to the product. only) CAUTION: Changes or modification not approved by JVC could fall , causing serious injury to a child or adult, and serious damage to insert the plug into the outlet, contact your... found to operate the equipment. In order not to Part 15 of these Important Safeguards carefully before use immediately after moving from overheating. This projector is used in installation such as they may result in a particular installation. These limits are provided for cleaning. - If the installation place is...
WARNING: THIS APPARATUS MUST BE EARTHED. If you are unable to the product. only) CAUTION: Changes or modification not approved by JVC could fall , causing serious injury to a child or adult, and serious damage to insert the plug into the outlet, contact your... found to operate the equipment. In order not to Part 15 of these Important Safeguards carefully before use immediately after moving from overheating. This projector is used in installation such as they may result in a particular installation. These limits are provided for cleaning. - If the installation place is...
Instructions
Page 3
..., hit, or damage the light-source lamp (lamp unit) in any kind on the label. It may cause injuries. - Do not ceiling-mount the projector to a place which could lead to lightning and power line surges. - This product is in performance this indicates a need for installation. This plug will ...away from a broken light-source lamp may cause the light-source lamp to break and lead to service this unit and its surrounding as this projector is enclosed in impaired eyesight. - Do not look into this product to install the unit (e.g. Do not use an air-conditioner so that ...
..., hit, or damage the light-source lamp (lamp unit) in any kind on the label. It may cause injuries. - Do not ceiling-mount the projector to a place which could lead to lightning and power line surges. - This product is in performance this indicates a need for installation. This plug will ...away from a broken light-source lamp may cause the light-source lamp to break and lead to service this unit and its surrounding as this projector is enclosed in impaired eyesight. - Do not look into this product to install the unit (e.g. Do not use an air-conditioner so that ...
Instructions
Page 8
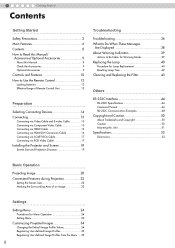
... via HDMI Cable 16 Connecting via HDMI-DVI Conversion Cable 16 Connecting via SCART-RCA Cable 17 Connecting via RGB Video Cable 17 Installing the Projector and Screen 18 Screen Size and Projection Distance 19 Troubleshooting Troubleshooting 36 What to Do When These Messages Are Displayed 38 About Warning Indicators 39...
... via HDMI Cable 16 Connecting via HDMI-DVI Conversion Cable 16 Connecting via SCART-RCA Cable 17 Connecting via RGB Video Cable 17 Installing the Projector and Screen 18 Screen Size and Projection Distance 19 Troubleshooting Troubleshooting 36 What to Do When These Messages Are Displayed 38 About Warning Indicators 39...
Instructions
Page 12
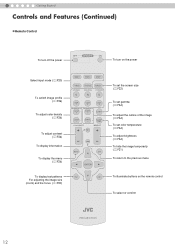
1 Getting Started Controls and Features (Continued) „ Remote Control To turn on the remote control To select or confirm PROJECTOR 12 ON To turn off the power OFF ........ SHARP - CONTRAST COLOR TEMP BRIGHT INFO HIDE MENU EXIT ENTER To set the screen size (pP22) To ...
1 Getting Started Controls and Features (Continued) „ Remote Control To turn on the remote control To select or confirm PROJECTOR 12 ON To turn off the power OFF ........ SHARP - CONTRAST COLOR TEMP BRIGHT INFO HIDE MENU EXIT ENTER To set the screen size (pP22) To ...
Instructions
Page 13
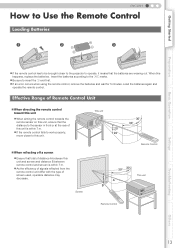
... Getting Started Preparation Basic Operation ENGLISH How to Use the Remote Control Loading Batteries 1 2 3 z If the remote control has to be brought closer to the projector to the sensor in front or at the rear of this unit is within 7 m.
... Getting Started Preparation Basic Operation ENGLISH How to Use the Remote Control Loading Batteries 1 2 3 z If the remote control has to be brought closer to the projector to the sensor in front or at the rear of this unit is within 7 m.
Instructions
Page 18
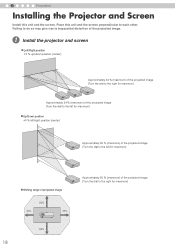
... Screen Install this unit and the screen perpendicular to each other. A Install the projector and screen „ Left/Right position *0 % up/down position (center) Approximately 34 % (maximum) of the projected image (Turn the dial to the right for maximum) ...
... Screen Install this unit and the screen perpendicular to each other. A Install the projector and screen „ Left/Right position *0 % up/down position (center) Approximately 34 % (maximum) of the projected image (Turn the dial to the right for maximum) ...
Instructions
Page 20
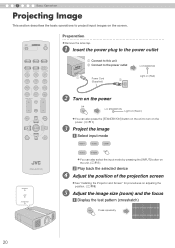
...Select input mode HDMI 1 HDMI 2 COMP. ON Preparation z Remove the lens cap. CONTRAST COLOR TEMP BRIGHT INFO HIDE MENU EXIT ENTER TEST LIGHT PROJECTOR WARNING LAMP STANDBY/ON A Connect to this unit B Connect to the power outlet A Power Cord (Supplied) B A STANDBY/ON Light on (... on the unit. (pP11) b Play back the selected device D Adjust the position of the projection screen E z See "Installing the Projector and Screen" for procedures on the screen. OFF ........ 3 Basic Operation Projecting Image This section describes the basic operations to project input images ...
...Select input mode HDMI 1 HDMI 2 COMP. ON Preparation z Remove the lens cap. CONTRAST COLOR TEMP BRIGHT INFO HIDE MENU EXIT ENTER TEST LIGHT PROJECTOR WARNING LAMP STANDBY/ON A Connect to this unit B Connect to the power outlet A Power Cord (Supplied) B A STANDBY/ON Light on (... on the unit. (pP11) b Play back the selected device D Adjust the position of the projection screen E z See "Installing the Projector and Screen" for procedures on the screen. OFF ........ 3 Basic Operation Projecting Image This section describes the basic operations to project input images ...

Instructions
Page 22
... image or hide the surrounding area of the projected image. ON HDMI 1 HDMI 2 COMP. CONTRAST COLOR TEMP BRIGHT INFO HIDE MENU EXIT ENTER TEST LIGHT PROJECTOR Setting the Screen Size The projected image can be set from "Aspect" of DVD software Aspect Ratio: Same Small image is projected Aspect Ratio: Landscape...
... image or hide the surrounding area of the projected image. ON HDMI 1 HDMI 2 COMP. CONTRAST COLOR TEMP BRIGHT INFO HIDE MENU EXIT ENTER TEST LIGHT PROJECTOR Setting the Screen Size The projected image can be set from "Aspect" of DVD software Aspect Ratio: Same Small image is projected Aspect Ratio: Landscape...
Instructions
Page 24
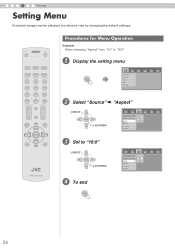
CONTRAST COLOR TEMP BRIGHT INFO HIDE MENU EXIT ENTER TEST LIGHT PROJECTOR Procedures for Menu Operation Example: When changing "Aspect" from "4:3" to "16:9" ASELECT ENTER BCONFIRM Image Setup Source Install. Func. ON HDMI 1 HDMI 2 COMP. OFF ........ VIDEO ...
CONTRAST COLOR TEMP BRIGHT INFO HIDE MENU EXIT ENTER TEST LIGHT PROJECTOR Procedures for Menu Operation Example: When changing "Aspect" from "4:3" to "16:9" ASELECT ENTER BCONFIRM Image Setup Source Install. Func. ON HDMI 1 HDMI 2 COMP. OFF ........ VIDEO ...
Instructions
Page 31
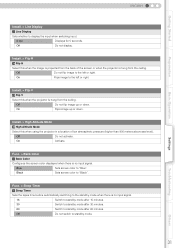
...60 minutes. Off Do not activate. Install. > High Altitude Mode d High Altitude Mode Select this when using the projector in a location of the screen or when the projector is hung from the ceiling. Blue Sets screen color to "Black". On Flips image up or down . Settings ... not switch to display the input when switching input. 5 sec Displays for 5 seconds. Install. > Flip H b Flip H Select this when the projector is hung from the ceiling. Func. > Sleep Timer f Sleep Timer Sets the lapse time before automatically switching to the standby mode when there is no...
...60 minutes. Off Do not activate. Install. > High Altitude Mode d High Altitude Mode Select this when using the projector in a location of the screen or when the projector is hung from the ceiling. Blue Sets screen color to "Black". On Flips image up or down . Settings ... not switch to display the input when switching input. 5 sec Displays for 5 seconds. Install. > Flip H b Flip H Select this when the projector is hung from the ceiling. Func. > Sleep Timer f Sleep Timer Sets the lapse time before automatically switching to the standby mode when there is no...
Instructions
Page 34
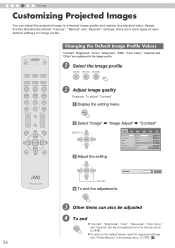
... NATURAL ASPECT DYNAMIC N D USER 1 USER 2 USER 3 COLOR + SHARP + GAMMA COLOR - Gamma Offset Pixel Adjust Contrast 0 Brightness 0 Color 0 Tint 4 Sharpness 0 DNR 0 c Adjust the setting ENTER Contrast 0 PROJECTOR ADJUST d To end the adjustments EXIT C Other items can also be adjusted from the remote control. (pP12) z To return to a desired image quality and register...
... NATURAL ASPECT DYNAMIC N D USER 1 USER 2 USER 3 COLOR + SHARP + GAMMA COLOR - Gamma Offset Pixel Adjust Contrast 0 Brightness 0 Color 0 Tint 4 Sharpness 0 DNR 0 c Adjust the setting ENTER Contrast 0 PROJECTOR ADJUST d To end the adjustments EXIT C Other items can also be adjusted from the remote control. (pP12) z To return to a desired image quality and register...
Instructions
Page 42
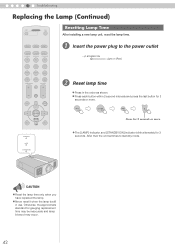
... power outlet A STANDBY/ON Light on (Red) B Reset lamp time z Press in use. EXIT ENTER HIDE Press for 2 seconds or more WARNING LAMP STANDBY/ON PROJECTOR z The [LAMP] indicator and [STANDBY/ON] indicator blink alternately for 2 seconds or more. 5 Troubleshooting Replacing the Lamp (Continued) OFF ........ CAUTION z Reset the lamp time only...
... power outlet A STANDBY/ON Light on (Red) B Reset lamp time z Press in use. EXIT ENTER HIDE Press for 2 seconds or more WARNING LAMP STANDBY/ON PROJECTOR z The [LAMP] indicator and [STANDBY/ON] indicator blink alternately for 2 seconds or more. 5 Troubleshooting Replacing the Lamp (Continued) OFF ........ CAUTION z Reset the lamp time only...
Instructions
Page 52
...Component Video Input (COMPONENT) HDMI Input (HDMI 1, HDMI 2) Power Requirements Power Consumption Operation Environment Installation Height Dimensions (Width c Height c Depth) Mass Accessories D-ILA Projector DLA-HD100 D-ILA device 1 2 / 0.7" (1920 pixels c1080 pixels) c 3 (Total no. Only 0.01 % or less of the pixels are either missing or would remain... lit up. *3 HDCP is 99.99 %. Pixel effectiveness is the abbreviation for Direct drive Image Light Amplifier. *2 D-ILA devices are subject to change without prior notice. • Please note that some of HDMI input terminal may not be ...
...Component Video Input (COMPONENT) HDMI Input (HDMI 1, HDMI 2) Power Requirements Power Consumption Operation Environment Installation Height Dimensions (Width c Height c Depth) Mass Accessories D-ILA Projector DLA-HD100 D-ILA device 1 2 / 0.7" (1920 pixels c1080 pixels) c 3 (Total no. Only 0.01 % or less of the pixels are either missing or would remain... lit up. *3 HDCP is 99.99 %. Pixel effectiveness is the abbreviation for Direct drive Image Light Amplifier. *2 D-ILA devices are subject to change without prior notice. • Please note that some of HDMI input terminal may not be ...

Instructions
Page 55
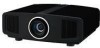
DLA-HD100 FOR SERVICING (Only in U.S.A.) D-ILA PROJECTOR PROJECTEUR D-ILA PROYECTOR D-ILA © 2007 Victor Company of Japan, Limited 1007TTH-SW-VP
DLA-HD100 FOR SERVICING (Only in U.S.A.) D-ILA PROJECTOR PROJECTEUR D-ILA PROYECTOR D-ILA © 2007 Victor Company of Japan, Limited 1007TTH-SW-VP


