
Software Guide
Page 13
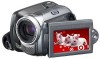
... captured with the USB cable. To USB connector Camera 1 To assure safety, make sure all units are turned off the camera causes malfunctions of the battery pack. ● When the USB cable is running during CyberLink DVD Solution installation. If it is connected, turning on the provided software. CONTINUED ON NEXT...
... captured with the USB cable. To USB connector Camera 1 To assure safety, make sure all units are turned off the camera causes malfunctions of the battery pack. ● When the USB cable is running during CyberLink DVD Solution installation. If it is connected, turning on the provided software. CONTINUED ON NEXT...
Software Guide
Page 21
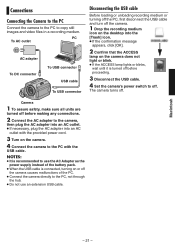
... camera to the PC to the PC, not through the hub. ● Do not use the AC Adapter as the power supply instead of the battery pack. ● When the USB cable is turned off . PC To AC outlet AC adapter To DC connector To USB connector USB cable To USB...
... camera to the PC to the PC, not through the hub. ● Do not use the AC Adapter as the power supply instead of the battery pack. ● When the USB cable is turned off . PC To AC outlet AC adapter To DC connector To USB connector USB cable To USB...

Instructions
Page 1
Retain this information for purchasing this product. Serial No. Before use of the camera) below. EN LYT1533-001D Model No. INSTRUCTIONS HARD DISK CAMCORDER GZ-MG37U GZ-MG27U ENGLISH GETTING STARTED 8 RECORDING 16 20 26 PLAYBACK 30 EDITING/PRINTING 36 DUBBING 47 MENU SETTINGS 52 To deactivate the demonstration mode, set "DEMO ... future reference. FURTHER INFORMATION 58 For Customer Use: Enter the Model No. (located on the bottom of the camera) and Serial No. (located on the battery pack mount of this hard disk camera.
Retain this information for purchasing this product. Serial No. Before use of the camera) below. EN LYT1533-001D Model No. INSTRUCTIONS HARD DISK CAMCORDER GZ-MG37U GZ-MG27U ENGLISH GETTING STARTED 8 RECORDING 16 20 26 PLAYBACK 30 EDITING/PRINTING 36 DUBBING 47 MENU SETTINGS 52 To deactivate the demonstration mode, set "DEMO ... future reference. FURTHER INFORMATION 58 For Customer Use: Enter the Model No. (located on the bottom of the camera) and Serial No. (located on the battery pack mount of this hard disk camera.

Instructions
Page 3
...you have been recorded correctly. In this case, battery charge starts if the battery is attached to Handle the Hard Disk Camera EN 3 Please read the following instructions before using the camera. How to the camera. Using generic non-JVC batteries can prevent it again. ● This product ...off before using it from the AC adapter. INFORMATION Video recording (with a JVC Data Battery. Reset the camera if it only in well-ventilated areas. ● After 5 minutes has elapsed in hard disk or SD cards. Factors such as background noise and interference can cause damage...
...you have been recorded correctly. In this case, battery charge starts if the battery is attached to Handle the Hard Disk Camera EN 3 Please read the following instructions before using the camera. How to the camera. Using generic non-JVC batteries can prevent it again. ● This product ...off before using it from the AC adapter. INFORMATION Video recording (with a JVC Data Battery. Reset the camera if it only in well-ventilated areas. ● After 5 minutes has elapsed in hard disk or SD cards. Factors such as background noise and interference can cause damage...

Instructions
Page 4
... and maintenance (servicing) instructions in a malfunction. This can result in dropping the unit, or in the literature accompanying the appliance. Replace battery with water or liquids (such as cosmetics or medicines, flower vases, potted plants, cups etc.) on the bottom and/or the back...has sufficient space on all sides to allow for ventilation (10 cm (3-15/ 16") or more on both sides, on Replaceable lithium battery The battery used battery promptly. ● Keep away from children. ● Do not disassemble and do not place any containers filled with Panasonic (Matsushita ...
... and maintenance (servicing) instructions in a malfunction. This can result in dropping the unit, or in the literature accompanying the appliance. Replace battery with water or liquids (such as cosmetics or medicines, flower vases, potted plants, cups etc.) on the bottom and/or the back...has sufficient space on all sides to allow for ventilation (10 cm (3-15/ 16") or more on both sides, on Replaceable lithium battery The battery used battery promptly. ● Keep away from children. ● Do not disassemble and do not place any containers filled with Panasonic (Matsushita ...
Instructions
Page 6
... 12 Language Setting 13 Date/Time Setting 13 Other Settings 14 Grip Adjustment 14 Tripod Mounting 14 Data Battery System 14 When Using an SD Card 15 RECORDING Video Video Recording 16 Registering Files to Events 17 Zooming 18 Changing the Screen Size 18 ...
... 12 Language Setting 13 Date/Time Setting 13 Other Settings 14 Grip Adjustment 14 Tripod Mounting 14 Data Battery System 14 When Using an SD Card 15 RECORDING Video Video Recording 16 Registering Files to Events 17 Zooming 18 Changing the Screen Size 18 ...

Instructions
Page 8
8 EN Accessories or AC Adapter AP-V18U / AP-V14U Battery Pack BN-VF707U Audio/Video Cable USB Cable (੬ SOFTWARE INSTALLATION AND USB CONNECTION GUIDE) Shoulder Strap (੬ pg. 9) Lens Cap (੬ pg. 9) CD-ROM Remote Control Unit RM-V730U (੬ pg. 33) Lithium Battery CR2025 (for Cables (੬ pg. 9) Large (A): Audio/Video Cable Large (B): USB Cable Small : DC Cord Core Filter for remote control unit) Pre-installed in the remote control unit at time of shipment.
8 EN Accessories or AC Adapter AP-V18U / AP-V14U Battery Pack BN-VF707U Audio/Video Cable USB Cable (੬ SOFTWARE INSTALLATION AND USB CONNECTION GUIDE) Shoulder Strap (੬ pg. 9) Lens Cap (੬ pg. 9) CD-ROM Remote Control Unit RM-V730U (੬ pg. 33) Lithium Battery CR2025 (for Cables (੬ pg. 9) Large (A): Audio/Video Cable Large (B): USB Cable Small : DC Cord Core Filter for remote control unit) Pre-installed in the remote control unit at time of shipment.
Instructions
Page 11
...49) (੬ pg. 26, 30) k Index Button [INDEX] (੬ pg. 28)/Remaining Space Button [ ] (੬ pg. 19)/Data Battery Button [ ] (੬ pg. 14) l Battery Release Button [BATT.] (੬ pg. 12) Connectors The connectors are located beneath the covers. Do not turn off the power or remove the...when connecting to a DVD burner [sold separately].) (੬ pg. 47) Other Parts T Reset Button [RESET] (੬ pg. 58) U Speaker (੬ pg. 26) V Battery Pack Mount (੬ pg. 12) W Camera Sensor Remote Sensor (੬ pg. 33) X Lens Y Stereo Microphone a LED Light (੬ pg. 18, 21) b Grip ...
...49) (੬ pg. 26, 30) k Index Button [INDEX] (੬ pg. 28)/Remaining Space Button [ ] (੬ pg. 19)/Data Battery Button [ ] (੬ pg. 14) l Battery Release Button [BATT.] (੬ pg. 12) Connectors The connectors are located beneath the covers. Do not turn off the power or remove the...when connecting to a DVD burner [sold separately].) (੬ pg. 47) Other Parts T Reset Button [RESET] (੬ pg. 58) U Speaker (੬ pg. 26) V Battery Pack Mount (੬ pg. 12) W Camera Sensor Remote Sensor (੬ pg. 33) X Lens Y Stereo Microphone a LED Light (੬ pg. 18, 21) b Grip ...
Instructions
Page 12
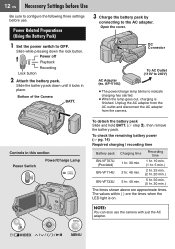
...Controls in place. 12 EN Necessary Settings before use the camera with just the AC adapter. Slide the battery pack down the lock button. Power off Playback Recording Lock button 2 Attach the battery pack. AP-V14U) To AC Outlet (110V to 240V) ● The power/charge lamp blinks to ...the AC adapter. To check the remaining battery power (੬ pg. 14) Required charging / recording time Battery pack Charging time Recording time BN-VF707U (Provided) 1 hr. 30 min. 1 hr. 10 min. (1 hr. 5 min.) BN-VF714U 2 ...
...Controls in place. 12 EN Necessary Settings before use the camera with just the AC adapter. Slide the battery pack down the lock button. Power off Playback Recording Lock button 2 Attach the battery pack. AP-V14U) To AC Outlet (110V to 240V) ● The power/charge lamp blinks to ...the AC adapter. To check the remaining battery power (੬ pg. 14) Required charging / recording time Battery pack Charging time Recording time BN-VF707U (Provided) 1 hr. 30 min. 1 hr. 10 min. (1 hr. 5 min.) BN-VF714U 2 ...
Instructions
Page 14
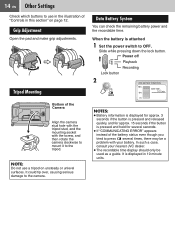
... adjustments. Tripod Mounting Bottom of the Camera Align the camera stud hole with the tripod stud, and the mounting socket with your nearest JVC dealer. ● The recordable time display should only be a problem with the screw, and then rotate the camera clockwise to mount ..." on unsteady or unlevel surfaces. Slide while pressing down the lock button. Power off Playback Recording Lock button 2 BATTERY CONDITION 100% 50% MAX TIME min 0% NOTES: ● Battery information is displayed for approx. 3 seconds if the button is pressed and released quickly, and for approx. 15 ...
... adjustments. Tripod Mounting Bottom of the Camera Align the camera stud hole with the tripod stud, and the mounting socket with your nearest JVC dealer. ● The recordable time display should only be a problem with the screw, and then rotate the camera clockwise to mount ..." on unsteady or unlevel surfaces. Slide while pressing down the lock button. Power off Playback Recording Lock button 2 BATTERY CONDITION 100% 50% MAX TIME min 0% NOTES: ● Battery information is displayed for approx. 3 seconds if the button is pressed and released quickly, and for approx. 15 ...

Instructions
Page 17
... PAGE]. ● To cancel the event registration, select [NON SECTION]. Unless you change the setting, you do, the sound of the hard disk drive may be stopped to MOV_00F.MOD, and MOV_010.MOD in MPEG2 format compliant with other digital video formats. ● Before recording important ... 1 1 1 1 1 1 1 NON SECTION NEXT PAGE 4 Select the event that this case, turn off . Press the REC/SNAP button to . When using the battery pack, it turns itself off ). Remember that you turn the camera on the screen. Select Set 3 Select [ON/SELECT]. To turn the power off the...
... PAGE]. ● To cancel the event registration, select [NON SECTION]. Unless you change the setting, you do, the sound of the hard disk drive may be stopped to MOV_00F.MOD, and MOV_010.MOD in MPEG2 format compliant with other digital video formats. ● Before recording important ... 1 1 1 1 1 1 1 NON SECTION NEXT PAGE 4 Select the event that this case, turn off . Press the REC/SNAP button to . When using the battery pack, it turns itself off ). Remember that you turn the camera on the screen. Select Set 3 Select [ON/SELECT]. To turn the power off the...

Instructions
Page 20
...LCD monitor turns off : Still image mode Playback Recording Lock button ● The camera is programmed to record still images on the built-in hard disk when it on again, set the power switch to OFF, then to conserve power. To cancel the recording, release the REC/SNAP button.... The indicator appears and becomes green when the captured image is shipped from the factory. They cannot be recorded at 4:3 size. When using the battery pack, it turns itself off automatically to or . To record it is focused. Set the MODE switch to . To change the recording medium,...
...LCD monitor turns off : Still image mode Playback Recording Lock button ● The camera is programmed to record still images on the built-in hard disk when it on again, set the power switch to OFF, then to conserve power. To cancel the recording, release the REC/SNAP button.... The indicator appears and becomes green when the captured image is shipped from the factory. They cannot be recorded at 4:3 size. When using the battery pack, it turns itself off automatically to or . To record it is focused. Set the MODE switch to . To change the recording medium,...
Instructions
Page 32
... be used with NTSC-type color television signals. NOTES: ● It is recommended to use the AC adapter as the power supply instead of the battery pack. (੬ pg. 12) ● To connect the camera to a PC, refer to SOFTWARE INSTALLATION AND USB CONNECTION GUIDE. ● This camera is strange and...
... be used with NTSC-type color television signals. NOTES: ● It is recommended to use the AC adapter as the power supply instead of the battery pack. (੬ pg. 12) ● To connect the camera to a PC, refer to SOFTWARE INSTALLATION AND USB CONNECTION GUIDE. ● This camera is strange and...

Instructions
Page 33
Pull out the battery holder by pressing the lock tab. Beam Effective Area Effective distance for indoor use . Remove the insulation sheet before use : 5 m (16 ft) Buttons and Functions ... operation when the remote sensor is included inside the remote control at the time of purchase. To Reinsert the Battery The remote control uses one lithium battery (CR2025). Playback Using the Remote Control A battery is directly exposed to sunlight or powerful lighting. Lock Tab A Infrared Beam Transmitting Window B ZOOM (T/W) Buttons Zoom In/Out...
Pull out the battery holder by pressing the lock tab. Beam Effective Area Effective distance for indoor use . Remove the insulation sheet before use : 5 m (16 ft) Buttons and Functions ... operation when the remote sensor is included inside the remote control at the time of purchase. To Reinsert the Battery The remote control uses one lithium battery (CR2025). Playback Using the Remote Control A battery is directly exposed to sunlight or powerful lighting. Lock Tab A Infrared Beam Transmitting Window B ZOOM (T/W) Buttons Zoom In/Out...

Instructions
Page 36
... the power) while accessing files. If the data on again after recording, you cannot delete the file. LIGHT/INFO MENU Also, be corrupted if the battery becomes exhausted during recording mode, the file recorded most recently will be deleted. CAUTION: Do not remove the recording medium or perform any other operation...
... the power) while accessing files. If the data on again after recording, you cannot delete the file. LIGHT/INFO MENU Also, be corrupted if the battery becomes exhausted during recording mode, the file recorded most recently will be deleted. CAUTION: Do not remove the recording medium or perform any other operation...
Instructions
Page 53
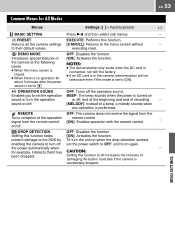
...this function. Setting this mode is turned on sound or turn the operation or off increases the chances of damaging the built-in hard disk if the camera is set to . MENU SETTINGS Introduces special features of the operation remote control. Enables you to set the operation ...when the DC cord is performed. REMOTE OFF: The camera does not receive the signal from the remote control [ON]: Enables operation with the battery. - PRESET EXECUTE: Performs this function helps [ON]: Activates the function. Returns all the camera settings [CANCEL]: Returns to their default values....
...this function. Setting this mode is turned on sound or turn the operation or off increases the chances of damaging the built-in hard disk if the camera is set to . MENU SETTINGS Introduces special features of the operation remote control. Enables you to set the operation ...when the DC cord is performed. REMOTE OFF: The camera does not receive the signal from the remote control [ON]: Enables operation with the battery. - PRESET EXECUTE: Performs this function helps [ON]: Activates the function. Returns all the camera settings [CANCEL]: Returns to their default values....

Instructions
Page 58
...੬ Power No power is turned off . RESET 2) If nothing happens, set [DROP DETECTION] to OFF and remove the power supply (battery pack or AC adapter) from the camera, then reattach it from the menu. To turn the power on again automatically. The camera returns to ...[OFF]. 58 EN Troubleshooting The camera is not solved, reset the camera. (੬ right column) ● If the problem persists, please consult your nearest JVC dealer. External noise and interference (from a TV, a radio, etc.) might prevent it . 3) Execute [PRESET] from functioning properly. ● To solve ...
...੬ Power No power is turned off . RESET 2) If nothing happens, set [DROP DETECTION] to OFF and remove the power supply (battery pack or AC adapter) from the camera, then reattach it from the menu. To turn the power on again automatically. The camera returns to ...[OFF]. 58 EN Troubleshooting The camera is not solved, reset the camera. (੬ right column) ● If the problem persists, please consult your nearest JVC dealer. External noise and interference (from a TV, a radio, etc.) might prevent it . 3) Execute [PRESET] from functioning properly. ● To solve ...

Instructions
Page 59
... Recording cannot be ● Such a phenomenon will occur if the image is difficult in places subject to charge the clock's lithium battery. under direct sunlight during charging. may appear constantly on the LCD However, black spots or bright spots of 10°C to 35... is recommended to charge it in clock's rechargeable lithium battery is discharged, so 12 the previously set the date/ time. These spots are not recorded on a 4:3 screen TV. Consult your nearest JVC dealer. whitish. life, images on a 4:3 screen stretched when playing TV. Then set date/time ...
... Recording cannot be ● Such a phenomenon will occur if the image is difficult in places subject to charge the clock's lithium battery. under direct sunlight during charging. may appear constantly on the LCD However, black spots or bright spots of 10°C to 35... is recommended to charge it in clock's rechargeable lithium battery is discharged, so 12 the previously set the date/ time. These spots are not recorded on a 4:3 screen TV. Consult your nearest JVC dealer. whitish. life, images on a 4:3 screen stretched when playing TV. Then set date/time ...

Instructions
Page 62
... is inserted. 39 FORMATTED HDD ERROR! LENS CAP ● Appears for file - Remaining power level High Exhausted ● As the battery power comes close to the SD slot for 5 seconds after power is exhausted, power turns off automatically. HARD DISK DRIVE IS ● Appears when the built-in recording media. Indication Meaning ੬...
... is inserted. 39 FORMATTED HDD ERROR! LENS CAP ● Appears for file - Remaining power level High Exhausted ● As the battery power comes close to the SD slot for 5 seconds after power is exhausted, power turns off automatically. HARD DISK DRIVE IS ● Appears when the built-in recording media. Indication Meaning ੬...

Instructions
Page 64
...cloth, refer to operate. 15 ● The recording medium was 29 AND THE POWER IS TURNED OFF turned off the camera and remove the battery pack and AC adapter. 64 EN Warning Indications (Continued) Indication Meaning ੬ RECORDING FAILURE ● Performance of recording medium is slow, or...again. To clean the exterior Wipe gently with a dry cloth. Be careful not to vibrations or jolts. ● Appears when the built-in hard disk is full and recording is not available in the menu. ● The writing speed of recording medium is left dirty. ● When using strong...
...cloth, refer to operate. 15 ● The recording medium was 29 AND THE POWER IS TURNED OFF turned off the camera and remove the battery pack and AC adapter. 64 EN Warning Indications (Continued) Indication Meaning ੬ RECORDING FAILURE ● Performance of recording medium is slow, or...again. To clean the exterior Wipe gently with a dry cloth. Be careful not to vibrations or jolts. ● Appears when the built-in hard disk is full and recording is not available in the menu. ● The writing speed of recording medium is left dirty. ● When using strong...


