

Instructions
Page 4
... signals Ⅵ Focus Assist function Enables easy and accurate focusing during shooting. Ⅵ User buttons added Enables you to switch camera settings instantly to suit the shooting conditions. Ⅵ... Enables white balance to be adjusted automatically or manually. Ⅵ Built-in or external microphone. Ⅵ Three video output terminals This camcorder comes with two SD card slots, and enables... of these videos or still pictures. Ⅵ Supports various HD video recording formats (1080i, 1080p, and 720p) Shooting can be performed in different HD recording modes, thus supporting a wide...
... signals Ⅵ Focus Assist function Enables easy and accurate focusing during shooting. Ⅵ User buttons added Enables you to switch camera settings instantly to suit the shooting conditions. Ⅵ... Enables white balance to be adjusted automatically or manually. Ⅵ Built-in or external microphone. Ⅵ Three video output terminals This camcorder comes with two SD card slots, and enables... of these videos or still pictures. Ⅵ Supports various HD video recording formats (1080i, 1080p, and 720p) Shooting can be performed in different HD recording modes, thus supporting a wide...
Instructions
Page 5
...Battery Power 20 Turning On the Power 20 Lens Cover 20 Setting the Date 21 Setting the Language 21 Assigning Functions to the USER Buttons 21 Viewing the Viewfinder/LCD Screen 22 Inserting an SD Card 23 Formatting the SD Card 24 Resetting the File Number 24... Shooting Selecting a Shooting Mode 25 Selecting the Video/Still Picture Shooting Mode . . . . . 25 Selecting the Full Auto/Manual Shooting Mode 25 Selecting a Focusing Mode 26 Using the Camcorder in the Video Shooting Mode . . . . . 26 Setting the Video Format 26 Displaying the Remaining Space on the SD Card . ....
...Battery Power 20 Turning On the Power 20 Lens Cover 20 Setting the Date 21 Setting the Language 21 Assigning Functions to the USER Buttons 21 Viewing the Viewfinder/LCD Screen 22 Inserting an SD Card 23 Formatting the SD Card 24 Resetting the File Number 24... Shooting Selecting a Shooting Mode 25 Selecting the Video/Still Picture Shooting Mode . . . . . 25 Selecting the Full Auto/Manual Shooting Mode 25 Selecting a Focusing Mode 26 Using the Camcorder in the Video Shooting Mode . . . . . 26 Setting the Video Format 26 Displaying the Remaining Space on the SD Card . ....
Instructions
Page 11
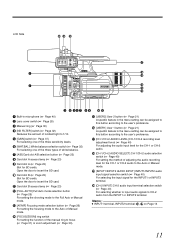
... mode selection button (A Page 26) For setting the focusing mode to the Full Auto or Manual mode. O [USER2] User 2 button (A Page 21) A specific feature in the menu setting can be assigned to this button according to the user's preference. A B H G F E D C 4 5 678 9 : ; T [CH-2 INPUT] CH-2 audio input ... (A Page 21) A specific feature in the menu setting can be assigned to this button according to the user's preference. MIC MIC+48V INPUT1 INPUT2 AUTO MANUAL CH-1 AUDIO SELECT CH-2 AUTO MANUAL 0 1 23 ND FILTER ON OFF USER1 USER2 FOCUS ZOOM AF/MF FULL AUTO GAIN WHT.BAL A / ...
... mode selection button (A Page 26) For setting the focusing mode to the Full Auto or Manual mode. O [USER2] User 2 button (A Page 21) A specific feature in the menu setting can be assigned to this button according to the user's preference. A B H G F E D C 4 5 678 9 : ; T [CH-2 INPUT] CH-2 audio input ... (A Page 21) A specific feature in the menu setting can be assigned to this button according to the user's preference. MIC MIC+48V INPUT1 INPUT2 AUTO MANUAL CH-1 AUDIO SELECT CH-2 AUTO MANUAL 0 1 23 ND FILTER ON OFF USER1 USER2 FOCUS ZOOM AF/MF FULL AUTO GAIN WHT.BAL A / ...

Instructions
Page 12
...Program AE selection and as the zooming lever. (A Page 32) When in the menu setting can be assigned to exit the menu screen. PRST- H- H [USER3] User 3 button (A Page 21) A specific feature in the playback mode, this lever is opened : 9 87 6D C CAM / MEDIA USER3 DISPLAY Q.REVIEW MENU COMPONENT OUT...AUDIO SELECT CH-2 AUTO MANUAL 0 1 23 ND FILTER ON OFF USER1 USER2 FOCUS ZOOM AF/MF FULL AUTO GAIN WHT.BAL A / B L- A When the LCD cover is used for menu setting. (A Page 57) Bottom N Tripod mounting holes (A Page 18) ● To prevent the camcorder from falling, attach securely...
...Program AE selection and as the zooming lever. (A Page 32) When in the menu setting can be assigned to exit the menu screen. PRST- H- H [USER3] User 3 button (A Page 21) A specific feature in the playback mode, this lever is opened : 9 87 6D C CAM / MEDIA USER3 DISPLAY Q.REVIEW MENU COMPONENT OUT...AUDIO SELECT CH-2 AUTO MANUAL 0 1 23 ND FILTER ON OFF USER1 USER2 FOCUS ZOOM AF/MF FULL AUTO GAIN WHT.BAL A / B L- A When the LCD cover is used for menu setting. (A Page 57) Bottom N Tripod mounting holes (A Page 18) ● To prevent the camcorder from falling, attach securely...

Instructions
Page 16
...A B H G F E D 4 : 5 0 PM NOV.1.2 0 0 9 C B A Shooting Mode A : Full Auto Shooting M : Manual Shooting B Focusing Mode AF : Auto Focus MF : Manual Focus C Exposure L : Fixed D Aperture E Shutter Speed F ND Filter Displayed when the ND filter switch is set to [ON]. G White Balance ...in the [FILE FORMAT] menu. F Mode Indicator RREC : Recording RW : Record Standby mode (Record Pause mode) G Time Code or User's Bit TC : Time Code UB : User's Bit The framing mode display for drop frames H Remaining Time on the left. O Speaker/Headphone Volume (displayed during volume adjustment) P ...
...A B H G F E D 4 : 5 0 PM NOV.1.2 0 0 9 C B A Shooting Mode A : Full Auto Shooting M : Manual Shooting B Focusing Mode AF : Auto Focus MF : Manual Focus C Exposure L : Fixed D Aperture E Shutter Speed F ND Filter Displayed when the ND filter switch is set to [ON]. G White Balance ...in the [FILE FORMAT] menu. F Mode Indicator RREC : Recording RW : Record Standby mode (Record Pause mode) G Time Code or User's Bit TC : Time Code UB : User's Bit The framing mode display for drop frames H Remaining Time on the left. O Speaker/Headphone Volume (displayed during volume adjustment) P ...

Instructions
Page 21
... your selection. Turn on the power. 2 . Push the Set Lever up or down to the next digit. MIC MIC+48V INPUT1 INPUT2 AUTO MANUAL CH-1 AUDIO SELECT CH-2 AUTO MANUAL 0 1 23 2 3 45 USER1 USER2 ND FILTER ON OFF USER1 USER2 FOCUS ZOOM AF/MF FULL AUTO GAIN WHT.BAL A / B L- ...MENU COMPONENT OUT A / V OUT B USER3 USER3 CAM / MEDIA DISPLAY Q.REVIEW MENU To do so, make use of the Set Lever to the USER Buttons This camcorder comes with three USER buttons. MENU 3 . Press MENU. Push the Set Lever up or down to your selection. Press the center of [USER1], [USER2], and [USER3...
... your selection. Turn on the power. 2 . Push the Set Lever up or down to the next digit. MIC MIC+48V INPUT1 INPUT2 AUTO MANUAL CH-1 AUDIO SELECT CH-2 AUTO MANUAL 0 1 23 2 3 45 USER1 USER2 ND FILTER ON OFF USER1 USER2 FOCUS ZOOM AF/MF FULL AUTO GAIN WHT.BAL A / B L- ...MENU COMPONENT OUT A / V OUT B USER3 USER3 CAM / MEDIA DISPLAY Q.REVIEW MENU To do so, make use of the Set Lever to the USER Buttons This camcorder comes with three USER buttons. MENU 3 . Press MENU. Push the Set Lever up or down to your selection. Press the center of [USER1], [USER2], and [USER3...
Instructions
Page 25
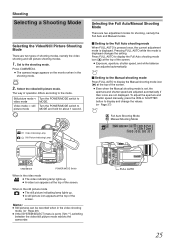
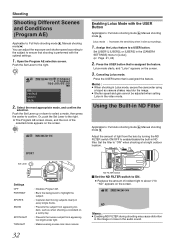
..., and white balance are two types of the screen. Press FULL AUTO to [720-**], switching between the video/still picture mode reboots the camcorder. B- PUSH ACCESS REC DC CAM/MEDIA POWER/MODE Switch When in the video shooting mode. (A Page 28) ● If the ...INDEX T PR W REC CAM / MEDIA USERS DISPLAY Q.REVIEW MENU IRIS OPEN SHUTTER AE ± CLOSE ADJ./ VOL. M- Shooting Selecting a Shooting Mode Selecting the Video/Still Picture Shooting Mode There are adjusted automatically. CAM / MEDIA 2 . Selecting the Full Auto/Manual Shooting Mode There are not displayed. To ...
..., and white balance are two types of the screen. Press FULL AUTO to [720-**], switching between the video/still picture mode reboots the camcorder. B- PUSH ACCESS REC DC CAM/MEDIA POWER/MODE Switch When in the video shooting mode. (A Page 28) ● If the ...INDEX T PR W REC CAM / MEDIA USERS DISPLAY Q.REVIEW MENU IRIS OPEN SHUTTER AE ± CLOSE ADJ./ VOL. M- Shooting Selecting a Shooting Mode Selecting the Video/Still Picture Shooting Mode There are adjusted automatically. CAM / MEDIA 2 . Selecting the Full Auto/Manual Shooting Mode There are not displayed. To ...
Instructions
Page 30
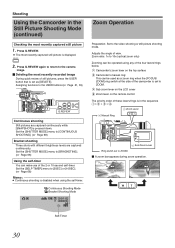
...still picture shooting mode. B- H- Continuous Shooting Mode Bracket Shooting Mode A [0010] B [9999] 10 Self-Timer Zoom Operation Preparation: Set to the USER buttons:(A Page 21, 65) 2 3 45 CH-2 INPUT AUDIO INPUT INPUT1 INPUT2 - Zoom ratio: 1x to ZOOM Ⅵ A zoom bar appears during... [SHUTTER MODE] menu to ZOOM. C Sub zoom lever on the LCD cover D Zoom lever on the top surface B Camcorder's manual ring: This can be operated using the self-timer. A Zoom Lever B Manual Ring W T OGRAM A E INDEX T PR W REC C Sub Zoom Lever Ring switch set to [CONTINUOUS SHOOTING]. (A...
...still picture shooting mode. B- H- Continuous Shooting Mode Bracket Shooting Mode A [0010] B [9999] 10 Self-Timer Zoom Operation Preparation: Set to the USER buttons:(A Page 21, 65) 2 3 45 CH-2 INPUT AUDIO INPUT INPUT1 INPUT2 - Zoom ratio: 1x to ZOOM Ⅵ A zoom bar appears during... [SHUTTER MODE] menu to ZOOM. C Sub zoom lever on the LCD cover D Zoom lever on the top surface B Camcorder's manual ring: This can be operated using the self-timer. A Zoom Lever B Manual Ring W T OGRAM A E INDEX T PR W REC C Sub Zoom Lever Ring switch set to [CONTINUOUS SHOOTING]. (A...
Instructions
Page 31
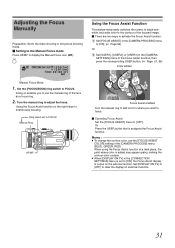
...Set [USER1], [USER2], or [USER3] in the [CAMERA SETTINGS] menu to the Focus Assist function, then press the corresponding USER button. (A Page 21, 65) Color added Focus Assist enabled Turn the manual ring to add color to where you to use the [FOCUS ASSIST COLOR] setting in the [CAMERA PROCESS] menu. (BLUE... added may appear grainy, making the contour color unclear. ● When [DISPLAY ON TV] in the [CONNECTION SETTINGS] menu is set to FOCUS Manual Ring AF/MF Using the Focus Assist Function This feature temporarily switches the screen to black-andwhite, and adds color to the contour of the...
...Set [USER1], [USER2], or [USER3] in the [CAMERA SETTINGS] menu to the Focus Assist function, then press the corresponding USER button. (A Page 21, 65) Color added Focus Assist enabled Turn the manual ring to add color to where you to use the [FOCUS ASSIST COLOR] setting in the [CAMERA PROCESS] menu. (BLUE... added may appear grainy, making the contour color unclear. ● When [DISPLAY ON TV] in the [CONNECTION SETTINGS] menu is set to FOCUS Manual Ring AF/MF Using the Focus Assist Function This feature temporarily switches the screen to black-andwhite, and adds color to the contour of the...
Instructions
Page 32
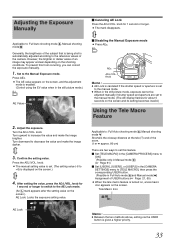
...You can adjust the exposure and shutter speed according to the subject to ensure that shooting is performed with the USER Button Applicable to: Full Auto shooting mode A, Manual shooting mode M Lolux mode : Increases the sensitivity when in dim surroundings. 1 . Select the most appropriate mode..., and confirm the selection. Push the Set Lever to confirm. Memo : ● When shooting in Lolux mode, secure the camcorder using a tripod as when...
...You can adjust the exposure and shutter speed according to the subject to ensure that shooting is performed with the USER Button Applicable to: Full Auto shooting mode A, Manual shooting mode M Lolux mode : Increases the sensitivity when in dim surroundings. 1 . Select the most appropriate mode..., and confirm the selection. Push the Set Lever to confirm. Memo : ● When shooting in Lolux mode, secure the camcorder using a tripod as when...
Instructions
Page 33
...18dB ND Memo : ● Between the two methods above, setting via the USER button is displayed on the screen and its setting becomes invalid.) Using the Tele Macro Feature Applicable to: Full Auto shooting mode A, Manual shooting mode M Shortens the closeup distance at the tele (T) end of the camera...; Canceling AE Lock Press the ADJ./VOL. ADJ./VOL ADJ./VOL ADJ./VOL Applicable to: Full Auto shooting mode A, Manual shooting mode M Generally, the brightness of USER buttons:(A Page 21, 65) ● When the tele macro feature is enabled. (Control using the EV value when in the still ...
...18dB ND Memo : ● Between the two methods above, setting via the USER button is displayed on the screen and its setting becomes invalid.) Using the Tele Macro Feature Applicable to: Full Auto shooting mode A, Manual shooting mode M Shortens the closeup distance at the tele (T) end of the camera...; Canceling AE Lock Press the ADJ./VOL. ADJ./VOL ADJ./VOL ADJ./VOL Applicable to: Full Auto shooting mode A, Manual shooting mode M Generally, the brightness of USER buttons:(A Page 21, 65) ● When the tele macro feature is enabled. (Control using the EV value when in the still ...

Instructions
Page 34
... by pushing the Set Lever to the left or right. ● The display area of the zebra pattern changes. Alternatively, press the USER button that is displayed at areas with the specified luminance levels. Shooting Displaying the Zebra Pattern Applicable to: Video shooting mode A Full Auto... Shooting Mode M Manual Shooting Mode During video shooting, diagonal lines (zebra pattern) are displayed only at the area that corresponds to the specified luminance level....
... by pushing the Set Lever to the left or right. ● The display area of the zebra pattern changes. Alternatively, press the USER button that is displayed at areas with the specified luminance levels. Shooting Displaying the Zebra Pattern Applicable to: Video shooting mode A Full Auto... Shooting Mode M Manual Shooting Mode During video shooting, diagonal lines (zebra pattern) are displayed only at the area that corresponds to the specified luminance level....
Instructions
Page 37
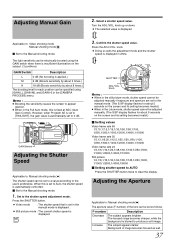
...30,1/60,1/80,1/125,1/250,1/500, 1/1000,1/2000,1/4000,1/8000 Ⅵ Setting shutter speed to AUTO Press the SHUTTER button twice to the user's preference. knob up or down. ● The selected value is displayed in the Lolux mode, shutter speed cannot be set to ...a shutter speed value. When this is automatically set to a value according to clear the display. Increase The subject appears darker. Set to the Manual shooting mode. Press the ADJ./VOL. F-number Description Decrease The subject appears brighter. Turn the ADJ./VOL. Press the SHUTTER button. ● ...
...30,1/60,1/80,1/125,1/250,1/500, 1/1000,1/2000,1/4000,1/8000 Ⅵ Setting shutter speed to AUTO Press the SHUTTER button twice to the user's preference. knob up or down. ● The selected value is displayed in the Lolux mode, shutter speed cannot be set to ...a shutter speed value. When this is automatically set to a value according to clear the display. Increase The subject appears darker. Set to the Manual shooting mode. Press the ADJ./VOL. F-number Description Decrease The subject appears brighter. Turn the ADJ./VOL. Press the SHUTTER button. ● ...
Instructions
Page 39
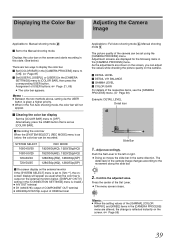
... appears. Press the center of the [GAMMA], [COLOR MATRIX], and [KNEE] items in the [CAMERA SETTINGS] menu to [OFF]. Alternatively, press the USER button that is set to [720-**], the onscreen display will not appear. Ⅵ Clearing the color bar display Set the [COLOR BAR] menu to [...9679; A/V OUT terminal ● D1 (480i/576i) output of COMPONENT OUT terminal ● 480i/480p/576i/576p output of HDMI terminal Applicable to the Manual shooting mode. Memo : ● When the setting values of the Set Lever. ● The menu screen closes. Displays the color bar on the external...
... appears. Press the center of the [GAMMA], [COLOR MATRIX], and [KNEE] items in the [CAMERA SETTINGS] menu to [OFF]. Alternatively, press the USER button that is set to [720-**], the onscreen display will not appear. Ⅵ Clearing the color bar display Set the [COLOR BAR] menu to [...9679; A/V OUT terminal ● D1 (480i/576i) output of COMPONENT OUT terminal ● 480i/480p/576i/576p output of HDMI terminal Applicable to the Manual shooting mode. Memo : ● When the setting values of the Set Lever. ● The menu screen closes. Displays the color bar on the external...
Instructions
Page 46
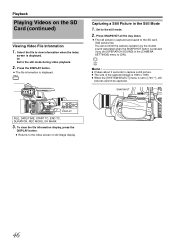
MIC MIC+48V INPUT1 INPUT2 AUTO MANUAL CH-1 AUDIO SELECT CH-2 AUTO MANUAL 0 1 23 ND FILTER ON OFF USER1 USER2 FOCUS ZOOM AF/MF FULL AUTO GAIN WHT.BAL A / B L- M- PRST- SNAPSHOT MIC 46 Or Set to the index ... captured image is 1920 x 1080. ● When the [SYSTEM SELECT] menu is pressed if you set to [ON]. LINE - A CAM / MEDIA USERS DISPLAY Q.REVIEW MENU COMPONENT OUT A / V OUT B CAM / MEDIA USERS DISPLAY Q.REVIEW MENU DISPLAY FILE, DATE/TIME, START TC, END TC, DURATION, REC MODE, OK MARK 3 . Set to view information when...
MIC MIC+48V INPUT1 INPUT2 AUTO MANUAL CH-1 AUDIO SELECT CH-2 AUTO MANUAL 0 1 23 ND FILTER ON OFF USER1 USER2 FOCUS ZOOM AF/MF FULL AUTO GAIN WHT.BAL A / B L- M- PRST- SNAPSHOT MIC 46 Or Set to the index ... captured image is 1920 x 1080. ● When the [SYSTEM SELECT] menu is pressed if you set to [ON]. LINE - A CAM / MEDIA USERS DISPLAY Q.REVIEW MENU COMPONENT OUT A / V OUT B CAM / MEDIA USERS DISPLAY Q.REVIEW MENU DISPLAY FILE, DATE/TIME, START TC, END TC, DURATION, REC MODE, OK MARK 3 . Set to view information when...
Instructions
Page 49
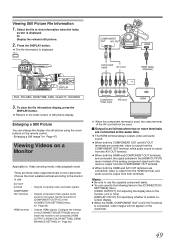
... OUT T A/V OUT AE AE W REC ADJ./ VOL. A CAM / MEDIA USERS DISPLAY Q.REVIEW MENU COMPONENT OUT A / V OUT B CAM / MEDIA USERS DISPLAY Q.REVIEW MENU DISPLAY FILE, FOLDER, DATE/TIME, SIZE, QUALITY, OK MARK... settings in the [HDMI OUTPUT] menu instead of the AV cord will not appear on this camcorder. A- A/V OUT terminal : Outputs composite video and audio signals. M- Set the resolution in use...Page 63) HDMI terminal : Outputs HDMI signals. MIC MIC+48V INPUT1 INPUT2 AUTO MANUAL CH-1 AUDIO SELECT CH-2 AUTO MANUAL 0 1 23 ND FILTER ON OFF USER1 USER2 FOCUS ZOOM AF/MF FULL ...
... OUT T A/V OUT AE AE W REC ADJ./ VOL. A CAM / MEDIA USERS DISPLAY Q.REVIEW MENU COMPONENT OUT A / V OUT B CAM / MEDIA USERS DISPLAY Q.REVIEW MENU DISPLAY FILE, FOLDER, DATE/TIME, SIZE, QUALITY, OK MARK... settings in the [HDMI OUTPUT] menu instead of the AV cord will not appear on this camcorder. A- A/V OUT terminal : Outputs composite video and audio signals. M- Set the resolution in use...Page 63) HDMI terminal : Outputs HDMI signals. MIC MIC+48V INPUT1 INPUT2 AUTO MANUAL CH-1 AUDIO SELECT CH-2 AUTO MANUAL 0 1 23 ND FILTER ON OFF USER1 USER2 FOCUS ZOOM AF/MF FULL ...


