

Instructions
Page 4
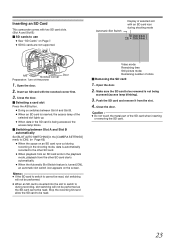
...Cut Pro. Getting Started Main Features This camcorder enables recording of HD format images as videos or still pictures on an SD card, and also playback of these videos or still pictures. Ⅵ Supports various HD video recording formats (1080i, 1080p, and 720p) Shooting can be performed...file format used by switching automatically between the slots. The recorded clips can be used widely in different environments. Ⅵ SD card recording This camcorder comes with shooting conditions that change as you can select a video or still picture from video recording and still picture recording...
...Cut Pro. Getting Started Main Features This camcorder enables recording of HD format images as videos or still pictures on an SD card, and also playback of these videos or still pictures. Ⅵ Supports various HD video recording formats (1080i, 1080p, and 720p) Shooting can be performed...file format used by switching automatically between the slots. The recorded clips can be used widely in different environments. Ⅵ SD card recording This camcorder comes with shooting conditions that change as you can select a video or still picture from video recording and still picture recording...
Instructions
Page 5
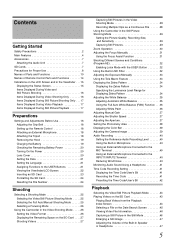
... Selecting the Full Auto/Manual Shooting Mode 25 Selecting a Focusing Mode 26 Using the Camcorder in the Video Shooting Mode . . . . . 26 Setting the Video Format 26 Displaying the Remaining Space on the SD Card . . . . 27 Shooting Videos 27 Capturing Still Pictures in the Video Shooting ...Mode 28 Recording Multiple Clips as a Continuous File . . . . . .28 Using the Camcorder in the Still Picture Shooting Mode 29 Setting the Picture ...
... Selecting the Full Auto/Manual Shooting Mode 25 Selecting a Focusing Mode 26 Using the Camcorder in the Video Shooting Mode . . . . . 26 Setting the Video Format 26 Displaying the Remaining Space on the SD Card . . . . 27 Shooting Videos 27 Capturing Still Pictures in the Video Shooting ...Mode 28 Recording Multiple Clips as a Continuous File . . . . . .28 Using the Camcorder in the Still Picture Shooting Mode 29 Setting the Picture ...
Instructions
Page 6
... such as functions and usage restrictions of this manual ● All rights reserved by JVC. A : Indicates the reference page numbers and reference items. Ⅵ Content of...Connecting to a Computer 54 Saving/Loading Settings 54 Saving Settings to an SD Card 54 Loading Settings from an SD Card 55 Operation Sound and Tally Settings 56 Displaying the Hour Meter 56 ... an event such as a show, performance or exhibition for personal enjoyment, it is strongly recommended that this camcorder is a trademark of HDMI Licensing, LLC. • We recommend using the Category 2 HDMI cable (High...
... such as functions and usage restrictions of this manual ● All rights reserved by JVC. A : Indicates the reference page numbers and reference items. Ⅵ Content of...Connecting to a Computer 54 Saving/Loading Settings 54 Saving Settings to an SD Card 54 Loading Settings from an SD Card 55 Operation Sound and Tally Settings 56 Displaying the Hour Meter 56 ... an event such as a show, performance or exhibition for personal enjoyment, it is strongly recommended that this camcorder is a trademark of HDMI Licensing, LLC. • We recommend using the Category 2 HDMI cable (High...
Instructions
Page 7
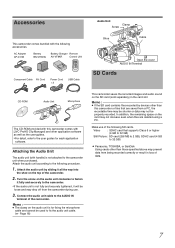
... [JVC ProHD Clip Manager] and other than this camcorder comes with handle) is for each application software. TFor detail, refer to the camcorder. Video : SDHC card that are deleted using a PC. Make use . 3 . Connect the audio unit cable to fasten it all the way into the shoe on the SD card (...sold separately) in loss of the camcorder. 2 . Memo : ● The clamp on the audio unit is not attached to the following accessories. Attach the audio unit...
... [JVC ProHD Clip Manager] and other than this camcorder comes with handle) is for each application software. TFor detail, refer to the camcorder. Video : SDHC card that are deleted using a PC. Make use . 3 . Connect the audio unit cable to fasten it all the way into the shoe on the SD card (...sold separately) in loss of the camcorder. 2 . Memo : ● The clamp on the audio unit is not attached to the following accessories. Attach the audio unit...
Instructions
Page 8
...camcorder, be incorrect if the camera is used near a heater for long hours ● Places subject to radiation or X-rays, or where corrosive gases occur Ⅵ Protect this device in a solution of time. Handling of the device with force or subject it to strong impact. Do not remove the SD card... with it in the viewfinder may appear in the image when switching between the playback picture and the EE picture. Ⅵ If placed on the SD card. Ⅵ Do not press against a hard object. Ⅵ Do not insert objects other devices. Ⅵ When the connectors that come with connector...
...camcorder, be incorrect if the camera is used near a heater for long hours ● Places subject to radiation or X-rays, or where corrosive gases occur Ⅵ Protect this device in a solution of time. Handling of the device with force or subject it to strong impact. Do not remove the SD card... with it in the viewfinder may appear in the image when switching between the playback picture and the EE picture. Ⅵ If placed on the SD card. Ⅵ Do not press against a hard object. Ⅵ Do not insert objects other devices. Ⅵ When the connectors that come with connector...
Instructions
Page 9
...camcorder that purpose, or by completely erasing the data, we recommend either using the battery in the image. Copyright Any recordings made on the rights of the owner of use this device under the sun with the doors and windows closed. Ⅵ Do not bend or drop the SD card,..., high humidity or corrosion, places near thermal equipment, or in a car under conditions where the temperature of this happens, format the SD card. Do not use only JVC batteries. We do not guarantee the safety and performance of this battery. Battery Battery Cap Ⅵ ATTENTION: The product you want to...
...camcorder that purpose, or by completely erasing the data, we recommend either using the battery in the image. Copyright Any recordings made on the rights of the owner of use this device under the sun with the doors and windows closed. Ⅵ Do not bend or drop the SD card,..., high humidity or corrosion, places near thermal equipment, or in a car under conditions where the temperature of this happens, format the SD card. Do not use only JVC batteries. We do not guarantee the safety and performance of this battery. Battery Battery Cap Ⅵ ATTENTION: The product you want to...
Instructions
Page 11
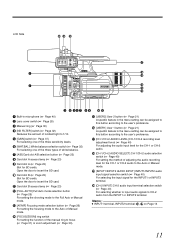
...INPUT2 terminal: R, S on Page 13 11 F [WHT.BAL.] White balance selection switch (A Page 35) For selecting one of the manual ring to insert the SD card. Open the door to focus (A Page 31) or zoom adjustment (A Page 30). R [CH-1/CH-2 AUDIO SELECT] CH-1/CH-2 audio selection switch (A Page...LEVEL] CH-1/CH-2 recording level adjustment knob (A Page 40) For adjusting the audio input level for the CH-1 or CH-2 audio to insert the SD card. S [INPUT1/INPUT2 AUDIO INPUT] INPUT1/INPUT2 audio input signal selection switch (A Page 40) For selecting the input signal for the INPUT1 or INPUT2 ...
...INPUT2 terminal: R, S on Page 13 11 F [WHT.BAL.] White balance selection switch (A Page 35) For selecting one of the manual ring to insert the SD card. Open the door to focus (A Page 31) or zoom adjustment (A Page 30). R [CH-1/CH-2 AUDIO SELECT] CH-1/CH-2 audio selection switch (A Page...LEVEL] CH-1/CH-2 recording level adjustment knob (A Page 40) For adjusting the audio input level for the CH-1 or CH-2 audio to insert the SD card. S [INPUT1/INPUT2 AUDIO INPUT] INPUT1/INPUT2 audio input signal selection switch (A Page 40) For selecting the input signal for the INPUT1 or INPUT2 ...

Instructions
Page 12
...5 REC ; A When the LCD cover is used for menu setting. (A Page 57) Bottom N Tripod mounting holes (A Page 18) ● To prevent the camcorder from falling, attach securely using the rotation prevention hole. ● Use screws with screw length 5 mm and below. 12 E Bottom E B OGRAM A B A... Review button (A Page 27) For checking the video image immediately before shooting starts. I [DISPLAY] Display button For switching the displays on the SD card (A Page 27) and the remaining battery power (A Page 20). Getting Started Names of Parts and Functions (continued) LCD Side (LCD Cover)...
...5 REC ; A When the LCD cover is used for menu setting. (A Page 57) Bottom N Tripod mounting holes (A Page 18) ● To prevent the camcorder from falling, attach securely using the rotation prevention hole. ● Use screws with screw length 5 mm and below. 12 E Bottom E B OGRAM A B A... Review button (A Page 27) For checking the video image immediately before shooting starts. I [DISPLAY] Display button For switching the displays on the SD card (A Page 27) and the remaining battery power (A Page 20). Getting Started Names of Parts and Functions (continued) LCD Side (LCD Cover)...
Instructions
Page 14
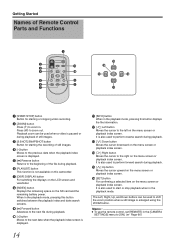
...the [CAMERA SETTINGS] menu to the previous date when the playback index screen is displayed. M [ ] Down button Moves the cursor downward on the SD card and the remaining battery power. It is not available on the menu screen or playback index screen. The Left, Right, Up, and Down buttons ...the LCD screen and viewfinder. When in the playback mode. Memo : ● To use the remote control, set [REMOTE] in the playback mode, pressing this camcorder. Getting Started Names of still images. D [-] button Moves to [ON]. (A Page 66) 14 L [ ] Left button Moves the cursor to start or stop...
...the [CAMERA SETTINGS] menu to the previous date when the playback index screen is displayed. M [ ] Down button Moves the cursor downward on the SD card and the remaining battery power. It is not available on the menu screen or playback index screen. The Left, Right, Up, and Down buttons ...the LCD screen and viewfinder. When in the playback mode. Memo : ● To use the remote control, set [REMOTE] in the playback mode, pressing this camcorder. Getting Started Names of still images. D [-] button Moves to [ON]. (A Page 66) 14 L [ ] Left button Moves the cursor to start or stop...

Instructions
Page 16
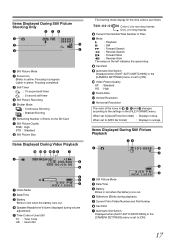
... when [TELE MACRO] in the [CAMERA PROCESS] menu is indicated by the card icon as follows: 0 0 : 0 0 : 0 0 : 0 0 Colon (:) for non-drop frames Dot (.) for drop frames H Remaining Time on the SD Card I Image Stabilizer [OFF] Displayed when [OIS] in the [FILE FORMAT] ...menu. O Speaker/Headphone Volume (displayed during volume adjustment) P Zoom 16 Q Card Slot : The selected card slot is set to the settings in the [CAMERA SETTINGS] menu is set...
... when [TELE MACRO] in the [CAMERA PROCESS] menu is indicated by the card icon as follows: 0 0 : 0 0 : 0 0 : 0 0 Colon (:) for non-drop frames Dot (.) for drop frames H Remaining Time on the SD Card I Image Stabilizer [OFF] Displayed when [OIS] in the [FILE FORMAT] ...menu. O Speaker/Headphone Volume (displayed during volume adjustment) P Zoom 16 Q Card Slot : The selected card slot is set to the settings in the [CAMERA SETTINGS] menu is set...
Instructions
Page 17
...and M changes according to [ON]. 17 D Speaker/Headphone Volume (displayed during playback) E Current File's Folder Number and File Number F Card Slot G Automatic Slot Switch Displayed when [SLOT AUTO SWITCHING] in the [CAMERA SETTINGS] menu is as follows: 0 0 : 0 ...non-drop frames Dot (.) for the time code is set to the settings in orange. H Card Slot I : Playback W : Still N : Forward Search O : Reverse Search WI : Forward Slow HW : Reverse Slow The value on the SD Card G Still Picture Quality FINE : High STD : Standard H Still Picture Size Items Displayed During ...
...and M changes according to [ON]. 17 D Speaker/Headphone Volume (displayed during playback) E Current File's Folder Number and File Number F Card Slot G Automatic Slot Switch Displayed when [SLOT AUTO SWITCHING] in the [CAMERA SETTINGS] menu is as follows: 0 0 : 0 ...non-drop frames Dot (.) for the time code is set to the settings in orange. H Card Slot I : Playback W : Still N : Forward Search O : Reverse Search WI : Forward Slow HW : Reverse Slow The value on the SD Card G Still Picture Quality FINE : High STD : Standard H Still Picture Size Items Displayed During ...
Instructions
Page 23
... notched corner first. 3 . Memo : ● If the SD card to switch to cannot be read, slot switching will not be read . Caution : ● Do not touch the metal part of shots Ⅵ Removing the SD card 1 . Inserting an SD Card This camcorder comes with two SD card slots. (Slot A and Slot B) Ⅵ SD cards to use ● See ASD CardsB on...
... notched corner first. 3 . Memo : ● If the SD card to switch to cannot be read, slot switching will not be read . Caution : ● Do not touch the metal part of shots Ⅵ Removing the SD card 1 . Inserting an SD Card This camcorder comes with two SD card slots. (Slot A and Slot B) Ⅵ SD cards to use ● See ASD CardsB on...
Instructions
Page 24
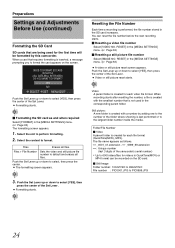
...to select [YES], then press the center of the Set Lever. ● Formatting starts. Ⅵ Formatting the SD card as follows. *** _0001_01.extension ~*** _9999_99.extension *** : Unique number (last 3 digits of the camcorder's serial number) T Up to select [YES], then press the center of the Set Lever. ● Video ... after resetting the number, a file is created with a number by this camcorder. Still picture: A new folder is created with the smallest number that is performed, the file number stored in the SD card increases. YES NO SELECT SET MENU QUIT Push the Set Lever up or down...
...to select [YES], then press the center of the Set Lever. ● Formatting starts. Ⅵ Formatting the SD card as follows. *** _0001_01.extension ~*** _9999_99.extension *** : Unique number (last 3 digits of the camcorder's serial number) T Up to select [YES], then press the center of the Set Lever. ● Video ... after resetting the number, a file is created with a number by this camcorder. Still picture: A new folder is created with the smallest number that is performed, the file number stored in the SD card increases. YES NO SELECT SET MENU QUIT Push the Set Lever up or down...
Instructions
Page 26
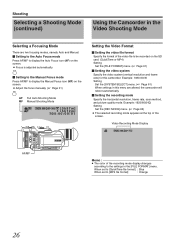
H- A B AF/MF Setting the Video Format Ⅵ Setting the video file format Specify the format of the video file to the settings in this camcorder. M- Example: 1920/60i(HQ) Setting Set the [REC MODE] menu. (A Page 62) ● The selected recording mode appears at the top of the... is adjusted automatically. A- PRST- AF/MF Ⅵ Setting to the Manual Focus mode Press AF/MF to display the Manual Focus icon (MF) on the SD card. (QuickTime or MP4) Setting Set the [FILE FORMAT] menu. (A Page 61) Ⅵ Setting the video system Specify the video system (vertical resolution and...
H- A B AF/MF Setting the Video Format Ⅵ Setting the video file format Specify the format of the video file to the settings in this camcorder. M- Example: 1920/60i(HQ) Setting Set the [REC MODE] menu. (A Page 62) ● The selected recording mode appears at the top of the... is adjusted automatically. A- PRST- AF/MF Ⅵ Setting to the Manual Focus mode Press AF/MF to display the Manual Focus icon (MF) on the SD card. (QuickTime or MP4) Setting Set the [FILE FORMAT] menu. (A Page 61) Ⅵ Setting the video system Specify the video system (vertical resolution and...
Instructions
Page 27
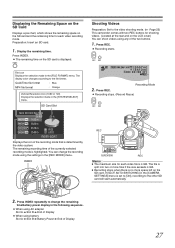
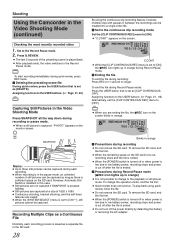
...694; ADJ./VOL. INDEX Shooting Videos Preparation: Set to the video shooting mode. (A Page 25) This camcorder comes with two REC buttons for shooting videos. (Located at the rear and on the SD card and the remaining time for each video recording mode. PUSH REC DC Q.REVIEW REC Memo : ●... : Orange Vertical Resolution Icon (1080 or 720) Displays the selection made in the [REC MODE] menu. Displaying the Remaining Space on the SD Card Displays a pie chart, which shows the remaining space on the LCD cover) You can change the remaining time/battery power display in the [...
...694; ADJ./VOL. INDEX Shooting Videos Preparation: Set to the video shooting mode. (A Page 25) This camcorder comes with two REC buttons for shooting videos. (Located at the rear and on the SD card and the remaining time for each video recording mode. PUSH REC DC Q.REVIEW REC Memo : ●... : Orange Vertical Resolution Icon (1080 or 720) Displays the selection made in the [REC MODE] menu. Displaying the Remaining Space on the SD Card Displays a pie chart, which shows the remaining space on the LCD cover) You can change the remaining time/battery power display in the [...
Instructions
Page 28
...When recording is in the pause mode, an unlimited number of still pictures can be captured as long as [CLIP CONTINUOUS OFF]. Shooting Using the Camcorder in this case. ● Still pictures are not captured if SNAPSHOT is pressed halfway. ● Still pictures are captured at a size of...press REC twice. Ⅵ Deleting the preceding scene file During quick review, press the USER button that is captured, APHOTOB appears on the SD card. Assigning functions to the playback or still picture mode. To end the file during Record Pause mode (RREC icon lights up in orange during ...
...When recording is in the pause mode, an unlimited number of still pictures can be captured as long as [CLIP CONTINUOUS OFF]. Shooting Using the Camcorder in this case. ● Still pictures are not captured if SNAPSHOT is pressed halfway. ● Still pictures are captured at a size of...press REC twice. Ⅵ Deleting the preceding scene file During quick review, press the USER button that is captured, APHOTOB appears on the SD card. Assigning functions to the playback or still picture mode. To end the file during Record Pause mode (RREC icon lights up in orange during ...
Instructions
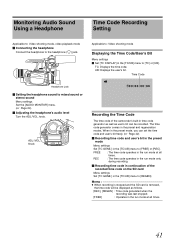
Page 41
...Displays the user's bit. FREE REC : The time code operates in the run mode only during recording. Ⅵ Recording time code in continuation of the camcorder's built-in time code generator as well as follows. [REC], [REGEN] : Time code generated when the recording was last stopped. [FREE] : Operates ... Code/User's Bit Menu settings Ⅵ Set [TC DISPLAY] in the preset and regeneration modes. Memo : ● When recording is stopped and the SD card is removed, the time code will be displayed as user's bit can set the time code and user's bit freely. (A Page 42) Ⅵ Recording...
...Displays the user's bit. FREE REC : The time code operates in the run mode only during recording. Ⅵ Recording time code in continuation of the camcorder's built-in time code generator as well as follows. [REC], [REGEN] : Time code generated when the recording was last stopped. [FREE] : Operates ... Code/User's Bit Menu settings Ⅵ Set [TC DISPLAY] in the preset and regeneration modes. Memo : ● When recording is stopped and the SD card is removed, the time code will be displayed as user's bit can set the time code and user's bit freely. (A Page 42) Ⅵ Recording...
Instructions
Page 43
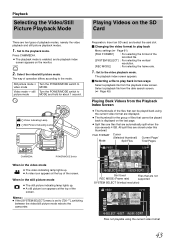
... . ● A video icon appears at the top of the screen. Set to [720-**], switching between the video/still picture mode reboots the camcorder. Memo : ● If the [SYSTEM SELECT] menu is enabled, and a playback index screen appears on the monitor. Select a playback file ... (Selected thumbnail) Mode Split Files Current Page/ Total Pages VIDEO 1/10 ? Playback Selecting the Video/Still Picture Playback Mode Playing Videos on the SD Card There are two types of the recorded file. [SYSTEM SELECT] : For selecting the vertical resolution. [REC MODE] : For selecting the frame rate...
... . ● A video icon appears at the top of the screen. Set to [720-**], switching between the video/still picture mode reboots the camcorder. Memo : ● If the [SYSTEM SELECT] menu is enabled, and a playback index screen appears on the monitor. Select a playback file ... (Selected thumbnail) Mode Split Files Current Page/ Total Pages VIDEO 1/10 ? Playback Selecting the Video/Still Picture Playback Mode Playing Videos on the SD Card There are two types of the recorded file. [SYSTEM SELECT] : For selecting the vertical resolution. [REC MODE] : For selecting the frame rate...
Instructions
Page 44
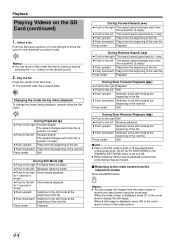
...by pressing the + or - When the index screen is displayed, press (W) of the next file Press center Still Memo : ● Files on the SD cards in slots A, B are played back continuously when [SLOT AUTO SWITCHING] in the [CAMERA SETTINGS] menu is set to [ON]. ● When frame-by... The search speed goes back by 1 step. Memo : ● You can display still images from the respective modes Press the INDEX button. button on the SD Card (continued) 1 . C Push to the left /right to move to display the still image. Select a file. When a still image is displayed, press ...
...by pressing the + or - When the index screen is displayed, press (W) of the next file Press center Still Memo : ● Files on the SD cards in slots A, B are played back continuously when [SLOT AUTO SWITCHING] in the [CAMERA SETTINGS] menu is set to [ON]. ● When frame-by... The search speed goes back by 1 step. Memo : ● You can display still images from the respective modes Press the INDEX button. button on the SD Card (continued) 1 . C Push to the left /right to move to display the still image. Select a file. When a still image is displayed, press ...
Instructions
Page 46
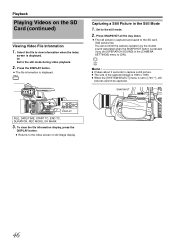
...AF/MF FULL AUTO GAIN WHT.BAL A / B L- M- PRST- B- Capturing a Still Picture in the [CAMERA SETTINGS] menu to the SD card. (Still picture file) You can confirm the capture operation by the shutter sound generated when the SNAPSHOT button is displayed. Set to the index.... ● The size of the captured image is 1920 x 1080. ● When the [SYSTEM SELECT] menu is displayed. Playback Playing Videos on the SD Card (continued) Viewing Video File Information 1 . H- SNAP SHOT Memo : ● It takes about 3 seconds to [720-**], still pictures cannot be captured. ...
...AF/MF FULL AUTO GAIN WHT.BAL A / B L- M- PRST- B- Capturing a Still Picture in the [CAMERA SETTINGS] menu to the SD card. (Still picture file) You can confirm the capture operation by the shutter sound generated when the SNAPSHOT button is displayed. Set to the index.... ● The size of the captured image is 1920 x 1080. ● When the [SYSTEM SELECT] menu is displayed. Playback Playing Videos on the SD Card (continued) Viewing Video File Information 1 . H- SNAP SHOT Memo : ● It takes about 3 seconds to [720-**], still pictures cannot be captured. ...


