
Instructions
Page 2
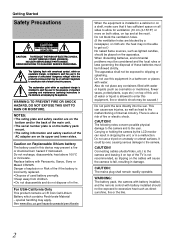
... of fire or electric shock. See www.dtsc.ca.gov/hazardouswaste/perchlorate When the equipment is installed in damage. Also do not dispose of the AC adapter are blocked by the LCD monitor can cause eye injuries, as well as direct sunshine, fire or the like. 2 Do not use this device may...
... of fire or electric shock. See www.dtsc.ca.gov/hazardouswaste/perchlorate When the equipment is installed in damage. Also do not dispose of the AC adapter are blocked by the LCD monitor can cause eye injuries, as well as direct sunshine, fire or the like. 2 Do not use this device may...
Instructions
Page 3
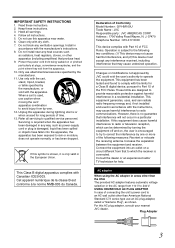
... classe B est conforme à la norme NMB-003 du Canada. These limits are designed to qualified service personnel. AC adapter When using the AC adapter in areas other apparatus (including amplifiers) that interference will not occur in any way, such as radiators, heat registers... the equipment. This equipment generates, uses, and can be determined by one or more of Conformity Model Number : GY-HM100U Trade Name : JVC Responsible party : JVC AMERICAS CORP. Servicing is no guarantee that produce heat. 9. IMPORTANT SAFETY INSTRUCTIONS 1. However, there is required when the...
... classe B est conforme à la norme NMB-003 du Canada. These limits are designed to qualified service personnel. AC adapter When using the AC adapter in areas other apparatus (including amplifiers) that interference will not occur in any way, such as radiators, heat registers... the equipment. This equipment generates, uses, and can be determined by one or more of Conformity Model Number : GY-HM100U Trade Name : JVC Responsible party : JVC AMERICAS CORP. Servicing is no guarantee that produce heat. 9. IMPORTANT SAFETY INSTRUCTIONS 1. However, there is required when the...
Instructions
Page 7
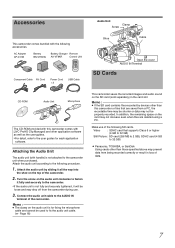
... be shorter or data may not increase even when files are deleted using a PC. Accessories This camcorder comes bundled with [JVC ProHD Clip Manager] and other than this camcorder comes with the following accessories. Attach the audio unit according to the user guides for fixing the ... terminal of the camcorder. 2 . Make use . 3 . TFor detail, refer to the following procedure. 1 . In addition, the remaining space on the audio unit clockwise to fasten it all the way into the shoe on the audio unit is for each application software. AC Adapter AP-V21M Battery ...
... be shorter or data may not increase even when files are deleted using a PC. Accessories This camcorder comes bundled with [JVC ProHD Clip Manager] and other than this camcorder comes with the following accessories. Attach the audio unit according to the user guides for fixing the ... terminal of the camcorder. 2 . Make use . 3 . TFor detail, refer to the following procedure. 1 . In addition, the remaining space on the audio unit clockwise to fasten it all the way into the shoe on the audio unit is for each application software. AC Adapter AP-V21M Battery ...
Instructions
Page 8
... [POWER] switch to AOFFB in a solution of 35 % to 80 %. They will deteriorate. Ⅵ Precautions for transportation ● When carrying the camcorder, be sure to hold the carrying handle. This is not recorded on the SD card. Ⅵ Do not press against a hard object. Ⅵ...● Rebooting when the [SYSTEM SELECT] menu is not a malfunction. Doing so may not turn off the power, or remove the battery/AC adapter during recording or playback. Ⅵ The camera may occur. Handling of the lens, color divergence phenomena (magnification chromatic aberration) may not show ...
... [POWER] switch to AOFFB in a solution of 35 % to 80 %. They will deteriorate. Ⅵ Precautions for transportation ● When carrying the camcorder, be sure to hold the carrying handle. This is not recorded on the SD card. Ⅵ Do not press against a hard object. Ⅵ...● Rebooting when the [SYSTEM SELECT] menu is not a malfunction. Doing so may not turn off the power, or remove the battery/AC adapter during recording or playback. Ⅵ The camera may occur. Handling of the lens, color divergence phenomena (magnification chromatic aberration) may not show ...
Instructions
Page 19
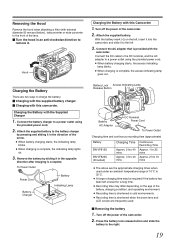
... time is complete, the access indicating lamp goes out. With the battery mark (D) on the age of the camcorder. 2 . Connect the DC cable to the DC terminal, and the AC adapter to a power outlet using the provided power cord. 2 . Attach the supplied battery. Charging the Battery There ...are frequently used under an ambient temperature range of the camcorder. 2 . Removing the Hood Remove the hood when attaching a filter (...
... time is complete, the access indicating lamp goes out. With the battery mark (D) on the age of the camcorder. 2 . Connect the DC cable to the DC terminal, and the AC adapter to a power outlet using the provided power cord. 2 . Attach the supplied battery. Charging the Battery There ...are frequently used under an ambient temperature range of the camcorder. 2 . Removing the Hood Remove the hood when attaching a filter (...
Instructions
Page 20
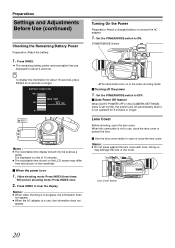
...OFF USER1 USER2 FOCUS ZOOM AF/MF FULL AUTO GAIN WHT.BAL A / B L- Turning On the Power Preparation: Attach a charged battery or connect the AC adapter. 1 . Lens Cover Before shooting, open or close the lens cover to protect the lens. Ⅵ Use the lens cover switch to [ON], ... 5 minutes or longer. Memo : ● When video shooting is in progress, the information does not appear. ● When the AC adapter is not in use , close the lens cover. Set the POWER/MODE switch to clear the display. When this camcorder is in use , the information does not appear.
...OFF USER1 USER2 FOCUS ZOOM AF/MF FULL AUTO GAIN WHT.BAL A / B L- Turning On the Power Preparation: Attach a charged battery or connect the AC adapter. 1 . Lens Cover Before shooting, open or close the lens cover to protect the lens. Ⅵ Use the lens cover switch to [ON], ... 5 minutes or longer. Memo : ● When video shooting is in progress, the information does not appear. ● When the AC adapter is not in use , close the lens cover. Set the POWER/MODE switch to clear the display. When this camcorder is in use , the information does not appear.
Instructions
Page 27
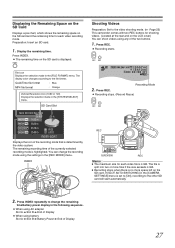
... recording mode using the settings in the [REC MODE] menu. Press INDEX repeatedly to the video shooting mode. (A Page 25) This camcorder comes with two REC buttons for shooting videos. (Located at the rear and on the LCD cover) You can change the remaining time/battery...displayed. The display color changes according to the other SD card will start automatically. 2 . If [SLOT AUTO SWITCHING] in the following sequence. ● When using AC adapter Slot A B Slot B B End of Display ● When using any of Display 27 You can shoot videos using battery Slot A B Slot B B Battery ...
... recording mode using the settings in the [REC MODE] menu. Press INDEX repeatedly to the video shooting mode. (A Page 25) This camcorder comes with two REC buttons for shooting videos. (Located at the rear and on the LCD cover) You can change the remaining time/battery...displayed. The display color changes according to the other SD card will start automatically. 2 . If [SLOT AUTO SWITCHING] in the following sequence. ● When using AC adapter Slot A B Slot B B End of Display ● When using any of Display 27 You can shoot videos using battery Slot A B Slot B B Battery ...
Instructions
Page 28
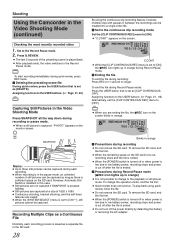
... the preceding scene file During quick review, press the USER button that is cut off the power directly by detaching the battery or removing the AC adapter. Recording Multiple Clips as there is played back. ● After playback ends, the video switches to the Record Pause mode. Q.REVIEW To...is pressed halfway. ● Still pictures are captured at a size of the preceding scene is sufficient space on the monitor screen. Shooting Using the Camcorder in the SD card. 28 By using quick review, close the file. ● Do not remove the SD card. However, Automatic Slot Switch...
... the preceding scene file During quick review, press the USER button that is cut off the power directly by detaching the battery or removing the AC adapter. Recording Multiple Clips as there is played back. ● After playback ends, the video switches to the Record Pause mode. Q.REVIEW To...is pressed halfway. ● Still pictures are captured at a size of the preceding scene is sufficient space on the monitor screen. Shooting Using the Camcorder in the SD card. 28 By using quick review, close the file. ● Do not remove the SD card. However, Automatic Slot Switch...
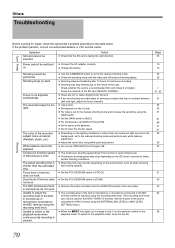
Instructions
Page 70
...for the INPUT1/INPUT2 terminal. Shooting Shooting cannot be switched on. ● Connect the AC adapter correctly. ● Charge the battery. The color of still pictures is facing the ... mode, close the clip file. Check whether the card is used for repair, check the camcorder's problem according to the nature of the lens does not work. Power cannot be performed. ...volume of the lens does not work . If the problem persists, consult our authorized dealers or JVC service center. Shooting stops by itself. Zoom knob of the built-in microphone or MIC terminal using...
...for the INPUT1/INPUT2 terminal. Shooting Shooting cannot be switched on. ● Connect the AC adapter correctly. ● Charge the battery. The color of still pictures is facing the ... mode, close the clip file. Check whether the card is used for repair, check the camcorder's problem according to the nature of the lens does not work. Power cannot be performed. ...volume of the lens does not work . If the problem persists, consult our authorized dealers or JVC service center. Shooting stops by itself. Zoom knob of the built-in microphone or MIC terminal using...
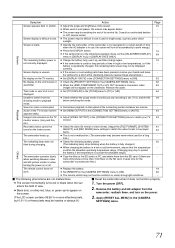
Instructions
Page 71
...pictures (more effective pixels, but 0.01 % or fewer pixels may be inactive or always lit.) 3 . Consult our authorized dealers - or JVC service center. Screen display is uneven. ● If the screen or surrounding parts have been pressed, remove your TV 63 monitor screen. (... Apply [RESET ALL MENU] in a hot or cold environment, ensure that the temperature - Remove the cable. Remove the battery and AC adapter from the camcorder, reattach them from the shooting mode to playback mode. ● Check whether the pause mode of the TV monitor screen ● Set...
...pictures (more effective pixels, but 0.01 % or fewer pixels may be inactive or always lit.) 3 . Consult our authorized dealers - or JVC service center. Screen display is uneven. ● If the screen or surrounding parts have been pressed, remove your TV 63 monitor screen. (... Apply [RESET ALL MENU] in a hot or cold environment, ensure that the temperature - Remove the cable. Remove the battery and AC adapter from the camcorder, reattach them from the shooting mode to playback mode. ● Check whether the pause mode of the TV monitor screen ● Set...
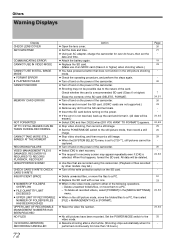
Instructions
Page 72
...a short while. (Shooting stops automatically when it . (All data will be captured. ● Turn off and on the power of the following operations. - When this camcorder. (Playback of an SDHC card (Class 6 or higher) when shooting videos.) ● You have been recorded. UNSUPPORTED SCENE! To delete all recorded videos, select [FORMAT...; Remove and re-insert the SD card. (SDXC cards are recorded using this happens, format the SD card. Action ● Using an AC adapter, charge the camcorder for more than 12 hours.) Page 20 21 - 19 23 20 7 24, 51 20 23 24, 63 24, 63 29 25 29 20 24, 63 ...
...a short while. (Shooting stops automatically when it . (All data will be captured. ● Turn off and on the power of the following operations. - When this camcorder. (Playback of an SDHC card (Class 6 or higher) when shooting videos.) ● You have been recorded. UNSUPPORTED SCENE! To delete all recorded videos, select [FORMAT...; Remove and re-insert the SD card. (SDXC cards are recorded using this happens, format the SD card. Action ● Using an AC adapter, charge the camcorder for more than 12 hours.) Page 20 21 - 19 23 20 7 24, 51 20 23 24, 63 24, 63 29 25 29 20 24, 63 ...
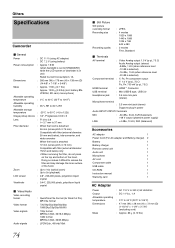
Instructions
Page 74
... so makes it difficult to remove the filter and may damage the inner surface of the hood. Others Specifications Camcorder Ⅵ General Power : DC 11 V (using AC adapter) DC 7.2 V (using battery) Power consumption : Approx 7.8 W (when backlight is set to [STANDARD]...: -60 dBu, 3 kK, XLR (balanced), +48 V output (phantom power supply) LINE : +4 dBu, 10 kK, XLR (balanced) Accessories AC adapter 1 Power Cord (For AC adapter and Battery charger) 2 Battery 1 Battery charger 1 Remote control unit 1 Audio unit 1 Microphone 1 AV cord 1 Component cable 1 USB cable 1 CD...
... so makes it difficult to remove the filter and may damage the inner surface of the hood. Others Specifications Camcorder Ⅵ General Power : DC 11 V (using AC adapter) DC 7.2 V (using battery) Power consumption : Approx 7.8 W (when backlight is set to [STANDARD]...: -60 dBu, 3 kK, XLR (balanced), +48 V output (phantom power supply) LINE : +4 dBu, 10 kK, XLR (balanced) Accessories AC adapter 1 Power Cord (For AC adapter and Battery charger) 2 Battery 1 Battery charger 1 Remote control unit 1 Audio unit 1 Microphone 1 AV cord 1 Component cable 1 USB cable 1 CD...


