
Instructions
Page 2
... to alert the user to the malfunctioning of fire or electric shock. Carrying or holding the camera by a newspaper, or cloth etc. CAUTION! Connecting cables (Audio/Video, etc.) to the camera and leaving it has sufficient space on top of this unit. (If water or liquid is intended to alert the...
... to alert the user to the malfunctioning of fire or electric shock. Carrying or holding the camera by a newspaper, or cloth etc. CAUTION! Connecting cables (Audio/Video, etc.) to the camera and leaving it has sufficient space on top of this unit. (If water or liquid is intended to alert the...

Instructions
Page 4
... Ⅵ Built-in monitor speaker for audio checking Ⅵ Recording check function for convenient...SD card recording This camcorder comes with two SD card slots...camcorder comes with an HDMI terminal, a component terminal, and an A/V OUT (video/audio output) terminal, which can be used as audio...images. Ⅵ Three audio input terminals This camcorder comes with little motion by...setting files The current menu and camcorder settings can be saved to an... also be loaded onto the camcorder according to the shooting scene ...Getting Started Main Features This camcorder enables recording of HD format...
... Ⅵ Built-in monitor speaker for audio checking Ⅵ Recording check function for convenient...SD card recording This camcorder comes with two SD card slots...camcorder comes with an HDMI terminal, a component terminal, and an A/V OUT (video/audio output) terminal, which can be used as audio...images. Ⅵ Three audio input terminals This camcorder comes with little motion by...setting files The current menu and camcorder settings can be saved to an... also be loaded onto the camcorder according to the shooting scene ...Getting Started Main Features This camcorder enables recording of HD format...
Instructions
Page 5
...27 Shooting Videos 27 Capturing Still Pictures in the Video Shooting Mode 28 Recording Multiple Clips as a Continuous File . . . . . .28 Using the Camcorder in the Still Picture Shooting Mode 29 Setting the Picture Quality, Recording Size, and Sensitivity 29 Capturing Still Pictures 29 Zoom Operation 30 Adjusting the...Connected to the MIC Terminal 40 Using an External Microphone Connected to the INPUT1/INPUT2 Terminal 40 Reducing Wind Noise 40 Monitoring Audio Sound Using a Headphone 41 Time Code Recording Setting 41 Displaying the Time Code/User's Bit 41 Recording the Time Code 41...
...27 Shooting Videos 27 Capturing Still Pictures in the Video Shooting Mode 28 Recording Multiple Clips as a Continuous File . . . . . .28 Using the Camcorder in the Still Picture Shooting Mode 29 Setting the Picture Quality, Recording Size, and Sensitivity 29 Capturing Still Pictures 29 Zoom Operation 30 Adjusting the...Connected to the MIC Terminal 40 Using an External Microphone Connected to the INPUT1/INPUT2 Terminal 40 Reducing Wind Noise 40 Monitoring Audio Sound Using a Headphone 41 Time Code Recording Setting 41 Displaying the Time Code/User's Bit 41 Recording the Time Code 41...
Instructions
Page 7
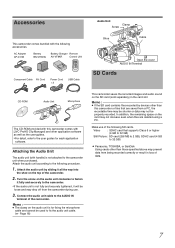
Attaching the Audio Unit The audio unit (with [JVC ProHD Clip Manager] and other application software as well as the user guides. Turn the screw on the card may drop off from being recorded correctly or result in the card slot. Memo : ● The clamp on the audio unit is for each ...will be loose and may not increase even when files are saved from a PC, the recordable time may be used to the camcorder unit when purchased. Connect the audio unit cable to 32 GB) ● Panasonic, TOSHIBA, or SanDisk Using cards other than those specified above may not be properly...
Attaching the Audio Unit The audio unit (with [JVC ProHD Clip Manager] and other application software as well as the user guides. Turn the screw on the card may drop off from being recorded correctly or result in the card slot. Memo : ● The clamp on the audio unit is for each ...will be loose and may not increase even when files are saved from a PC, the recordable time may be used to the camcorder unit when purchased. Connect the audio unit cable to 32 GB) ● Panasonic, TOSHIBA, or SanDisk Using cards other than those specified above may not be properly...
Instructions
Page 8
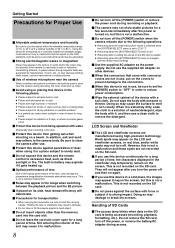
... settings Ⅵ Use the supplied AC adapter as direct sunlight or fire. They will deteriorate. Ⅵ Precautions for transportation ● When carrying the camcorder, be sure to set ● Rebooting after use a clean cloth to remove the detergent. Handling of time. LCD Screen and Viewfinder Ⅵ The...put on the SD card. Ⅵ Do not press against penetration of the device with water. (Especially when shooting in the picture or audio and/or the colors may appear to lag on the screen, but this is used near the camera When a wireless microphone or wireless microphone...
... settings Ⅵ Use the supplied AC adapter as direct sunlight or fire. They will deteriorate. Ⅵ Precautions for transportation ● When carrying the camcorder, be sure to set ● Rebooting after use a clean cloth to remove the detergent. Handling of time. LCD Screen and Viewfinder Ⅵ The...put on the SD card. Ⅵ Do not press against penetration of the device with water. (Especially when shooting in the picture or audio and/or the colors may appear to lag on the screen, but this is used near the camera When a wireless microphone or wireless microphone...
Instructions
Page 11
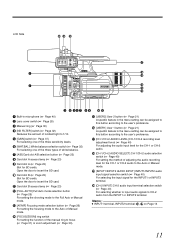
... lamp (A Page 23) L [FULL AUTO] Full Auto mode selection button (A Page 25) For setting the shooting mode to insert the SD card. S [INPUT1/INPUT2 AUDIO INPUT] INPUT1/INPUT2 audio input signal selection switch (A Page 40) For selecting the input signal for SD cards. B- A B H G F E D C 4 5 678 9 : ; ...AF/MF] Focusing mode selection button (A Page 26) For setting the focusing mode to the Auto or Manual mode. R [CH-1/CH-2 AUDIO SELECT] CH-1/CH-2 audio selection switch (A Page 40) For setting the method of white balance. G [A/B] Card slot A/B selection button (A Page 23) H Card ...
... lamp (A Page 23) L [FULL AUTO] Full Auto mode selection button (A Page 25) For setting the shooting mode to insert the SD card. S [INPUT1/INPUT2 AUDIO INPUT] INPUT1/INPUT2 audio input signal selection switch (A Page 40) For selecting the input signal for SD cards. B- A B H G F E D C 4 5 678 9 : ; ...AF/MF] Focusing mode selection button (A Page 26) For setting the focusing mode to the Auto or Manual mode. R [CH-1/CH-2 AUDIO SELECT] CH-1/CH-2 audio selection switch (A Page 40) For setting the method of white balance. G [A/B] Card slot A/B selection button (A Page 23) H Card ...

Instructions
Page 12
...the zooming lever. (A Page 32) When in the playback mode, pressing this camcorder to the Camera Shooting or Media Playback mode. H- E Bottom E B OGRAM A B A LCD cover B [COMPONENT OUT] Component output terminal (A Page 49) C [A/V OUT] Audio/Video output terminal (A Page 49) D [Q.REVIEW] Quick Review button (A Page..., this lever is used for menu setting. (A Page 57) Bottom N Tripod mounting holes (A Page 18) ● To prevent the camcorder from falling, attach securely using the rotation prevention hole. ● Use screws with screw length 5 mm and below. 12 Getting Started Names...
...the zooming lever. (A Page 32) When in the playback mode, pressing this camcorder to the Camera Shooting or Media Playback mode. H- E Bottom E B OGRAM A B A LCD cover B [COMPONENT OUT] Component output terminal (A Page 49) C [A/V OUT] Audio/Video output terminal (A Page 49) D [Q.REVIEW] Quick Review button (A Page..., this lever is used for menu setting. (A Page 57) Bottom N Tripod mounting holes (A Page 18) ● To prevent the camcorder from falling, attach securely using the rotation prevention hole. ● Use screws with screw length 5 mm and below. 12 Getting Started Names...
Instructions
Page 13
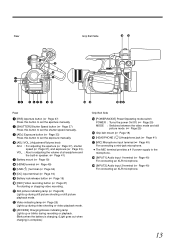
... 6 7 8 9 : ; C [AE±] Exposure button (A Page 33) Press this button to set the shutter speed manually. R [INPUT1] Audio input 1 terminal (A Page 40) For connecting an XLR microphone. VOL. : Also for adjusting the volume of a headphone and the built-in speaker. ...27) For starting or stopping video recording. K Still picture indicating lamp (A Page 25) Lights up during video shooting or video playback mode. S [INPUT2] Audio input 2 terminal (A Page 40) For connecting an XLR microphone. 13 L Video indicating lamp (A Page 25) Lights up during recording or playback. M [...
... 6 7 8 9 : ; C [AE±] Exposure button (A Page 33) Press this button to set the shutter speed manually. R [INPUT1] Audio input 1 terminal (A Page 40) For connecting an XLR microphone. VOL. : Also for adjusting the volume of a headphone and the built-in speaker. ...27) For starting or stopping video recording. K Still picture indicating lamp (A Page 25) Lights up during video shooting or video playback mode. S [INPUT2] Audio input 2 terminal (A Page 40) For connecting an XLR microphone. 13 L Video indicating lamp (A Page 25) Lights up during recording or playback. M [...
Instructions
Page 18
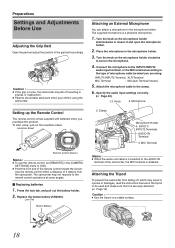
...XLR Terminal MIC Terminal : Mini-jack Terminal (stereo) 5 . Connect the microphone to the INPUT1/INPUT2 audio input terminal, or the MIC terminal according to the type of the camcorder, the MIC terminal is a phantom microphone. 1 . Microphone 5. Lock Tab Button Battery Attaching an External ... or damages, read the instruction manual of the grip belt accordingly. Specify the audio input settings correctly. (A Page 40) 1.3. Attaching the Tripod To prevent the camcorder from the camcorder. Preparations Settings and Adjustments Before Use Adjusting the Grip Belt Open the pad and...
...XLR Terminal MIC Terminal : Mini-jack Terminal (stereo) 5 . Connect the microphone to the INPUT1/INPUT2 audio input terminal, or the MIC terminal according to the type of the camcorder, the MIC terminal is a phantom microphone. 1 . Microphone 5. Lock Tab Button Battery Attaching an External ... or damages, read the instruction manual of the grip belt accordingly. Specify the audio input settings correctly. (A Page 40) 1.3. Attaching the Tripod To prevent the camcorder from the camcorder. Preparations Settings and Adjustments Before Use Adjusting the Grip Belt Open the pad and...

Instructions
Page 21
... close the menu screen, press MENU. Push the Set Lever up or down to confirm your preference. MIC MIC+48V INPUT1 INPUT2 AUTO MANUAL CH-1 AUDIO SELECT CH-2 AUTO MANUAL 0 1 23 2 3 45 USER1 USER2 ND FILTER ON OFF USER1 USER2 FOCUS ZOOM AF/MF FULL AUTO GAIN WHT.BAL A / B L- ... 1 . MENU 3 . Turn on the power. 2 . Select the [DISPLAY SETTINGS] menu. Push the Set Lever up or down to the USER Buttons This camcorder comes with three USER buttons. Press the center of the date and time using the [DATE DISPLAY STYLE] item in the [CAMERA SETTINGS] menu. (A Page...
... close the menu screen, press MENU. Push the Set Lever up or down to confirm your preference. MIC MIC+48V INPUT1 INPUT2 AUTO MANUAL CH-1 AUDIO SELECT CH-2 AUTO MANUAL 0 1 23 2 3 45 USER1 USER2 ND FILTER ON OFF USER1 USER2 FOCUS ZOOM AF/MF FULL AUTO GAIN WHT.BAL A / B L- ... 1 . MENU 3 . Turn on the power. 2 . Select the [DISPLAY SETTINGS] menu. Push the Set Lever up or down to the USER Buttons This camcorder comes with three USER buttons. Press the center of the date and time using the [DATE DISPLAY STYLE] item in the [CAMERA SETTINGS] menu. (A Page...
Instructions
Page 30
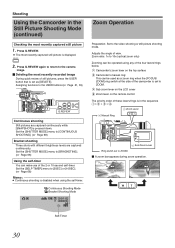
... Shooting Mode Bracket Shooting Mode A [0010] B [9999] 10 Self-Timer Zoom Operation Preparation: Set to the USER buttons:(A Page 21, 65) 2 3 45 CH-2 INPUT AUDIO INPUT INPUT1 INPUT2 - Set the [SELF-TIMER] menu to [2SEC] or [10SEC]. (A Page 68) Memo : ● Continuous shooting is set as a zoom ring when the... [FOCUS/ ZOOM] ring switch at the side of the camcorder is disabled when using any of the 2 or 10-second self-timer. LINE - Adjusts the angle of these levers/rings is displayed...
... Shooting Mode Bracket Shooting Mode A [0010] B [9999] 10 Self-Timer Zoom Operation Preparation: Set to the USER buttons:(A Page 21, 65) 2 3 45 CH-2 INPUT AUDIO INPUT INPUT1 INPUT2 - Set the [SELF-TIMER] menu to [2SEC] or [10SEC]. (A Page 68) Memo : ● Continuous shooting is set as a zoom ring when the... [FOCUS/ ZOOM] ring switch at the side of the camcorder is disabled when using any of the 2 or 10-second self-timer. LINE - Adjusts the angle of these levers/rings is displayed...
Instructions
Page 32
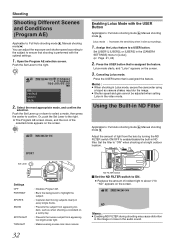
... such as camera shakes may cause distortion in the image or noise in ND filter. Memo : ● When shooting in Lolux mode, secure the camcorder using a tripod as when shooting a snowfield on the screen. Using the Built-in ND Filter Applicable to: Full Auto shooting mode A, Manual shooting mode...a sunny day. : Prevents the human subject from the lens by turning the ND FILTER switch ON/OFF to enable/disable the built-in the audio sound. Shooting Shooting Different Scenes and Conditions (Program AE) Applicable to: Full Auto shooting mode A, Manual shooting mode M You can adjust the ...
... such as camera shakes may cause distortion in the image or noise in ND filter. Memo : ● When shooting in Lolux mode, secure the camcorder using a tripod as when shooting a snowfield on the screen. Using the Built-in ND Filter Applicable to: Full Auto shooting mode A, Manual shooting mode...a sunny day. : Prevents the human subject from the lens by turning the ND FILTER switch ON/OFF to enable/disable the built-in the audio sound. Shooting Shooting Different Scenes and Conditions (Program AE) Applicable to: Full Auto shooting mode A, Manual shooting mode M You can adjust the ...
Instructions
Page 40
... that requires a +48 V power supply (phantom microphone), or when using the CH-2 INPUT switch. Ⅵ Selecting CH-2 audio Configure the CH-2 INPUT switch INPUT1: Inputs the audio from the INPUT1 terminal to a dynamic microphone. AUTO : Use this setting when connecting to the INPUT1 or INPUT2 terminal Configure the...shooting mode M Ⅵ Setting the input level. LEVEL] menu. (-20 dB/-12 dB) (A Page 64) Using the Built-in use, remove the audio unit cable from the INPUT2 terminal to the AUTO or MANUAL mode. Menu settings Set the [WIND CUT] menu. (A Page 63) TWhen the built-...
... that requires a +48 V power supply (phantom microphone), or when using the CH-2 INPUT switch. Ⅵ Selecting CH-2 audio Configure the CH-2 INPUT switch INPUT1: Inputs the audio from the INPUT1 terminal to a dynamic microphone. AUTO : Use this setting when connecting to the INPUT1 or INPUT2 terminal Configure the...shooting mode M Ⅵ Setting the input level. LEVEL] menu. (-20 dB/-12 dB) (A Page 64) Using the Built-in use, remove the audio unit cable from the INPUT2 terminal to the AUTO or MANUAL mode. Menu settings Set the [WIND CUT] menu. (A Page 63) TWhen the built-...
Instructions
Page 41
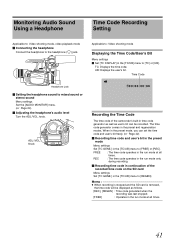
... when the recording was last stopped. [FREE] : Operates in the run mode only during recording. Ⅵ Recording time code in continuation of the camcorder's built-in the preset and regeneration modes. Memo : ● When recording is stopped and the SD card is removed, the time code will be...code of the recorded time code on the SD card Menu settings Set [TC GENE.] in the run mode at all times. 41 Monitoring Audio Sound Using a Headphone Time Code Recording Setting Applicable to: Video shooting mode, video playback mode Ⅵ Connecting the headphone Connect the headphone to...
... when the recording was last stopped. [FREE] : Operates in the run mode only during recording. Ⅵ Recording time code in continuation of the camcorder's built-in the preset and regeneration modes. Memo : ● When recording is stopped and the SD card is removed, the time code will be...code of the recorded time code on the SD card Menu settings Set [TC GENE.] in the run mode at all times. 41 Monitoring Audio Sound Using a Headphone Time Code Recording Setting Applicable to: Video shooting mode, video playback mode Ⅵ Connecting the headphone Connect the headphone to...
Instructions
Page 46
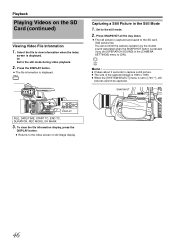
...1920 x 1080. ● When the [SYSTEM SELECT] menu is pressed if you set to the still mode during video playback. 2 . DISPLAY 2 3 45 CH-2 INPUT AUDIO INPUT INPUT1 INPUT2 - A CAM / MEDIA USERS DISPLAY Q.REVIEW MENU COMPONENT OUT A / V OUT B CAM / MEDIA USERS DISPLAY Q.REVIEW MENU DISPLAY FILE, DATE/TIME, START... information when the index screen is displayed. Select the file to the still mode. 2 . A- MIC MIC+48V INPUT1 INPUT2 AUTO MANUAL CH-1 AUDIO SELECT CH-2 AUTO MANUAL 0 1 23 ND FILTER ON OFF USER1 USER2 FOCUS ZOOM AF/MF FULL AUTO GAIN WHT.BAL A / B L- SNAPSHOT MIC 46...
...1920 x 1080. ● When the [SYSTEM SELECT] menu is pressed if you set to the still mode during video playback. 2 . DISPLAY 2 3 45 CH-2 INPUT AUDIO INPUT INPUT1 INPUT2 - A CAM / MEDIA USERS DISPLAY Q.REVIEW MENU COMPONENT OUT A / V OUT B CAM / MEDIA USERS DISPLAY Q.REVIEW MENU DISPLAY FILE, DATE/TIME, START... information when the index screen is displayed. Select the file to the still mode. 2 . A- MIC MIC+48V INPUT1 INPUT2 AUTO MANUAL CH-1 AUDIO SELECT CH-2 AUTO MANUAL 0 1 23 ND FILTER ON OFF USER1 USER2 FOCUS ZOOM AF/MF FULL AUTO GAIN WHT.BAL A / B L- SNAPSHOT MIC 46...
Instructions
Page 47
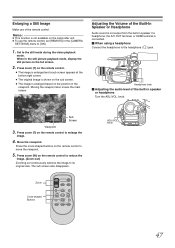
... image to its original size. Move the viewpoint. Set to enlarge the image. 4 . Adjusting the Volume of the Built-In Speaker or Headphone Audio sound is not available on the position of the remote control. The sub screen also disappears. IRIS OPEN SHUTTER AE ʶ CLOSE ADJ./VOL....] in the [CAMERA SETTINGS] menu to [ON]. 1 . MIC Headphone Jack Ⅵ Adjusting the audio level of the built-in speaker if a headphone, the A/V OUT terminal, or HDMI terminal is enlarged based on the camcorder unit. ● To use of the viewpoint. knob. PUSH ACCESS REC DC Zoom Cross-shaped SET...
... image to its original size. Move the viewpoint. Set to enlarge the image. 4 . Adjusting the Volume of the Built-In Speaker or Headphone Audio sound is not available on the position of the remote control. The sub screen also disappears. IRIS OPEN SHUTTER AE ʶ CLOSE ADJ./VOL....] in the [CAMERA SETTINGS] menu to [ON]. 1 . MIC Headphone Jack Ⅵ Adjusting the audio level of the built-in speaker if a headphone, the A/V OUT terminal, or HDMI terminal is enlarged based on the camcorder unit. ● To use of the viewpoint. knob. PUSH ACCESS REC DC Zoom Cross-shaped SET...
Instructions
Page 49
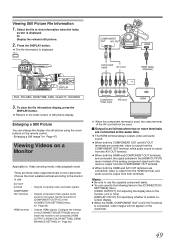
...BAL A / B L- M- A CAM / MEDIA USERS DISPLAY Q.REVIEW MENU COMPONENT OUT A / V OUT B CAM / MEDIA USERS DISPLAY Q.REVIEW MENU DISPLAY FILE, FOLDER, DATE/TIME, SIZE, QUALITY, OK MARK 3 . Audio sound is displayed. Configure the settings in the [CONNECTION SETTINGS] menu. [VIDEO OUTPUT]: For adjusting the display size on the remote control. H- A/V OUT terminal : Outputs... resolution in the menu is connected, video images will not be used , the video terminal of the AV cord will not appear on this camcorder. Viewing Still Picture File Information 1 . PRST- A-
...BAL A / B L- M- A CAM / MEDIA USERS DISPLAY Q.REVIEW MENU COMPONENT OUT A / V OUT B CAM / MEDIA USERS DISPLAY Q.REVIEW MENU DISPLAY FILE, FOLDER, DATE/TIME, SIZE, QUALITY, OK MARK 3 . Audio sound is displayed. Configure the settings in the [CONNECTION SETTINGS] menu. [VIDEO OUTPUT]: For adjusting the display size on the remote control. H- A/V OUT terminal : Outputs... resolution in the menu is connected, video images will not be used , the video terminal of the AV cord will not appear on this camcorder. Viewing Still Picture File Information 1 . PRST- A-
Instructions
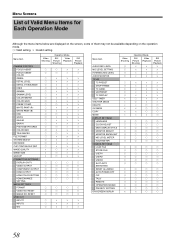
Page 58
...;ן ן ן ן ן ן Still Picture Playback ⅜ ⅜ ⅜ Menu Item AUDIO REF. RESET IMAGE NO. UB PRESET TC DISPLAY SELF-TIMER SHUTTER MODE DELETE OK MARK COPY MOVE DISPLAY SETTINGS LANGUAGE CLOCK ADJUST DATE DISPLAY STYLE... TV VIDEO OUTPUT COMPONENT OUTPUT HDMI OUTPUT HDMI COLOR SETTING HDMI ENHANCE SETTING MEDIA SETTINGS FORMAT VIDEO NO. LEVEL MIC LEVEL SETTING INTERNAL MIC LEVEL AUDIO MONITOR TC/UB TC PRESET DROP FRAME TC GENE.
...;ן ן ן ן ן ן Still Picture Playback ⅜ ⅜ ⅜ Menu Item AUDIO REF. RESET IMAGE NO. UB PRESET TC DISPLAY SELF-TIMER SHUTTER MODE DELETE OK MARK COPY MOVE DISPLAY SETTINGS LANGUAGE CLOCK ADJUST DATE DISPLAY STYLE... TV VIDEO OUTPUT COMPONENT OUTPUT HDMI OUTPUT HDMI COLOR SETTING HDMI ENHANCE SETTING MEDIA SETTINGS FORMAT VIDEO NO. LEVEL MIC LEVEL SETTING INTERNAL MIC LEVEL AUDIO MONITOR TC/UB TC PRESET DROP FRAME TC GENE.
Instructions
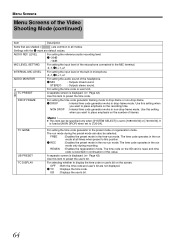
Page 64
...user's bit are default values. R MIX : Outputs mixed sound. Use this value. The time code operates in microphone. -2,-1,R0,+1,+2 AUDIO MONITOR For setting the audio sound of the headphone. R TC : Displays the time code. For setting the time code or user's bit. TC PRESET A separate...the preset mode or regeneration mode. FREE : Enables the preset mode in the run mode during recording. LEVEL For setting the reference audio recording level. R -20dB -12dB MIC LEVEL SETTING For setting the input level of the microphone connected to place emphasis on the...
...user's bit are default values. R MIX : Outputs mixed sound. Use this value. The time code operates in microphone. -2,-1,R0,+1,+2 AUDIO MONITOR For setting the audio sound of the headphone. R TC : Displays the time code. For setting the time code or user's bit. TC PRESET A separate...the preset mode or regeneration mode. FREE : Enables the preset mode in the run mode during recording. LEVEL For setting the reference audio recording level. R -20dB -12dB MIC LEVEL SETTING For setting the input level of the microphone connected to place emphasis on the...
Instructions
Page 70
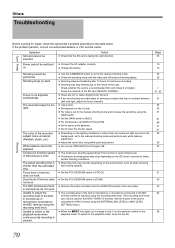
Others Troubleshooting Card Power Before sending for the INPUT1/INPUT2 terminal. If the problem persists, consult our authorized dealers or JVC service center. Symptom SD card cannot be performed. Shooting stops by itself. Focus knob of the card. Unable to switch to the playback mode ... subjects. ● Set the FOCUS/ZOOM switch to FOCUS. ● Set the FOCUS/ZOOM switch to ZOOM. ● Remove the audio unit cable from the AUDIO IN terminal of the camcorder. ● The recording level of the built-in microphone or MIC terminal using the [INTERNAL MIC LEVEL] or [MIC LEVEL SETTING...
Others Troubleshooting Card Power Before sending for the INPUT1/INPUT2 terminal. If the problem persists, consult our authorized dealers or JVC service center. Symptom SD card cannot be performed. Shooting stops by itself. Focus knob of the card. Unable to switch to the playback mode ... subjects. ● Set the FOCUS/ZOOM switch to FOCUS. ● Set the FOCUS/ZOOM switch to ZOOM. ● Remove the audio unit cable from the AUDIO IN terminal of the camcorder. ● The recording level of the built-in microphone or MIC terminal using the [INTERNAL MIC LEVEL] or [MIC LEVEL SETTING...


