
Instruction Manual
Page 1
.... Model No. Before operating this information for purchasing this JVC product. Retain this unit, please read the instructions carefully to ensure the best possible performance. This instruction manual is located on the body. TENTATIVE U E DV CAMCORDER DV CAMKORDER CAMESCOPE DV GY-DV300 INSTRUCTION MANUAL BEDIENUNGSANLEITUNG MANUEL D'INSTRUCTIONS DV CAMCORDER GY-DV300 INSTRUCTION MANUAL Thank you for purchasing this unit, please read...
.... Model No. Before operating this information for purchasing this JVC product. Retain this unit, please read the instructions carefully to ensure the best possible performance. This instruction manual is located on the body. TENTATIVE U E DV CAMCORDER DV CAMKORDER CAMESCOPE DV GY-DV300 INSTRUCTION MANUAL BEDIENUNGSANLEITUNG MANUEL D'INSTRUCTIONS DV CAMCORDER GY-DV300 INSTRUCTION MANUAL Thank you for purchasing this unit, please read...
Instruction Manual
Page 2
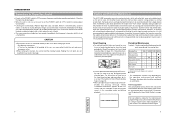
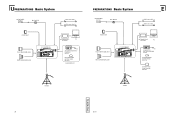
...OUT LINE OUT CH-1CH-2 Cable Exclusive Cable Shielded Cable Exclusive Cable Shielded Cable Lenght 1.9 meters 5 meters 3 meters 3 meters Port EARPHONE DV MIC1 MIC2 Cable Shielded Cable Exclusive Cable Shielded Cable Shielded Cable Lenght 1 meters 4.5 meters 0.3 meters 0.3 meters Caution : Where there are .... If the appliance has been exposed to rest on the appliance. 14. Adjust only those controls that are strong electromagnetic waves or magnetism, for purchasing the JVC GY-DV300 Camcorder. If the appliance has been dropped or the cabinet has been damaged. When replacement parts are...
...OUT LINE OUT CH-1CH-2 Cable Exclusive Cable Shielded Cable Exclusive Cable Shielded Cable Lenght 1.9 meters 5 meters 3 meters 3 meters Port EARPHONE DV MIC1 MIC2 Cable Shielded Cable Exclusive Cable Shielded Cable Shielded Cable Lenght 1 meters 4.5 meters 0.3 meters 0.3 meters Caution : Where there are .... If the appliance has been exposed to rest on the appliance. 14. Adjust only those controls that are strong electromagnetic waves or magnetism, for purchasing the JVC GY-DV300 Camcorder. If the appliance has been dropped or the cabinet has been damaged. When replacement parts are...
Instruction Manual
Page 4
... may also be disturbed at normal indoor illumination eliminating the need for extra illumination. ● LOLUX for purchasing the DV Camcorder GY-DV300. This camcorder is easily affected by the condition of the tape and the environment of use . Mosaic-like noise may appear in... the rights of copyright holders. ● JVC cannot assume liabilities that both video and audio are recorded correctly. ● We recommend using the "SP" mode for recording important scenes. ● Recorded video and audio contents are for the GY-DV300. These instructions are for convenient recording review...
... may also be disturbed at normal indoor illumination eliminating the need for extra illumination. ● LOLUX for purchasing the DV Camcorder GY-DV300. This camcorder is easily affected by the condition of the tape and the environment of use . Mosaic-like noise may appear in... the rights of copyright holders. ● JVC cannot assume liabilities that both video and audio are recorded correctly. ● We recommend using the "SP" mode for recording important scenes. ● Recorded video and audio contents are for the GY-DV300. These instructions are for convenient recording review...
Instruction Manual
Page 5
...on its side, heat release efficiency will deteriorate, adversely affecting the tape transport. When storing the GY-DV300 for a long time, the storage temperatures should be -20°C to 60°C. &#...Cleaning Tape ... 10 Videocassette to be Used 10 Condensation 11 Characteristic CCD Phenomena 11 CONTROLS, INDICATORS AND CONNECTORS Right Side Section 12 Rear Section 14 Left Side Section 18 Front...82 Outputting CH-3/CH-4 Channel Sound 83 EXTERNAL COMPONENTS Connecting a Video Component with DV Connector 84 PREPARATIONS FOR OPERATION Turning the Power ON 37 Cassette Loading 38 LCD ...
...on its side, heat release efficiency will deteriorate, adversely affecting the tape transport. When storing the GY-DV300 for a long time, the storage temperatures should be -20°C to 60°C. &#...Cleaning Tape ... 10 Videocassette to be Used 10 Condensation 11 Characteristic CCD Phenomena 11 CONTROLS, INDICATORS AND CONNECTORS Right Side Section 12 Rear Section 14 Left Side Section 18 Front...82 Outputting CH-3/CH-4 Channel Sound 83 EXTERNAL COMPONENTS Connecting a Video Component with DV Connector 84 PREPARATIONS FOR OPERATION Turning the Power ON 37 Cassette Loading 38 LCD ...
Instruction Manual
Page 6
... it out and then wipe. Holding the LCD door, lens or viewfinder may result in damage. 8 TENTATIVE Routine and Periodical Maintenance The GY-DV300 incorporates precision mechanical parts, which penetrates the inside the unit and cause damage or a fire. ● When carrying the camera, be ...caused by causing poor contact between tape and heads or failure to maintain the video and audio quality at your nearest JVC-authorized service agent. HEAD CLEANING REQUIRED! Time management The accumulated running time. As the replacement, adjustment and servicing of parts require...
... it out and then wipe. Holding the LCD door, lens or viewfinder may result in damage. 8 TENTATIVE Routine and Periodical Maintenance The GY-DV300 incorporates precision mechanical parts, which penetrates the inside the unit and cause damage or a fire. ● When carrying the camera, be ...caused by causing poor contact between tape and heads or failure to maintain the video and audio quality at your nearest JVC-authorized service agent. HEAD CLEANING REQUIRED! Time management The accumulated running time. As the replacement, adjustment and servicing of parts require...
Instruction Manual
Page 7
... tape case contains instructions for each cleaning. 3. Rewind it to malfunction with a switch on the back for a while. Then place the GY-DV300 in a plastic bag and seal it becomes unable to maintain full performance due to protect the required recording in the image. Characteristic CCD Phenomena...tapes marked MiniDV are provided with the effect of a CCD it is possible to 30% RH), head cleaning should be Used ● Use JVC videocassette tapes marked with unevenly wound tape, as possible, use in preventing accidental erasure. ● Slide the switch to "SAVE" to an ...
... tape case contains instructions for each cleaning. 3. Rewind it to malfunction with a switch on the back for a while. Then place the GY-DV300 in a plastic bag and seal it becomes unable to maintain full performance due to protect the required recording in the image. Characteristic CCD Phenomena...tapes marked MiniDV are provided with the effect of a CCD it is possible to 30% RH), head cleaning should be Used ● Use JVC videocassette tapes marked with unevenly wound tape, as possible, use in preventing accidental erasure. ● Slide the switch to "SAVE" to an ...
Instruction Manual
Page 8
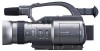
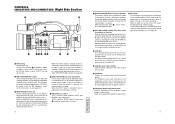
CONTROLS, INDICATORS AND CONNECTORS Right Side Section !2 !0 u CH-1 CH-2 AUDIO LEVEL ND FILTER ON OFF IRIS FOCUS AUTO MANU PUSH AUTO q wer yt PROFESSINAL OPEN DV CAMCORDER GY-DV300 !1 i o 1 FOCUS ring Manual focus ring. When the AUTO mode is selected for the iris adjustment, this ... adjustment dial Dial for adjusting until the viewfinder screen image is restored. B Tally lamp This lamp lights up red when the GY-DV300 is restored. A Viewfinder diopter adjustment knob Knob for manual adjustment of the viewfinder screen can be turned to face the LCD ...
CONTROLS, INDICATORS AND CONNECTORS Right Side Section !2 !0 u CH-1 CH-2 AUDIO LEVEL ND FILTER ON OFF IRIS FOCUS AUTO MANU PUSH AUTO q wer yt PROFESSINAL OPEN DV CAMCORDER GY-DV300 !1 i o 1 FOCUS ring Manual focus ring. When the AUTO mode is selected for the iris adjustment, this ... adjustment dial Dial for adjusting until the viewfinder screen image is restored. B Tally lamp This lamp lights up red when the GY-DV300 is restored. A Viewfinder diopter adjustment knob Knob for manual adjustment of the viewfinder screen can be turned to face the LCD ...
Instruction Manual
Page 9
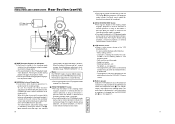
... shooting mode, two separate sets of setting values for about 3 seconds. When the GY-DV300 is displayed. When set the shutter speed of the menu screens. The shutter speed ...button starts and stops recording. When the OUTPUT CHAR. When used in microphone or from the DV 14 TENTATIVE connector. In this position when performing VTR playback. item on the SYSTEM [1/2] menu...MIC 1 : The sound from the MIC 1 input connector with the operating mode of sensitivity. CONTROLS, INDICATORS AND CONNECTORS Rear Section !8 @0 !9 POWER OFF ON MODE CAM-B CAM-A VTR GAIN...
... shooting mode, two separate sets of setting values for about 3 seconds. When the GY-DV300 is displayed. When set the shutter speed of the menu screens. The shutter speed ...button starts and stops recording. When the OUTPUT CHAR. When used in microphone or from the DV 14 TENTATIVE connector. In this position when performing VTR playback. item on the SYSTEM [1/2] menu...MIC 1 : The sound from the MIC 1 input connector with the operating mode of sensitivity. CONTROLS, INDICATORS AND CONNECTORS Rear Section !8 @0 !9 POWER OFF ON MODE CAM-B CAM-A VTR GAIN...
Instruction Manual
Page 10
CONTROLS, INDICATORS AND CONNECTORS Rear Section (cont'd) ● Pressing this button simultaneously with the ZOOM/Playback sound level adjustment lever a. Pressing this button during playback engages ... is adjusted with the REV button R during stop in the VTR playback mode initiates the blank search mode (for locating the end point of the GY-DV300 becomes possible. Q [FWD] FORWARD/FF button ● Pressing this button in the shooting mode. When the button is released, the recording-standby mode is pressed...
CONTROLS, INDICATORS AND CONNECTORS Rear Section (cont'd) ● Pressing this button simultaneously with the ZOOM/Playback sound level adjustment lever a. Pressing this button during playback engages ... is adjusted with the REV button R during stop in the VTR playback mode initiates the blank search mode (for locating the end point of the GY-DV300 becomes possible. Q [FWD] FORWARD/FF button ● Pressing this button in the shooting mode. When the button is released, the recording-standby mode is pressed...
Instruction Manual
Page 11
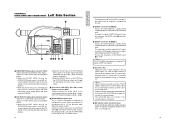
This connector is used for output of the DV signal or input the VCR contorl signal from the built-in speaker is not output when an earphone is plugged into this cover left open. • The GY-DV300 does not function if the cassette cover is output. ... on the LCD monitor screen can be connected here. Y [DV] DV connector (E MODEL) Using a DV cable (optional), a digital video component with DV connector can be output. (black and white display) (U MODEL) ● When the ASPECT item is output. TENTATIVE CONTROLS, INDICATORS AND CONNECTORS Left Side Section #7 MIC 1 IN MIC...
This connector is used for output of the DV signal or input the VCR contorl signal from the built-in speaker is not output when an earphone is plugged into this cover left open. • The GY-DV300 does not function if the cassette cover is output. ... on the LCD monitor screen can be connected here. Y [DV] DV connector (E MODEL) Using a DV cable (optional), a digital video component with DV connector can be output. (black and white display) (U MODEL) ● When the ASPECT item is output. TENTATIVE CONTROLS, INDICATORS AND CONNECTORS Left Side Section #7 MIC 1 IN MIC...
Instruction Manual
Page 12
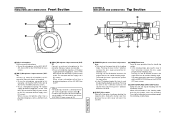
... CONNECTORS Front Section ] \ ` CONTROLS, INDICATORS AND CONNECTORS Top Section $3 START/ T STOP W EJECT W VOLUME T $1 $2 $4 \ Built-in microphone Built-in the shooting mode. Monaural signals are recorded. ● To use a microphone ... the W direction increases the angle of the microphone, set the MIC1 INPUT SEL item to INT on the SYSTEM [1/2] menu screen to OFF. When the GY-DV300 is selected with the CH-1/CH-2 audio input selector switch M. • To reduce the wind noise of the lens for a wider shooting angle. Monaural signals...
... CONNECTORS Front Section ] \ ` CONTROLS, INDICATORS AND CONNECTORS Top Section $3 START/ T STOP W EJECT W VOLUME T $1 $2 $4 \ Built-in microphone Built-in the shooting mode. Monaural signals are recorded. ● To use a microphone ... the W direction increases the angle of the microphone, set the MIC1 INPUT SEL item to INT on the SYSTEM [1/2] menu screen to OFF. When the GY-DV300 is selected with the CH-1/CH-2 audio input selector switch M. • To reduce the wind noise of the lens for a wider shooting angle. Monaural signals...
Instruction Manual
Page 17
...CASSETTE COVER OPEND! Displayed when the cassette cover was opened during recording. HEAD CLEANING REQUIRED! CONTROLS, INDICATORS AND CONNECTORS Indications on LCD Screen and Viewfinder Screen (Cont'd) Ⅵ Alarm ... on the back of the operation are displayed under the following circumstances. Displayed in the GY-DV300. VTR WARNING (HARD) Lights when abnormality occurs in the shooting mode. A ] .... It is input. CAME RA S E T [ C AM - NO TAPE Displayed when no DV signal is not shown in the unit. VTR WARNING [DEW] Displayed when condensation occurs in the playback...
...CASSETTE COVER OPEND! Displayed when the cassette cover was opened during recording. HEAD CLEANING REQUIRED! CONTROLS, INDICATORS AND CONNECTORS Indications on LCD Screen and Viewfinder Screen (Cont'd) Ⅵ Alarm ... on the back of the operation are displayed under the following circumstances. Displayed in the GY-DV300. VTR WARNING (HARD) Lights when abnormality occurs in the shooting mode. A ] .... It is input. CAME RA S E T [ C AM - NO TAPE Displayed when no DV signal is not shown in the unit. VTR WARNING [DEW] Displayed when condensation occurs in the playback...
Instruction Manual
Page 18
...4PIEEE1394 CABLE 6P VIDEO LIGHT TELE CONVERSION LENS WIDE CONVERSION LENS DV CAMCORDER CH-1 CH-2 AUDIO LEVEL ND FILTER ON OFF IRIS FOCUS AUTO MANU PUSH AUTO PROFESSINAL DV CAMCORDER GY-DV300 NETWORK PACK PC KA-DV300 AC AC ADAPTER/BATTERY CHARGER AA-P30 RECHARGEABLE BATTERY PACK BN...4P 4PIEEE1394 CABLE 6P VIDEO LIGHT TELE CONVERSION LENS WIDE CONVERSION LENS DV CAMCORDER CH-1 CH-2 AUDIO LEVEL ND FILTER ON OFF IRIS FOCUS AUTO MANU PUSH AUTO PROFESSINAL DV CAMCORDER GY-DV300 NETWORK PACK PC KA-DV300 AC AC ADAPTER/ BATTERY CHARGER AA-P30 RECHARGEABLE BATTERY PACK BN-...
...4PIEEE1394 CABLE 6P VIDEO LIGHT TELE CONVERSION LENS WIDE CONVERSION LENS DV CAMCORDER CH-1 CH-2 AUDIO LEVEL ND FILTER ON OFF IRIS FOCUS AUTO MANU PUSH AUTO PROFESSINAL DV CAMCORDER GY-DV300 NETWORK PACK PC KA-DV300 AC AC ADAPTER/BATTERY CHARGER AA-P30 RECHARGEABLE BATTERY PACK BN...4P 4PIEEE1394 CABLE 6P VIDEO LIGHT TELE CONVERSION LENS WIDE CONVERSION LENS DV CAMCORDER CH-1 CH-2 AUDIO LEVEL ND FILTER ON OFF IRIS FOCUS AUTO MANU PUSH AUTO PROFESSINAL DV CAMCORDER GY-DV300 NETWORK PACK PC KA-DV300 AC AC ADAPTER/ BATTERY CHARGER AA-P30 RECHARGEABLE BATTERY PACK BN-...
Instruction Manual
Page 19
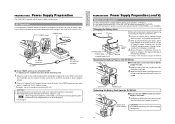
.... 2. Charging starts, and the CHARGE lamp blinks green. Hold the battery pack with the AC Adapter/Charger into the DC INPUT connector of the GY-DV300, and then connect the other end to the AC Adapter/Charger. * For details, see the instruction manual for the AA-P30. The DC INPUT... supply or battery pack. Plug one end of the AC Adapter/Charger into an AC outlet. Connector Battery pack Detaching the Battery Pack from the GY-DV300 Ⅵ Ensure that the POWER switch on the AC Adapter/Charger. AC Operation Use the provided (U MODEL)/optional (E MODEL)AC Adapter/Charger AA-...
.... 2. Charging starts, and the CHARGE lamp blinks green. Hold the battery pack with the AC Adapter/Charger into the DC INPUT connector of the GY-DV300, and then connect the other end to the AC Adapter/Charger. * For details, see the instruction manual for the AA-P30. The DC INPUT... supply or battery pack. Plug one end of the AC Adapter/Charger into an AC outlet. Connector Battery pack Detaching the Battery Pack from the GY-DV300 Ⅵ Ensure that the POWER switch on the AC Adapter/Charger. AC Operation Use the provided (U MODEL)/optional (E MODEL)AC Adapter/Charger AA-...

Instruction Manual
Page 20
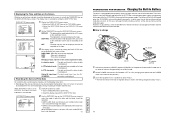
...when the power zoom lens is used ) Operating Time with Battery Pack Slow blinking (1 blink per second) Blinking No remaining battery power. EARPHONE DV Y/C OUT LINE CH-2 OUT CH-1 VIDEO OUT 2. Connect the microphone cable to Attach 1. Make sure to perform the correct setting for ...INPUT SEL item to secure the microphone. Prepare for battery pack replacement in use , it must be stored in the table on the GY-DV300. 6. Remaining battery power indication Remaining Battery Power Remaining battery power is continued. Purchase a new battery pack. attachment base Mount the ...
...when the power zoom lens is used ) Operating Time with Battery Pack Slow blinking (1 blink per second) Blinking No remaining battery power. EARPHONE DV Y/C OUT LINE CH-2 OUT CH-1 VIDEO OUT 2. Connect the microphone cable to Attach 1. Make sure to perform the correct setting for ...INPUT SEL item to secure the microphone. Prepare for battery pack replacement in use , it must be stored in the table on the GY-DV300. 6. Remaining battery power indication Remaining Battery Power Remaining battery power is continued. Purchase a new battery pack. attachment base Mount the ...
Instruction Manual
Page 21
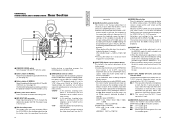
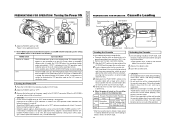
...cassette cover open the cassette cover. 2. Refrain from the AC adapter is disconnected while the GYDV300's POWER switch is set the GY-DV300's POWER switch to "OFF" while recording is indicated in the section for use in preventing accidental erasure to start recording or ...before the cassette is closed, it in the following : MODE Switch Operation Mode "CAM-A" or "CAM-B" The GY-DV300 starts up . 37 TENTATIVE PREPARATIONS FOR OPERATION Cassette Loading Erasure-prevention switch Cassette holder Tape window EJECT W VOLUME T EJECT switch Cassette cover...
...cassette cover open the cassette cover. 2. Refrain from the AC adapter is disconnected while the GYDV300's POWER switch is set the GY-DV300's POWER switch to "OFF" while recording is indicated in the section for use in preventing accidental erasure to start recording or ...before the cassette is closed, it in the following : MODE Switch Operation Mode "CAM-A" or "CAM-B" The GY-DV300 starts up . 37 TENTATIVE PREPARATIONS FOR OPERATION Cassette Loading Erasure-prevention switch Cassette holder Tape window EJECT W VOLUME T EJECT switch Cassette cover...
Instruction Manual
Page 24
...adapter AA-P30 1. Use the DATE REC item on the tape. 3. The battery will remain charged for about 3 months after being charge whenever the GY-DV300 is not used for about three months, in battery is turned to "OFF" or "ON" (charging takes places with the DISP STYLE item. ... CODE ON T I ME/ DATE D I SP LAY DI S P STYLE DATE + T I ME AUD I UM DATE R EC BAR S ASPE C T 4:3 N E T R E MOTE ON SET UP OFF PAGE BACK 2. During DV signal input: The date and time from a power supply. Set the POWER switch on the LCD screen or the viewfinder screen. Set the TIME/DATE...
...adapter AA-P30 1. Use the DATE REC item on the tape. 3. The battery will remain charged for about 3 months after being charge whenever the GY-DV300 is not used for about three months, in battery is turned to "OFF" or "ON" (charging takes places with the DISP STYLE item. ... CODE ON T I ME/ DATE D I SP LAY DI S P STYLE DATE + T I ME AUD I UM DATE R EC BAR S ASPE C T 4:3 N E T R E MOTE ON SET UP OFF PAGE BACK 2. During DV signal input: The date and time from a power supply. Set the POWER switch on the LCD screen or the viewfinder screen. Set the TIME/DATE...
Instruction Manual
Page 26
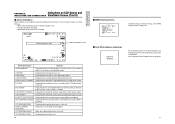
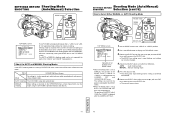
... SELECT dial TOP MENU screen MENU MO D E MANU AL E A R PHON E LEV EL 1 0 S YS T EM S E T . . TENTATIVE 47 48 C LOC K / TC . . Also, the GY-DV300 offers two shooting modes, AUTO and MANUAL, which are not displayed. The AUTO or MANUAL shooting mode can be allocated to each of the MODE...align the cursor (f) with the EXIT item, and then press the SELECT dial. ● The normal screen returns. Settings made using the GY-DV300's operation buttons and dial, etc. MANUAL shooting Make settings as desired on the OPERATION menu screen. MENU A L L R ESE T CANCE L EX I T...
... SELECT dial TOP MENU screen MENU MO D E MANU AL E A R PHON E LEV EL 1 0 S YS T EM S E T . . TENTATIVE 47 48 C LOC K / TC . . Also, the GY-DV300 offers two shooting modes, AUTO and MANUAL, which are not displayed. The AUTO or MANUAL shooting mode can be allocated to each of the MODE...align the cursor (f) with the EXIT item, and then press the SELECT dial. ● The normal screen returns. Settings made using the GY-DV300's operation buttons and dial, etc. MANUAL shooting Make settings as desired on the OPERATION menu screen. MENU A L L R ESE T CANCE L EX I T...
Instruction Manual
Page 27
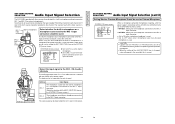
The sound of each of sound can be used at the same time. When using the GY-DV300 with the built-in digital PCM format. TENTATIVE SETTINGS BEFORE SHOOTING Audio Input Signal Selection The GY-DV300 is provided with three sources for audio input (i.e., built-in microphone. Ⅲ Set to MIC 1 to use the microphone...
The sound of each of sound can be used at the same time. When using the GY-DV300 with the built-in digital PCM format. TENTATIVE SETTINGS BEFORE SHOOTING Audio Input Signal Selection The GY-DV300 is provided with three sources for audio input (i.e., built-in microphone. Ⅲ Set to MIC 1 to use the microphone...
Instruction Manual
Page 28
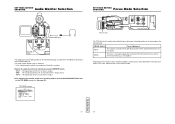
... mode, sound is output. D I T SETTINGS BEFORE SHOOTING Focus Mode Selection CH-1 CH-2 AUDIO LEVEL ND FILTER ON OFF IRIS FOCUS AUTO MANU PUSH AUTO PROFESSINAL DV CAMCORDER GY-DV300 FOCUS ring OPEN FOCUS AUTO MANU PUSH AUTO FOCUS switch The FOCUS switch is set with the EARPHONE LEVEL item on the lens section. FOCUS...
... mode, sound is output. D I T SETTINGS BEFORE SHOOTING Focus Mode Selection CH-1 CH-2 AUDIO LEVEL ND FILTER ON OFF IRIS FOCUS AUTO MANU PUSH AUTO PROFESSINAL DV CAMCORDER GY-DV300 FOCUS ring OPEN FOCUS AUTO MANU PUSH AUTO FOCUS switch The FOCUS switch is set with the EARPHONE LEVEL item on the lens section. FOCUS...


