Installation Manual
Page 2
...XP) (pre-installed) CPU : Intel MMX® Pentium®, at http://www.jvc-victor.co.jp/english/worldmap/index-e.html), please fill out the following requirements must be satisfied to connect a camcorder to your PC, or questions regarding basic operation of your questions, depending on their ...subject matter. Notice for Users Use of this software (refer to the JVC Worldwide Service Network at least 200 MHz RAM : At...
...XP) (pre-installed) CPU : Intel MMX® Pentium®, at http://www.jvc-victor.co.jp/english/worldmap/index-e.html), please fill out the following requirements must be satisfied to connect a camcorder to your PC, or questions regarding basic operation of your questions, depending on their ...subject matter. Notice for Users Use of this software (refer to the JVC Worldwide Service Network at least 200 MHz RAM : At...

Installation Manual
Page 3
...recommended Display : Must be capable of their respective holders. -3- Windows® 98, Windows® 98SE cannot be used when you connect a camcorder to the PC with 32,000 color Miscellaneous : QuickTime 4 or later ● The system requirements information above is a registered trademark of ...not a guarantee that the provided software will work on all personal computers meeting those requirements. ● If your PC. (Refer to "JVC Accessories" on our world web site at least 1 GB recommended Connector : USB connector IEEE1394 (i.LINK) connector Display : Must be capable ...
...recommended Display : Must be capable of their respective holders. -3- Windows® 98, Windows® 98SE cannot be used when you connect a camcorder to the PC with 32,000 color Miscellaneous : QuickTime 4 or later ● The system requirements information above is a registered trademark of ...not a guarantee that the provided software will work on all personal computers meeting those requirements. ● If your PC. (Refer to "JVC Accessories" on our world web site at least 1 GB recommended Connector : USB connector IEEE1394 (i.LINK) connector Display : Must be capable ...

Installation Manual
Page 4
...Quit any other operating systems and the item is not displayed. Windows® 98/98SE: Be sure NOT to connect the USB cable between the camcorder and the PC before installing the driver. For details, see "Installing USB Video Streaming driver for Windows® XP users" (੬ pg. ...not displayed. ImageMixer 1.7 This application is also used to capture still images and video clips from that there are no need to record camcorder's audio and video output on the driver or the software. -4- USB Video Streaming driver This driver allows you can install the desired ...
...Quit any other operating systems and the item is not displayed. Windows® 98/98SE: Be sure NOT to connect the USB cable between the camcorder and the PC before installing the driver. For details, see "Installing USB Video Streaming driver for Windows® XP users" (੬ pg. ...not displayed. ImageMixer 1.7 This application is also used to capture still images and video clips from that there are no need to record camcorder's audio and video output on the driver or the software. -4- USB Video Streaming driver This driver allows you can install the desired ...

Installation Manual
Page 7
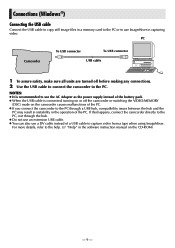
...Important Notice] dialog box appears, click [Next] and then [Quit] to close the dialog box. 2 Connect the camcorder to continue installation because this problem has no effect on digital signature may appear. Be sure not to 9 until the [Found New Hardware Wizard] screen is cleared. After a moment...), refer to "Connecting the USB cable" (੬ pg. 9). Double-click the [JVC] folder and then double-click the [Docs] folder. The warning message appears. 8 Click [Continue Anyway]. After you connect the camcorder to the PC with a USB cable. ● Refer to "VIDEO CONFERENCE OVER THE...
...Important Notice] dialog box appears, click [Next] and then [Quit] to close the dialog box. 2 Connect the camcorder to continue installation because this problem has no effect on digital signature may appear. Be sure not to 9 until the [Found New Hardware Wizard] screen is cleared. After a moment...), refer to "Connecting the USB cable" (੬ pg. 9). Double-click the [JVC] folder and then double-click the [Docs] folder. The warning message appears. 8 Click [Continue Anyway]. After you connect the camcorder to the PC with a USB cable. ● Refer to "VIDEO CONFERENCE OVER THE...
Installation Manual
Page 8
... When a warning message dialog box on digital signature appears, click [OK] to continue installation. 8 Confirm the following procedure. Restart the PC. 6 Load the provided CD-ROM in [My Computer]. Updating [Device Manager] (Windows®) If the camcorder is connected to the PC with the USB...in [Device Manager] by performing steps 2 - 3. ● [JVC PIX-MCV Video Capture] in [Imaging Devices] ● [JVC PIX-MCV Audio Capture] in [Sound, video and game controllers] ● [JVC Composite PIX-MCV Device] and [JVC Communication PIX-MCV Video Driver] in [Universal Serial Bus Controllers] -8-...
... When a warning message dialog box on digital signature appears, click [OK] to continue installation. 8 Confirm the following procedure. Restart the PC. 6 Load the provided CD-ROM in [My Computer]. Updating [Device Manager] (Windows®) If the camcorder is connected to the PC with the USB...in [Device Manager] by performing steps 2 - 3. ● [JVC PIX-MCV Video Capture] in [Imaging Devices] ● [JVC PIX-MCV Audio Capture] in [Sound, video and game controllers] ● [JVC Composite PIX-MCV Device] and [JVC Communication PIX-MCV Video Driver] in [Universal Serial Bus Controllers] -8-...
Installation Manual
Page 9
For more details, refer to the help. (੬ "Help" in the software instruction manual on the camcorder causes malfunctions of the PC. ● If you connect the camcorder to the PC through the hub. ● Do not use an extension USB cable. ● You can also use a DV cable instead of a ... to capture video from a tape when using ImageMixer. NOTES: ● It is recommended to use ImageMixer in capturing video. If this happens, connect the camcorder directly to the PC, not through a USB hub, compatibility issues between the hub and the PC may result in instability in the operation of the...
For more details, refer to the help. (੬ "Help" in the software instruction manual on the camcorder causes malfunctions of the PC. ● If you connect the camcorder to the PC through the hub. ● Do not use an extension USB cable. ● You can also use a DV cable instead of a ... to capture video from a tape when using ImageMixer. NOTES: ● It is recommended to use ImageMixer in capturing video. If this happens, connect the camcorder directly to the PC, not through a USB hub, compatibility issues between the hub and the PC may result in instability in the operation of the...
Installation Manual
Page 10
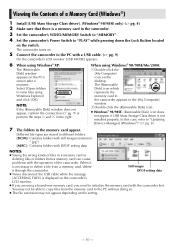
...card to the PC without doing so. ● The file extension may not be able to initialize the memory card with the operation of the camcorder. the camcorder appears in the [My Computer] NOTE: If the [Removable Disk] window does not appear, confirm the connection (੬ pg. 9) or ... the wrong kinds of files in a memory card or deleting files or folders from a memory card can cause problems with the camcorder first. The camcorder turns on. 5 Connect the camcorder to "PLAY" while pressing down the Lock Button located on the screen after a desktop. moment. In this case, refer to...
...card to the PC without doing so. ● The file extension may not be able to initialize the memory card with the operation of the camcorder. the camcorder appears in the [My Computer] NOTE: If the [Removable Disk] window does not appear, confirm the connection (੬ pg. 9) or ... the wrong kinds of files in a memory card or deleting files or folders from a memory card can cause problems with the camcorder first. The camcorder turns on. 5 Connect the camcorder to "PLAY" while pressing down the Lock Button located on the screen after a desktop. moment. In this case, refer to...

Installation Manual
Page 11
... folder within the [DCIM] folder. To view a still image, double-click the still image file (extension ".jpg"). - 11 - The message [ACCESSING FILES] appears on the camcorder's LCD monitor. NOTE: Never disconnect the USB cable while the message [ACCESSING FILES] is displayed on the LCD monitor of a Memory Card (Windows®)" (੬... card can handle the JPEG file format. Copying Files to the PC (Windows®) Still image files that folder in "Viewing the Contents of the camcorder, and the folder is copied from the memory card to the PC.
... folder within the [DCIM] folder. To view a still image, double-click the still image file (extension ".jpg"). - 11 - The message [ACCESSING FILES] appears on the camcorder's LCD monitor. NOTE: Never disconnect the USB cable while the message [ACCESSING FILES] is displayed on the LCD monitor of a Memory Card (Windows®)" (੬... card can handle the JPEG file format. Copying Files to the PC (Windows®) Still image files that folder in "Viewing the Contents of the camcorder, and the folder is copied from the memory card to the PC.

Installation Manual
Page 12
... currently displayed, wait until it disappears before proceeding. 2 Double-click the [My Computer] icon on the LCD monitor of the camcorder. ● If the message [ACCESSING FILES] is connected to "OFF". A menu appears. 4 Click [Eject] in the [My Computer] window. The [Removable Disk] ...disappear, wait for a while, and then proceed to step 5. 5 Disconnect the USB cable. ● If any message appears, click [OK]. 6 Set the camcorder's Power Switch to the PC correctly, the [Removable Disk] icon appears. 3 Right-click the [Removable Disk] icon in the menu. When using Windows® ...
... currently displayed, wait until it disappears before proceeding. 2 Double-click the [My Computer] icon on the LCD monitor of the camcorder. ● If the message [ACCESSING FILES] is connected to "OFF". A menu appears. 4 Click [Eject] in the [My Computer] window. The [Removable Disk] ...disappear, wait for a while, and then proceed to step 5. 5 Disconnect the USB cable. ● If any message appears, click [OK]. 6 Set the camcorder's Power Switch to the PC correctly, the [Removable Disk] icon appears. 3 Right-click the [Removable Disk] icon in the menu. When using Windows® ...

Installation Manual
Page 13
...and then click [Close]. ● Windows® 2000/XP ● Windows® Me The model name depends on the LCD monitor of the camcorder. ● If the message [ACCESSING FILES] is currently displayed, wait until it disappears before proceeding. 2 Double-click the [Safely Remove Hardware] ... bar. Windows® 2000/Me: If a message indicating that the message [ACCESSING FILES] is not currently displayed on the connected camcorder. 5 Disconnect the USB cable. 6 Set the camcorder's Power Switch to step 5. 3 Select [USB Mass Storage Device] or [USB Disk], and then click [Stop]. ●...
...and then click [Close]. ● Windows® 2000/XP ● Windows® Me The model name depends on the LCD monitor of the camcorder. ● If the message [ACCESSING FILES] is currently displayed, wait until it disappears before proceeding. 2 Double-click the [Safely Remove Hardware] ... bar. Windows® 2000/Me: If a message indicating that the message [ACCESSING FILES] is not currently displayed on the connected camcorder. 5 Disconnect the USB cable. 6 Set the camcorder's Power Switch to step 5. 3 Select [USB Mass Storage Device] or [USB Disk], and then click [Stop]. ●...

Installation Manual
Page 14
..."Start.pdf" file and click the button of the PC. ● If you are turned off before making any other software you connect the camcorder to the PC through the hub. ● Do not use an extension USB cable. NOTES: ● The software instruction manual is connected, ...turning on or off the camcorder or switching the VIDEO/MEMORY (DSC) mode on the camcorder causes malfunctions of the desired language. Double click the CD-ROM icon. 2 Double-click the [ImageMixer] folder in PDF ...
..."Start.pdf" file and click the button of the PC. ● If you are turned off before making any other software you connect the camcorder to the PC through the hub. ● Do not use an extension USB cable. NOTES: ● The software instruction manual is connected, ...turning on or off the camcorder or switching the VIDEO/MEMORY (DSC) mode on the camcorder causes malfunctions of the desired language. Double click the CD-ROM icon. 2 Double-click the [ImageMixer] folder in PDF ...
Installation Manual
Page 15
... - The folders in a memory card or deleting files or folders from a memory card can cause problems with a USB cable. (੬ pg. 14) On the camcorder's LCD monitor [USB MODE] appears. We recommend that there is a memory card in different folders. [DCIM]: Contains folders with still images (extension ".jpg") [MISC]:... the wrong kinds of the memory card icon is necessary to delete a file from the memory card to initialize the memory card with the camcorder first. Different file types are using a brand new memory card, you name the icon to tell it is "untitled". When it from ...
... - The folders in a memory card or deleting files or folders from a memory card can cause problems with a USB cable. (੬ pg. 14) On the camcorder's LCD monitor [USB MODE] appears. We recommend that there is a memory card in different folders. [DCIM]: Contains folders with still images (extension ".jpg") [MISC]:... the wrong kinds of the memory card icon is necessary to delete a file from the memory card to initialize the memory card with the camcorder first. Different file types are using a brand new memory card, you name the icon to tell it is "untitled". When it from ...

Installation Manual
Page 16
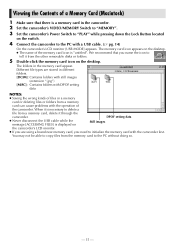
...cable (Macintosh) Before loading or unloading memory cards or turning off the PC, first disconnect the USB cable and turn off . - 16 - The camcorder turns off the camcorder. 1 Drop the memory card icon on the desktop into the [Trash] icon. ● If the confirmation message appears, click [OK]. 2 ... copied, and then drag and drop that can be copied to the PC. The message [ACCESSING FILES] appears on the LCD monitor of the camcorder. ● If the message [ACCESSING FILES] is displayed on the application icon. NOTE: Never disconnect the USB cable while the message [ACCESSING ...
...cable (Macintosh) Before loading or unloading memory cards or turning off the PC, first disconnect the USB cable and turn off . - 16 - The camcorder turns off the camcorder. 1 Drop the memory card icon on the desktop into the [Trash] icon. ● If the confirmation message appears, click [OK]. 2 ... copied, and then drag and drop that can be copied to the PC. The message [ACCESSING FILES] appears on the LCD monitor of the camcorder. ● If the message [ACCESSING FILES] is displayed on the application icon. NOTE: Never disconnect the USB cable while the message [ACCESSING ...

Instructions
Page 1
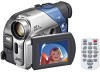
...DIGITAL STILL CAMERA (D.S.C.) RECORDING & PLAYBACK 18 ADVANCED FEATURES 25 REFERENCES 38 INSTRUCTIONS TERMS 54 For Customer Use: Enter below the Model No. which is located on the World Wide Web for Digital Video Camera: http://www.jvc....co.jp/english/cyber/ For Accessories: http://www.jvc.co.jp/english/accessory/ MasterPage: FrontCover Dear Customer....fm Page 1 Tuesday, November 18, 2003 11:38 AM DIGITAL VIDEO CAMERA GR-D72 Please visit our Homepage on the bottom of this product. Before use of the...
...DIGITAL STILL CAMERA (D.S.C.) RECORDING & PLAYBACK 18 ADVANCED FEATURES 25 REFERENCES 38 INSTRUCTIONS TERMS 54 For Customer Use: Enter below the Model No. which is located on the World Wide Web for Digital Video Camera: http://www.jvc....co.jp/english/cyber/ For Accessories: http://www.jvc.co.jp/english/accessory/ MasterPage: FrontCover Dear Customer....fm Page 1 Tuesday, November 18, 2003 11:38 AM DIGITAL VIDEO CAMERA GR-D72 Please visit our Homepage on the bottom of this product. Before use of the...
Instructions
Page 2
... the viewfinder and/or the LCD monitor can cause eye injuries, as well as they are possible anywhere. ● Use the JVC BN-V408U/V416U/V428U battery packs and, to recharge them or supply power to dripping or splashing. The apparatus shall not be ... not point the lens or the viewfinder directly into the sun. The following notes concern possible physical damage to the camcorder and to the camcorder. CAUTIONS: ● This camcorder is also a risk of internal circuitry. Replace battery with water. REFER SERVICING TO QUALIFIED SERVICE PERSONNEL. For disposal ...
... the viewfinder and/or the LCD monitor can cause eye injuries, as well as they are possible anywhere. ● Use the JVC BN-V408U/V416U/V428U battery packs and, to recharge them or supply power to dripping or splashing. The apparatus shall not be ... not point the lens or the viewfinder directly into the sun. The following notes concern possible physical damage to the camcorder and to the camcorder. CAUTIONS: ● This camcorder is also a risk of internal circuitry. Replace battery with water. REFER SERVICING TO QUALIFIED SERVICE PERSONNEL. For disposal ...
Instructions
Page 3
... ventilation openings. Use only with the cart, stand, tripod, bracket, or table specified by the manufacturer. 10. Unplug this camcorder is intended for private consumer use attachments/accessories specified by the manufacturer, or sold with this unit. Heed all instructions. 5. GR... " " can be used , use this apparatus near any heat sources such as radiators, heat registers, stoves, or other digital video formats. ...remember that this camcorder is not compatible with the Mini DV mark . ...make sure you obtain permission beforehand.) MasterPage: Safety_Right EN 3 Do not ...
... ventilation openings. Use only with the cart, stand, tripod, bracket, or table specified by the manufacturer. 10. Unplug this camcorder is intended for private consumer use attachments/accessories specified by the manufacturer, or sold with this unit. Heed all instructions. 5. GR... " " can be used , use this apparatus near any heat sources such as radiators, heat registers, stoves, or other digital video formats. ...remember that this camcorder is not compatible with the Mini DV mark . ...make sure you obtain permission beforehand.) MasterPage: Safety_Right EN 3 Do not ...
Instructions
Page 5
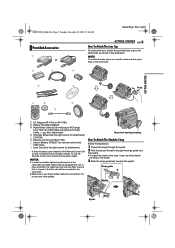
... Fold it back and thread it through the strap guide and the buckle. ● To adjust the length of the camcorder, provided cables may be connected to the camcorder. ● Make sure to use the provided cables for attachment) * A lithium battery is flush to the... camcorder as shown in the illustration. Strap guide 2 Buckle 3 1 Eyelet NOTE: To confirm the lens cap is on correctly make...STARTED EN 5 How To Attach The Lens Cap To protect the lens, attach the provided lens cap to the camcorder.
... Fold it back and thread it through the strap guide and the buckle. ● To adjust the length of the camcorder, provided cables may be connected to the camcorder. ● Make sure to use the provided cables for attachment) * A lithium battery is flush to the... camcorder as shown in the illustration. Strap guide 2 Buckle 3 1 Eyelet NOTE: To confirm the lens cap is on correctly make...STARTED EN 5 How To Attach The Lens Cap To protect the lens, attach the provided lens cap to the camcorder.

Instructions
Page 6
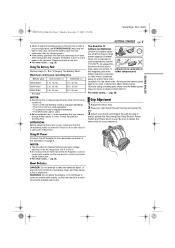
...Wind once. 3 Close the core filter until it . Disconnect the AC Adapter from the AC outlet. AC Adapter To AC outlet This camcorder's 2-way power supply system lets you choose the most appropriate source of cable between the cable plug and the core filter. BN-V416U Approx.... 3 hr. The core filter reduces interference. 1 Release the stoppers on the camcorder blinks to the camcorder. 5 Plug the AC Adapter into an AC outlet. To detach the battery pack Slide the battery pack down slightly while sliding BATT....
...Wind once. 3 Close the core filter until it . Disconnect the AC Adapter from the AC outlet. AC Adapter To AC outlet This camcorder's 2-way power supply system lets you choose the most appropriate source of cable between the cable plug and the core filter. BN-V416U Approx.... 3 hr. The core filter reduces interference. 1 Release the stoppers on the camcorder blinks to the camcorder. 5 Plug the AC Adapter into an AC outlet. To detach the battery pack Slide the battery pack down slightly while sliding BATT....
Instructions
Page 7
... capacity. Failure to function. Do not allow the DC terminals of the AC Adapter to come in contact with metals, as shown in a camcorder malfunction. GR-D74US_04Start.fm Page 7 Monday, November 17, 2003 2:53 PM MasterPage: Start_Right GETTING STARTED ● When charging the battery pack for... a short time, then re-attach it to the camcorder. However, when one . ● For other warm, protected place for the first time or after having been fully charged, the battery is ...
... capacity. Failure to function. Do not allow the DC terminals of the AC Adapter to come in contact with metals, as shown in a camcorder malfunction. GR-D74US_04Start.fm Page 7 Monday, November 17, 2003 2:53 PM MasterPage: Start_Right GETTING STARTED ● When charging the battery pack for... a short time, then re-attach it to the camcorder. However, when one . ● For other warm, protected place for the first time or after having been fully charged, the battery is ...

Instructions
Page 8
... ADJ.", RETURN and press it . Suitable for "Month" is no indication on the display. M (Manual Recording): Allows you to switch off the camcorder by opening/closing the LCD monitor or pulling out/pushing in a memory card. ● When the Power Switch is recorded onto the tape at all...monitor in . GR-D94US.book Page 8 Monday, November 17, 2003 2:12 PM MasterPage: Left 8 EN GETTING STARTED Operation Mode To turn on/off the camcorder. VIDEO/MEMORY Switch Position VIDEO: Allows you to record on a tape or play back a recording on the tape. ● Allows you to display a ...
... ADJ.", RETURN and press it . Suitable for "Month" is no indication on the display. M (Manual Recording): Allows you to switch off the camcorder by opening/closing the LCD monitor or pulling out/pushing in a memory card. ● When the Power Switch is recorded onto the tape at all...monitor in . GR-D94US.book Page 8 Monday, November 17, 2003 2:12 PM MasterPage: Left 8 EN GETTING STARTED Operation Mode To turn on/off the camcorder. VIDEO/MEMORY Switch Position VIDEO: Allows you to record on a tape or play back a recording on the tape. ● Allows you to display a ...


