
Instructions
Page 1
... and answer our Consumer Survey (in English only): http://www.jvc-victor.co.jp/english/index-e.html For Accessories: http://www.jvc-victor.co.jp/english/accessory/ INSTRUCTIONS For Customer Use: Enter below the Model No. Model No. DIGITAL VIDEO CAMERA GR-DV3000 Please visit our Homepage on the bottom of the camcorder. Serial No.
... and answer our Consumer Survey (in English only): http://www.jvc-victor.co.jp/english/index-e.html For Accessories: http://www.jvc-victor.co.jp/english/accessory/ INSTRUCTIONS For Customer Use: Enter below the Model No. Model No. DIGITAL VIDEO CAMERA GR-DV3000 Please visit our Homepage on the bottom of the camcorder. Serial No.

Instructions
Page 2
...: TO REDUCE THE RISK OF ELECTRIC SHOCK, DO NOT REMOVE COVER (OR BACK). This camcorder is recommended that it has sufficient space on top and at the rear). The apparatus shall...carefully read the safety information and precautions contained in the following pages to enter this digital video camera. Also do not remove cover. 2 EN Dear Customer, Thank you refer to qualified service ... cannot be placed on the cover page. • Notes appear after most subsections. Use the JVC BNV408U/V416U/V428U battery packs and, to recharge them, the provided multi-voltage AC Power Adapter/...
...: TO REDUCE THE RISK OF ELECTRIC SHOCK, DO NOT REMOVE COVER (OR BACK). This camcorder is recommended that it has sufficient space on top and at the rear). The apparatus shall...carefully read the safety information and precautions contained in the following pages to enter this digital video camera. Also do not remove cover. 2 EN Dear Customer, Thank you refer to qualified service ... cannot be placed on the cover page. • Notes appear after most subsections. Use the JVC BNV408U/V416U/V428U battery packs and, to recharge them, the provided multi-voltage AC Power Adapter/...

Instructions
Page 6
...: In order to maintain optimum performance of the camcorder, provided cables may be connected to the camcorder. NOTE: To confirm the lens cap is on correctly make sure the cap is flush to the camera. 1 2 3 The lens cap can be attached/ removed even with one core filter, the end that is closest... to the filter should be equipped with the lens hood attached to the camcorder. 6 EN PROVIDED ACCESSORIES AC Power Adapter/ Charger AA-V40U...
...: In order to maintain optimum performance of the camcorder, provided cables may be connected to the camcorder. NOTE: To confirm the lens cap is on correctly make sure the cap is flush to the camera. 1 2 3 The lens cap can be attached/ removed even with one core filter, the end that is closest... to the filter should be equipped with the lens hood attached to the camcorder. 6 EN PROVIDED ACCESSORIES AC Power Adapter/ Charger AA-V40U...

Instructions
Page 11
...month. Press it twice. When you finish setting the minute and press the MENU wheel in . AUTO - Press it and "month" is not highlighted the camcorder's internal clock continues to " " while pressing down the Lock Button located on . 2 Press the MENU wheel in , the date and time begin operation... 11 Date/Time Settings The date/time is turned on the switch, and open the LCD monitor fully or pull out the viewfinder fully. BALANCE CAMERA MANUAL S Y S T EM D I ME CODE CLOCK ADJ . - The Menu Screen appears. 3 Rotate the MENU wheel to the first date/ time parameter (month), the clock...
...month. Press it twice. When you finish setting the minute and press the MENU wheel in . AUTO - Press it and "month" is not highlighted the camcorder's internal clock continues to " " while pressing down the Lock Button located on . 2 Press the MENU wheel in , the date and time begin operation... 11 Date/Time Settings The date/time is turned on the switch, and open the LCD monitor fully or pull out the viewfinder fully. BALANCE CAMERA MANUAL S Y S T EM D I ME CODE CLOCK ADJ . - The Menu Screen appears. 3 Rotate the MENU wheel to the first date/ time parameter (month), the clock...

Instructions
Page 15
...; During playback of a tape recorded on another camcorder, blocks of noise may appear or there may be momentary pauses in the SP mode. • "LP" (Long Play) is turned on tapes recorded in the sound. The CAMERA Menu appears. 4 Rotate the MENU wheel to select " RETURN", and press it... . The power lamp lights and the camcorder is more economical, providing 1.5 times the recording time. The Sub Menu appears. Rotate the MENU...
...; During playback of a tape recorded on another camcorder, blocks of noise may appear or there may be momentary pauses in the SP mode. • "LP" (Long Play) is turned on tapes recorded in the sound. The CAMERA Menu appears. 4 Rotate the MENU wheel to select " RETURN", and press it... . The power lamp lights and the camcorder is more economical, providing 1.5 times the recording time. The Sub Menu appears. Rotate the MENU...

Instructions
Page 20
... a shutter closing. Motor Drive Mode Keeping SNAPSHOT pressed provides an effect similar to select " RETURN" and press it twice. Press it and the CAMERA Menu appears. 4 Rotate the MENU wheel to select "SNAP MODE", then press it. 5 Rotate the MENU wheel to the PHONE connector, the... shutter sound is set the Power Switch to select " CAMERA". If you press during Recording PHOTO" appears and a still image will be recorded for approx. 6 seconds, then the camcorder re-enters the Record-Standby mode. MENU Wheel Display Menu Screen SNAP MODE - In...
... a shutter closing. Motor Drive Mode Keeping SNAPSHOT pressed provides an effect similar to select " RETURN" and press it twice. Press it and the CAMERA Menu appears. 4 Rotate the MENU wheel to select "SNAP MODE", then press it. 5 Rotate the MENU wheel to the PHONE connector, the... shutter sound is set the Power Switch to select " CAMERA". If you press during Recording PHOTO" appears and a still image will be recorded for approx. 6 seconds, then the camcorder re-enters the Record-Standby mode. MENU Wheel Display Menu Screen SNAP MODE - In...

Instructions
Page 21
Picture Quality Displays the quality of image: F (Fine) or S (Standard) (in order of shots that can use your camcorder as a Digital Still Camera for Camera File system). The image is locked. To record it on the memory card, press SNAPSHOT fully. • Still images are recorded in ... memory card is set the Power Switch to DCF. NOTE: You should already have any compatibility with no longer heard from the battery pack, the camcorder shuts off automatically to "ON" (੬ pg. 29), the Stabilizer will be stored. To Delete Unwanted Still Images when unwanted still images are...
Picture Quality Displays the quality of image: F (Fine) or S (Standard) (in order of shots that can use your camcorder as a Digital Still Camera for Camera File system). The image is locked. To record it on the memory card, press SNAPSHOT fully. • Still images are recorded in ... memory card is set the Power Switch to DCF. NOTE: You should already have any compatibility with no longer heard from the battery pack, the camcorder shuts off automatically to "ON" (੬ pg. 29), the Stabilizer will be stored. To Delete Unwanted Still Images when unwanted still images are...

Instructions
Page 25
... Frame-By-Frame Playback, or towards "w" for reverse Frame-By-Frame Playback during Shuttle Search. After 5 minutes in the Stop mode, the camcorder's power is displayed. Once you hold 2 or 3. Slow-Motion Playback, Playback Zoom and Playback Special Effects Available only with it , normal ... mode. The search continues as long as you release it flipped over and pushed against the camera body. ● LCD monitor/viewfinder indications: • When power is supplied from a battery, the camcorder shuts off . ● When 4/6 is pressed, the image may not be viewed in either...
... Frame-By-Frame Playback, or towards "w" for reverse Frame-By-Frame Playback during Shuttle Search. After 5 minutes in the Stop mode, the camcorder's power is displayed. Once you hold 2 or 3. Slow-Motion Playback, Playback Zoom and Playback Special Effects Available only with it , normal ... mode. The search continues as long as you release it flipped over and pushed against the camera body. ● LCD monitor/viewfinder indications: • When power is supplied from a battery, the camcorder shuts off . ● When 4/6 is pressed, the image may not be viewed in either...

Instructions
Page 28
... function and press it . ON DEMO MODE - AUTO - F I NE I MAGE S I T ZOOM - 40x SNAP MODE - RETURN FADER /W I SPLAY DSC F . BALANCE CAMERA MANUAL S Y S T EM D I PE PROGRAM AE W. The Sub Menu appears. MELODY TALLY - OFF DEC 25 ' 02 5 : 30 PM RETURN QUAL I N UP -...PROGRAM AE W. FUL L GA I TY - The selected function menu appears. 4 Function menu setting depends on -screen menu system that simplifies many of the more detailed camcorder settings (੬ pg. 29 - 31). 1 Set the Power Switch to select " RETURN" and press it . BEEP - OF F SOUND I ON - BACKGRND NAV...
... function and press it . ON DEMO MODE - AUTO - F I NE I MAGE S I T ZOOM - 40x SNAP MODE - RETURN FADER /W I SPLAY DSC F . BALANCE CAMERA MANUAL S Y S T EM D I PE PROGRAM AE W. The Sub Menu appears. MELODY TALLY - OFF DEC 25 ' 02 5 : 30 PM RETURN QUAL I N UP -...PROGRAM AE W. FUL L GA I TY - The selected function menu appears. 4 Function menu setting depends on -screen menu system that simplifies many of the more detailed camcorder settings (੬ pg. 29 - 31). 1 Set the Power Switch to select " RETURN" and press it . BEEP - OF F SOUND I ON - BACKGRND NAV...

Instructions
Page 29
... adjustment. Refer to "5-Second Recording" (੬ pg. 35). Refer to "Self-Timer" (੬ pg. 34). Allows you to shoot dark scenes with the camcorder on a tripod. ● The " " indicator blinks or goes out if the Stabilizer cannot be used. When set to record a few frames only. W.BALANCE...(੬ pg. 35). NOTES: ● Settings made in focus depends on two separate channels. (Equivalent to the 48 kHz mode of previous models) CAMERA ZOOM 10X When set to a maximum of 300X digital magnification. ference (੬ pg. 15). GAIN UP OFF Allows you to " the menu settings ...
... adjustment. Refer to "5-Second Recording" (੬ pg. 35). Refer to "Self-Timer" (੬ pg. 34). Allows you to shoot dark scenes with the camcorder on a tripod. ● The " " indicator blinks or goes out if the Stabilizer cannot be used. When set to record a few frames only. W.BALANCE...(੬ pg. 35). NOTES: ● Settings made in focus depends on two separate channels. (Equivalent to the 48 kHz mode of previous models) CAMERA ZOOM 10X When set to a maximum of 300X digital magnification. ference (੬ pg. 15). GAIN UP OFF Allows you to " the menu settings ...

Instructions
Page 31
... is performed with the VIDEO/MEMORY Switch set to a TV. "CLOCK ADJ." Refer to "VIDEO", still images are recorded only onto the tape. Makes the camcorder's display appear on the remote control (provided) (੬ pg. 55, 58, 67). DSC : Factory-preset NOTES: ● " SYSTEM" and " DISPLAY" ...pg. 11). In this mode, the "SNAP MODE" selection in the CAMERA Menu is also applicable to " ". ● The date indication can be turned on/off by pressing the DISPLAY Button on screen when the camcorder is set to set to memory card recording. However, the menu settings can...
... is performed with the VIDEO/MEMORY Switch set to a TV. "CLOCK ADJ." Refer to "VIDEO", still images are recorded only onto the tape. Makes the camcorder's display appear on the remote control (provided) (੬ pg. 55, 58, 67). DSC : Factory-preset NOTES: ● " SYSTEM" and " DISPLAY" ...pg. 11). In this mode, the "SNAP MODE" selection in the CAMERA Menu is also applicable to " ". ● The date indication can be turned on/off by pressing the DISPLAY Button on screen when the camcorder is set to set to memory card recording. However, the menu settings can...

Instructions
Page 38
... during recording or during Record-Standby. ● Some modes of "Program AE With Special Effects" (੬ pg. 38, 39). • "GAIN UP" in the CAMERA Menu (੬ pg. 29). • "DIS" in the MANUAL Menu (੬ pg. 29). ● During Night-Alive, it . If an unusable mode is...while the shutter speed is not grainy, it may be difficult to select " PRO- The Menu Screen appears. 3 Rotate the MENU wheel to bring the camcorder into focus. IMPORTANT Some modes of manual focus and/or a tripod is complete. 5 Press the MENU wheel in . Although the recorded image is being automatically...
... during recording or during Record-Standby. ● Some modes of "Program AE With Special Effects" (੬ pg. 38, 39). • "GAIN UP" in the CAMERA Menu (੬ pg. 29). • "DIS" in the MANUAL Menu (੬ pg. 29). ● During Night-Alive, it . If an unusable mode is...while the shutter speed is not grainy, it may be difficult to select " PRO- The Menu Screen appears. 3 Rotate the MENU wheel to bring the camcorder into focus. IMPORTANT Some modes of manual focus and/or a tripod is complete. 5 Press the MENU wheel in . Although the recorded image is being automatically...

Instructions
Page 46
... 2 Press the MENU wheel in a memory card as files which can be conveniently sent via e-mail. The Menu Screen closes. 5 Press E-MAIL. The camcorder enters the E-Mail Clip Record-Standby mode. 6 Press the Recording Start/Stop Button to start shooting. 7 Press the Recording Start/Stop Button to select " RETURN... Display 240 E-MAIL CL IP 35m i n 00 : 00 STANDBY ADVANCED FEATURES (cont.) E-Mail Clip Recording You can make video clips from real-time camera image or recorded video footage and store them in . Rotate the MENU wheel to select the desired image size, then press it. 4 Rotate the MENU...
... 2 Press the MENU wheel in a memory card as files which can be conveniently sent via e-mail. The Menu Screen closes. 5 Press E-MAIL. The camcorder enters the E-Mail Clip Record-Standby mode. 6 Press the Recording Start/Stop Button to start shooting. 7 Press the Recording Start/Stop Button to select " RETURN... Display 240 E-MAIL CL IP 35m i n 00 : 00 STANDBY ADVANCED FEATURES (cont.) E-Mail Clip Recording You can make video clips from real-time camera image or recorded video footage and store them in . Rotate the MENU wheel to select the desired image size, then press it. 4 Rotate the MENU...

Instructions
Page 47
...the E-Mail Clip Record-Standby mode. 5 Press the Recording Start/Stop Button to the instructions of "TO MAKE VIDEO CLIPS FROM REAL-TIME CAMERA IMAGE"). 3 Press 4/6 to end E-Mail Clip Recording. Mail Clip Recording. The normal screen reappears. Set the VIDEO/MEMORY Switch to "... to " " while pressing down the Lock Button located on a memory card . . . ..... ੬ pg. 26, 27. "COMPLETED" is displayed, then the camcorder re-enters the E-Mail Clip RecordStandby mode. 7 Press E-MAIL to start E- Mail Clip Recording. 6 Press the Recording Start/Stop Button to stop tape playback. To...
...the E-Mail Clip Record-Standby mode. 5 Press the Recording Start/Stop Button to the instructions of "TO MAKE VIDEO CLIPS FROM REAL-TIME CAMERA IMAGE"). 3 Press 4/6 to end E-Mail Clip Recording. Mail Clip Recording. The normal screen reappears. Set the VIDEO/MEMORY Switch to "... to " " while pressing down the Lock Button located on a memory card . . . ..... ੬ pg. 26, 27. "COMPLETED" is displayed, then the camcorder re-enters the E-Mail Clip RecordStandby mode. 7 Press E-MAIL to start E- Mail Clip Recording. 6 Press the Recording Start/Stop Button to stop tape playback. To...

Instructions
Page 57
... up for Microsoft Hotmail. ● In the Web Camera mode, the following buttons cannot be connected to the camcorder. ● It is not powered on, the camcorder does not enter the Web Camera mode. 4 When finished, turn off . 2 Connect the camcorder to your PC and all units are turned off the... PC first, then the camcorder. If a cable has only one or...
... up for Microsoft Hotmail. ● In the Web Camera mode, the following buttons cannot be connected to the camcorder. ● It is not powered on, the camcorder does not enter the Web Camera mode. 4 When finished, turn off . 2 Connect the camcorder to your PC and all units are turned off the... PC first, then the camcorder. If a cable has only one or...

Instructions
Page 63
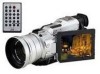
... Transmits the beam signal. position (" " or " "). DUB Button ^ PLAY Button & FF Button * STOP Button ( PAUSE Button ) R.A.EDIT Buttons Functions With the camcorder's Power With the camcorder's Power Switch Switch set to the camera set to " ". Zoom in /out (੬ pg. 22) - - - - 1 2 3 45 6 7 89 0 ! @ $# % ^& *( ) EN 63...pg. 65 - ੬ pg. 65 - ੬ pg. 67 Functions the same as the Recording Start/Stop Button on the camcorder. - ੬ pg. 66 Functions the same as SNAPSHOT on the camcorder. - ੬ pg. 63 - ੬ pg. 71 - ੬ pg. 63 - ੬ pg. 72 - &#...
... Transmits the beam signal. position (" " or " "). DUB Button ^ PLAY Button & FF Button * STOP Button ( PAUSE Button ) R.A.EDIT Buttons Functions With the camcorder's Power With the camcorder's Power Switch Switch set to the camera set to " ". Zoom in /out (੬ pg. 22) - - - - 1 2 3 45 6 7 89 0 ! @ $# % ^& *( ) EN 63...pg. 65 - ੬ pg. 65 - ੬ pg. 67 Functions the same as the Recording Start/Stop Button on the camcorder. - ੬ pg. 66 Functions the same as SNAPSHOT on the camcorder. - ੬ pg. 63 - ੬ pg. 71 - ੬ pg. 63 - ੬ pg. 72 - &#...

Instructions
Page 82
r Headphone Connector [PHONE pg. 72 No sound is connected. i Multi Connector When attaching the Jack Box to the camcorder, this part is output from the speaker when headphones are located beneath a cover. EN 83 t PRINTER Connector Connect to cover this connector. P Viewfinder pg. ...Connector [DV IN/OUT] (i.Link pg. 56, 58, 60 * i.Link refers to the connector u, open the LCD monitor. The logo is built-in here. O Camera Sensor Be careful not to the optional printer equipped with the i.Link standard. SOUND Button pg. 45 & Monitor Open Button [PUSH OPEN] ..... ੬ pg. 18...
r Headphone Connector [PHONE pg. 72 No sound is connected. i Multi Connector When attaching the Jack Box to the camcorder, this part is output from the speaker when headphones are located beneath a cover. EN 83 t PRINTER Connector Connect to cover this connector. P Viewfinder pg. ...Connector [DV IN/OUT] (i.Link pg. 56, 58, 60 * i.Link refers to the connector u, open the LCD monitor. The logo is built-in here. O Camera Sensor Be careful not to the optional printer equipped with the i.Link standard. SOUND Button pg. 45 & Monitor Open Button [PUSH OPEN] ..... ੬ pg. 18...

Instructions
Page 91
...-in Clock's Lithium Battery pg. 11 C Channels (Left/Right pg. 33 Charge The Battery Pack pg. 8 Cinema pg. 30 Classic Film pg. 39 Clean The Camcorder pg. 80 Connections pg. 9, 54 - 60, 67 D Darken The LCD Monitor pg. 18 Date/Time Display pg. 31 - 33 Date/Time Settings pg. 11 Deleting... pg. 19 L LCD monitor/Viewfinder Indications .... ੬ pg. 84 - 88 Load A Tape pg. 12 M Manual Focus pg. 24 Memory Card pg. 13, 90 Menu Screen, CAMERA pg. 29 Menu Screen, DISPLAY pg. 31, 32 Menu Screen, DSC pg. 16, 31 Menu Screen, MANUAL pg. 29, 30 Menu Screen, SYSTEM pg. 30...
...-in Clock's Lithium Battery pg. 11 C Channels (Left/Right pg. 33 Charge The Battery Pack pg. 8 Cinema pg. 30 Classic Film pg. 39 Clean The Camcorder pg. 80 Connections pg. 9, 54 - 60, 67 D Darken The LCD Monitor pg. 18 Date/Time Display pg. 31 - 33 Date/Time Settings pg. 11 Deleting... pg. 19 L LCD monitor/Viewfinder Indications .... ੬ pg. 84 - 88 Load A Tape pg. 12 M Manual Focus pg. 24 Memory Card pg. 13, 90 Menu Screen, CAMERA pg. 29 Menu Screen, DISPLAY pg. 31, 32 Menu Screen, DSC pg. 16, 31 Menu Screen, MANUAL pg. 29, 30 Menu Screen, SYSTEM pg. 30...
Instructions
Page 93
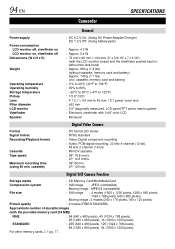
...) : Approx. 660 g (1.4 lbs) (without cassette, memory card and battery) Approx. 740 g (1.7 lbs) (incl. 94 EN SPECIFICATIONS Camcorder General Power supply Power consumption LCD monitor off, viewfinder on LCD monitor on, viewfinder off Dimensions (W x H x D) Weight Operating temperature Operating ... 0.44" color LCD : Monaural Format Signal format Recording/Playback format Cassette Tape speed Maximum recording time (using 80 min. cassette) Digital Video Camera : DV format (SD mode) : NTSC standard : Video: Digital component recording : Audio: PCM digital recording, 32 kHz 4-channel (12...
...) : Approx. 660 g (1.4 lbs) (without cassette, memory card and battery) Approx. 740 g (1.7 lbs) (incl. 94 EN SPECIFICATIONS Camcorder General Power supply Power consumption LCD monitor off, viewfinder on LCD monitor on, viewfinder off Dimensions (W x H x D) Weight Operating temperature Operating ... 0.44" color LCD : Monaural Format Signal format Recording/Playback format Cassette Tape speed Maximum recording time (using 80 min. cassette) Digital Video Camera : DV format (SD mode) : NTSC standard : Video: Digital component recording : Audio: PCM digital recording, 32 kHz 4-channel (12...


