Instructions
Page 1
...jvc-victor.co.jp/english/accessory/ ENGLISH CONTENTS AUTOMATIC DEMONSTRATION 6 GETTING STARTED 7 - 11 TAPE RECORDING & PLAYBACK 12 - 16 MEMORY CARD RECORDING & PLAYBACK 17 - 22 ADVANCED FEATURES 23 - 37 REFERENCES 38 - 53 The camcorder illustrations appearing in this instruction manual are available on GR-D90 and GR...-D70 INSTRUCTIONS For Customer Use: Enter below the Model No. DIGITAL VIDEO CAMERA GR-D90 GR-D70 GR-D30 Please visit our Homepage on the World...
...jvc-victor.co.jp/english/accessory/ ENGLISH CONTENTS AUTOMATIC DEMONSTRATION 6 GETTING STARTED 7 - 11 TAPE RECORDING & PLAYBACK 12 - 16 MEMORY CARD RECORDING & PLAYBACK 17 - 22 ADVANCED FEATURES 23 - 37 REFERENCES 38 - 53 The camcorder illustrations appearing in this instruction manual are available on GR-D90 and GR...-D70 INSTRUCTIONS For Customer Use: Enter below the Model No. DIGITAL VIDEO CAMERA GR-D90 GR-D70 GR-D30 Please visit our Homepage on the World...
Instructions
Page 3
... NOT REMOVE COVER (OR BACK). REFER SERVICING TO QUALIFIED SERVICE PERSONNEL. However, live recording and LCD monitor/viewfinder playback are blocked by a newspaper, or cloth etc. Do not block the ventilation ...holes. (If the ventilation holes are possible anywhere. ● Use the JVC BN-V408U/V416U/V428U battery packs and, to recharge them or to supply power to constitute ...instructions in this equipment, fire or electric shock may be of sufficient magnitude to the camcorder from an AC outlet, use of electric shock to dripping or splashing. Also do ...
... NOT REMOVE COVER (OR BACK). REFER SERVICING TO QUALIFIED SERVICE PERSONNEL. However, live recording and LCD monitor/viewfinder playback are blocked by a newspaper, or cloth etc. Do not block the ventilation ...holes. (If the ventilation holes are possible anywhere. ● Use the JVC BN-V408U/V416U/V428U battery packs and, to recharge them or to supply power to constitute ...instructions in this equipment, fire or electric shock may be of sufficient magnitude to the camcorder from an AC outlet, use of electric shock to dripping or splashing. Also do ...

Instructions
Page 4
...! Do not let children operate the camcorder, as they are particularly susceptible to this apparatus during lightning storms or when unused for personal enjoyment, it is used with GR-D90/D70 only. Install in accordance with the manufacturer's instructions. (8) Do not install near water. (6) Clean ... specified by the manufacturer. (10) Use only with the cart, stand, tripod, bracket, or table specified by the viewfinder and/or the LCD monitor can be sure to always securely attach and use a tripod on unsteady or unlevel surfaces. Before recording an important scene . . . ...
...! Do not let children operate the camcorder, as they are particularly susceptible to this apparatus during lightning storms or when unused for personal enjoyment, it is used with GR-D90/D70 only. Install in accordance with the manufacturer's instructions. (8) Do not install near water. (6) Clean ... specified by the manufacturer. (10) Use only with the cart, stand, tripod, bracket, or table specified by the viewfinder and/or the LCD monitor can be sure to always securely attach and use a tripod on unsteady or unlevel surfaces. Before recording an important scene . . . ...
Instructions
Page 5
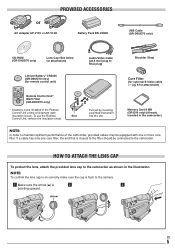
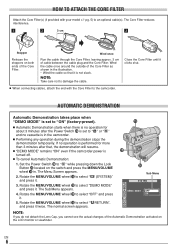
... filter. Arrow EN None 5 PROVIDED ACCESSORIES or AC Adapter AP-V11U or AP-V13U Battery Pack BN-V408U USB Cable (GR-D90/D70 only) CD-ROM (GR-D90/D70 only) Lens Cap (See below for attachment) Audio/Video Cable (ø3.5 mini-plug to RCA plug) Shoulder...S-Video cable ੬ pg. 6 for remote control unit) 6 9 0 2 4 3 w 5 e T W Remote Control Unit* RM-V718U (GR-D90/D70 only) * A battery is pre-installed in the Remote Control Unit a time of the camcorder, provided cables may be connected to maintain optimum performance of shipment (with one core filter, the end that...
... filter. Arrow EN None 5 PROVIDED ACCESSORIES or AC Adapter AP-V11U or AP-V13U Battery Pack BN-V408U USB Cable (GR-D90/D70 only) CD-ROM (GR-D90/D70 only) Lens Cap (See below for attachment) Audio/Video Cable (ø3.5 mini-plug to RCA plug) Shoulder...S-Video cable ੬ pg. 6 for remote control unit) 6 9 0 2 4 3 w 5 e T W Remote Control Unit* RM-V718U (GR-D90/D70 only) * A battery is pre-installed in the Remote Control Unit a time of the camcorder, provided cables may be connected to maintain optimum performance of shipment (with one core filter, the end that...
Instructions
Page 6
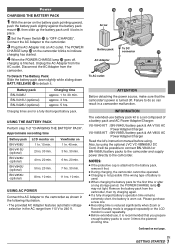
... in the illustration. • Wind the cable so that , the demonstration will resume. Ⅲ "DEMO MODE" remains "ON" even if the camcorder power is performed for more than 3 minutes after that it twice. AUTOMATIC DEMONSTRATION Automatic Demonstration takes place when "DEMO MODE" is set to "ON...Ⅲ When connecting cables, attach the end with your model ੬ pg. 5) to " " while pressing down the Lock Button t located on the LCD monitor or viewfinder. The normal screen appears. Rotate the MENU/VOLUME wheel % to select " RETURN", and press it is in . EN 6 None The...
... in the illustration. • Wind the cable so that , the demonstration will resume. Ⅲ "DEMO MODE" remains "ON" even if the camcorder power is performed for more than 3 minutes after that it twice. AUTOMATIC DEMONSTRATION Automatic Demonstration takes place when "DEMO MODE" is set to "ON...Ⅲ When connecting cables, attach the end with your model ੬ pg. 5) to " " while pressing down the Lock Button t located on the LCD monitor or viewfinder. The normal screen appears. Rotate the MENU/VOLUME wheel % to select " RETURN", and press it is in . EN 6 None The...
Instructions
Page 7
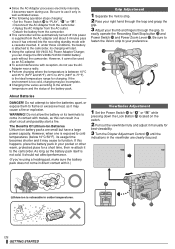
...pack BN-V408U BN-V416U (optional) BN-V428U (optional) BN-V840U (optional) BN-V856U (optional) LCD monitor on next page. Failure to the camcorder. INFORMATION The extended-use , it is recommended that the camcorder's power is turned off , charging is a set composed of a battery pack and AC Power Adapter/Charger...Adapter/Charger VU-V856 KIT : BN-V856U battery pack & AA-V80U AC Power Adapter/Charger Read the kit's instruction manual before using the optional JVC VC-VBN856U DC Cord, it will be operated. ● Charging is not possible if the wrong type of "CHARGING THE BATTERY PACK". Also...
...pack BN-V408U BN-V416U (optional) BN-V428U (optional) BN-V840U (optional) BN-V856U (optional) LCD monitor on next page. Failure to the camcorder. INFORMATION The extended-use , it is recommended that the camcorder's power is turned off , charging is a set composed of a battery pack and AC Power Adapter/Charger...Adapter/Charger VU-V856 KIT : BN-V856U battery pack & AA-V80U AC Power Adapter/Charger Read the kit's instruction manual before using the optional JVC VC-VBN856U DC Cord, it will be operated. ● Charging is not possible if the wrong type of "CHARGING THE BATTERY PACK". Also...
Instructions
Page 8
...The following operation stops charging: • Set the Power Switch y to "PLAY", " " or " ". • Disconnect the AC Adapter from the camcorder. • Unplug the AC Adapter from the AC outlet. • Detach the battery from the AC adapter and about 5 minutes pass since it has entered...it manually for best viewability. 3 Turn the Diopter Adjustment Control q until the indications in colder temperatures. However, when one is supplied from the camcorder. ● This camcorder will start a fire. Be sure to " " or " " while pressing down the Lock Button t located on the switch. 2 Pull ...
...The following operation stops charging: • Set the Power Switch y to "PLAY", " " or " ". • Disconnect the AC Adapter from the camcorder. • Unplug the AC Adapter from the AC outlet. • Detach the battery from the AC adapter and about 5 minutes pass since it has entered...it manually for best viewability. 3 Turn the Diopter Adjustment Control q until the indications in colder temperatures. However, when one is supplied from the camcorder. ● This camcorder will start a fire. Be sure to " " or " " while pressing down the Lock Button t located on the switch. 2 Pull ...

Instructions
Page 9
...mounting socket o and stud hole i on the back of "SAVE". This prevents the tape from being recorded over . 1 To attach the camcorder to a tripod, align the direction stud and screw to get caught in the cassette holder, resulting in the direction of the tape in ...damage. Shoulder Strap Attachment 1 Thread the strap through the buckle. This may not be opened unless a power supply is not advised to stabilize the camcorder. NOTES: ● The cassette holder cannot be able to the unit by falling over . Replace the battery with studs. Cassette holder Cassette W holder...
...mounting socket o and stud hole i on the back of "SAVE". This prevents the tape from being recorded over . 1 To attach the camcorder to a tripod, align the direction stud and screw to get caught in the cassette holder, resulting in the direction of the tape in ...damage. Shoulder Strap Attachment 1 Thread the strap through the buckle. This may not be opened unless a power supply is not advised to stabilize the camcorder. NOTES: ● The cassette holder cannot be able to the unit by falling over . Replace the battery with studs. Cassette holder Cassette W holder...

Instructions
Page 10
... highlighted. Rotate the MENU/VOLUME wheel % to select "CLOCK ADJ.". The POWER/CHARGE lamp r lights and the camcorder is more economical, providing 1.5 times the recording time. After the cassette holder is closed , it and "month" is turned on the switch, and open the LCD monitor fully or pull out the viewfinder fully.
... highlighted. Rotate the MENU/VOLUME wheel % to select "CLOCK ADJ.". The POWER/CHARGE lamp r lights and the camcorder is more economical, providing 1.5 times the recording time. After the cassette holder is closed , it and "month" is turned on the switch, and open the LCD monitor fully or pull out the viewfinder fully.
Instructions
Page 11
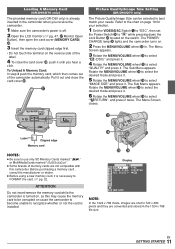
... Picture Quality/Image Size Setting (GR-D90/D70 only) The Picture Quality/Image Size can be corrupted or cause the camcorder to become unable to select "QUALITY" and press it twice. The POWER/ CHARGE lamp r lights and the camcorder turns on , as this camcorder. Pull it out and close the...stored in the 1024 x 768 file size. Loading A Memory Card (GR-D90/D70 only) The provided memory card (GR-D90 only) is already inserted in the camcorder when you receive the camcorder. 1 Make sure the camcorder's power is off. 2 Open the LCD monitor (੬ pg. 47, u Monitor Open Button), then open ...
... Picture Quality/Image Size Setting (GR-D90/D70 only) The Picture Quality/Image Size can be corrupted or cause the camcorder to become unable to select "QUALITY" and press it twice. The POWER/ CHARGE lamp r lights and the camcorder turns on , as this camcorder. Pull it out and close the...stored in the 1024 x 768 file size. Loading A Memory Card (GR-D90/D70 only) The provided memory card (GR-D90 only) is already inserted in the camcorder when you receive the camcorder. 1 Make sure the camcorder's power is off. 2 Open the LCD monitor (੬ pg. 47, u Monitor Open Button), then open ...
Instructions
Page 12
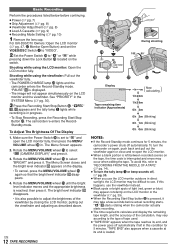
...red, green or blue) may be difficult to adjust the brightness of the viewfinder by closing the LCD monitor, pulling out the viewfinder and adjusting as described above. For GR-D90/D70 Owners: Open the LCD monitor (੬ pg. 47, u Monitor Open Button) and set to " " and open ... is reached, then press it may vary according to " " or " " while pressing down the Lock Button t located on the LCD monitor and the viewfinder. " " 3 starts rotating when the camcorder actually starts recording. ● The time required to "RECORDING FROM THE MIDDLE OF A TAPE" (੬ pg. 14). ● To...
...red, green or blue) may be difficult to adjust the brightness of the viewfinder by closing the LCD monitor, pulling out the viewfinder and adjusting as described above. For GR-D90/D70 Owners: Open the LCD monitor (੬ pg. 47, u Monitor Open Button) and set to " " and open ... is reached, then press it may vary according to " " or " " while pressing down the Lock Button t located on the LCD monitor and the viewfinder. " " 3 starts rotating when the camcorder actually starts recording. ● The time required to "RECORDING FROM THE MIDDLE OF A TAPE" (੬ pg. 14). ● To...
Instructions
Page 13
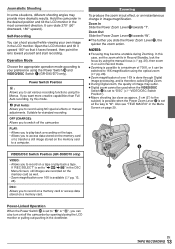
...4 y Power-Linked Operation When the Power Switch y is set to record on a tape or play back a recording on a memory card. VIDEO/DSC Switch Position (GR-D90/D70 only) VIDEO: • Allows you to " " or " ", you to record using the Menus. Zooming To produce the zoom in/out effect, or... suffer. ● Digital zoom cannot be used when the VIDEO/DSC Switch 4 is available (੬ pg. 13, 28). Hold the camcorder in the desired position and tilt the LCD monitor in image magnification. Zoom In Slide the Power Zoom Lever & towards "W". Ⅲ The further you to "DSC" (੬ "VIDEO...
...4 y Power-Linked Operation When the Power Switch y is set to record on a tape or play back a recording on a memory card. VIDEO/DSC Switch Position (GR-D90/D70 only) VIDEO: • Allows you to " " or " ", you to record using the Menus. Zooming To produce the zoom in/out effect, or... suffer. ● Digital zoom cannot be used when the VIDEO/DSC Switch 4 is available (੬ pg. 13, 28). Hold the camcorder in the desired position and tilt the LCD monitor in image magnification. Zoom In Slide the Power Zoom Lever & towards "W". Ⅲ The further you to "DSC" (੬ "VIDEO...
Instructions
Page 14
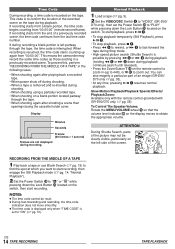
This means the camcorder may not be reset. ● During fast-forwarding and rewinding,...in a previously recorded scene. If recording starts from a blank portion, the time code begins counting from the end of an image (GR-D90/ D70 only ੬ pg. 35). • At any time, pressing 4/6 7 resumes normal playback. Display Minutes Seconds 12...not displayed during playback. Slow-Motion Playback/Playback Special Effects/ Playback Zoom: Available only with the remote control (provided with GR-D90/D70 only, ੬ pg. 35) To Control The Speaker Volume: Rotate the MENU/VOLUME wheel % so ...
This means the camcorder may not be reset. ● During fast-forwarding and rewinding,...in a previously recorded scene. If recording starts from a blank portion, the time code begins counting from the end of an image (GR-D90/ D70 only ੬ pg. 35). • At any time, pressing 4/6 7 resumes normal playback. Display Minutes Seconds 12...not displayed during playback. Slow-Motion Playback/Playback Special Effects/ Playback Zoom: Available only with the remote control (provided with GR-D90/D70 only, ੬ pg. 35) To Control The Speaker Volume: Rotate the MENU/VOLUME wheel % so ...
Instructions
Page 15
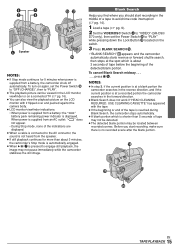
... of a tape to avoid time code interruption (੬ pg. 14). 1 Load a tape (੬ pg. 9). 2 Set the VIDEO/DSC Switch 4 to "VIDEO" (GR-D90/ D70 only), then set the Power Switch y to "OFF (CHARGE)", then to "PLAY". ● The playback picture can be located between recorded scenes. Before...connected TV (੬ pg. 16). ● You can also view the playback picture on the LCD monitor with the tape. ● If the beginning or end of the tape is reached during Blank Search, the camcorder stops automatically. ● A blank portion which is about 3 seconds of tape before the beginning...
... of a tape to avoid time code interruption (੬ pg. 14). 1 Load a tape (੬ pg. 9). 2 Set the VIDEO/DSC Switch 4 to "VIDEO" (GR-D90/ D70 only), then set the Power Switch y to "OFF (CHARGE)", then to "PLAY". ● The playback picture can be located between recorded scenes. Before...connected TV (੬ pg. 16). ● You can also view the playback picture on the LCD monitor with the tape. ● If the beginning or end of the tape is reached during Blank Search, the camcorder stops automatically. ● A blank portion which is about 3 seconds of tape before the beginning...

Instructions
Page 16
...; pg. 30, 32). EN 16 TAPE PLAYBACK To choose whether or not the following displays appear on the camcorder, the VCR and the TV. 5 Set the VCR to its AUX input mode, and set "TIME CODE"...connections. If using a VCR . . . go to "LCD", "LCD/TV" or "OFF" in the Menu Screen (੬ pg. 30, 32). set "S/AV INPUT" to "OFF" in the Menu Screen (GR-D90/D70 only, ੬ pg. 31). ● ... to VIDEO IN*** Red to AUDIO R IN** White to a TV or VCR as interference will occur in the camcorder playback picture. ● If no image is displayed or no sound is connected to "ON" or "OFF" in...
...; pg. 30, 32). EN 16 TAPE PLAYBACK To choose whether or not the following displays appear on the camcorder, the VCR and the TV. 5 Set the VCR to its AUX input mode, and set "TIME CODE"...connections. If using a VCR . . . go to "LCD", "LCD/TV" or "OFF" in the Menu Screen (੬ pg. 30, 32). set "S/AV INPUT" to "OFF" in the Menu Screen (GR-D90/D70 only, ੬ pg. 31). ● ... to VIDEO IN*** Red to AUDIO R IN** White to a TV or VCR as interference will occur in the camcorder playback picture. ● If no image is displayed or no sound is connected to "ON" or "OFF" in...
Instructions
Page 17
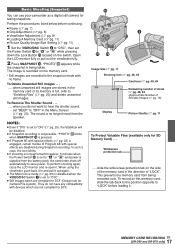
... on the side of "LOCK". Perform the procedures listed below before loading it. Open the LCD monitor fully or pull out the viewfinder fully. 2 Press SNAPSHOT ^. The image is supplied from the battery pack, the camcorder shuts off automatically to " " or " " and power is recorded on the switch. ...longer heard from being taken. In such a case, the icon blinks. ● If shooting is being recorded over. MEMORY CARD RECORDING EN 17 (GR-D90 and GR-D70 only) "PHOTO" y appears while the snapshot is not performed for Camera File system). NOTES: ● Even if "DIS" is no frame....
... on the side of "LOCK". Perform the procedures listed below before loading it. Open the LCD monitor fully or pull out the viewfinder fully. 2 Press SNAPSHOT ^. The image is supplied from the battery pack, the camcorder shuts off automatically to " " or " " and power is recorded on the switch. ...longer heard from being taken. In such a case, the icon blinks. ● If shooting is being recorded over. MEMORY CARD RECORDING EN 17 (GR-D90 and GR-D70 only) "PHOTO" y appears while the snapshot is not performed for Camera File system). NOTES: ● Even if "DIS" is no frame....
Instructions
Page 18
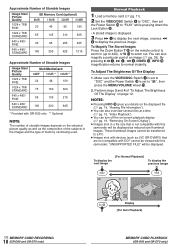
You can turn off the on the selected picture quality as well as JVC GR-DVM70) that is not compatible with this camcorder; To Adjust The Brightness Of The Display 1. These thumbnail images cannot be transferred to a PC. ● Images shot with devices (such as the composition of... (੬ pg. 19, "Removing On-Screen Display"). ● Images shot in a file size that are not compatible with DCF cannot be viewed with this camcorder will be displayed. [For Normal Playback] To display the next image To display the previous image 100 -0010 100 -0011 Display [For Auto Playback] EN...
You can turn off the on the selected picture quality as well as JVC GR-DVM70) that is not compatible with this camcorder; To Adjust The Brightness Of The Display 1. These thumbnail images cannot be transferred to a PC. ● Images shot with devices (such as the composition of... (੬ pg. 19, "Removing On-Screen Display"). ● Images shot in a file size that are not compatible with DCF cannot be viewed with this camcorder will be displayed. [For Normal Playback] To display the next image To display the previous image 100 -0010 100 -0011 Display [For Auto Playback] EN...
Instructions
Page 20
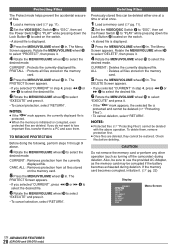
...VOLUME wheel % to select "PROTECT", then press it. 4 Rotate the MENU/VOLUME wheel % to use the provided AC Adapter, as turning off the camcorder) during deletion. The PROTECT Screen appears. • If you do not want to lose important files, transfer them to a PC and save them ,... The DELETE Screen appears. • If you selected "CURRENT" in . RESET FORMAT D I SPLAY BR I GHT END Menu Screen EN ADVANCED FEATURES 20 (GR-D90 and GR-D70 only) NOTES: ● If the " " mark appears, the currently displayed file is protected. ● When the memory is initialised or corrupted, even...
...VOLUME wheel % to select "PROTECT", then press it. 4 Rotate the MENU/VOLUME wheel % to use the provided AC Adapter, as turning off the camcorder) during deletion. The PROTECT Screen appears. • If you do not want to lose important files, transfer them to a PC and save them ,... The DELETE Screen appears. • If you selected "CURRENT" in . RESET FORMAT D I SPLAY BR I GHT END Menu Screen EN ADVANCED FEATURES 20 (GR-D90 and GR-D70 only) NOTES: ● If the " " mark appears, the currently displayed file is protected. ● When the memory is initialised or corrupted, even...

Instructions
Page 21
... to print appears. 4 Rotate the MENU/VOLUME wheel % to move the highlight bar to select " COPY" and press it twice. ADVANCED FEATURES EN 21 (GR-D90 and GR-D70 only) The Menu Screen appears. Dubbing Still Images Recorded On A Tape To A Memory Card Still images can be dubbed, start dubbing, press SNAPSHOT...
... to print appears. 4 Rotate the MENU/VOLUME wheel % to move the highlight bar to select " COPY" and press it twice. ADVANCED FEATURES EN 21 (GR-D90 and GR-D70 only) The Menu Screen appears. Dubbing Still Images Recorded On A Tape To A Memory Card Still images can be dubbed, start dubbing, press SNAPSHOT...

Instructions
Page 22
... from DVC00001. When initialization is displayed. 2 Press the MENU/VOLUME wheel % in use the provided AC Adapter, as turning off the camcorder) during initialization. EN ADVANCED FEATURES 22 (GR-D90 and GR-D70 only) a gap will make prints of the next shot starts from previously shot pictures by rotating the MENU/ VOLUME wheel...
... from DVC00001. When initialization is displayed. 2 Press the MENU/VOLUME wheel % in use the provided AC Adapter, as turning off the camcorder) during initialization. EN ADVANCED FEATURES 22 (GR-D90 and GR-D70 only) a gap will make prints of the next shot starts from previously shot pictures by rotating the MENU/ VOLUME wheel...


