
Software Guide
Page 7
...; It is a memory card in the operation of the PC. ● If you connect the camcorder to the PC through the hub. ● Do not use the AC Adapter as the power supply instead of the battery pack. ● When the USB cable is connected, turning on or off before making any... connections. 2 Use the USB cable to connect the camcorder to the PC. NOTE: If the [Removable Disk] window does not appear, confirm...
...; It is a memory card in the operation of the PC. ● If you connect the camcorder to the PC through the hub. ● Do not use the AC Adapter as the power supply instead of the battery pack. ● When the USB cable is connected, turning on or off before making any... connections. 2 Use the USB cable to connect the camcorder to the PC. NOTE: If the [Removable Disk] window does not appear, confirm...

Software Guide
Page 10
... PAGE If this happens, connect the camcorder directly to the PC. Connections (Macintosh) Connect the USB cable to copy still image files in a memory card to the PC through the hub. ● Do not use the AC Adapter as the power supply instead of the battery pack. ● When the USB cable... is connected, turning on or off before making any connections. 2 Use the USB cable to connect the camcorder to the PC, not through a USB hub, compatibility issues between the hub and...
... PAGE If this happens, connect the camcorder directly to the PC. Connections (Macintosh) Connect the USB cable to copy still image files in a memory card to the PC through the hub. ● Do not use the AC Adapter as the power supply instead of the battery pack. ● When the USB cable... is connected, turning on or off before making any connections. 2 Use the USB cable to connect the camcorder to the PC, not through a USB hub, compatibility issues between the hub and...
Instructions
Page 2
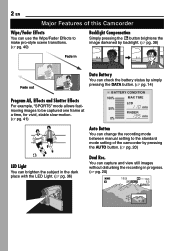
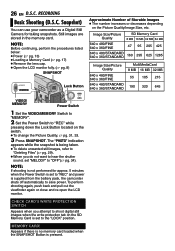
... be captured one frame at a time, for vivid, stable slow-motion. (੬ pg. 41) Data Battery You can check the battery status by simply pressing the DATA button. (੬ pg. 14) BATTERY CONDITION 100% MAX TIME LCD 50% min FINDER 0% min Auto Button You can change the recording mode between... manual setting to the standard mode setting of the camcorder by pressing the AUTO button. (੬ pg. 20) LED Light You...
... be captured one frame at a time, for vivid, stable slow-motion. (੬ pg. 41) Data Battery You can check the battery status by simply pressing the DATA button. (੬ pg. 14) BATTERY CONDITION 100% MAX TIME LCD 50% min FINDER 0% min Auto Button You can change the recording mode between... manual setting to the standard mode setting of the camcorder by pressing the AUTO button. (੬ pg. 20) LED Light You...
Instructions
Page 3
... video and audio have been recorded properly. ● We recommend cleaning your cassette tapes and camcorder in the proper environment. If you obtain permission beforehand.) ● DO NOT leave the unit - It is recommended only genuine JVC batteries and accessories are either registered trademarks or trademarks of Microsoft Corporation in the United States...
... video and audio have been recorded properly. ● We recommend cleaning your cassette tapes and camcorder in the proper environment. If you obtain permission beforehand.) ● DO NOT leave the unit - It is recommended only genuine JVC batteries and accessories are either registered trademarks or trademarks of Microsoft Corporation in the United States...

Instructions
Page 4
... special handling may apply. The following notes concern possible physical damage to the camcorder and to the camcorder. Replace battery with NTSC-type color television signals. Danger of explosion or Risk of fire if the battery is also a risk of injury. Do not block the ventilation holes. (...used for ventilation (10 cm (3-15/16") or more on both sides, on its upper and lower sides. The lightning flash with JVC Data Battery. When the equipment is allowed to enter this type of fire or electric shock. It could tip over, causing serious damage...
... special handling may apply. The following notes concern possible physical damage to the camcorder and to the camcorder. Replace battery with NTSC-type color television signals. Danger of explosion or Risk of fire if the battery is also a risk of injury. Do not block the ventilation holes. (...used for ventilation (10 cm (3-15/16") or more on both sides, on its upper and lower sides. The lightning flash with JVC Data Battery. When the equipment is allowed to enter this type of fire or electric shock. It could tip over, causing serious damage...

Instructions
Page 5
...using a blower brush. Read these instructions. 3. Do not use caution when moving the cart/ apparatus combination to wipe off the camcorder and remove the battery pack and AC Adapter. Be careful not to qualified service personnel. IMPORTANT SAFETY INSTRUCTIONS 1. Use only with the manufacturer's ... lightning storms or when unused for long periods of each product. ● To clean the viewfinder, please consult your nearest JVC dealer. Close the LCD monitor. Use an optional cleaning cassette (੬ pg. 3). Do not install near water. 6. Keep these ...
...using a blower brush. Read these instructions. 3. Do not use caution when moving the cart/ apparatus combination to wipe off the camcorder and remove the battery pack and AC Adapter. Be careful not to qualified service personnel. IMPORTANT SAFETY INSTRUCTIONS 1. Use only with the manufacturer's ... lightning storms or when unused for long periods of each product. ● To clean the viewfinder, please consult your nearest JVC dealer. Close the LCD monitor. Use an optional cleaning cassette (੬ pg. 3). Do not install near water. 6. Keep these ...

Instructions
Page 7
...LIGHT Move the control lever right. 1 1 QUICK REVIEW Move the control lever left. 2) Press down the control lever to select SET: SET Lithium Battery CR2025* (for connections. NOTES: ● In order to use the provided cables for remote control unit) Shoulder Strap (੬ pg. 12) Lens... Cap (੬ pg. 12) * A lithium battery is closest to the filter should be connected to the camcorder. ● Make sure to maintain optimum performance of the camcorder, provided cables may be equipped with insulation sheet).
...LIGHT Move the control lever right. 1 1 QUICK REVIEW Move the control lever left. 2) Press down the control lever to select SET: SET Lithium Battery CR2025* (for connections. NOTES: ● In order to use the provided cables for remote control unit) Shoulder Strap (੬ pg. 12) Lens... Cap (੬ pg. 12) * A lithium battery is closest to the filter should be connected to the camcorder. ● Make sure to maintain optimum performance of the camcorder, provided cables may be equipped with insulation sheet).
Instructions
Page 9
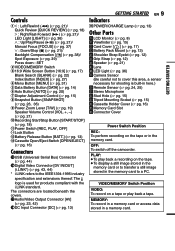
...Volume Control [VOL. +, -] (੬ pg. 21) !Recording Start/Stop Button [START/STOP] (੬ pg. 18) "Power Switch [REC, PLAY, OFF] #Lock Button $Battery Release Button [BATT.] (੬ pg. 13) %Cassette Open/Eject Switch [OPEN/EJECT] (੬ pg. 16) Connectors &USB (Universal Serial Bus) Connector (੬ pg. 44...pg. 36) ìCamera Sensor (Be careful not to the IEEE1394-1995 industry specification and extensions thereof. OFF: To switch off the camcorder. The logo is used for shooting is built-in here.) îRemote Sensor (੬ pg. 24, 25) ïStereo Microphone ñ...
...Volume Control [VOL. +, -] (੬ pg. 21) !Recording Start/Stop Button [START/STOP] (੬ pg. 18) "Power Switch [REC, PLAY, OFF] #Lock Button $Battery Release Button [BATT.] (੬ pg. 13) %Cassette Open/Eject Switch [OPEN/EJECT] (੬ pg. 16) Connectors &USB (Universal Serial Bus) Connector (੬ pg. 44...pg. 36) ìCamera Sensor (Be careful not to the IEEE1394-1995 industry specification and extensions thereof. OFF: To switch off the camcorder. The logo is used for shooting is built-in here.) îRemote Sensor (੬ pg. 24, 25) ïStereo Microphone ñ...

Instructions
Page 13
... Charging time BN-VF808U* Approx. 1 hr. 30 min. GETTING STARTED Unplug the AC Adapter from the camcorder. In this case, the battery charge starts if the battery is worn out and needs to be operated. ● Charging is not possible if the wrong type of time under ...the AC Adapter into an AC outlet. 5 Connect the AC Adapter to the camcorder. ● The POWER/CHARGE lamp on the battery pack pointing upward, push the battery pack slightly against the battery pack mount 1. 3 Slide up the battery pack until it down. Power Switch To DC connector Lock Button To AC ...
... Charging time BN-VF808U* Approx. 1 hr. 30 min. GETTING STARTED Unplug the AC Adapter from the camcorder. In this case, the battery charge starts if the battery is worn out and needs to be operated. ● Charging is not possible if the wrong type of time under ...the AC Adapter into an AC outlet. 5 Connect the AC Adapter to the camcorder. ● The POWER/CHARGE lamp on the battery pack pointing upward, push the battery pack slightly against the battery pack mount 1. 3 Slide up the battery pack until it down. Power Switch To DC connector Lock Button To AC ...

Instructions
Page 14
...nder, close the LCD monitor and pull out the viewfinder fully. When the battery is in the AC range from 110 V to 240 V. Using AC Power Perform step 4 - 5 in a camcorder malfunction. Language Settings The language on the display can be set to cover 3 times ...features automatic voltage selection in progress. ● If "COMMUNICATION ERROR" appears instead of LCD monitor in "Charging The Battery Pack" (੬ pg. 13). In such a case, consult your nearest JVC dealer. INFORMATION: The following conditions: • Zoom or Record-Standby mode is engaged repeatedly. • The ...
...nder, close the LCD monitor and pull out the viewfinder fully. When the battery is in the AC range from 110 V to 240 V. Using AC Power Perform step 4 - 5 in a camcorder malfunction. Language Settings The language on the display can be set to cover 3 times ...features automatic voltage selection in progress. ● If "COMMUNICATION ERROR" appears instead of LCD monitor in "Charging The Battery Pack" (੬ pg. 13). In such a case, consult your nearest JVC dealer. INFORMATION: The following conditions: • Zoom or Record-Standby mode is engaged repeatedly. • The ...

Instructions
Page 16
...be powered up to "REC" and the VIDEO/MEMORY Switch is closed, it recedes completely before closing the cassette holder cover. ● When the battery pack's charge is set to close the cassette holder; Wait until it recedes automatically. TAPE! Appears if a tape is not loaded when the ... Power Switch is set to "REC" and the VIDEO/MEMORY Switch is low, you wait a few minutes later, insert it again. ● When the camcorder is suddenly moved from a cold place to a warm environment, wait a short time before continuing. 3 Close the cassette holder cover firmly until it ...
...be powered up to "REC" and the VIDEO/MEMORY Switch is closed, it recedes completely before closing the cassette holder cover. ● When the battery pack's charge is set to close the cassette holder; Wait until it recedes automatically. TAPE! Appears if a tape is not loaded when the ... Power Switch is set to "REC" and the VIDEO/MEMORY Switch is low, you wait a few minutes later, insert it again. ● When the camcorder is suddenly moved from a cold place to a warm environment, wait a short time before continuing. 3 Close the cassette holder cover firmly until it ...

Instructions
Page 21
...pull out the viewfinder again or close and re-open the LCD monitor. ● When a cable is not heard from a battery, the camcorder shuts off automatically. HDV Appears when pictures recorded in the HDV format cannot be displayed for approx. 3 seconds on a connected TV. (&#...2668; pg. 23) ● If Stop mode continues for more than about 3 minutes, the camcorder's Stop mode is supplied from the speaker. MEMORY BLANK Lock Button 6 ¡ 1 7 MENU Speaker Power Switch 1 Load a cassette. (੬ pg. 16)...
...pull out the viewfinder again or close and re-open the LCD monitor. ● When a cable is not heard from a battery, the camcorder shuts off automatically. HDV Appears when pictures recorded in the HDV format cannot be displayed for approx. 3 seconds on a connected TV. (&#...2668; pg. 23) ● If Stop mode continues for more than about 3 minutes, the camcorder's Stop mode is supplied from the speaker. MEMORY BLANK Lock Button 6 ¡ 1 7 MENU Speaker Power Switch 1 Load a cassette. (੬ pg. 16)...

Instructions
Page 23
...4. 3 Connect the VCR output to the TV input, referring to your VCR's instruction manual. 4 Turn on the camcorder, the VCR and the TV. 5 Set the VCR to its AUX input mode, and set the TV to its... VIDEO mode. 6 Start playback on the camcorder. (੬ pg. 21) ● Please set your TV (16:9 TV or 4:3 TV). (੬ pg....VCR as the power supply instead of the battery pack. (੬ pg. 13) ● To monitor the picture and sound from the camcorder without inserting a tape or memory card, set the camcorder's Power Switch to"REC", then set "...
...4. 3 Connect the VCR output to the TV input, referring to your VCR's instruction manual. 4 Turn on the camcorder, the VCR and the TV. 5 Set the VCR to its AUX input mode, and set the TV to its... VIDEO mode. 6 Start playback on the camcorder. (੬ pg. 21) ● Please set your TV (16:9 TV or 4:3 TV). (੬ pg....VCR as the power supply instead of the battery pack. (੬ pg. 13) ● To monitor the picture and sound from the camcorder without inserting a tape or memory card, set the camcorder's Power Switch to"REC", then set "...

Instructions
Page 24
... Button (੬ pg. 25) %EFFECT ON/OFF Button (੬ pg. 25) The following buttons are available when the camcorder's Power Switch is 5m (16ft). Installing The Battery The remote control uses one lithium battery (CR2025). Remote sensor NOTE: The transmitted beam may cause incorrect operation when the remote sensor is directly exposed to...
... Button (੬ pg. 25) %EFFECT ON/OFF Button (੬ pg. 25) The following buttons are available when the camcorder's Power Switch is 5m (16ft). Installing The Battery The remote control uses one lithium battery (CR2025). Remote sensor NOTE: The transmitted beam may cause incorrect operation when the remote sensor is directly exposed to...
Instructions
Page 26
...: If shooting is not performed for taking snapshots. Appears if there is no memory card loaded when the SNAPSHOT Button is supplied from the battery pack, the camcorder shuts off automatically to "REC" and power is pressed. NOTE: Before continuing, perform the procedures listed below: ● Power (੬ .... 29). ● When you do not want to hear the shutter sound, set "MELODY" to the "LOCK" position. Snapshot) You can use your camcorder as a Digital Still Camera for approx. 5 minutes when the Power Switch is set to "OFF"(੬ pg. 34). MEMORY CARD! The "PHOTO" indication...
...: If shooting is not performed for taking snapshots. Appears if there is no memory card loaded when the SNAPSHOT Button is supplied from the battery pack, the camcorder shuts off automatically to "REC" and power is pressed. NOTE: Before continuing, perform the procedures listed below: ● Power (੬ .... 29). ● When you do not want to hear the shutter sound, set "MELODY" to the "LOCK" position. Snapshot) You can use your camcorder as a Digital Still Camera for approx. 5 minutes when the Power Switch is set to "OFF"(੬ pg. 34). MEMORY CARD! The "PHOTO" indication...
Instructions
Page 27
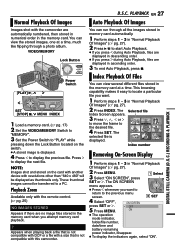
...a photo album. Press 2 to the desired file. 4 5 6 4 Press SET. ON ● The operation mode indicator, folder/file number, date/time and battery remaining power indicator, disappear. ● To display the indicators again, select "ON". VIDEO/MEMORY Lock Button [PLAY] 3, 3 2 Power Switch 1 SET [STOP] 7, 4 ...a file that is not compatible with DCF or a file with a size that is not compatible with the camcorder are displayed in descending order. ● If you attempt memory card playback. ? Normal Playback Of Images Images shot with this...
...a photo album. Press 2 to the desired file. 4 5 6 4 Press SET. ON ● The operation mode indicator, folder/file number, date/time and battery remaining power indicator, disappear. ● To display the indicators again, select "ON". VIDEO/MEMORY Lock Button [PLAY] 3, 3 2 Power Switch 1 SET [STOP] 7, 4 ...a file that is not compatible with DCF or a file with a size that is not compatible with the camcorder are displayed in descending order. ● If you attempt memory card playback. ? Normal Playback Of Images Images shot with this...
Instructions
Page 40
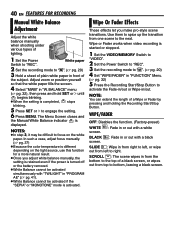
... top to bottom, leaving a black screen. NOTES: ● In step 3, it may be activated if the "SEPIA" or "MONOTONE" mode is turned off or the battery removed. ● White Balance cannot be activated simultaneously with "TWILIGHT" in front of the subject. Wipe Or Fader Effects These effects let you adjust white...
... top to bottom, leaving a black screen. NOTES: ● In step 3, it may be activated if the "SEPIA" or "MONOTONE" mode is turned off or the battery removed. ● White Balance cannot be activated simultaneously with "TWILIGHT" in front of the subject. Wipe Or Fader Effects These effects let you adjust white...
Instructions
Page 42
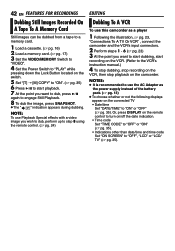
... code Set "ON SCREEN" to "ON" or "OFF" (੬ pg. 35). NOTES: ● It is recommended to use this camcorder as the power supply instead of the battery pack. (੬ pg. 13) ● To choose whether or not the following displays appear on the connected TV • Date/time ...) EDITING Dubbing To A VCR To use the AC Adapter as a player 1 Following the illustration, ੬ pg. 23, "Connections To A TV Or VCR" , connect the camcorder and the VCR's input connectors. 2 Perform steps 1 - 6 (੬ pg. 23) 3 At the point you want to start dubbing, start playback. 7 At the point you...
... code Set "ON SCREEN" to "ON" or "OFF" (੬ pg. 35). NOTES: ● It is recommended to use this camcorder as the power supply instead of the battery pack. (੬ pg. 13) ● To choose whether or not the following displays appear on the connected TV • Date/time ...) EDITING Dubbing To A VCR To use the AC Adapter as a player 1 Following the illustration, ੬ pg. 23, "Connections To A TV Or VCR" , connect the camcorder and the VCR's input connectors. 2 Perform steps 1 - 6 (੬ pg. 23) 3 At the point you want to start dubbing, start playback. 7 At the point you...

Instructions
Page 43
..., the dubbing may stop dubbing. EDITING EN 43 NOTES: ● It is recommended to use the optional JVC VC-VDV204U or VC-VDV206U DV cable. To use this camcorder as shown in the illustration. 3 Set the camcorder's Power Switch to "PLAY". 4 Set "REC MODE" to "SP" or "LP". (੬ pg....IN " indication appears on the original tape, regardless of the current "SOUND MODE" setting. (੬ pg. 33) COPY PROTECTED Appears if dubbing of the battery pack. (੬ pg. 13) ● If a blank portion or disturbed image is little, if any, image or sound deterioration. ADVANCED FEATURES The ...
..., the dubbing may stop dubbing. EDITING EN 43 NOTES: ● It is recommended to use the optional JVC VC-VDV204U or VC-VDV206U DV cable. To use this camcorder as shown in the illustration. 3 Set the camcorder's Power Switch to "PLAY". 4 Set "REC MODE" to "SP" or "LP". (੬ pg....IN " indication appears on the original tape, regardless of the current "SOUND MODE" setting. (੬ pg. 33) COPY PROTECTED Appears if dubbing of the battery pack. (੬ pg. 13) ● If a blank portion or disturbed image is little, if any, image or sound deterioration. ADVANCED FEATURES The ...
Instructions
Page 44
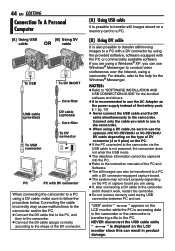
...to follow the procedure below. NEVER disconnect the USB cable while " " is not powered, the camcorder does not enter the USB mode. ● The date/time information cannot be sure to use ...of the PC and Software. ● The still images can result in the camcorder or the camcorder is recommended to use the optional JVC VC-VDV206U or VC-VDV204U DV cable depending on the type of DV connector ...® XP, you wish to use to the camcorder. ● When using a DV cable, be captured into the PC. ● Refer to the instruction manuals of the battery pack. (੬ pg. 13) ● Never...
...to follow the procedure below. NEVER disconnect the USB cable while " " is not powered, the camcorder does not enter the USB mode. ● The date/time information cannot be sure to use ...of the PC and Software. ● The still images can result in the camcorder or the camcorder is recommended to use the optional JVC VC-VDV206U or VC-VDV204U DV cable depending on the type of DV connector ...® XP, you wish to use to the camcorder. ● When using a DV cable, be captured into the PC. ● Refer to the instruction manuals of the battery pack. (੬ pg. 13) ● Never...


