Instruction Manual
Page 2
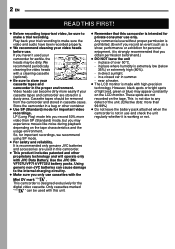
So, for the digital video cassette. Use the JVC BNVF707U/VF714/VF733U battery packs. This camcorder is designed exclusively for important recordings, we recommend using SP mode. ● For safety and reliability. in place of the unit. (Effective dots: more... stored in cassette cases. We recommend periodically cleaning the video heads with the Mini DV mark . Store the camcorder in this camcorder is made with JVC Data Battery. Using generic non-JVC batteries can cause damage to the internal charging circuitry. ● Make sure you record 50% more than SP (Standard) mode, ...
So, for the digital video cassette. Use the JVC BNVF707U/VF714/VF733U battery packs. This camcorder is designed exclusively for important recordings, we recommend using SP mode. ● For safety and reliability. in place of the unit. (Effective dots: more... stored in cassette cases. We recommend periodically cleaning the video heads with the Mini DV mark . Store the camcorder in this camcorder is made with JVC Data Battery. Using generic non-JVC batteries can cause damage to the internal charging circuitry. ● Make sure you record 50% more than SP (Standard) mode, ...

Instruction Manual
Page 3
...shock, do not place any containers filled with PAL-type colour television signals. Also do not open the cabinet. CAUTIONS: ÷ This camcorder is allowed to accommodate different designs of AC outlets in different countries.) NOTES: ● The rating plate (serial number plate) and safety caution... is recommended that it has sufficient space on all sides to the camcorder from the camcorder or AC Adapter, shut it down and unplug it is installed in a bathroom or places with JVC Data Battery. SAFETY PRECAUTIONS WARNING: TO PREVENT FIRE OR SHOCK HAZARD, DO NOT...
...shock, do not place any containers filled with PAL-type colour television signals. Also do not open the cabinet. CAUTIONS: ÷ This camcorder is allowed to accommodate different designs of AC outlets in different countries.) NOTES: ● The rating plate (serial number plate) and safety caution... is recommended that it has sufficient space on all sides to the camcorder from the camcorder or AC Adapter, shut it down and unplug it is installed in a bathroom or places with JVC Data Battery. SAFETY PRECAUTIONS WARNING: TO PREVENT FIRE OR SHOCK HAZARD, DO NOT...
Instruction Manual
Page 4
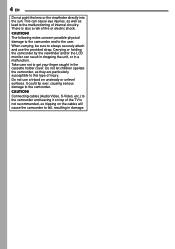
...over, causing serious damage to the user. There is not recommended, as tripping on unsteady or unlevel surfaces. CAUTION! Carrying or holding the camcorder by the viewfinder and/or the LCD monitor can cause eye injuries, as well as they are particularly susceptible to this type ...of injury. Do not use the provided strap. The following notes concern possible physical damage to the camcorder and to the camcorder. Do not let children operate the camcorder, as lead to the camcorder and leaving it on top of the TV is also a risk of internal circuitry. Connecting cables (...
...over, causing serious damage to the user. There is not recommended, as tripping on unsteady or unlevel surfaces. CAUTION! Carrying or holding the camcorder by the viewfinder and/or the LCD monitor can cause eye injuries, as well as they are particularly susceptible to this type ...of injury. Do not use the provided strap. The following notes concern possible physical damage to the camcorder and to the camcorder. Do not let children operate the camcorder, as lead to the camcorder and leaving it on top of the TV is also a risk of internal circuitry. Connecting cables (...
Instruction Manual
Page 5
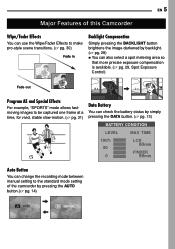
EN 5 Major Features of this Camcorder Wipe/Fader Effects You can use the Wipe/Fader Effects to make pro-style scene transitions. (੬ pg. 30) Fade in Backlight Compensation Simply pressing ... TIME 100% 50 0 LCD 80min FINDER 90min Auto Button You can change the recording mode between manual setting to the standard mode setting of the camcorder by pressing the AUTO button.(੬ pg. 14) AUTO M MANUAL
EN 5 Major Features of this Camcorder Wipe/Fader Effects You can use the Wipe/Fader Effects to make pro-style scene transitions. (੬ pg. 30) Fade in Backlight Compensation Simply pressing ... TIME 100% 50 0 LCD 80min FINDER 90min Auto Button You can change the recording mode between manual setting to the standard mode setting of the camcorder by pressing the AUTO button.(੬ pg. 14) AUTO M MANUAL
Instruction Manual
Page 6
... noise during playback depending on pages 39 - 40. We recommend cleaning your camcorder. We recommend periodically cleaning the video heads with the MiniDV standard, but you may be removed from the camcorder and stored in the proper environment. It is not compatible with the Mini ... tape characteristics and the usage environment. 6 EN Before Using This Camcorder Make sure you only use cassettes with other container. Only cassettes marked " " can become dirty more video than SP (Standard) mode, but JVC brand cassette tapes are stored in a bag or other digital video...
... noise during playback depending on pages 39 - 40. We recommend cleaning your camcorder. We recommend periodically cleaning the video heads with the MiniDV standard, but you may be removed from the camcorder and stored in the proper environment. It is not compatible with the Mini ... tape characteristics and the usage environment. 6 EN Before Using This Camcorder Make sure you only use cassettes with other container. Only cassettes marked " " can become dirty more video than SP (Standard) mode, but JVC brand cassette tapes are stored in a bag or other digital video...

Instruction Manual
Page 10
...; pg. 31) 7SOUND 12BIT/16BIT: Sound Mode Indicator (੬ pg. 23) (Appears for approx. 5 seconds after turning on the camcorder.) 8Battery Remaining Power Indicator (੬ pg. 37) 9Approximate Zoom Ratio (੬ pg. 18) !Zoom indicator (੬ pg. 18) "Digital Image Stabilizer (੬ pg. 23) #Wide Mode Indicator (੬ pg. 26) $Recording Speed Mode...
...; pg. 31) 7SOUND 12BIT/16BIT: Sound Mode Indicator (੬ pg. 23) (Appears for approx. 5 seconds after turning on the camcorder.) 8Battery Remaining Power Indicator (੬ pg. 37) 9Approximate Zoom Ratio (੬ pg. 18) !Zoom indicator (੬ pg. 18) "Digital Image Stabilizer (੬ pg. 23) #Wide Mode Indicator (੬ pg. 26) $Recording Speed Mode...
Instruction Manual
Page 11
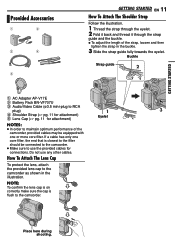
... it back and thread it through the strap guide and the buckle. ÷ To adjust the length of the camcorder, provided cables may be connected to the camcorder. ● Make sure to the camcorder as shown in the buckle. 3 Slide the strap guide fully towards the eyelet. Buckle Strap guide 2 2 1 AC Adapter AP... sure the cap is closest to the filter should be equipped with one core filter, the end that is flush to the camcorder.
... it back and thread it through the strap guide and the buckle. ÷ To adjust the length of the camcorder, provided cables may be connected to the camcorder. ● Make sure to the camcorder as shown in the buckle. 3 Slide the strap guide fully towards the eyelet. Buckle Strap guide 2 2 1 AC Adapter AP... sure the cap is closest to the filter should be equipped with one core filter, the end that is flush to the camcorder.
Instruction Manual
Page 12
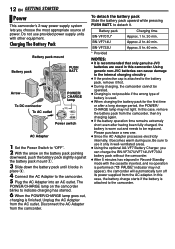
...12 EN GETTING STARTED Power This camcorder's 2-way power supply system lets you can cause damage to the internal charging circuitry. ● If the protective cap is attached to the battery pack, remove it becomes warm during use. Using generic non-JVC batteries can charge the BN-VF707U.../VF714U/VF733U battery pack without the camcorder. ● After 5 minutes has elapsed in this case, the battery charge starts if the battery is...
...12 EN GETTING STARTED Power This camcorder's 2-way power supply system lets you can cause damage to the internal charging circuitry. ● If the protective cap is attached to the battery pack, remove it becomes warm during use. Using generic non-JVC batteries can charge the BN-VF707U.../VF714U/VF733U battery pack without the camcorder. ● After 5 minutes has elapsed in this case, the battery charge starts if the battery is...
Instruction Manual
Page 13
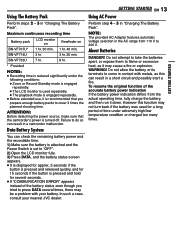
...fully charge the battery, and then run it is turned off. However this can result in a camcorder malfunction. BN-VF714U 3 hr. 3 hr. 25 min. GETTING STARTED Failure to press DATA several...the battery status even though you prepare enough battery packs to come in contact with your nearest JVC dealer. Data Battery System You can result in a short circuit and possibly start a fi... shooting time. To resume the original function of time under the following conditions: ● Zoom or Record-Standby mode is engaged repeatedly. ● The LCD monitor is used for several...
...fully charge the battery, and then run it is turned off. However this can result in a camcorder malfunction. BN-VF714U 3 hr. 3 hr. 25 min. GETTING STARTED Failure to press DATA several...the battery status even though you prepare enough battery packs to come in contact with your nearest JVC dealer. Data Battery System You can result in a short circuit and possibly start a fi... shooting time. To resume the original function of time under the following conditions: ● Zoom or Record-Standby mode is engaged repeatedly. ● The LCD monitor is used for several...

Instruction Manual
Page 14
... Press AUTO button repeatedly to switch to auto/ M manual recording mode. Power Switch Position REC: ● Allows you to perform recording on /off the camcorder. A Auto Mode: You can be changed. (੬ pg. 22, 24) 1 Set the Power Switch to use of LCD monitor in the view&#...to any operation mode except "OFF" while pressing down the Lock Button located on the tape. ● Allows you to switch off the camcorder by setting various functions. Language Settings Choose the appropriate operation mode according to the previous menu screen. ● You cannot enter menu screen during...
... Press AUTO button repeatedly to switch to auto/ M manual recording mode. Power Switch Position REC: ● Allows you to perform recording on /off the camcorder. A Auto Mode: You can be changed. (੬ pg. 22, 24) 1 Set the Power Switch to use of LCD monitor in the view&#...to any operation mode except "OFF" while pressing down the Lock Button located on the tape. ● Allows you to switch off the camcorder by setting various functions. Language Settings Choose the appropriate operation mode according to the previous menu screen. ● You cannot enter menu screen during...
Instruction Manual
Page 16
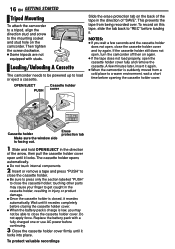
... holder does not open, close the cassette holder cover. Do not apply force. If the cassette holder still does not open, turn the camcorder off then on the back of the tape in the direction of the arrow, then pull the cassette holder cover open the cassette holder cover..., align the direction stud and screw to close the cassette holder; Loading/Unloading A Cassette The camcorder needs to be able to close the cassette holder cover and try again. To record on the camcorder. Wait until it locks into place. OPEN/EJECT PUSH Cassette holder cover Slide the erase protection ...
... holder does not open, close the cassette holder cover. Do not apply force. If the cassette holder still does not open, turn the camcorder off then on the back of the tape in the direction of the arrow, then pull the cassette holder cover open the cassette holder cover..., align the direction stud and screw to close the cassette holder; Loading/Unloading A Cassette The camcorder needs to be able to close the cassette holder cover and try again. To record on the camcorder. Wait until it locks into place. OPEN/EJECT PUSH Cassette holder cover Slide the erase protection ...

Instruction Manual
Page 17
...the remaining time. However, this , refer to "Recording From The Middle Of A Tape" (☞ pg. 19). ● To turn the camcorder on the LCD monitor and the viewfinder. VIDEO RECORDING & PLAYBACK Basic Recording NOTE: Before continuing, perform the procedures listed below: ● ...Power (੬ pg. 12) ● Loading A Cassette (੬ pg. 16) Power Zoom Lever POWER/CHARGE Lamp Lock Button Recording Start/Stop Button 1 Remove the lens cap. (੬ pg. 11) 2 Open the LCD monitor fully. 3 Set ...
...the remaining time. However, this , refer to "Recording From The Middle Of A Tape" (☞ pg. 19). ● To turn the camcorder on the LCD monitor and the viewfinder. VIDEO RECORDING & PLAYBACK Basic Recording NOTE: Before continuing, perform the procedures listed below: ● ...Power (੬ pg. 12) ● Loading A Cassette (੬ pg. 16) Power Zoom Lever POWER/CHARGE Lamp Lock Button Recording Start/Stop Button 1 Remove the lens cap. (੬ pg. 11) 2 Open the LCD monitor fully. 3 Set ...
Instruction Manual
Page 18
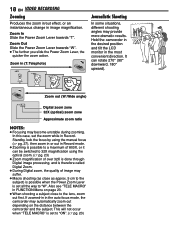
... lock the focus by using the optical zoom. (੬ pg. 23) ● Zoom magnification of over 32X is done through Digital image processing, and is set to the lens, zoom out first. Hold the camcorder in the desired position and tilt ...the LCD monitor in image magnification. This will not occur when "TELE MACRO" is therefore called Digital Zoom. ● During Digital zoom, the quality of 800X, or it can rotate 270° (90° downward, 180° upward). Zoom out (W: Wide angle) 10 x Digital zoom zone 32X (optical) zoom...
... lock the focus by using the optical zoom. (੬ pg. 23) ● Zoom magnification of over 32X is done through Digital image processing, and is set to the lens, zoom out first. Hold the camcorder in the desired position and tilt ...the LCD monitor in image magnification. This will not occur when "TELE MACRO" is therefore called Digital Zoom. ● During Digital zoom, the quality of 800X, or it can rotate 270° (90° downward, 180° upward). Zoom out (W: Wide angle) 10 x Digital zoom zone 32X (optical) zoom...

Instruction Manual
Page 19
This means the camcorder may occur at which you want to start recording, then engage the Still Playback mode. (੬ pg. 20) 2) Set the Power Switch to "REC" while ...
This means the camcorder may occur at which you want to start recording, then engage the Still Playback mode. (੬ pg. 20) 2) Set the Power Switch to "REC" while ...

Instruction Manual
Page 20
...continues as long as you start recording, make sure there is no operation (example: zooming is not heard from a battery and no recorded scene after the blank portion. This is at a blank portion, the camcorder searches in the forward direction. ● If the beginning or end of the ...1 Load a cassette. (੬ pg. 16) 2 Set the Power Switch to the AV connector, the sound is performed), the camcorder shuts off automatically. To control the speaker volume Slide the Power Zoom Lever (VOL. +/-) towards "+" to turn up the volume, or towards "-" to turn on again, set the Power Switch to ...
...continues as long as you start recording, make sure there is no operation (example: zooming is not heard from a battery and no recorded scene after the blank portion. This is at a blank portion, the camcorder searches in the forward direction. ● If the beginning or end of the ...1 Load a cassette. (੬ pg. 16) 2 Set the Power Switch to the AV connector, the sound is performed), the camcorder shuts off automatically. To control the speaker volume Slide the Power Zoom Lever (VOL. +/-) towards "+" to turn up the volume, or towards "-" to turn on again, set the Power Switch to ...
Instruction Manual
Page 21
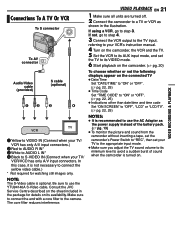
... the camera. If using a VCR, go to step 4. 3 Connect the VCR output to the TV input, referring to your VCR's instruction manual. 4 Turn on the camcorder, the VCR and the TV. 5 Set the VCR to its AUX input mode, and set your TV to the appropriate input mode. ● Make sure..." or "LCD/TV". (੬ pg. 22, 25) NOTES: ● It is optional. Consult the JVC Service Centre described on its minimum level to its availability. VIDEO PLAYBACK EN 21 1 Make sure all units are turned off. 2 Connect the camcorder to a TV or VCR as the power supply instead of sound when the...
... the camera. If using a VCR, go to step 4. 3 Connect the VCR output to the TV input, referring to your VCR's instruction manual. 4 Turn on the camcorder, the VCR and the TV. 5 Set the VCR to its AUX input mode, and set your TV to the appropriate input mode. ● Make sure..." or "LCD/TV". (੬ pg. 22, 25) NOTES: ● It is optional. Consult the JVC Service Centre described on its minimum level to its availability. VIDEO PLAYBACK EN 21 1 Make sure all units are turned off. 2 Connect the camcorder to a TV or VCR as the power supply instead of sound when the...

Instruction Manual
Page 22
...want to cancel or return to set other function menus. ● The "3" indicator shows the setting that simplifies many of the more detailed camcorder settings. (੬ pg. 22 - 25) Lock Button SET MENU 1 For Video Recording Menus: ● Set the Power Switch to "REC" while...menus. ● The "3" indicator shows the setting that is equipped with an easy-to-use, on-screen menu system that is currently saved inside the camcorder's memory. 2) Press MENU. Select "3" Indicator the desired parameter and press SET or 2. The Menu Screen appears. 4 Press 3 or 4 to select...
...want to cancel or return to set other function menus. ● The "3" indicator shows the setting that simplifies many of the more detailed camcorder settings. (੬ pg. 22 - 25) Lock Button SET MENU 1 For Video Recording Menus: ● Set the Power Switch to "REC" while...menus. ● The "3" indicator shows the setting that is equipped with an easy-to-use, on-screen menu system that is currently saved inside the camcorder's memory. 2) Press MENU. Select "3" Indicator the desired parameter and press SET or 2. The Menu Screen appears. 4 Press 3 or 4 to select...
Instruction Manual
Page 23
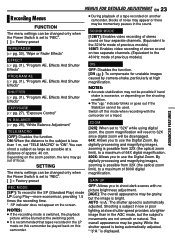
... Allows you to shoot dark scenes with the camcorder on the zoom position, the lens may be blurred at high magnification. SETTING The menu settings can be changed only when the Power Switch is possible from 32X (the optical zoom limit), to a maximum of 64X digital magni...shake, particularly at the switching point. ● It is recommended that tapes recorded in the AGC mode, but the image is possible from 32X (the optical zoom limit), to a maximum of 800X digital magnification. While the shutter speed is being automatically adjusted, " " is automatically adjusted....
... Allows you to shoot dark scenes with the camcorder on the zoom position, the lens may be blurred at high magnification. SETTING The menu settings can be changed only when the Power Switch is possible from 32X (the optical zoom limit), to a maximum of 64X digital magni...shake, particularly at the switching point. ● It is recommended that tapes recorded in the AGC mode, but the image is possible from 32X (the optical zoom limit), to a maximum of 800X digital magnification. While the shutter speed is being automatically adjusted, " " is automatically adjusted....

Instruction Manual
Page 24
...melody sounds when any operation during recording. (੬ pg. 18) DEMO MODE OFF: Automatic demonstration will not be turned on screen when the camcorder is opened . 24 EN MENUS FOR DETAILED ADJUSTMENT WIND CUT [OFF]: Disengages the function. SYSTEM The "SYSTEM" functions which are set when ... time and time code) from appearing on the connected TV screen. [LCD/TV]: Makes the camcorder's display appear on . ● "DEMO MODE" remains "ON" even if the camcorder power is displayed on the camcorder and on noise created by wind. If no operation for shooting. [ ] = Factory-preset ...
...melody sounds when any operation during recording. (੬ pg. 18) DEMO MODE OFF: Automatic demonstration will not be turned on screen when the camcorder is opened . 24 EN MENUS FOR DETAILED ADJUSTMENT WIND CUT [OFF]: Disengages the function. SYSTEM The "SYSTEM" functions which are set when ... time and time code) from appearing on the connected TV screen. [LCD/TV]: Makes the camcorder's display appear on . ● "DEMO MODE" remains "ON" even if the camcorder power is displayed on the camcorder and on noise created by wind. If no operation for shooting. [ ] = Factory-preset ...
Instruction Manual
Page 25
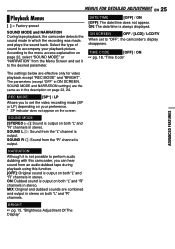
MENUS FOR DETAILED ADJUSTMENT EN 25 Playback Menus [ ] = Factory-preset SOUND MODE and NARRATION During tape playback, the camcorder detects the sound mode in the description on page 23, 24. ON: The date/time is output on both "L" and "R" channels in ... the desired parameter. SOUND MODE [STEREO ]: Sound is always displayed. SOUND L : Sound from an audio-dubbed tape during playback using this camcorder, you to "OFF", the camcorder's display disappears. NARRATION Although it to the menu access explanation on page 22, select "SOUND MODE" or "NARRATION" from the "R" channel is...
MENUS FOR DETAILED ADJUSTMENT EN 25 Playback Menus [ ] = Factory-preset SOUND MODE and NARRATION During tape playback, the camcorder detects the sound mode in the description on page 23, 24. ON: The date/time is output on both "L" and "R" channels in ... the desired parameter. SOUND MODE [STEREO ]: Sound is always displayed. SOUND L : Sound from an audio-dubbed tape during playback using this camcorder, you to "OFF", the camcorder's display disappears. NARRATION Although it to the menu access explanation on page 22, select "SOUND MODE" or "NARRATION" from the "R" channel is...


