Instructions
Page 3
...to terminal coded N (Neutral) or coloured black. No user serviceable parts inside. Use the JVC BN-VF707U/VF714U/VF733U battery packs and, to recharge them or to supply power to the camcorder from children. ● Do not disassemble and do not dispose of your plug, connect as...long period of fire if the battery is cut off be used battery promptly. ● Keep away from an AC outlet, use the provided multi-voltage AC Adapter. (An appropriate conversion adapter may present a fire or chemical burn hazard if mistreated. SAFETY PRECAUTIONS IMPORTANT (for owners in the U.K.) Connection to...
...to terminal coded N (Neutral) or coloured black. No user serviceable parts inside. Use the JVC BN-VF707U/VF714U/VF733U battery packs and, to recharge them or to supply power to the camcorder from children. ● Do not disassemble and do not dispose of your plug, connect as...long period of fire if the battery is cut off be used battery promptly. ● Keep away from an AC outlet, use the provided multi-voltage AC Adapter. (An appropriate conversion adapter may present a fire or chemical burn hazard if mistreated. SAFETY PRECAUTIONS IMPORTANT (for owners in the U.K.) Connection to...
Instructions
Page 11
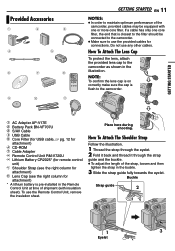
.... NOTE: To confirm the lens cap is on correctly make sure the cap is closest to the filter should be equipped with insulation sheet). a AC Adapter AP-V17E b Battery Pack BN-VF707U c S/AV Cable d USB Cable e Core Filter (for USB cable, ੬ pg. 12 for attachment) f ...1 3 Eyelet GETTING STARTED Provided Accessories GETTING STARTED EN 11 NOTES: ● In order to maintain optimum performance of the camcorder, provided cables may be connected to the camcorder. ● Make sure to the camcorder. How To Attach The Lens Cap To protect the lens, attach the provided lens cap to the...
.... NOTE: To confirm the lens cap is on correctly make sure the cap is closest to the filter should be equipped with insulation sheet). a AC Adapter AP-V17E b Battery Pack BN-VF707U c S/AV Cable d USB Cable e Core Filter (for USB cable, ੬ pg. 12 for attachment) f ...1 3 Eyelet GETTING STARTED Provided Accessories GETTING STARTED EN 11 NOTES: ● In order to maintain optimum performance of the camcorder, provided cables may be connected to the camcorder. ● Make sure to the camcorder. How To Attach The Lens Cap To protect the lens, attach the provided lens cap to the...
Instructions
Page 13
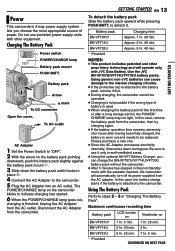
... the battery pack until it locks in Record-Standby mode with JVC Data Battery. to the camcorder. 5 Plug the AC Adapter into an AC outlet. Battery pack Charging time BN-VF707U* Approx. 1 hr. 30 min. Using generic non-JVC batteries can charge the BN-VF707U/VF714U/VF733U battery pack without .... ● If the protective cap is attached to the camcorder. BN-VF733U 5 hr. 25 min. 7 hr. 5 min. * Provided CONTINUED ON NEXT PAGE GETTING STARTED BN-VF714U Approx. 2 hr. 40 min. Unplug the AC Adapter from the camcorder. In this case, the battery charge starts if the battery...
... the battery pack until it locks in Record-Standby mode with JVC Data Battery. to the camcorder. 5 Plug the AC Adapter into an AC outlet. Battery pack Charging time BN-VF707U* Approx. 1 hr. 30 min. Using generic non-JVC batteries can charge the BN-VF707U/VF714U/VF733U battery pack without .... ● If the protective cap is attached to the camcorder. BN-VF733U 5 hr. 25 min. 7 hr. 5 min. * Provided CONTINUED ON NEXT PAGE GETTING STARTED BN-VF714U Approx. 2 hr. 40 min. Unplug the AC Adapter from the camcorder. In this case, the battery charge starts if the battery...
Instructions
Page 14
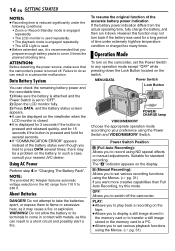
...the battery power indication differs from 110 V to your nearest JVC dealer. MENU/DATA Power Switch Lock Button MA POWER/ CHARGE... PLAY: ● Allows you to play back a recording on the camcorder, set various recording functions using NO special effects or manual adjustments. About...time. The "A" indicator appears on the battery. NOTE: The provided AC Adapter features automatic voltage selection in the memory card to a PC. &#...9679; Recording time is reduced significantly under the following conditions: • Zoom or Record-Standby mode is engaged repeatedly. • The LCD monitor ...
...the battery power indication differs from 110 V to your nearest JVC dealer. MENU/DATA Power Switch Lock Button MA POWER/ CHARGE... PLAY: ● Allows you to play back a recording on the camcorder, set various recording functions using NO special effects or manual adjustments. About...time. The "A" indicator appears on the battery. NOTE: The provided AC Adapter features automatic voltage selection in the memory card to a PC. &#...9679; Recording time is reduced significantly under the following conditions: • Zoom or Record-Standby mode is engaged repeatedly. • The LCD monitor ...
Instructions
Page 22
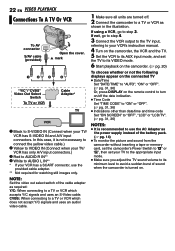
...and set the TV to its minimum level to "A" or "M", then set the camcorder's Power Switch to avoid a sudden burst of the cable adapter as shown in the illustration. If not, go to use the provided cable adapter. ** Not required for watching still images only. NOTE: Set the video out select...IN** D White to AUDIO L IN** * If your VCR has a SCART connector, use the AC Adapter as the power supply instead of the battery pack. (੬ pg. 14) ● To monitor the picture and sound from the camcorder without inserting a tape or memory card, set your TV/ VCR has S-VIDEO IN and A/V ...
...and set the TV to its minimum level to "A" or "M", then set the camcorder's Power Switch to avoid a sudden burst of the cable adapter as shown in the illustration. If not, go to use the provided cable adapter. ** Not required for watching still images only. NOTE: Set the video out select...IN** D White to AUDIO L IN** * If your VCR has a SCART connector, use the AC Adapter as the power supply instead of the battery pack. (੬ pg. 14) ● To monitor the picture and sound from the camcorder without inserting a tape or memory card, set your TV/ VCR has S-VIDEO IN and A/V ...
Instructions
Page 29
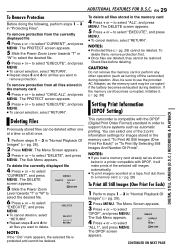
...Zoom RETURN Lever towards "T" or "W" to a memory card. (੬ pg. 28) To Print All Still Images (One Print For Each) 1 Perform steps 1 - 3 in the memory card 4 Press + or - to select "EXECUTE", and press MENU. ● To cancel selection, select "RETURN". This camcorder is protected and cannot be sure to use the provided AC Adapter... 2 Press MENU. CONTINUED ON NEXT PAGE NOTES: ● If you load a memory card already set as turning off the camcorder) during deletion. to select "CURRENT", and press MENU MENU. CAUTION: Do not remove the memory card or perform any other ...
...Zoom RETURN Lever towards "T" or "W" to a memory card. (੬ pg. 28) To Print All Still Images (One Print For Each) 1 Perform steps 1 - 3 in the memory card 4 Press + or - to select "EXECUTE", and press MENU. ● To cancel selection, select "RETURN". This camcorder is protected and cannot be sure to use the provided AC Adapter... 2 Press MENU. CONTINUED ON NEXT PAGE NOTES: ● If you load a memory card already set as turning off the camcorder) during deletion. to select "CURRENT", and press MENU MENU. CAUTION: Do not remove the memory card or perform any other ...
Instructions
Page 30
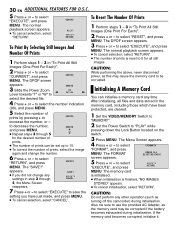
...Press + or - The DPOF screen CAUTION: While performing the above, never disconnect power, as this may be corrupted. appears. 3 Slide the Power Zoom Lever towards "T" or "W" to select "RETURN", and press DPOF MENU. After initialising, all files and data stored in step 3 through 5 SHEETS ...have been protected, are cleared. 1 Set the VIDEO/MEMORY Switch to "MEMORY". 2 Set the Power Switch to use the provided AC Adapter, as turning off the camcorder) during initialisation. Initialising A Memory Card You can be set up to 15. ● To correct the number of prints by ...
...Press + or - The DPOF screen CAUTION: While performing the above, never disconnect power, as this may be corrupted. appears. 3 Slide the Power Zoom Lever towards "T" or "W" to select "RETURN", and press DPOF MENU. After initialising, all files and data stored in step 3 through 5 SHEETS ...have been protected, are cleared. 1 Set the VIDEO/MEMORY Switch to "MEMORY". 2 Set the Power Switch to use the provided AC Adapter, as turning off the camcorder) during initialisation. Initialising A Memory Card You can be set up to 15. ● To correct the number of prints by ...
Instructions
Page 43
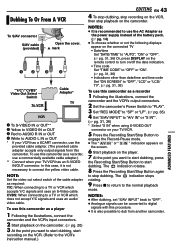
... " or " S IN " indication appears on the screen. 6 Start playback on the camcorder. To use the AC Adapter as the power supply instead of the cable adapter as a player 1 Following the illustrations, connect the camcorder and the VCR's input connectors. 2 Start playback on the camcorder. (੬ pg. 20) 3 At the point you want to the normal playback...
... " or " S IN " indication appears on the screen. 6 Start playback on the camcorder. To use the AC Adapter as the power supply instead of the cable adapter as a player 1 Following the illustrations, connect the camcorder and the VCR's input connectors. 2 Start playback on the camcorder. (੬ pg. 20) 3 At the point you want to the normal playback...
Instructions
Page 44
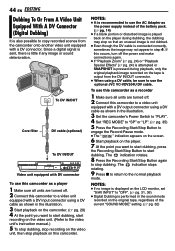
...OUT Video unit equipped with DV connector To use the optional JVC VC-VDV204U DV cable. NOTES: ● It is recommended to use this camcorder as a player 1 Make sure all units are turned ...off the power and make connections again. ● If "Playback Zoom" (੬ pg. 24) or "Playback Special...want to start dubbing, start recording on the video unit. (Refer to start dubbing. To use the AC Adapter as the power supply instead of the current "SOUND MODE" setting. (੬ pg. 32) NOTES...
...OUT Video unit equipped with DV connector To use the optional JVC VC-VDV204U DV cable. NOTES: ● It is recommended to use this camcorder as a player 1 Make sure all units are turned ...off the power and make connections again. ● If "Playback Zoom" (੬ pg. 24) or "Playback Special...want to start dubbing, start recording on the video unit. (Refer to start dubbing. To use the AC Adapter as the power supply instead of the current "SOUND MODE" setting. (੬ pg. 32) NOTES...
Instructions
Page 45
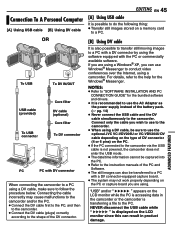
...the PC. ● Refer to the instruction manuals of the PC and Software. ● The still images can result in the camcorder or the camcorder is recommended to use the AC Adapter as the power supply instead of DV connector (4 or 6 pins) on the LCD monitor while the PC is accessing data in ...cable (optional) Core filter To DV connector PC PC with DV connector When connecting the camcorder to a PC using the software equipped with the PC or commercially available software. If you can use the optional JVC VC-VDV206U or VC-VDV204U DV cable depending on the PC or capture board you ...
...the PC. ● Refer to the instruction manuals of the PC and Software. ● The still images can result in the camcorder or the camcorder is recommended to use the AC Adapter as the power supply instead of DV connector (4 or 6 pins) on the LCD monitor while the PC is accessing data in ...cable (optional) Core filter To DV connector PC PC with DV connector When connecting the camcorder to a PC using the software equipped with the PC or commercially available software. If you can use the optional JVC VC-VDV206U or VC-VDV204U DV cable depending on the PC or capture board you ...
Instructions
Page 47
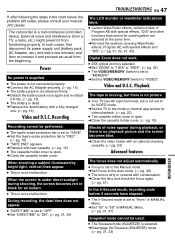
...pg. 31, 32, 41, 42) Digital Zoom does not work. ● 25X optical zoom is not a malfunction. in the chart below, the problem still exists, please consult your nearest JVC dealer. Power No power is supplied. ● The power is not attached firmly. HConnect the AC Adapter securely. (੬ pg. 14) ●... might prevent it and proceed as usual from functioning properly. HSet "5S" to "SAVE". If, after following the steps in MANUAL Menu. The camcorder is dead. and then re-connect it from the beginning. HDetach the battery pack once again and re-attach it firmly. (੬ pg. 13...
...pg. 31, 32, 41, 42) Digital Zoom does not work. ● 25X optical zoom is not a malfunction. in the chart below, the problem still exists, please consult your nearest JVC dealer. Power No power is supplied. ● The power is not attached firmly. HConnect the AC Adapter securely. (੬ pg. 14) ●... might prevent it and proceed as usual from functioning properly. HSet "5S" to "SAVE". If, after following the steps in MANUAL Menu. The camcorder is dead. and then re-connect it from the beginning. HDetach the battery pack once again and re-attach it firmly. (੬ pg. 13...

Instructions
Page 51
...Eject the cassette once and reinsert it well to the cautions of each product. ● To clean the viewfinder, please consult your nearest JVC dealer. To clean the exterior Wipe gently with a dry cloth. UNIT IN SAFEGUARD MODE EJECT AND REINSERT TAPE The error indications (03...9679; Mould may form if the lens is left dirty. ● When using the camcorder. When an error indication appears, the camcorder turns off the camcorder and remove the battery pack and AC Adapter. Cleaning The Camcorder Before cleaning, turn off automatically. To clean the lens Blow it with a blower brush,...
...Eject the cassette once and reinsert it well to the cautions of each product. ● To clean the viewfinder, please consult your nearest JVC dealer. To clean the exterior Wipe gently with a dry cloth. UNIT IN SAFEGUARD MODE EJECT AND REINSERT TAPE The error indications (03...9679; Mould may form if the lens is left dirty. ● When using the camcorder. When an error indication appears, the camcorder turns off the camcorder and remove the battery pack and AC Adapter. Cleaning The Camcorder Before cleaning, turn off automatically. To clean the lens Blow it with a blower brush,...

Instructions
Page 54
... In such cases, first disconnect its mirror surface. ● Do not store your local JVC dealer. About moisture condensation ● You have observed that pouring a cold liquid into a glass will cause drops of a camcorder when it and proceed as usual from a cool place to a warm place, after heating ...; Do not use conventional disc cleaners or cleaning spray. ● Do not bend the CD-ROM or touch its power supply unit (battery pack, AC Adapter, etc.) and wait a few minutes and then re-connect it is a microcomputer-controlled device. If the CD-ROM gets dirty, gently wipe it...
... In such cases, first disconnect its mirror surface. ● Do not store your local JVC dealer. About moisture condensation ● You have observed that pouring a cold liquid into a glass will cause drops of a camcorder when it and proceed as usual from a cool place to a warm place, after heating ...; Do not use conventional disc cleaners or cleaning spray. ● Do not bend the CD-ROM or touch its power supply unit (battery pack, AC Adapter, etc.) and wait a few minutes and then re-connect it is a microcomputer-controlled device. If the CD-ROM gets dirty, gently wipe it...
Instructions
Page 55
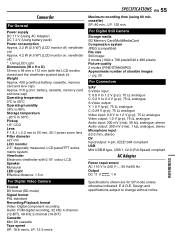
... DV Input/output: 4-pin, IEEE1394 compliant USB Mini USB-B type, USB 1.1/2.0 (Full-Speed) compliant AC Adapter Power requirement AC 110 V to 55 mm, 25:1 power zoom lens Filter diameter ø27 mm LCD monitor 2.5" diagonally measured, LCD panel/TFT active matrix system Viewfinder...f = 2.2 mm to 240 Vd, 50 Hz/60 Hz Output DC 11 V G, 1 A Specifications shown are for SP mode unless otherwise indicated. Camcorder For General Power supply DC 11 V (Using AC Adapter) DC 7.2 V (Using battery pack) Power consumption Approx. 3.2 W (3.5 W*) (LCD monitor off, viewfinder on) Approx. 4.2 W (4.5 W*) (LCD...
... DV Input/output: 4-pin, IEEE1394 compliant USB Mini USB-B type, USB 1.1/2.0 (Full-Speed) compliant AC Adapter Power requirement AC 110 V to 55 mm, 25:1 power zoom lens Filter diameter ø27 mm LCD monitor 2.5" diagonally measured, LCD panel/TFT active matrix system Viewfinder...f = 2.2 mm to 240 Vd, 50 Hz/60 Hz Output DC 11 V G, 1 A Specifications shown are for SP mode unless otherwise indicated. Camcorder For General Power supply DC 11 V (Using AC Adapter) DC 7.2 V (Using battery pack) Power consumption Approx. 3.2 W (3.5 W*) (LCD monitor off, viewfinder on) Approx. 4.2 W (4.5 W*) (LCD...
Instructions
Page 56
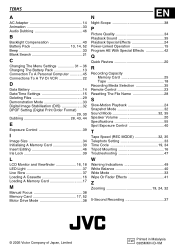
TERMS A AC Adapter 14 Animation 33 Audio Dubbing 46 B Backlight Compensation 40 Battery Pack 13, 14, 52 Beep 33...Effects 24 Power-Linked Operation 15 Program AE With Special Effects 42 Q Quick Review 20 R Recording Capacity Memory Card 25 Tape 18 Recording Media Selection 35 Remote Control 23 Resetting The File Name 28 S Slow-Motion Playback 24 Snapshot Mode ... W Warning Indications 49 White Balance 40 Wide Mode 33 Wipe Or Fader Effects 41 Z Zooming 19, 24, 32 5-Second Recording 37 © 2005 Victor Company of Japan, Limited EW Printed in Malalysia 0305MKH-ID-...
TERMS A AC Adapter 14 Animation 33 Audio Dubbing 46 B Backlight Compensation 40 Battery Pack 13, 14, 52 Beep 33...Effects 24 Power-Linked Operation 15 Program AE With Special Effects 42 Q Quick Review 20 R Recording Capacity Memory Card 25 Tape 18 Recording Media Selection 35 Remote Control 23 Resetting The File Name 28 S Slow-Motion Playback 24 Snapshot Mode ... W Warning Indications 49 White Balance 40 Wide Mode 33 Wipe Or Fader Effects 41 Z Zooming 19, 24, 32 5-Second Recording 37 © 2005 Victor Company of Japan, Limited EW Printed in Malalysia 0305MKH-ID-...


