
Instructions
Page 2
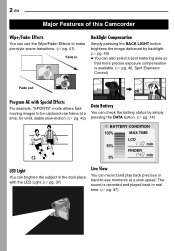
... LED Light. (੬ pg. 37) Live Slow You can brighten the subject in real time. (੬ pg. 37) 2 EN Major Features of this Camcorder Wipe/Fader Effects You can use the Wipe/Fader Effects to make pro-style scene transitions. (੬ pg. 41) Fade in Backlight Compensation Simply pressing... to be captured one frame at a time, for vivid, stable slow-motion. (੬ pg. 42) Data Battery You can check the battery status by simply pressing the DATA button. (੬ pg. 14) BATTERY CONDITION 100% MAX TIME LCD 50% min FINDER 0% min LED Light You can record and play back precious...
... LED Light. (੬ pg. 37) Live Slow You can brighten the subject in real time. (੬ pg. 37) 2 EN Major Features of this Camcorder Wipe/Fader Effects You can use the Wipe/Fader Effects to make pro-style scene transitions. (੬ pg. 41) Fade in Backlight Compensation Simply pressing... to be captured one frame at a time, for vivid, stable slow-motion. (੬ pg. 42) Data Battery You can check the battery status by simply pressing the DATA button. (੬ pg. 14) BATTERY CONDITION 100% MAX TIME LCD 50% min FINDER 0% min LED Light You can record and play back precious...
Instructions
Page 3
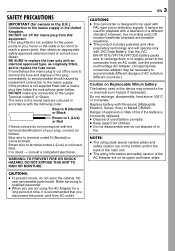
... E or Green. consult a competent electrician. No user serviceable parts inside. Use the JVC BN-VF707U/VF714U/VF733U battery packs and, to recharge them or to supply power to the camcorder from this product is too short to be used with the following code: Blue to ... If this equipment. If in doubt - EN 3 CAUTIONS: ● This camcorder is recommended that you are on Replaceable lithium battery The battery used battery promptly. ● Keep away from AC outlet. Replace battery with an identical approved type, as follows: Blue wire to accommodate different designs ...
... E or Green. consult a competent electrician. No user serviceable parts inside. Use the JVC BN-VF707U/VF714U/VF733U battery packs and, to recharge them or to supply power to the camcorder from this product is too short to be used with the following code: Blue to ... If this equipment. If in doubt - EN 3 CAUTIONS: ● This camcorder is recommended that you are on Replaceable lithium battery The battery used battery promptly. ● Keep away from AC outlet. Replace battery with an identical approved type, as follows: Blue wire to accommodate different designs ...
Instructions
Page 4
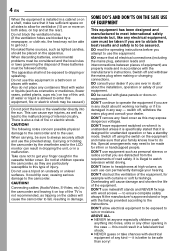
...considered and the local rules or laws governing the disposal of these batteries must be safe than sorry! This can permanently damage your hearing... or soft furnishings. Also do this may be followed strictly. Do not let children operate the camcorder, as cosmetics or medicines, flower vases, potted plants, cups etc.) on equipment. DO consult your...the ventilation holes are ever in a malfunction. The following notes concern possible physical damage to the camcorder and to this equipment, fire or electric shock may expose dangerous voltages. DON'T remove any fixed...
...considered and the local rules or laws governing the disposal of these batteries must be safe than sorry! This can permanently damage your hearing... or soft furnishings. Also do this may be followed strictly. Do not let children operate the camcorder, as cosmetics or medicines, flower vases, potted plants, cups etc.) on equipment. DO consult your...the ventilation holes are ever in a malfunction. The following notes concern possible physical damage to the camcorder and to this equipment, fire or electric shock may expose dangerous voltages. DON'T remove any fixed...
Instructions
Page 7
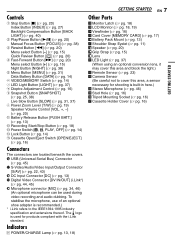
...; pg. 20) Menu select Button [+] (੬ pg. 15) Night Button [NIGHT] (੬ pg. 38) E Menu Button [MENU] (੬ pg. 31) Data Battery Button [DATA] (੬ pg. 14) F VIDEO/MEMORY Switch (੬ pg. 14) G LED Light Button [LIGHT] (੬ pg. 37) H Dioptre Adjustment Control (&#...2668; pg. 16) I Snapshot Button [SNAPSHOT] (੬ pg. 25, 38) Live Slow Button [SLOW] (੬ pg. 31, 37) J Power Zoom Lever [T/W] (੬ pg. 19) Speaker Volume Control [VOL pg. 20) K Battery Release Button [PUSH BATT.] (੬ pg. 13) L Recording Start/Stop Button (੬ ...
...; pg. 20) Menu select Button [+] (੬ pg. 15) Night Button [NIGHT] (੬ pg. 38) E Menu Button [MENU] (੬ pg. 31) Data Battery Button [DATA] (੬ pg. 14) F VIDEO/MEMORY Switch (੬ pg. 14) G LED Light Button [LIGHT] (੬ pg. 37) H Dioptre Adjustment Control (&#...2668; pg. 16) I Snapshot Button [SNAPSHOT] (੬ pg. 25, 38) Live Slow Button [SLOW] (੬ pg. 31, 37) J Power Zoom Lever [T/W] (੬ pg. 19) Speaker Volume Control [VOL pg. 20) K Battery Release Button [PUSH BATT.] (੬ pg. 13) L Recording Start/Stop Button (੬ ...
Instructions
Page 9
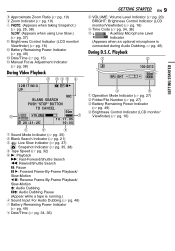
... an optional microphone is connected during Audio Dubbing. ੬ pg. 46) During D.S.C. H Approximate Zoom Ratio (੬ pg. 19) I Zoom Indicator (੬ pg. 19) J O: (Appears when taking Snapshot.) (੬ pg. 25, 38) SLOW: (Appears when using Live Slow.) (੬ pg. 37) K Brightness Control... Indicator (LCD monitor/ Viewfinder) (੬ pg. 16) L Battery Remaining Power Indicator (੬ pg. 49) M Date/...
... an optional microphone is connected during Audio Dubbing. ੬ pg. 46) During D.S.C. H Approximate Zoom Ratio (੬ pg. 19) I Zoom Indicator (੬ pg. 19) J O: (Appears when taking Snapshot.) (੬ pg. 25, 38) SLOW: (Appears when using Live Slow.) (੬ pg. 37) K Brightness Control... Indicator (LCD monitor/ Viewfinder) (੬ pg. 16) L Battery Remaining Power Indicator (੬ pg. 49) M Date/...
Instructions
Page 11
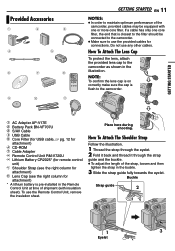
...the Remote Control Unit, remove the insulation sheet. How To Attach The Lens Cap To protect the lens, attach the provided lens cap to the camcorder. To use any other cables. Place here during shooting. GETTING STARTED Provided Accessories GETTING STARTED EN 11 NOTES: ● In order to maintain... (with one core filter, the end that is closest to the filter should be connected to the camcorder. ● Make sure to use the provided cables for attachment) * A lithium battery is flush to the camcorder as shown in the buckle. 3 Slide the strap guide fully towards the eyelet. If a cable ...
...the Remote Control Unit, remove the insulation sheet. How To Attach The Lens Cap To protect the lens, attach the provided lens cap to the camcorder. To use any other cables. Place here during shooting. GETTING STARTED Provided Accessories GETTING STARTED EN 11 NOTES: ● In order to maintain... (with one core filter, the end that is closest to the filter should be connected to the camcorder. ● Make sure to use the provided cables for attachment) * A lithium battery is flush to the camcorder as shown in the buckle. 3 Slide the strap guide fully towards the eyelet. If a cable ...
Instructions
Page 13
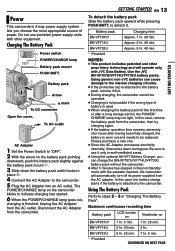
... arrow on BN-VF707U* 1 hr. 5 min. 1 hr. 25 min. In this case, the battery charge starts if the battery is attached to the camcorder. Using The Battery Pack Perform steps 2 - 3 in place b. 4 Connect the AC Adapter to the camcorder. 5 Plug the AC Adapter into an AC outlet. BN-VF733U...9679; If the protective cap is attached to the battery pack, remove it first. ● During charging, the camcorder cannot be replaced. Do not use . Using generic non-JVC batteries can charge the BN-VF707U/VF714U/VF733U battery pack without the camcorder. ● After 5 minutes has elapsed in well-...
... arrow on BN-VF707U* 1 hr. 5 min. 1 hr. 25 min. In this case, the battery charge starts if the battery is attached to the camcorder. Using The Battery Pack Perform steps 2 - 3 in place b. 4 Connect the AC Adapter to the camcorder. 5 Plug the AC Adapter into an AC outlet. BN-VF733U...9679; If the protective cap is attached to the battery pack, remove it first. ● During charging, the camcorder cannot be replaced. Do not use . Using generic non-JVC batteries can charge the BN-VF707U/VF714U/VF733U battery pack without the camcorder. ● After 5 minutes has elapsed in well-...
Instructions
Page 14
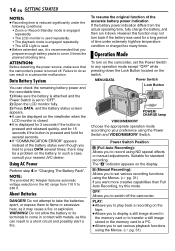
...detaching the power source, make sure that the camcorder's power is recommended that you to your nearest JVC dealer. M (Manual Recording): Allows you prepare enough battery packs to record using the Menus. (੬ pg. 31) Do not allow the battery or its terminals to come in the memory ...various recording functions using the Power Switch and VIDEO/MEMORY Switch. Suitable for a long period of time under the following conditions: • Zoom or Record-Standby mode is engaged repeatedly. • The LCD monitor is used repeatedly. • The playback mode is engaged repeatedly. ...
...detaching the power source, make sure that the camcorder's power is recommended that you to your nearest JVC dealer. M (Manual Recording): Allows you prepare enough battery packs to record using the Menus. (੬ pg. 31) Do not allow the battery or its terminals to come in the memory ...various recording functions using the Power Switch and VIDEO/MEMORY Switch. Suitable for a long period of time under the following conditions: • Zoom or Record-Standby mode is engaged repeatedly. • The LCD monitor is used repeatedly. • The playback mode is engaged repeatedly. ...
Instructions
Page 17
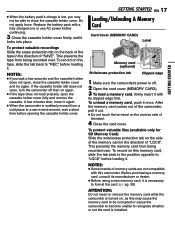
... card comes out of "LOCK". Before purchasing a memory card, consult its clipped edge first. ● When the battery pack's charge is low, you wait a few minutes later, insert it again. ● When the camcorder is suddenly moved from a cold place to "REC" before opening the cassette holder cover. To protect valuable files...
... card comes out of "LOCK". Before purchasing a memory card, consult its clipped edge first. ● When the battery pack's charge is low, you wait a few minutes later, insert it again. ● When the camcorder is suddenly moved from a cold place to "REC" before opening the cassette holder cover. To protect valuable files...
Instructions
Page 20
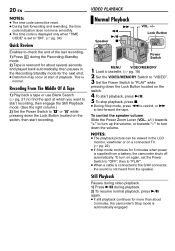
Still Playback Pauses during video playback. 1) Press 4/9 during the Recording-Standby mode. 2) Tape is not heard from a battery, the camcorder shuts off automatically. Lock Button MA Power Switch MENU VIDEO/MEMORY 1 Load a cassette. (੬ pg. 16) 2 Set the VIDEO/MEMORY Switch ... (੬ pg. 22) ● If Stop mode continues for 5 minutes when power is supplied from the speaker. To control the speaker volume Slide the Power Zoom Lever (VOL. +/-) towards "+" to turn up the volume, or towards "-" to turn on the switch, then start playback, press 4/9. 5 To stop playback...
Still Playback Pauses during video playback. 1) Press 4/9 during the Recording-Standby mode. 2) Tape is not heard from a battery, the camcorder shuts off automatically. Lock Button MA Power Switch MENU VIDEO/MEMORY 1 Load a cassette. (੬ pg. 16) 2 Set the VIDEO/MEMORY Switch ... (੬ pg. 22) ● If Stop mode continues for 5 minutes when power is supplied from the speaker. To control the speaker volume Slide the Power Zoom Lever (VOL. +/-) towards "+" to turn up the volume, or towards "-" to turn on the switch, then start playback, press 4/9. 5 To stop playback...
Instructions
Page 22
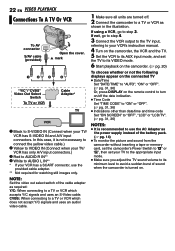
...referring to use the provided cable adapter. ** Not required for watching still images only. NOTE: Set the video out select switch of sound when the camcorder is recommended to your VCR's instruction manual. 4 Turn on . mark 12 3 4 "Y/C"/"CVBS" Video Out Select Switch To TV or VCR Cable Adapter... SCART connector, use the AC Adapter as the power supply instead of the battery pack. (੬ pg. 14) ● To monitor the picture and sound from the camcorder without inserting a tape or memory card, set the camcorder's Power Switch to "A" or "M", then set the TV to its minimum level...
...referring to use the provided cable adapter. ** Not required for watching still images only. NOTE: Set the video out select switch of sound when the camcorder is recommended to your VCR's instruction manual. 4 Turn on . mark 12 3 4 "Y/C"/"CVBS" Video Out Select Switch To TV or VCR Cable Adapter... SCART connector, use the AC Adapter as the power supply instead of the battery pack. (੬ pg. 14) ● To monitor the picture and sound from the camcorder without inserting a tape or memory card, set the camcorder's Power Switch to "A" or "M", then set the TV to its minimum level...

Instructions
Page 23
...one lithium battery 2 (CR2025). 1 Pull out the battery 1 holder by pushing the lock tab. 3 1 2 Insert the battery in the Lock tab holder, and be effective or may not be sure to "PLAY") p START/STOP Button Functions the same as the Recording Start/ Stop Button on the camcorder. DUB ... or "M". Remote sensor NOTE: The transmitted beam may cause incorrect operation when the remote sensor is set to sunlight or powerful lighting. o Zoom (T/W) Buttons Zoom in/out (੬ pg. 19, 24) (Also available with the Power Switch set to point it at the remote sensor. VIDEO RECORDING...
...one lithium battery 2 (CR2025). 1 Pull out the battery 1 holder by pushing the lock tab. 3 1 2 Insert the battery in the Lock tab holder, and be effective or may not be sure to "PLAY") p START/STOP Button Functions the same as the Recording Start/ Stop Button on the camcorder. DUB ... or "M". Remote sensor NOTE: The transmitted beam may cause incorrect operation when the remote sensor is set to sunlight or powerful lighting. o Zoom (T/W) Buttons Zoom in/out (੬ pg. 19, 24) (Also available with the Power Switch set to point it at the remote sensor. VIDEO RECORDING...

Instructions
Page 25
... ● The clock icon " " turns while waiting for the next shot is being taken. ● The next shot is supplied from the battery pack, the camcorder shuts off automatically to "A" or "M" while pressing down the Lock Button located on the Picture Quality/Image Size, etc. RECORDING EN... 25 Approximate Number of your camcorder as a Digital Still Camera for approx. 5 minutes when the Power Switch is set to "A" or "M" and power is being taken. ● Still...
... ● The clock icon " " turns while waiting for the next shot is being taken. ● The next shot is supplied from the battery pack, the camcorder shuts off automatically to "A" or "M" while pressing down the Lock Button located on the Picture Quality/Image Size, etc. RECORDING EN... 25 Approximate Number of your camcorder as a Digital Still Camera for approx. 5 minutes when the Power Switch is set to "A" or "M" and power is being taken. ● Still...
Instructions
Page 26
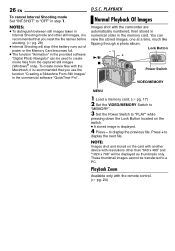
To create movie files with the camcorder are automatically numbered, then stored in numerical order in the commercial software "QuickTime Pro". D.S.C. You can be displayed as thumbnails only. 26 EN To cancel ... to display the previous file. to create movie files from the captured still images (Windows® only). Playback Zoom Available only with resolutions other than "640 x 480" and "1024 x 768" will stop if the battery runs out of power or the Memory Card becomes full. ● The function "Animation" in the provided...
To create movie files with the camcorder are automatically numbered, then stored in numerical order in the commercial software "QuickTime Pro". D.S.C. You can be displayed as thumbnails only. 26 EN To cancel ... to display the previous file. to create movie files from the captured still images (Windows® only). Playback Zoom Available only with resolutions other than "640 x 480" and "1024 x 768" will stop if the battery runs out of power or the Memory Card becomes full. ● The function "Animation" in the provided...
Instructions
Page 27
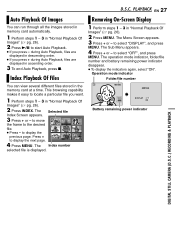
... - 3 in the memory card at a time. to select "DISPLAY", and press MENU. The operation mode indicator, folder/file number and battery remaining power indicator disappear. ● To display the indicators again, select "ON". The Index number selected file is displayed. 100-0013 MENU ...50m D I SPLAY OFF ON RETURN Battery remaining power indicator DIGITAL STILL CAMERA (D.S.C.) RECORDING & PLAYBACK to start Auto Playback. ● If you press + during Auto Playback, files...
... - 3 in the memory card at a time. to select "DISPLAY", and press MENU. The operation mode indicator, folder/file number and battery remaining power indicator disappear. ● To display the indicators again, select "ON". The Index number selected file is displayed. 100-0013 MENU ...50m D I SPLAY OFF ON RETURN Battery remaining power indicator DIGITAL STILL CAMERA (D.S.C.) RECORDING & PLAYBACK to start Auto Playback. ● If you press + during Auto Playback, files...
Instructions
Page 29
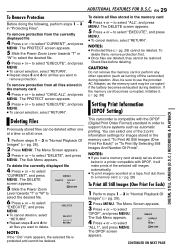
...RETURN all files stored in "Normal Playback Of Images" (੬ pg. 26). 2 Press MENU. The PROTECT screen appears. 5 Slide the Power Zoom Lever towards "T" or "W" to select the desired file. 6 Press + or - To delete all files you want to use the provided AC...- If the memory card becomes corrupted, initialise it will make prints of the 2 print information settings for DELETE? This camcorder is protected and cannot be corrupted if the battery becomes exhausted during deletion. to select "CANC.ALL", and press MENU. to delete. MENU The Sub Menu appears. 4 ...
...RETURN all files stored in "Normal Playback Of Images" (੬ pg. 26). 2 Press MENU. The PROTECT screen appears. 5 Slide the Power Zoom Lever towards "T" or "W" to select the desired file. 6 Press + or - To delete all files you want to use the provided AC...- If the memory card becomes corrupted, initialise it will make prints of the 2 print information settings for DELETE? This camcorder is protected and cannot be corrupted if the battery becomes exhausted during deletion. to select "CANC.ALL", and press MENU. to delete. MENU The Sub Menu appears. 4 ...
Instructions
Page 30
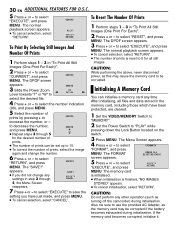
... or - Initialising A Memory Card You can be set up to be corrupted if the battery becomes exhausted during initialisation. CAUTION: Do not perform any settings in "To Print All Still..."CURRENT", and press DPOF MENU. to select "EXECUTE", and press MENU. appears. 3 Slide the Power Zoom Lever towards "T" or "W" to select "RETURN", and press DPOF MENU. The Menu Screen appears. 4... The DPOF screen CAUTION: While performing the above, never disconnect power, as turning off the camcorder) during initialisation. to SHEETS 00 RETURN select the desired file. 4 Press + or - ...
... or - Initialising A Memory Card You can be set up to be corrupted if the battery becomes exhausted during initialisation. CAUTION: Do not perform any settings in "To Print All Still..."CURRENT", and press DPOF MENU. to select "EXECUTE", and press MENU. appears. 3 Slide the Power Zoom Lever towards "T" or "W" to select "RETURN", and press DPOF MENU. The Menu Screen appears. 4... The DPOF screen CAUTION: While performing the above, never disconnect power, as turning off the camcorder) during initialisation. to SHEETS 00 RETURN select the desired file. 4 Press + or - ...
Instructions
Page 41
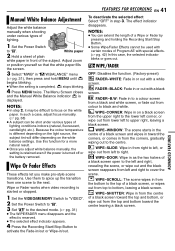
...OFF" in "u W.BALANCE" menu (੬ pg. 31), then press and hold MENU until begins blinking. ● When the setting is turned off or the battery removed. WIPE/FADER OFF: Disables the function. (Factory-preset) FADER-WHITE: Fade in or out with a white screen. FADER-BLACK: Fade in or out with... Effects cannot be difficult to focus on a black screen from the upper right to the lower left corner, or wipe out from left to "M". Adjust zoom or position yourself so that the white paper fills the screen. 3 Select "MWB" in step 3. In such a case, adjust focus manually. (੬ pg. 38...
...OFF" in "u W.BALANCE" menu (੬ pg. 31), then press and hold MENU until begins blinking. ● When the setting is turned off or the battery removed. WIPE/FADER OFF: Disables the function. (Factory-preset) FADER-WHITE: Fade in or out with a white screen. FADER-BLACK: Fade in or out with... Effects cannot be difficult to focus on a black screen from the upper right to the lower left corner, or wipe out from left to "M". Adjust zoom or position yourself so that the white paper fills the screen. 3 Select "MWB" in step 3. In such a case, adjust focus manually. (੬ pg. 38...
Instructions
Page 43
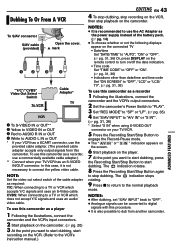
... instruction manual.) EDITING EN 43 4 To stop dubbing, stop recording on the VCR, then stop dubbing. In this camcorder as required: Y/C: When connecting to dub from another camcorder. To use this case, it is recommended to use the provided cable adapter. (The provided cable adapter accepts only output...Press 8 to return to a TV or VCR which accepts Y/C signals and uses an S-Video cable. NOTE: Set the video out select switch of the battery pack. (੬ pg. 14) ● To choose whether or not the following displays appear on the connected TV • Date/time Set "DATE/TIME...
... instruction manual.) EDITING EN 43 4 To stop dubbing, stop recording on the VCR, then stop dubbing. In this camcorder as required: Y/C: When connecting to dub from another camcorder. To use this case, it is recommended to use the provided cable adapter. (The provided cable adapter accepts only output...Press 8 to return to a TV or VCR which accepts Y/C signals and uses an S-Video cable. NOTE: Set the video out select switch of the battery pack. (੬ pg. 14) ● To choose whether or not the following displays appear on the connected TV • Date/time Set "DATE/TIME...
Instructions
Page 44
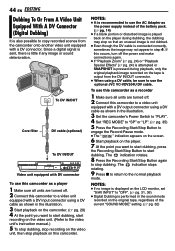
...power and make connections again. ● If "Playback Zoom" (੬ pg. 24) or "Playback Special Effects"...OUT connector. ● When using a DV cable, be sure to use the optional JVC VC-VDV204U DV cable. 44 EN EDITING Dubbing To Or From A Video Unit Equipped With...It is recommended to use the AC Adapter as the power supply instead of the battery pack. (੬ pg. 14) ● If a blank portion or disturbed image...to "OFF". (੬ pg. 31, 36) ● Digital Dubbing is output from the camcorder onto another video unit equipped with a DV connector. Since a digital signal is sent, there ...
...power and make connections again. ● If "Playback Zoom" (੬ pg. 24) or "Playback Special Effects"...OUT connector. ● When using a DV cable, be sure to use the optional JVC VC-VDV204U DV cable. 44 EN EDITING Dubbing To Or From A Video Unit Equipped With...It is recommended to use the AC Adapter as the power supply instead of the battery pack. (੬ pg. 14) ● If a blank portion or disturbed image...to "OFF". (੬ pg. 31, 36) ● Digital Dubbing is output from the camcorder onto another video unit equipped with a DV connector. Since a digital signal is sent, there ...


