Instructions
Page 5
... This Manual 2 Getting Started 3 Step 1: Unpack 3 Step 2: Prepare the Remote Control 3 Step 3: Hook Up 4 Changing the Scanning Mode 6 Before Operating the System 7 Playable Disc Types 7 Display Indicators 8 Daily Operations-Playback 10 Listening to the Radio 11 Playing Back a Disc 12 Daily Operations-Sound&Other Adjustments .... 14 Adjusting the Volume 14 Adjusting the Sound 14 Presetting Automatic DVD Sound Increase Level............15 Adjusting the Audio Input Level 15 Changing the Display Brightness 15 Changing the Picture Tone 15 Setting the Clock 16 Turning Off the Power...
... This Manual 2 Getting Started 3 Step 1: Unpack 3 Step 2: Prepare the Remote Control 3 Step 3: Hook Up 4 Changing the Scanning Mode 6 Before Operating the System 7 Playable Disc Types 7 Display Indicators 8 Daily Operations-Playback 10 Listening to the Radio 11 Playing Back a Disc 12 Daily Operations-Sound&Other Adjustments .... 14 Adjusting the Volume 14 Adjusting the Sound 14 Presetting Automatic DVD Sound Increase Level............15 Adjusting the Audio Input Level 15 Changing the Display Brightness 15 Changing the Picture Tone 15 Setting the Clock 16 Turning Off the Power...
Instructions
Page 6
... and the ventilation openings or holes. DO NOT disassemble the System since there are no user serviceable parts inside the unit. Indicates that this example, 2 seconds). • If no number is inside the arrow indicates the period of time, unplug the AC power cord from the wall outlet. In this manual, the operations using the remote control is only possible using the buttons and controls on the...
... and the ventilation openings or holes. DO NOT disassemble the System since there are no user serviceable parts inside the unit. Indicates that this example, 2 seconds). • If no number is inside the arrow indicates the period of time, unplug the AC power cord from the wall outlet. In this manual, the operations using the remote control is only possible using the buttons and controls on the...
Instructions
Page 8
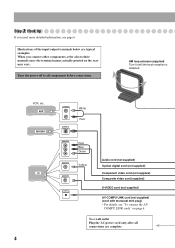
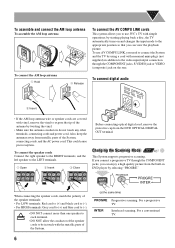
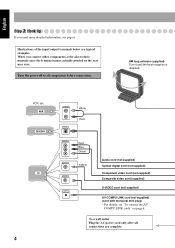
... COMPU LINK cords" on the rear may vary. AUX DECODER TV 4 AUDIO OUT OPTICAL DIGITAL IN White Red VIDEO INPUT PR PB Y VIDEO INPUT VIDEO INPUT AV COMPU LINK Red Blue Green Yellow Audio cord (not supplied) Optical digital cord (not supplied) Component video cord (not supplied) Composite video cord (supplied) S-VIDEO cord (not supplied) AV COMPU LINK cord (not supplied) (cord with monaural mini plug) • For details, see page 6. AM loop antenna (supplied) Turn it until the best reception is obtained. To a wall outlet Plug the AC power cord only after all components before connections...
... COMPU LINK cords" on the rear may vary. AUX DECODER TV 4 AUDIO OUT OPTICAL DIGITAL IN White Red VIDEO INPUT PR PB Y VIDEO INPUT VIDEO INPUT AV COMPU LINK Red Blue Green Yellow Audio cord (not supplied) Optical digital cord (not supplied) Component video cord (not supplied) Composite video cord (supplied) S-VIDEO cord (not supplied) AV COMPU LINK cord (not supplied) (cord with monaural mini plug) • For details, see page 6. AM loop antenna (supplied) Turn it until the best reception is obtained. To a wall outlet Plug the AC power cord only after all components before connections...
Instructions
Page 10
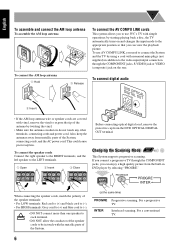
... to use AV COMPU LINK, you need to connect the System and the TV by using a cord with monaural mini-plugs (not supplied) in addition to the video input/output connection through the COMPONENT jacks, you can enjoy a high quality picture from the DVD OPTICAL DIGITAL OUT terminal. To connect digital audio DDVIGDITOAPLTOICUATL 2 Insert • If the AM loop antenna wire or speaker cords are covered with the metallic parts of the System. (at the same time) PROGRE...
... to use AV COMPU LINK, you need to connect the System and the TV by using a cord with monaural mini-plugs (not supplied) in addition to the video input/output connection through the COMPONENT jacks, you can enjoy a high quality picture from the DVD OPTICAL DIGITAL OUT terminal. To connect digital audio DDVIGDITOAPLTOICUATL 2 Insert • If the AM loop antenna wire or speaker cords are covered with the metallic parts of the System. (at the same time) PROGRE...
Instructions
Page 11
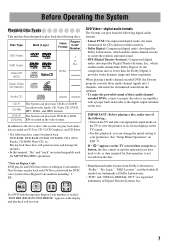
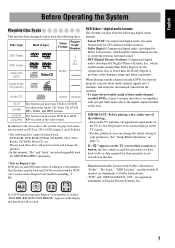
...-channel encoded DVD, the System properly converts these multi-channel signals into 2 channels, and emits the downmixed sound from Dolby Laboratories. EX.: DVD Video-digital audio formats The System can play back the following discs: Disc Type Mark (Logo) Video Format Region Code* Number DVD Video DVD Audio Video CD (VCD) DIGITAL VIDEO 1 or ALL NTSC Super Video CD (SVCD) SUPER VIDEO Audio CD COMPACT DIGITAL AUDIO CD-R CD-RW DVD-R DVD-RW The System can play back DVD-R or DVDRW recorded in the Audio CD, Video CD, SVCD, MP3, WMA, and JPEG formats. See "Setup Menu Operations...
...-channel encoded DVD, the System properly converts these multi-channel signals into 2 channels, and emits the downmixed sound from Dolby Laboratories. EX.: DVD Video-digital audio formats The System can play back the following discs: Disc Type Mark (Logo) Video Format Region Code* Number DVD Video DVD Audio Video CD (VCD) DIGITAL VIDEO 1 or ALL NTSC Super Video CD (SVCD) SUPER VIDEO Audio CD COMPACT DIGITAL AUDIO CD-R CD-RW DVD-R DVD-RW The System can play back DVD-R or DVDRW recorded in the Audio CD, Video CD, SVCD, MP3, WMA, and JPEG formats. See "Setup Menu Operations...
Instructions
Page 14
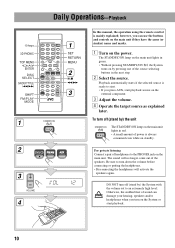
... keys 3D PHONIC TOP MENU ,, , ENTER DISC SELECT GROUP/TITLE 4/¢ SHIFT FM/PLAY MODE 1 STANDBY/ON 2 DVD/CD 3 VOLUME 4 1 SET RETURN MENU 2 8,7 1/¡ 3 In this manual, the operation using the remote control is ready to start. • If you press AUX, start playback. 10 To turn on the System or start playback source on the external component. 3 Adjust the volume. 4 Operate the target source as explained later. For private listening Connect a pair of power is always consumed even...
... keys 3D PHONIC TOP MENU ,, , ENTER DISC SELECT GROUP/TITLE 4/¢ SHIFT FM/PLAY MODE 1 STANDBY/ON 2 DVD/CD 3 VOLUME 4 1 SET RETURN MENU 2 8,7 1/¡ 3 In this manual, the operation using the remote control is ready to start. • If you press AUX, start playback. 10 To turn on the System or start playback source on the external component. 3 Adjust the volume. 4 Operate the target source as explained later. For private listening Connect a pair of power is always consumed even...
Instructions
Page 37
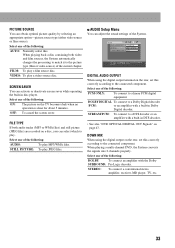
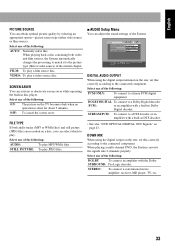
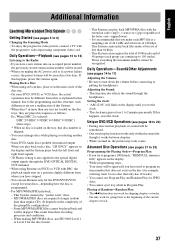
... amplifier with the Dolby SURROUND: Pro Logic decoder. DIGITAL AUDIO OUTPUT When using the digital output on the TV becomes dark when no operation is done for about 5 minutes. Select one of the following: PCM ONLY: To connect to the picture type (film or video source) of the following : AUDIO: To play JPEG files. 7 AUDIO Setup Menu You can select which to play. DOLBY DIGITAL To connect to the connected component. STEREO: To connect a conventional stereo amplifier, receiver, MD player...
... amplifier with the Dolby SURROUND: Pro Logic decoder. DIGITAL AUDIO OUTPUT When using the digital output on the TV becomes dark when no operation is done for about 5 minutes. Select one of the following: PCM ONLY: To connect to the picture type (film or video source) of the following : AUDIO: To play JPEG files. 7 AUDIO Setup Menu You can select which to play. DOLBY DIGITAL To connect to the connected component. STEREO: To connect a conventional stereo amplifier, receiver, MD player...
Instructions
Page 41
... lose 1 to 20) • During slow-motion playback, no disc is loaded on a disc that disc number is programmed. • For MP3/WMA/JPEG playback... - This System cannot play "packet write" discs. - Daily Operations-Sound&Other Adjustments (see pages 3 to the programming and disc structure; Adjusting the Sound: • This function also affects the sound through the DVD OPTICAL DIGITAL OUT terminal. • When using component video cord. If this happens, preset the stations again.
... lose 1 to 20) • During slow-motion playback, no disc is loaded on a disc that disc number is programmed. • For MP3/WMA/JPEG playback... - This System cannot play "packet write" discs. - Daily Operations-Sound&Other Adjustments (see pages 3 to the programming and disc structure; Adjusting the Sound: • This function also affects the sound through the DVD OPTICAL DIGITAL OUT terminal. • When using component video cord. If this happens, preset the stations again.

Instructions
Page 44
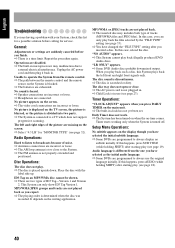
... produced DVD Audio discs. No picture is displayed on the screen. ] The video cord connections are incorrect or loose. Place the disc with your System, check this happens, press AUDIO (while holding SHIFT) after starting play . ] The disc is placed upside down. No sound is heard. ] Speaker connections are incorrect or loose. ] Headphones are suddenly canceled before calling for "MONITOR TYPE" (see page 33). ] You have changed the...
... produced DVD Audio discs. No picture is displayed on the screen. ] The video cord connections are incorrect or loose. Place the disc with your System, check this happens, press AUDIO (while holding SHIFT) after starting play . ] The disc is placed upside down. No sound is heard. ] Speaker connections are incorrect or loose. ] Headphones are suddenly canceled before calling for "MONITOR TYPE" (see page 33). ] You have changed the...
Instructions
Page 48
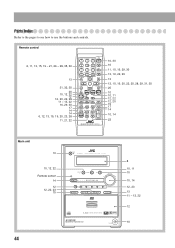
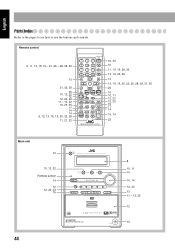
...AUDIO 1 SUB TITLE 2 STANDBY/ON ANGLE 3 ZOOM 4 5 VFP DISPLAY 6 3D PHONIC 7 8 DVD LEVEL 9 PROGRESSIVE PAGE + 10 0 10 SET RETURN CANCEL TOP MENU MENU ENTER SET UP ON SCREEN GROUP/TITLE SLOW + CLOCK/ TIMER SLEEP DIMMER A.STANDBY BASS/ FADE TREBLE RHYTHM AX MUTING FM/PLAY REPEAT A-B MODE REPEAT VOLUME RM-SFSS77J REMOTE CONTROL...22 Remote sensor 14 12 12, 22, 23 15 STANDBY/ ON DVD/CD FM/AM AUX # VOLUME R HYT H M A X DISC SELECT DISC1 DISC2 DISC3 DISC4 DISC5 DIMMER 3D PHONIC 5-DVD CHANGER , PLAY & EXCHANGE DIGITAL Digital Direct Progressive Scan PHONES 8...
...AUDIO 1 SUB TITLE 2 STANDBY/ON ANGLE 3 ZOOM 4 5 VFP DISPLAY 6 3D PHONIC 7 8 DVD LEVEL 9 PROGRESSIVE PAGE + 10 0 10 SET RETURN CANCEL TOP MENU MENU ENTER SET UP ON SCREEN GROUP/TITLE SLOW + CLOCK/ TIMER SLEEP DIMMER A.STANDBY BASS/ FADE TREBLE RHYTHM AX MUTING FM/PLAY REPEAT A-B MODE REPEAT VOLUME RM-SFSS77J REMOTE CONTROL...22 Remote sensor 14 12 12, 22, 23 15 STANDBY/ ON DVD/CD FM/AM AUX # VOLUME R HYT H M A X DISC SELECT DISC1 DISC2 DISC3 DISC4 DISC5 DIMMER 3D PHONIC 5-DVD CHANGER , PLAY & EXCHANGE DIGITAL Digital Direct Progressive Scan PHONES 8...
Instructions
Page 50
... will repair or replace defective parts at JVC authorized service centers. Accessories 8. JVC SHALL NOT BE LIABLE FOR THE LOSS OF USE OF THE PRODUCT, INCONVENIENCE, LOSS OR ANY OTHER DAMAGES, WHETHER DIRECT, INCIDENTAL OR CONSEQUENTIAL (INCLUDING, WITHOUT LIMITATION, DAMAGE TO TAPES, RECORDS OR DISCS) RESULTING FROM THE USE OF THIS PRODUCT, OR ARISING OUT OF ANY BREACH OF THIS WARRANTY. Model No. : Purchase data : Serial...
... will repair or replace defective parts at JVC authorized service centers. Accessories 8. JVC SHALL NOT BE LIABLE FOR THE LOSS OF USE OF THE PRODUCT, INCONVENIENCE, LOSS OR ANY OTHER DAMAGES, WHETHER DIRECT, INCIDENTAL OR CONSEQUENTIAL (INCLUDING, WITHOUT LIMITATION, DAMAGE TO TAPES, RECORDS OR DISCS) RESULTING FROM THE USE OF THIS PRODUCT, OR ARISING OUT OF ANY BREACH OF THIS WARRANTY. Model No. : Purchase data : Serial...
Instructions
Page 57
... This Manual 2 Getting Started 3 Step 1: Unpack 3 Step 2: Prepare the Remote Control 3 Step 3: Hook Up 4 Changing the Scanning Mode 6 Before Operating the System 7 Playable Disc Types 7 Display Indicators 8 Daily Operations-Playback 10 Listening to the Radio 11 Playing Back a Disc 12 Daily Operations-Sound&Other Adjustments .... 14 Adjusting the Volume 14 Adjusting the Sound 14 Presetting Automatic DVD Sound Increase Level............15 Adjusting the Audio Input Level 15 Changing the Display Brightness 15 Changing the Picture Tone 15 Setting the Clock 16 Turning Off the Power...
... This Manual 2 Getting Started 3 Step 1: Unpack 3 Step 2: Prepare the Remote Control 3 Step 3: Hook Up 4 Changing the Scanning Mode 6 Before Operating the System 7 Playable Disc Types 7 Display Indicators 8 Daily Operations-Playback 10 Listening to the Radio 11 Playing Back a Disc 12 Daily Operations-Sound&Other Adjustments .... 14 Adjusting the Volume 14 Adjusting the Sound 14 Presetting Automatic DVD Sound Increase Level............15 Adjusting the Audio Input Level 15 Changing the Display Brightness 15 Changing the Picture Tone 15 Setting the Clock 16 Turning Off the Power...

Instructions
Page 58
...; Install the System in again. Indicates that you press the button briefly and repeatedly until the moisture evaporates, unplug the AC power cord, then plug it in a location with wet hands. If they have a doubt about This System" and "Troubleshooting," but not in this occur, the System may condense on the main unit. 2 Indicates that this manual, the operations using the buttons and controls...
...; Install the System in again. Indicates that you press the button briefly and repeatedly until the moisture evaporates, unplug the AC power cord, then plug it in a location with wet hands. If they have a doubt about This System" and "Troubleshooting," but not in this occur, the System may condense on the main unit. 2 Indicates that this manual, the operations using the buttons and controls...
Instructions
Page 60
... antenna (supplied) Turn it until the best reception is obtained. To a wall outlet Plug the AC power cord only after all components before connections. Turn the power off to their manuals since the terminal names actually printed on page 6. VCR, etc. AUX DECODER TV 4 AUDIO OUT OPTICAL DIGITAL IN White Red VIDEO INPUT PR PB Y VIDEO INPUT VIDEO INPUT AV COMPU LINK Red Blue Green Yellow Audio cord (not supplied) Optical digital cord (not supplied) Component video cord (not supplied) Composite video cord (supplied) S-VIDEO cord (not supplied) AV COMPU LINK cord (not supplied...
... antenna (supplied) Turn it until the best reception is obtained. To a wall outlet Plug the AC power cord only after all components before connections. Turn the power off to their manuals since the terminal names actually printed on page 6. VCR, etc. AUX DECODER TV 4 AUDIO OUT OPTICAL DIGITAL IN White Red VIDEO INPUT PR PB Y VIDEO INPUT VIDEO INPUT AV COMPU LINK Red Blue Green Yellow Audio cord (not supplied) Optical digital cord (not supplied) Component video cord (not supplied) Composite video cord (supplied) S-VIDEO cord (not supplied) AV COMPU LINK cord (not supplied...
Instructions
Page 62
... antenna by starting playing back a disc, the TV automatically turns on and changes the input mode to the appropriate position so that you connect a progressive TV through the COMPONENT jacks, S-VIDEO jack or VIDEO (composite) jack on the rear. To use JVC's TV with vinyl, remove the vinyl to expose the tip of the System. (at the same time) PROGRE Progressive scanning. To connect digital audio DDVIGDITOAPLTOICUATL 2 Insert • If the AM loop antenna wire or speaker cords...
... antenna by starting playing back a disc, the TV automatically turns on and changes the input mode to the appropriate position so that you connect a progressive TV through the COMPONENT jacks, S-VIDEO jack or VIDEO (composite) jack on the rear. To use JVC's TV with vinyl, remove the vinyl to expose the tip of the System. (at the same time) PROGRE Progressive scanning. To connect digital audio DDVIGDITOAPLTOICUATL 2 Insert • If the AM loop antenna wire or speaker cords...
Instructions
Page 63
... "Setup Menu Operations" on the rear. If " " appears on the display and playback will generate noise and damage the speakers. • In this system can change the initial setting to the above discs, this manual, "file" and "track" are registered trademarks of Digital Theater Systems, Inc. When playing a multi-channel encoded DVD, the System properly converts these multi-channel signals into 2 channels, and emits the downmixed sound from Dolby Laboratories. IMPORTANT: Before playing a disc, make...
... "Setup Menu Operations" on the rear. If " " appears on the display and playback will generate noise and damage the speakers. • In this system can change the initial setting to the above discs, this manual, "file" and "track" are registered trademarks of Digital Theater Systems, Inc. When playing a multi-channel encoded DVD, the System properly converts these multi-channel signals into 2 channels, and emits the downmixed sound from Dolby Laboratories. IMPORTANT: Before playing a disc, make...
Instructions
Page 89
FILM: To play a video source disc. Select one of the following : DOLBY To connect an amplifier with the Dolby SURROUND: Pro Logic decoder. STILL PICTURE: To play JPEG files. 7 AUDIO Setup Menu You can select which to play MP3/WMA files. DIGITAL AUDIO OUTPUT When using the digital output on the rear, set this correctly according to the connected component. DOWN MIX When using the digital output terminal on the TV becomes dark when no operation is done for...
FILM: To play a video source disc. Select one of the following : DOLBY To connect an amplifier with the Dolby SURROUND: Pro Logic decoder. STILL PICTURE: To play JPEG files. 7 AUDIO Setup Menu You can select which to play MP3/WMA files. DIGITAL AUDIO OUTPUT When using the digital output on the rear, set this correctly according to the connected component. DOWN MIX When using the digital output terminal on the TV becomes dark when no operation is done for...
Instructions
Page 93
... discs while playing or selecting another disc. • Some DVD Audio discs prohibit downmixed output. This result from their recording processes and conditions. - This System can recognize the total of 1000 tracks and of less than 64 kbps. - Adjusting the Sound: • This function also affects the sound through the DVD OPTICAL DIGITAL OUT terminal. • When using component video cord. MP3/WMA/JPEG discs are required a longer readout time...
... discs while playing or selecting another disc. • Some DVD Audio discs prohibit downmixed output. This result from their recording processes and conditions. - This System can recognize the total of 1000 tracks and of less than 64 kbps. - Adjusting the Sound: • This function also affects the sound through the DVD OPTICAL DIGITAL OUT terminal. • When using component video cord. MP3/WMA/JPEG discs are required a longer readout time...
Instructions
Page 96
... this System plays back the left and right edges of noise. ] Antennas connections are disabled. ] The built-in clock has not yet been set. The disc sound is discontinuous. ] The disc is heard. ] Speaker connections are incorrect or loose. ] Headphones are programmed to the System. ] The FM antenna is in . Timer starts working only when the System is connected to always use (see page 19). Audio language is different from the remote control...
... this System plays back the left and right edges of noise. ] Antennas connections are disabled. ] The built-in clock has not yet been set. The disc sound is discontinuous. ] The disc is heard. ] Speaker connections are incorrect or loose. ] Headphones are programmed to the System. ] The FM antenna is in . Timer starts working only when the System is connected to always use (see page 19). Audio language is different from the remote control...
Instructions
Page 100
...AUDIO 1 SUB TITLE 2 STANDBY/ON ANGLE 3 ZOOM 4 5 VFP DISPLAY 6 3D PHONIC 7 8 DVD LEVEL 9 PROGRESSIVE PAGE + 10 0 10 SET RETURN CANCEL TOP MENU MENU ENTER SET UP ON SCREEN GROUP/TITLE SLOW + CLOCK/ TIMER SLEEP DIMMER A.STANDBY BASS/ FADE TREBLE RHYTHM AX MUTING FM/PLAY REPEAT A-B MODE REPEAT VOLUME RM-SFSS77J REMOTE CONTROL...22 Remote sensor 14 12 12, 22, 23 15 STANDBY/ ON DVD/CD FM/AM AUX # VOLUME R HYT H M A X DISC SELECT DISC1 DISC2 DISC3 DISC4 DISC5 DIMMER 3D PHONIC 5-DVD CHANGER , PLAY & EXCHANGE DIGITAL Digital Direct Progressive Scan PHONES 8...
...AUDIO 1 SUB TITLE 2 STANDBY/ON ANGLE 3 ZOOM 4 5 VFP DISPLAY 6 3D PHONIC 7 8 DVD LEVEL 9 PROGRESSIVE PAGE + 10 0 10 SET RETURN CANCEL TOP MENU MENU ENTER SET UP ON SCREEN GROUP/TITLE SLOW + CLOCK/ TIMER SLEEP DIMMER A.STANDBY BASS/ FADE TREBLE RHYTHM AX MUTING FM/PLAY REPEAT A-B MODE REPEAT VOLUME RM-SFSS77J REMOTE CONTROL...22 Remote sensor 14 12 12, 22, 23 15 STANDBY/ ON DVD/CD FM/AM AUX # VOLUME R HYT H M A X DISC SELECT DISC1 DISC2 DISC3 DISC4 DISC5 DIMMER 3D PHONIC 5-DVD CHANGER , PLAY & EXCHANGE DIGITAL Digital Direct Progressive Scan PHONES 8...


