Specifications
Page 2
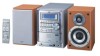
... 3-Preset Timer • 2-Way Bass-Reflex Speakers • Active Hyper-Bass PRO for one touch playback • Sleep Timer • Wake-up Volume • Electronic Bass/Treble Tone Controls • Program (32 tracks) / Random / Repeat Play * min. RMS, driven into 6 ohms, at the touch of Japan, Limited. Product Description High-power 5-CD changer system with USB input (PC Link) featuring Sound Turbo and 2-way speakers Basic Features • Sources: CD, CD-R/RW, MP3 (CD-R/RW), Tuner • Power Output...
... 3-Preset Timer • 2-Way Bass-Reflex Speakers • Active Hyper-Bass PRO for one touch playback • Sleep Timer • Wake-up Volume • Electronic Bass/Treble Tone Controls • Program (32 tracks) / Random / Repeat Play * min. RMS, driven into 6 ohms, at the touch of Japan, Limited. Product Description High-power 5-CD changer system with USB input (PC Link) featuring Sound Turbo and 2-way speakers Basic Features • Sources: CD, CD-R/RW, MP3 (CD-R/RW), Tuner • Power Output...
Instruction Manual
Page 1
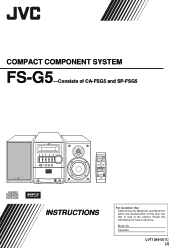
Retain this information for future reference. Serial No. and Serial No. Model No. which are located either on the rear, bottom or side of CA-FSG5 and SP-FSG5 INSTRUCTIONS For Customer Use: Enter below the Model No. LVT1349-001C [J] COMPACT COMPONENT SYSTEM FS-G5-Consists of the cabinet.
Retain this information for future reference. Serial No. and Serial No. Model No. which are located either on the rear, bottom or side of CA-FSG5 and SP-FSG5 INSTRUCTIONS For Customer Use: Enter below the Model No. LVT1349-001C [J] COMPACT COMPONENT SYSTEM FS-G5-Consists of the cabinet.

Instruction Manual
Page 2
... for a Class B digital device, pursuant to radio communications. CAUTION Changes or modifications not approved by one or more of electric shock to operate the equipment. G-1 REFER SERVICING TO QUALIFIED SERVICE PERSONNEL. Connect the equipment into an outlet on , the user is no guarantee that may cause harmful interference to part 15 of important operating and maintenance (servicing) instructions in a particular installation. Warnings, Cautions and...
... for a Class B digital device, pursuant to radio communications. CAUTION Changes or modifications not approved by one or more of electric shock to operate the equipment. G-1 REFER SERVICING TO QUALIFIED SERVICE PERSONNEL. Connect the equipment into an outlet on , the user is no guarantee that may cause harmful interference to part 15 of important operating and maintenance (servicing) instructions in a particular installation. Warnings, Cautions and...
Instruction Manual
Page 5
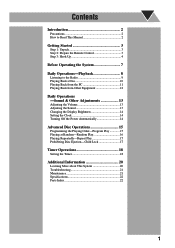
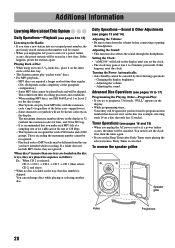
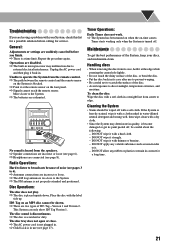
... 12 Daily Operations -Sound & Other Adjustments 13 Adjusting the Volume 13 Adjusting the Sound 13 Changing the Display Brightness 14 Setting the Clock 14 Turning Off the Power Automatically 14 Advanced Disc Operations 15 Programming the Playing Order-Program Play 15 Playing at Random-Random Play 16 Playing Repeatedly-Repeat Play 17 Prohibiting Disc Ejection-Child Lock 17 Timer Operations 18 Setting the Timer 18 Additional Information 20 Learning More about This System 20 Troubleshooting 21 Maintenance 21 Specifications 22 Parts Index...
... 12 Daily Operations -Sound & Other Adjustments 13 Adjusting the Volume 13 Adjusting the Sound 13 Changing the Display Brightness 14 Setting the Clock 14 Turning Off the Power Automatically 14 Advanced Disc Operations 15 Programming the Playing Order-Program Play 15 Playing at Random-Random Play 16 Playing Repeatedly-Repeat Play 17 Prohibiting Disc Ejection-Child Lock 17 Timer Operations 18 Setting the Timer 18 Additional Information 20 Learning More about This System 20 Troubleshooting 21 Maintenance 21 Specifications 22 Parts Index...

Instruction Manual
Page 6
... number inside the arrow indicates the period of press (in this example, 2 seconds). • If no user serviceable parts inside the System in the following carefully: • Make sure there is good ventilation around the main unit. Indicates that this operation is only possible using the remote control. DO NOT install the System in a location near heat sources, or in a place subject to direct...
... number inside the arrow indicates the period of press (in this example, 2 seconds). • If no user serviceable parts inside the System in the following carefully: • Make sure there is good ventilation around the main unit. Indicates that this operation is only possible using the remote control. DO NOT install the System in a location near heat sources, or in a place subject to direct...
Instruction Manual
Page 8
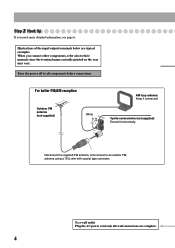
... supplied) AM loop antenna Keep it horizontally. Step 3: Hook Up If you connect other components, refer also to their manuals since the terminal names actually printed on the rear may vary. Turn the power off to an outdoor FM antenna using a 75 Ω wire with coaxial type connector. To a wall outlet Plug the AC power cord only after all components before connections. Disconnect the supplied FM antenna, and connect to all connections...
... supplied) AM loop antenna Keep it horizontally. Step 3: Hook Up If you connect other components, refer also to their manuals since the terminal names actually printed on the rear may vary. Turn the power off to an outdoor FM antenna using a 75 Ω wire with coaxial type connector. To a wall outlet Plug the AC power cord only after all components before connections. Disconnect the supplied FM antenna, and connect to all connections...

Instruction Manual
Page 11
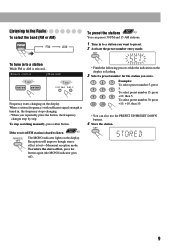
... Auto Standby activated. 9 Timer indicators • : Lights when Daily Timer stands by ; flashes while working . • SLEEP: Lights when the Sleep Timer is detected. - GR.: Repeats all the discs. - CD: Repeats the one track. - Before Operating the System The indications on the main display • While listening to radio: • While selecting USB: ST REC REC Band Frequency • While playing a CD: Source name • While selecting AUX: REC REC Track number...
... Auto Standby activated. 9 Timer indicators • : Lights when Daily Timer stands by ; flashes while working . • SLEEP: Lights when the Sleep Timer is detected. - GR.: Repeats all the discs. - CD: Repeats the one track. - Before Operating the System The indications on the main display • While listening to radio: • While selecting USB: ST REC REC Band Frequency • While playing a CD: Source name • While selecting AUX: REC REC Track number...

Instruction Manual
Page 12
... ready to the PHONES jack on the external component. 3 Adjust the volume. 4 Operate the target source as explained later. DISPLAY • Press the button again, to turn off . • Without pressing STANDBY/ON , the System turns on standby. Daily Operations-Playback Numeric buttons 4/1, 7,¡/¢ Disc selection buttons FM MODE/ MP3 1 STANDBY/ON 2 3 VOLUME 4 1 SET DISPLAY PRESET UP, PRESET DOWN 2 3 1 Turn on the System or REC start playback source on the main unit. Be sure to display the clock indication. 8 otherwise...
... ready to the PHONES jack on the external component. 3 Adjust the volume. 4 Operate the target source as explained later. DISPLAY • Press the button again, to turn off . • Without pressing STANDBY/ON , the System turns on standby. Daily Operations-Playback Numeric buttons 4/1, 7,¡/¢ Disc selection buttons FM MODE/ MP3 1 STANDBY/ON 2 3 VOLUME 4 1 SET DISPLAY PRESET UP, PRESET DOWN 2 3 1 Turn on the System or REC start playback source on the main unit. Be sure to display the clock indication. 8 otherwise...
Instruction Manual
Page 13
...-Monaural reception mode. Reception will improve though stereo effect is tuned in to a station you repeatedly press the button, the frequency changes step by step. DOWN UP Frequency starts changing on the display. Listening to the Radio To select the band (FM or AM) FM AM Remote To preset the stations ONLY You can also use the PRESET UP/PRESET DOWN buttons. 4 Store the station. To select preset number 30...
...-Monaural reception mode. Reception will improve though stereo effect is tuned in to a station you repeatedly press the button, the frequency changes step by step. DOWN UP Frequency starts changing on the display. Listening to the Radio To select the band (FM or AM) FM AM Remote To preset the stations ONLY You can also use the PRESET UP/PRESET DOWN buttons. 4 Store the station. To select preset number 30...
Instruction Manual
Page 14
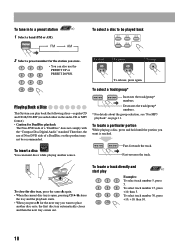
... is open, pressing CD 6 closes the tray and the playback starts. • When you press 0 for the station you store. 1 2 3 4 5 6 • You can insert discs while playing another disc onto, the first disc tray automatically closes and then the next tray comes out. Main Unit To insert a disc ONLY You can also use of Non-DVD side of a "DualDisc" does not comply with the "Compact Disc Digital Audio...
... is open, pressing CD 6 closes the tray and the playback starts. • When you press 0 for the station you store. 1 2 3 4 5 6 • You can insert discs while playing another disc onto, the first disc tray automatically closes and then the next tray comes out. Main Unit To insert a disc ONLY You can also use of Non-DVD side of a "DualDisc" does not comply with the "Compact Disc Digital Audio...
Instruction Manual
Page 15
... using a USB cable (not supplied). (front panel) PC USB cable MP3 groups/tracks configuration This System plays back MP3 tracks as follows: FM MODE/ MP3 TRACK GROUP TRACK: GROUP: 4/1, ¡/¢, and number buttons work for the track selection of the MP3 discs. 4/1, ¡/¢, and number buttons work for the group selection or the track selection. Playing Back from the PC This System is running . 2 Select USB as the source. 3 Set...
... using a USB cable (not supplied). (front panel) PC USB cable MP3 groups/tracks configuration This System plays back MP3 tracks as follows: FM MODE/ MP3 TRACK GROUP TRACK: GROUP: 4/1, ¡/¢, and number buttons work for the track selection of the MP3 discs. 4/1, ¡/¢, and number buttons work for the group selection or the track selection. Playing Back from the PC This System is running . 2 Select USB as the source. 3 Set...

Instruction Manual
Page 16
... sounds on the other equipment. Playing Back from PC. Refer to the manuals supplied with analog audio output jacks such as an MD player, or a TV, etc. Refer to the corresponding plug of the audio output. If the audio output on the PC Press USB, then start playback from other equipment To connect other equipment By using an stereo mini plug cord (not supplied), you can connect equipment with the other equipment. Stereo mini plug cord (not supplied) AUX...
... sounds on the other equipment. Playing Back from PC. Refer to the manuals supplied with analog audio output jacks such as an MD player, or a TV, etc. Refer to the corresponding plug of the audio output. If the audio output on the PC Press USB, then start playback from other equipment To connect other equipment By using an stereo mini plug cord (not supplied), you can connect equipment with the other equipment. Stereo mini plug cord (not supplied) AUX...
Instruction Manual
Page 18
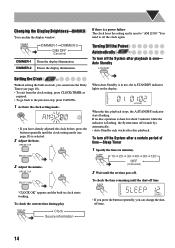
.... 1 Activate the clock setting mode. You need to "AM 12:00." PRESET UP SET PRESET DOWN When Auto Standby is in clock starts working. REC A.STANDBY When the disc playback stops, the A.STANDBY indicator starts flashing. SLEEP 10 20 30 60 90 120 OFF (Canceled) 2 Wait until the shut-off time SLEEP REC "CLOCK OK" appears and the built-in use the Daily Timer (see page 18) is over- Changing the Display Brightness...
.... 1 Activate the clock setting mode. You need to "AM 12:00." PRESET UP SET PRESET DOWN When Auto Standby is in clock starts working. REC A.STANDBY When the disc playback stops, the A.STANDBY indicator starts flashing. SLEEP 10 20 30 60 90 120 OFF (Canceled) 2 Wait until the shut-off time SLEEP REC "CLOCK OK" appears and the built-in use the Daily Timer (see page 18) is over- Changing the Display Brightness...
Instruction Manual
Page 19
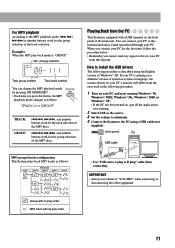
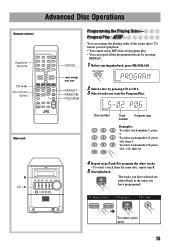
... select a track from the same disc, repeat step 3. 5 Start playback. PROGRAM REC PRGM 2 Select a disc by pressing REPEAT. 1 Before starting playback, press PROGRAM. The tracks you have programmed. Remote control Numeric buttons CD 6 Disc selection buttons Main unit 7 CD 1 0 Advanced Disc Operations CANCEL 4/1,7, ¡/¢ REPEAT RANDOM PROGRAM Programming the Playing Order- REC PRGM Disc number Track number Program step Examples: 1 2 3 To select track number 5, press 5. 4 5 6 To select track number 15, press +10, then 5. 7 8 9 To...
... select a track from the same disc, repeat step 3. 5 Start playback. PROGRAM REC PRGM 2 Select a disc by pressing REPEAT. 1 Before starting playback, press PROGRAM. The tracks you have programmed. Remote control Numeric buttons CD 6 Disc selection buttons Main unit 7 CD 1 0 Advanced Disc Operations CANCEL 4/1,7, ¡/¢ REPEAT RANDOM PROGRAM Programming the Playing Order- REC PRGM Disc number Track number Program step Examples: 1 2 3 To select track number 5, press 5. 4 5 6 To select track number 15, press +10, then 5. 7 8 9 To...
Instruction Manual
Page 22
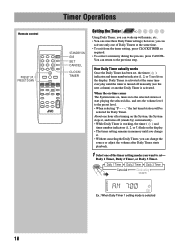
You can store three Daily Timer settings; Daily Timer is working, the timer ( ) and timer number indicators (1, 2, or 3) flash on the display. About one hour after Daily Timer starts playback. 1 Select one of the timer setting modes you can change it , and turns off manually (see page 14) REC 1 Ex.: When Daily Timer 1 setting mode is activated. Remote control PRESET UP, PRESET DOWN Timer Operations STANDBY/ON SET CANCEL CLOCK/ TIMER Setting the Timer Remote ONLY Using Daily Timer, you can wake up with music, etc. • You...
You can store three Daily Timer settings; Daily Timer is working, the timer ( ) and timer number indicators (1, 2, or 3) flash on the display. About one hour after Daily Timer starts playback. 1 Select one of the timer setting modes you can change it , and turns off manually (see page 14) REC 1 Ex.: When Daily Timer 1 setting mode is activated. Remote control PRESET UP, PRESET DOWN Timer Operations STANDBY/ON SET CANCEL CLOCK/ TIMER Setting the Timer Remote ONLY Using Daily Timer, you can wake up with music, etc. • You...

Instruction Manual
Page 23
... 3 Timer CLOCK /TIMER Canceled Clock setting (see page 14) 2 Turn off the System (on standby) if you have set the timer with the System turned on the Timer again, repeat the above steps and press in step 2... When selecting CD: Select a disc by pressing PRESET UP or PRESET DOWN, then press SET. PRESET UP SET PRESET DOWN 2 Select the playback source-"TUNER FM," "TUNER AM," "CD," or "AUX IN." SET The number indicator corresponding to the Daily Timer lights. 19 2 Make...
... 3 Timer CLOCK /TIMER Canceled Clock setting (see page 14) 2 Turn off the System (on standby) if you have set the timer with the System turned on the Timer again, repeat the above steps and press in step 2... When selecting CD: Select a disc by pressing PRESET UP or PRESET DOWN, then press SET. PRESET UP SET PRESET DOWN 2 Select the playback source-"TUNER FM," "TUNER AM," "CD," or "AUX IN." SET The number indicator corresponding to the Daily Timer lights. 19 2 Make...
Instruction Manual
Page 24
..., preset the stations again. Timer Operations (see pages 18 and 19) • When you unplug the AC power cord or if a power failure occurs, the timer will be erased in a few days. To remove the speaker grilles Speaker grille Holes Projections 20 MP3 discs are required a longer readout time than one you set the Sleep Timer after Daily Timer starts playing the selected source, Daily Timer is skipped. When making MP3 discs, use...
..., preset the stations again. Timer Operations (see pages 18 and 19) • When you unplug the AC power cord or if a power failure occurs, the timer will be erased in a few days. To remove the speaker grilles Speaker grille Holes Projections 20 MP3 discs are required a longer readout time than one you set the Sleep Timer after Daily Timer starts playing the selected source, Daily Timer is skipped. When making MP3 discs, use...
Instruction Manual
Page 25
... service. General: Adjustments or settings are exhausted. Unable to direct sunlight, temperature extremes, and moisture. Timer starts working only when the System is turned off , be careful about the following: - DO NOT wipe it at the edge while pressing the center hole lightly. • Do not touch the shiny surface of the disc. • Avoid exposure to operate the System from its case after use...
... service. General: Adjustments or settings are exhausted. Unable to direct sunlight, temperature extremes, and moisture. Timer starts working only when the System is turned off , be careful about the following: - DO NOT wipe it at the edge while pressing the center hole lightly. • Do not touch the shiny surface of the disc. • Avoid exposure to operate the System from its case after use...
Instruction Manual
Page 26
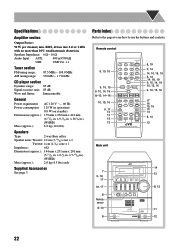
... CD 1 CD 2 CD 3 REPEAT CD 4 CD 5 PROGRAM RANDOM FM MODE/ MP3 FADE MUTING SLEEP A.STANDBY DIMMER SOUND BASS/ TURBO AHB PRO TREBLE VOLUME RM-SFSG5J REMOTE CONTROL 17 16 15, 16 13 14 8, 13 13 Main unit 7 9, 10, 17 10, 17 8 Remote sensor 8-10 8 DOWN UP DIMMER SOUND TURBO VOLUME CD CD CD CD CD 1 2 3 4 5 0 0 0 0 0 STANDBY CD FM/AM USB/AUX 14 13 8, 13 5-CD 5-CD CHANGER, PLAY&EXCHANGE PHONES USB AUDIO AUX 11 12 22 x 7-15/16 in . Speakers Impedance: 6 Ω - 16 Ω Audio Input AUX...
... CD 1 CD 2 CD 3 REPEAT CD 4 CD 5 PROGRAM RANDOM FM MODE/ MP3 FADE MUTING SLEEP A.STANDBY DIMMER SOUND BASS/ TURBO AHB PRO TREBLE VOLUME RM-SFSG5J REMOTE CONTROL 17 16 15, 16 13 14 8, 13 13 Main unit 7 9, 10, 17 10, 17 8 Remote sensor 8-10 8 DOWN UP DIMMER SOUND TURBO VOLUME CD CD CD CD CD 1 2 3 4 5 0 0 0 0 0 STANDBY CD FM/AM USB/AUX 14 13 8, 13 5-CD 5-CD CHANGER, PLAY&EXCHANGE PHONES USB AUDIO AUX 11 12 22 x 7-15/16 in . Speakers Impedance: 6 Ω - 16 Ω Audio Input AUX...
Instruction Manual
Page 29
EN © 2005 Victor Company of Japan, Limited 0105MWMMDWBET FS-G5 COMPACT COMPONENT SYSTEM
EN © 2005 Victor Company of Japan, Limited 0105MWMMDWBET FS-G5 COMPACT COMPONENT SYSTEM


