

Instructions
Page 1
English COMPACT COMPONENT SYSTEM EX-A10 Consists of the cabinet. Retain this information for future reference. LVT1403-002B [J, C, UJ] Serial No. which are located either on the rear, bottom or side of RX-EXA10, SP-EXA10 and XV-EXA10 INSTRUCTIONS For Customer Use: Enter below the Model No. Model No. and Serial No.
English COMPACT COMPONENT SYSTEM EX-A10 Consists of the cabinet. Retain this information for future reference. LVT1403-002B [J, C, UJ] Serial No. which are located either on the rear, bottom or side of RX-EXA10, SP-EXA10 and XV-EXA10 INSTRUCTIONS For Customer Use: Enter below the Model No. Model No. and Serial No.
Instructions
Page 2
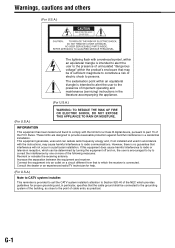
... can radiate radio frequency energy and, if not installed and used in accordance with the instructions, may be determined by one or more of the following measures: Reorient or relocate the receiving antenna. Increase the separation ...
... can radiate radio frequency energy and, if not installed and used in accordance with the instructions, may be determined by one or more of the following measures: Reorient or relocate the receiving antenna. Increase the separation ...
Instructions
Page 6
... 18 Selecting a radio station 18 Tuning in to a preset radio station 19 Playing back DVDs/CDs Basic operations of the DVD player 20 Playing back a DVD/CD 20 Changing the display in the display window ......23 Selecting a chapter/track using the number buttons 23 Stopping playback 23 Pausing playback 24 Advancing the picture frame...
... 18 Selecting a radio station 18 Tuning in to a preset radio station 19 Playing back DVDs/CDs Basic operations of the DVD player 20 Playing back a DVD/CD 20 Changing the display in the display window ......23 Selecting a chapter/track using the number buttons 23 Stopping playback 23 Pausing playback 24 Advancing the picture frame...
Instructions
Page 7
...other audio equipment 41 Timer Timer 42 Using the sleep timer 42 Using the playback timer 43 Reference Using the AV COMPU LINK function 45 Connection and setup 45 Operation 45 Special cautions 46 Notes on handling 46 About DVDs/CDs 47 Playable DVD/CD types 47 Disc structure 49 ... in parentheses is not supplied for the purpose of explanation. • You can use the remote control. CAUTION • Do not fold the optical digital cord as those on the receiver or the DVD player are simplified or exaggerated for U.S.A. You can operate some functions differently from the...
...other audio equipment 41 Timer Timer 42 Using the sleep timer 42 Using the playback timer 43 Reference Using the AV COMPU LINK function 45 Connection and setup 45 Operation 45 Special cautions 46 Notes on handling 46 About DVDs/CDs 47 Playable DVD/CD types 47 Disc structure 49 ... in parentheses is not supplied for the purpose of explanation. • You can use the remote control. CAUTION • Do not fold the optical digital cord as those on the receiver or the DVD player are simplified or exaggerated for U.S.A. You can operate some functions differently from the...
Instructions
Page 8
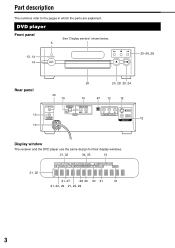
Part description The numbers refer to the pages in which the parts are explained. DVD player Front panel See "Display window" shown below. 5 13, 14 14 23-26, 28 Rear panel 10 13 45 10 20 20, 28 20, 24 10 47 12 12 12 Display window The receiver and the DVD player use the same design for their display windows. 21, 22 34, 35 13 21, 22 21, 27 28 30 30 31 31 21, 22, 29 21, 22, 29 3
Part description The numbers refer to the pages in which the parts are explained. DVD player Front panel See "Display window" shown below. 5 13, 14 14 23-26, 28 Rear panel 10 13 45 10 20 20, 28 20, 24 10 47 12 12 12 Display window The receiver and the DVD player use the same design for their display windows. 21, 22 34, 35 13 21, 22 21, 27 28 30 30 31 31 21, 22, 29 21, 22, 29 3
Instructions
Page 9
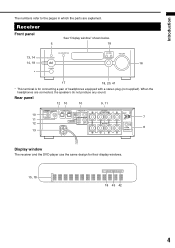
Receiver Front panel See "Display window" shown below. 5 18 13, 14 14, 18 16 * 17 18, 20, 41 * This terminal is for their display windows. 15, 18 18 43 42 4 When the headphones are explained. Rear panel 12 10 10 9, 11 10 7 11 12 8 13 Display window The receiver and the DVD player use the same design for connecting a pair of headphones equipped with a stereo plug (not supplied). Introduction The numbers refer to the pages in which the parts are connected, the speakers do not produce any sound.
Receiver Front panel See "Display window" shown below. 5 18 13, 14 14, 18 16 * 17 18, 20, 41 * This terminal is for their display windows. 15, 18 18 43 42 4 When the headphones are explained. Rear panel 12 10 10 9, 11 10 7 11 12 8 13 Display window The receiver and the DVD player use the same design for connecting a pair of headphones equipped with a stereo plug (not supplied). Introduction The numbers refer to the pages in which the parts are connected, the speakers do not produce any sound.
Instructions
Page 10
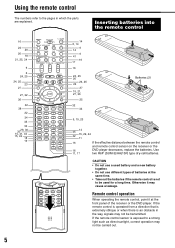
CAUTION • Do not use a used battery and a new battery together. • Do not use different types of the receiver or the DVD player. Otherwise it at the front panel of batteries at the same time. • Take out the batteries if the remote control is exposed to a ... 15, 29, 44 11 16 16 11, 17 If the effective distance between the remote control and remote control sensor on the receiver or the DVD player decreases, replace the batteries. If the remote control is operated from a direction that is extremely oblique or when there is an obstacle in which...
CAUTION • Do not use a used battery and a new battery together. • Do not use different types of the receiver or the DVD player. Otherwise it at the front panel of batteries at the same time. • Take out the batteries if the remote control is exposed to a ... 15, 29, 44 11 16 16 11, 17 If the effective distance between the remote control and remote control sensor on the receiver or the DVD player decreases, replace the batteries. If the remote control is operated from a direction that is extremely oblique or when there is an obstacle in which...
Instructions
Page 11
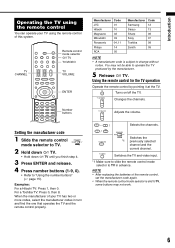
... remote control You can operate your TV has two or more codes, select the manufacturer codes in advance. When the manufacturer of your TV using the remote control of the remote control, set the manufacturer code again. • When the remote control mode selector is subject to TV in ...turn and find the one that operates the TV and the remote control properly. Manufacturer Code JVC 01 Hitachi 10 Magnavox 02 Mitsubishi 03 Panasonic 04, 11 Philips 14 RCA 05 Manufacturer Samsung Sanyo Sharp Sony Toshiba Zenith Code 12 13 06...
... remote control You can operate your TV has two or more codes, select the manufacturer codes in advance. When the manufacturer of your TV using the remote control of the remote control, set the manufacturer code again. • When the remote control mode selector is subject to TV in ...turn and find the one that operates the TV and the remote control properly. Manufacturer Code JVC 01 Hitachi 10 Magnavox 02 Mitsubishi 03 Panasonic 04, 11 Philips 14 RCA 05 Manufacturer Samsung Sanyo Sharp Sony Toshiba Zenith Code 12 13 06...
Instructions
Page 13
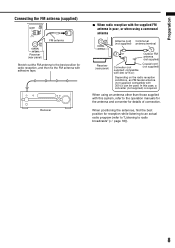
... antenna other than those supplied with this case, a converter (not supplied) is poor, or when using a communal antenna Antenna cord Communal (not supplied) antenna terminal Receiver (rear panel) or Outdoor FM antenna (not supplied) Converter (not supplied: compatible with 300 C/75 C) ... radio broadcasts" (A page 18)). 8 When positioning the antennas, find the best position for radio reception, and then fix the FM antenna with 300 C) can be used.
... antenna other than those supplied with this case, a converter (not supplied) is poor, or when using a communal antenna Antenna cord Communal (not supplied) antenna terminal Receiver (rear panel) or Outdoor FM antenna (not supplied) Converter (not supplied: compatible with 300 C/75 C) ... radio broadcasts" (A page 18)). 8 When positioning the antennas, find the best position for radio reception, and then fix the FM antenna with 300 C) can be used.

Instructions
Page 16
..., hold down BASS ADJUST for 2 or more seconds once again to the SPEAKERS WOOFER LEFT and RIGHT terminals on the receiver. Each time you can use the audio cord.) Amplifier-built-in subwoofer (not supplied) Receiver (rear panel) NOTE • The impedance of the subwoofer for details.
..., hold down BASS ADJUST for 2 or more seconds once again to the SPEAKERS WOOFER LEFT and RIGHT terminals on the receiver. Each time you can use the audio cord.) Amplifier-built-in subwoofer (not supplied) Receiver (rear panel) NOTE • The impedance of the subwoofer for details.
Instructions
Page 20
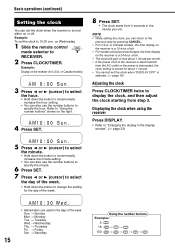
... Press 2 or 3 (cursor) to select the minute. • Hold down the button to incrementally increase the minute setting. • You can also use the number buttons to specify the minute. 6 Press SET. 7 Press 2 or 3 (cursor) to select the day of the week. AM • Abbreviations are...8594; Tuesday Wed.→ Wednesday Thu. → Thursday Fri. → Friday Sat. → Saturday 15 Using the number buttons Examples: 5: 15: → → 150 Displaying the clock when using the receiver Press DISPLAY. • Refer to "Changing the display in the minute you can return to change ...
... Press 2 or 3 (cursor) to select the minute. • Hold down the button to incrementally increase the minute setting. • You can also use the number buttons to specify the minute. 6 Press SET. 7 Press 2 or 3 (cursor) to select the day of the week. AM • Abbreviations are...8594; Tuesday Wed.→ Wednesday Thu. → Thursday Fri. → Friday Sat. → Saturday 15 Using the number buttons Examples: 5: 15: → → 150 Displaying the clock when using the receiver Press DISPLAY. • Refer to "Changing the display in the minute you can return to change ...
Instructions
Page 23
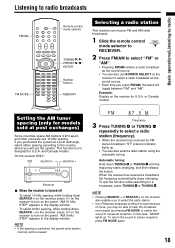
..." (stereo) indicator lights up . SEARCH + Receiver 7 When the receiver is difficult to hear because of noise, you press FM/AM, the band will use 10 kHz spacing. Automatic tuning: Hold down SEARCH + on the receiver, press F on the receiver to turn on the receiver to select a radio broadcast ...select "FM" or "AM". • Pressing FM/AM selects a radio broadcast as the sound source. • You can also select a radio station using the automatic tuning. Example: Display on the receiver to the country where you will toggle between "FM" and "AM". and Canada models. To quit ...
..." (stereo) indicator lights up . SEARCH + Receiver 7 When the receiver is difficult to hear because of noise, you press FM/AM, the band will use 10 kHz spacing. Automatic tuning: Hold down SEARCH + on the receiver, press F on the receiver to turn on the receiver to select a radio broadcast ...select "FM" or "AM". • Pressing FM/AM selects a radio broadcast as the sound source. • You can also select a radio station using the automatic tuning. Example: Display on the receiver to the country where you will toggle between "FM" and "AM". and Canada models. To quit ...
Instructions
Page 24
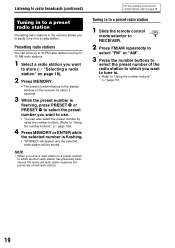
...radio broadcasts (continued) Tuning in to a preset radio station Presetting radio stations in the receiver allows you to easily tune in . • Refer to "Using the number buttons" (A page 15). 19 NOTE • When you store a radio station to a preset number to which you want to tune in to...Press FM/AM repeatedly to select "FM" or "AM". 3 Press the number buttons to select the preset number of the remote control buttons, refer to "Using the number buttons". (A page 15)) 4 Press MEMORY or ENTER while the selected number is flashing. • "STORED" will appear and the selected radio ...
...radio broadcasts (continued) Tuning in to a preset radio station Presetting radio stations in the receiver allows you to easily tune in . • Refer to "Using the number buttons" (A page 15). 19 NOTE • When you store a radio station to a preset number to which you want to tune in to...Press FM/AM repeatedly to select "FM" or "AM". 3 Press the number buttons to select the preset number of the remote control buttons, refer to "Using the number buttons". (A page 15)) 4 Press MEMORY or ENTER while the selected number is flashing. • "STORED" will appear and the selected radio ...
Instructions
Page 25
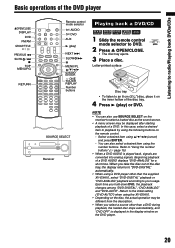
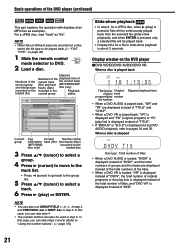
...be displayed after starting playback of the DVD player Playing back DVDs/CDs 0OPEN/CLOSE DISPLAY DVD FM/AM GROUP/TITLE / PREVIOUS 4 SLOW /1 7 TOP MENU/PG RETURN Remote control mode selector F AUDIO F DVD AUX 3 (play ) or DVD. You can also use SOURCE SELECT on the inner hollow of... Playing back a DVD/CD 1 Slide the remote control mode selector to "DVD-DIGITAL" automatically. • When using a DVD player other than the supplied XV-EXA10, select "DVD-DIGITAL" playback or "DVD-ANALOG" playback according to "Using the number buttons" (A page 15). • When a DVD AUDIO is displayed...
...be displayed after starting playback of the DVD player Playing back DVDs/CDs 0OPEN/CLOSE DISPLAY DVD FM/AM GROUP/TITLE / PREVIOUS 4 SLOW /1 7 TOP MENU/PG RETURN Remote control mode selector F AUDIO F DVD AUX 3 (play ) or DVD. You can also use SOURCE SELECT on the inner hollow of... Playing back a DVD/CD 1 Slide the remote control mode selector to "DVD-DIGITAL" automatically. • When using a DVD player other than the supplied XV-EXA10, select "DVD-DIGITAL" playback or "DVD-ANALOG" playback according to "Using the number buttons" (A page 15). • When a DVD AUDIO is displayed...
Instructions
Page 26
... • The number buttons can also use GROUP/TITLE or in step 3 and PREVIOUS 4 or NEXT ¢ in step 5. is displayed during DVD AUDIO playback, refer to select a track. 6 Press 3 (play lists is displayed instead of the total number of titles, and "DVD VR" is displayed instead of titles •...CHAP". • When a DVD VR is played back, "VR" is displayed and "PG" (original program) or "PL" (play ) is pressed, files will be continuously played back from the selected file (slide-show playback), and when ENTER is pressed, only a selected file will be used in slide-show playback is...
... • The number buttons can also use GROUP/TITLE or in step 3 and PREVIOUS 4 or NEXT ¢ in step 5. is displayed during DVD AUDIO playback, refer to select a track. 6 Press 3 (play lists is displayed instead of the total number of titles, and "DVD VR" is displayed instead of titles •...CHAP". • When a DVD VR is played back, "VR" is displayed and "PG" (original program) or "PL" (play ) is pressed, files will be continuously played back from the selected file (slide-show playback), and when ENTER is pressed, only a selected file will be used in slide-show playback is...
Instructions
Page 27
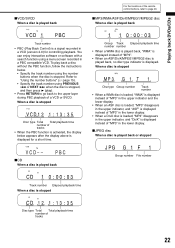
... Disc type Total Total playback time number of tracks • When the PBC function is activated, the display below . • Specify the track number using PREVIOUS 4 or NEXT ¢ when the disc is stopped, and then press 3 (play back a disc without the PBC function, follow the instructions ...the track number using the number buttons when the disc is stopped. Refer to page 20. ■MP3/WMA/ASF/DivX/MPEG1/MPEG2 disc When a disc is played back Track number • PBC (Play Back Control) is a signal recorded in a VCD (version 2.0) for a short time. Playing back DVDs/CDs ■...
... Disc type Total Total playback time number of tracks • When the PBC function is activated, the display below . • Specify the track number using PREVIOUS 4 or NEXT ¢ when the disc is stopped, and then press 3 (play back a disc without the PBC function, follow the instructions ...the track number using the number buttons when the disc is stopped. Refer to page 20. ■MP3/WMA/ASF/DivX/MPEG1/MPEG2 disc When a disc is played back Track number • PBC (Play Back Control) is a signal recorded in a VCD (version 2.0) for a short time. Playing back DVDs/CDs ■...
Instructions
Page 28
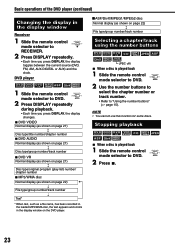
...display window on the DVD player. 23 Stopping playback 7 When a disc is played back 1 Slide the remote control mode selector to DVD. 2 Use the number buttons to select the chapter number or track number. • Refer to "Using the number buttons" (A page 15). DVD player 1 Slide the... remote control mode selector to DVD. 2 Press DISPLAY repeatedly during playback. • Each ...
...display window on the DVD player. 23 Stopping playback 7 When a disc is played back 1 Slide the remote control mode selector to DVD. 2 Use the number buttons to select the chapter number or track number. • Refer to "Using the number buttons" (A page 15). DVD player 1 Slide the... remote control mode selector to DVD. 2 Press DISPLAY repeatedly during playback. • Each ...
Instructions
Page 29
... Each time you press the button, the speed increases. Appears when the Region Code of the DVD does not match the code the DVD player supports. (A page 47) Appears when no sound will be used only while the button is reading the disc information. Appears when the disc tray is loaded. Appears... when an unplayable disc is played back 1 Slide the remote control mode selector to DVD. Fast reverse/fast forward search 7 When a disc is...
... Each time you press the button, the speed increases. Appears when the Region Code of the DVD does not match the code the DVD player supports. (A page 47) Appears when no sound will be used only while the button is reading the disc information. Appears when the disc tray is loaded. Appears... when an unplayable disc is played back 1 Slide the remote control mode selector to DVD. Fast reverse/fast forward search 7 When a disc is...
Instructions
Page 30
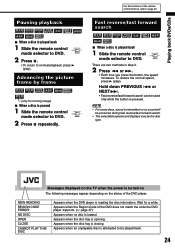
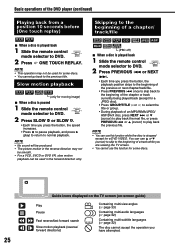
... ONE TOUCH REPLAY. NOTE • No sound will be produced. • The picture motion in the reverse direction may not be used for a DVD VIDEO. Basic operations of the DVD player (continued) Playing back from a position 10 seconds before (One touch replay) Skipping to the beginning of a chapter/ track/file... 3 (play back the previous file. NOTE • This operation may not be smooth. • For a VCD, SVCD or DVD VR, slow motion playback can be used in the forward direction only. (PBC off) 7 When a disc is stopped except for some discs. Guide icons displayed on the TV...
... ONE TOUCH REPLAY. NOTE • No sound will be produced. • The picture motion in the reverse direction may not be used for a DVD VIDEO. Basic operations of the DVD player (continued) Playing back from a position 10 seconds before (One touch replay) Skipping to the beginning of a chapter/ track/file... 3 (play back the previous file. NOTE • This operation may not be smooth. • For a VCD, SVCD or DVD VR, slow motion playback can be used in the forward direction only. (PBC off) 7 When a disc is stopped except for some discs. Guide icons displayed on the TV...
Instructions
Page 31
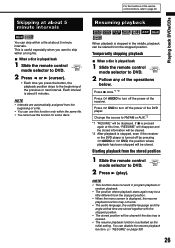
... subtitle language and the angle at that time are automatically assigned from the stopped position. Press F DVD to the beginning of the previous or next interval. This is useful especially when you press the button, the playback position skips to turn off the power of the ... to page 20. Skipping at about 5 minute intervals For the locations of the remote control buttons, refer to DVD. 2 Follow any of the operations below. Resuming playback Playing back DVDs/CDs You can use this function only within a long file. 7 When a disc is activated as the initial setting. Press 7 ...
... subtitle language and the angle at that time are automatically assigned from the stopped position. Press F DVD to the beginning of the previous or next interval. This is useful especially when you press the button, the playback position skips to turn off the power of the ... to page 20. Skipping at about 5 minute intervals For the locations of the remote control buttons, refer to DVD. 2 Follow any of the operations below. Resuming playback Playing back DVDs/CDs You can use this function only within a long file. 7 When a disc is activated as the initial setting. Press 7 ...


