
Instructions
Page 6
... Introduction Supplied accessories 2 Part description 3 DVD player 3 Receiver 4 Using the remote control 5 Inserting batteries into the remote control .......... 5 Operating the TV using the remote control......... 6 Preparation Connections 7 Standard setup 7 Connecting the antennas 7 Connecting the speakers 9 Connecting the receiver and the DVD player ... 10 Connecting other equipment 11 Connecting a TV 12 Connecting the power cords 13 Basic operations Basic operations 14 Turning on/off the system 14 Setting the clock 15 Dimmer 16 Adjusting the volume 16 Turning off the sound...
... Introduction Supplied accessories 2 Part description 3 DVD player 3 Receiver 4 Using the remote control 5 Inserting batteries into the remote control .......... 5 Operating the TV using the remote control......... 6 Preparation Connections 7 Standard setup 7 Connecting the antennas 7 Connecting the speakers 9 Connecting the receiver and the DVD player ... 10 Connecting other equipment 11 Connecting a TV 12 Connecting the power cords 13 Basic operations Basic operations 14 Turning on/off the system 14 Setting the clock 15 Dimmer 16 Adjusting the volume 16 Turning off the sound...
Instructions
Page 7
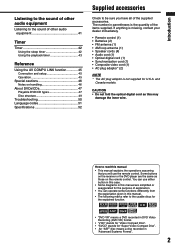
... use the remote control. Introduction Listening to the sound of other audio equipment Listening to the sound of other audio equipment 41 Timer Timer 42 Using the sleep timer 42 Using the playback timer 43 Reference Using the AV COMPU LINK function 45 Connection and setup 45 Operation 45 Special cautions 46 Notes on handling 46 About DVDs/CDs 47 Playable DVD/CD types 47 Disc structure 49 Troubleshooting 50 Language codes 51 Specifications 52 Introduction Supplied...
... use the remote control. Introduction Listening to the sound of other audio equipment Listening to the sound of other audio equipment 41 Timer Timer 42 Using the sleep timer 42 Using the playback timer 43 Reference Using the AV COMPU LINK function 45 Connection and setup 45 Operation 45 Special cautions 46 Notes on handling 46 About DVDs/CDs 47 Playable DVD/CD types 47 Disc structure 49 Troubleshooting 50 Language codes 51 Specifications 52 Introduction Supplied...
Instructions
Page 12
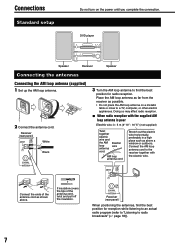
...; Do not place the AM loop antenna on the power until you complete the connection. If insulation covers the tips of the antenna cord as shown above a window or outdoors. Connections Standard setup Preparation Do not turn on a metallic table or close to a TV, computer, or other electric appliances. DVD player Speaker Receiver Speaker Connecting the antennas Connecting the AM loop antenna (supplied) 1 Set up the AM loop antenna. 2 Connect the antenna cord.
...; Do not place the AM loop antenna on the power until you complete the connection. If insulation covers the tips of the antenna cord as shown above a window or outdoors. Connections Standard setup Preparation Do not turn on a metallic table or close to a TV, computer, or other electric appliances. DVD player Speaker Receiver Speaker Connecting the antennas Connecting the AM loop antenna (supplied) 1 Set up the AM loop antenna. 2 Connect the antenna cord.
Instructions
Page 14
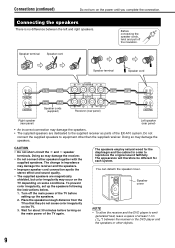
..., set up the speakers. 2. Doing so may damage the speakers. Turn off the insulation. The change in order to emit generated heat, leave a space of the EX-A10 system. Speaker cover NOTE • To allow the receiver and the DVD player to reproduce the original sound faithfully. Connecting the speakers There is no difference between the receiver or the DVD player and the speakers or other objects. 9 Before connecting the speaker cords...
..., set up the speakers. 2. Doing so may damage the speakers. Turn off the insulation. The change in order to emit generated heat, leave a space of the EX-A10 system. Speaker cover NOTE • To allow the receiver and the DVD player to reproduce the original sound faithfully. Connecting the speakers There is no difference between the receiver or the DVD player and the speakers or other objects. 9 Before connecting the speaker cords...
Instructions
Page 17
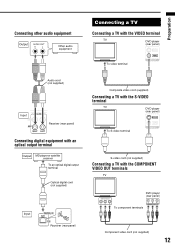
... TV DVD player (rear panel) To video terminal Audio cord (not supplied) Input Receiver (rear panel) Connecting digital equipment with an optical output terminal Output MD player or satellite receiver To an optical digital output terminal Optical digital cord (not supplied) Input Receiver (rear panel) Composite video cord (supplied) Connecting a TV with the S-VIDEO terminal TV DVD player (rear panel) To S-video terminal S-video cord (not supplied) Connecting a TV with the COMPONENT VIDEO OUT terminals TV DVD player (rear panel) To component terminals Component video cord (not...
... TV DVD player (rear panel) To video terminal Audio cord (not supplied) Input Receiver (rear panel) Connecting digital equipment with an optical output terminal Output MD player or satellite receiver To an optical digital output terminal Optical digital cord (not supplied) Input Receiver (rear panel) Composite video cord (supplied) Connecting a TV with the S-VIDEO terminal TV DVD player (rear panel) To S-video terminal S-video cord (not supplied) Connecting a TV with the COMPONENT VIDEO OUT terminals TV DVD player (rear panel) To component terminals Component video cord (not...
Instructions
Page 18
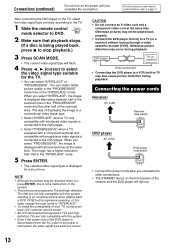
... a component terminal and compatible with progressive video signals is displayed with progressive scanning. Connecting the power cords Receiver AC outlet Receiver (rear panel) DVD player AC outlet DVD player (rear panel) • Connect the power cords after you select "PROGRESSIVE", the image is connected to stop playback.) 3 Press SCAN MODE. • The current video signal type will light up. 13 CAUTION • Do not connect an S-video cord and a component video cord at the same time. For the locations of the system...
... a component terminal and compatible with progressive video signals is displayed with progressive scanning. Connecting the power cords Receiver AC outlet Receiver (rear panel) DVD player AC outlet DVD player (rear panel) • Connect the power cords after you select "PROGRESSIVE", the image is connected to stop playback.) 3 Press SCAN MODE. • The current video signal type will light up. 13 CAUTION • Do not connect an S-video cord and a component video cord at the same time. For the locations of the system...
Instructions
Page 21
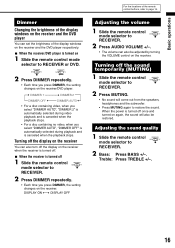
... the receiver and the DVD player You can also turn off the display on the receiver when the receiver is turned off. 7 When the receiver is canceled when the playback stops. DISPLAY ON DISPLAY OFF Adjusting the volume 1 Slide the remote control mode selector to RECEIVER or DVD. 2 Press DIMMER repeatedly. • Each time you press DIMMER, the setting changes on again, the sound will come out from the speakers, headphones and the subwoofer...
... the receiver and the DVD player You can also turn off the display on the receiver when the receiver is turned off. 7 When the receiver is canceled when the playback stops. DISPLAY ON DISPLAY OFF Adjusting the volume 1 Slide the remote control mode selector to RECEIVER or DVD. 2 Press DIMMER repeatedly. • Each time you press DIMMER, the setting changes on again, the sound will come out from the speakers, headphones and the subwoofer...
Instructions
Page 23
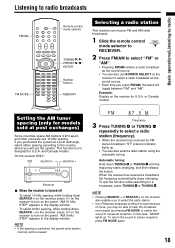
... stops changing. Basic operations/Listening to radio Listening to radio broadcasts Listening to radio FM/AM FM MODE Remote control mode selector TUNING / / PRESET / / ENTER Number buttons MEMORY Selecting a radio station This receiver can receive FM and AM radio broadcasts. 1 Slide the remote control mode selector to RECEIVER. 2 Press FM/AM to select "FM" or "AM". • Pressing FM/AM selects a radio broadcast as the sound source. • Each time you will use the system. Example: Display on the power...
... stops changing. Basic operations/Listening to radio Listening to radio broadcasts Listening to radio FM/AM FM MODE Remote control mode selector TUNING / / PRESET / / ENTER Number buttons MEMORY Selecting a radio station This receiver can receive FM and AM radio broadcasts. 1 Slide the remote control mode selector to RECEIVER. 2 Press FM/AM to select "FM" or "AM". • Pressing FM/AM selects a radio broadcast as the sound source. • Each time you will use the system. Example: Display on the power...
Instructions
Page 25
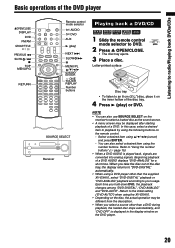
Listening to radio/Playing back DVDs/CDs Basic operations of a DVD AUDIO displays "DVD-ANALOG" for a short time. Beginning playback of the DVD player Playing back DVDs/CDs 0OPEN/CLOSE DISPLAY DVD FM/AM GROUP/TITLE / PREVIOUS 4 SLOW /1 7 TOP MENU/PG RETURN Remote control mode selector F AUDIO F DVD AUX 3 (play ) or DVD. In this case, select a desired item to playback by using the following buttons on the inner hollow of the disc tray. 4 Press 3 (play ) NEXT ¢ SLOW /¡ 8 MENU/PL 5///2/3 (cursor)/ ENTER...
Listening to radio/Playing back DVDs/CDs Basic operations of a DVD AUDIO displays "DVD-ANALOG" for a short time. Beginning playback of the DVD player Playing back DVDs/CDs 0OPEN/CLOSE DISPLAY DVD FM/AM GROUP/TITLE / PREVIOUS 4 SLOW /1 7 TOP MENU/PG RETURN Remote control mode selector F AUDIO F DVD AUX 3 (play ) or DVD. In this case, select a desired item to playback by using the following buttons on the inner hollow of the disc tray. 4 Press 3 (play ) NEXT ¢ SLOW /¡ 8 MENU/PL 5///2/3 (cursor)/ ENTER...
Instructions
Page 27
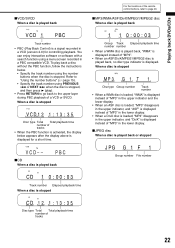
... disc is displayed for controlling playback. Refer to "Using the number buttons" (A page 15). • Specify the track number using a menu screen recorded in a VCD (version 2.0) for a short time. Playing back DVDs/CDs ■ VCD/SVCD When a disc is played back For the locations of the remote control buttons, refer to page 20. ■MP3/WMA/ASF/DivX/MPEG1/MPEG2 disc When a disc is played back Track number • PBC (Play Back Control) is stopped Disc...
... disc is displayed for controlling playback. Refer to "Using the number buttons" (A page 15). • Specify the track number using a menu screen recorded in a VCD (version 2.0) for a short time. Playing back DVDs/CDs ■ VCD/SVCD When a disc is played back For the locations of the remote control buttons, refer to page 20. ■MP3/WMA/ASF/DivX/MPEG1/MPEG2 disc When a disc is played back Track number • PBC (Play Back Control) is stopped Disc...
Instructions
Page 31
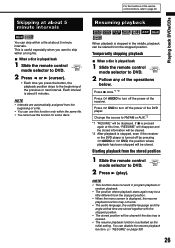
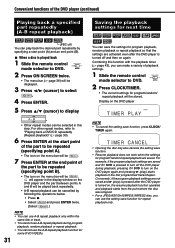
... remote control mode selector to DVD. 2 Follow any of the receiver. Press 7 once.*1 *2 Press F AUDIO to turn off the power of the remote control buttons, refer to skip within a long file. 7 When a disc is activated as the initial setting. This is useful especially when you press the button, the playback position skips to DVD. 2 Press 3 (play). Change the source to FM/AM or AUX.*2 *1 "RESUME" will be cleared if the disc tray is opened...
... remote control mode selector to DVD. 2 Follow any of the receiver. Press 7 once.*1 *2 Press F AUDIO to turn off the power of the remote control buttons, refer to skip within a long file. 7 When a disc is activated as the initial setting. This is useful especially when you press the button, the playback position skips to DVD. 2 Press 3 (play). Change the source to FM/AM or AUX.*2 *1 "RESUME" will be cleared if the disc tray is opened...
Instructions
Page 33
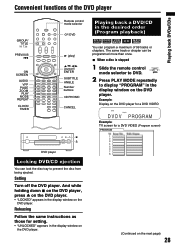
... setting. • "UNLOCKED" appears in the display window on the DVD player. The same track or chapter can lock the disc tray to display "PROGRAM" in the desired order (Program playback) 3 (play) 5///2/3 (cursor)/ ENTER SUBTITLE ANGLE Number buttons 3D PHONIC CANCEL You can program a maximum of 99 tracks or chapters. Playing back DVDs/CDs Convenient functions of the DVD player GROUP/ TITLE / PREVIOUS 4 ON SCREEN AUDIO VFP PAGE ZOOM PLAY MODE REPEAT CLOCK/ TIMER Remote control mode...
... setting. • "UNLOCKED" appears in the display window on the DVD player. The same track or chapter can lock the disc tray to display "PROGRAM" in the desired order (Program playback) 3 (play) 5///2/3 (cursor)/ ENTER SUBTITLE ANGLE Number buttons 3D PHONIC CANCEL You can program a maximum of 99 tracks or chapters. Playing back DVDs/CDs Convenient functions of the DVD player GROUP/ TITLE / PREVIOUS 4 ON SCREEN AUDIO VFP PAGE ZOOM PLAY MODE REPEAT CLOCK/ TIMER Remote control mode...

Instructions
Page 34
... screen for a DVD VIDEO (Program screen) 29 Convenient functions of the DVD player (continued) 3 Press the number buttons to program chapters/tracks. • Refer to "Using the number buttons" (A page 15). ■Display on the DVD player for the program playback will be displayed. . NOTE • Only for DVD AUDIO/ MP3/WMA disc • Select a group number, and then a track number. . Group indicator Track indicator Group Chapter number number Program number ■Display on the DVD player for VCD/SVCD/CD...
... screen for a DVD VIDEO (Program screen) 29 Convenient functions of the DVD player (continued) 3 Press the number buttons to program chapters/tracks. • Refer to "Using the number buttons" (A page 15). ■Display on the DVD player for the program playback will be displayed. . NOTE • Only for DVD AUDIO/ MP3/WMA disc • Select a group number, and then a track number. . Group indicator Track indicator Group Chapter number number Program number ■Display on the DVD player for VCD/SVCD/CD...
Instructions
Page 35
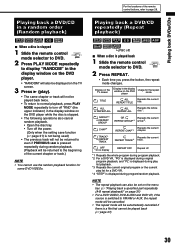
... button, the repeat mode changes. TRACK*4 or REPEAT TRACK Repeats the current REPEAT TRACK*4 track. NOTE • The repeat playback can also be played back (A page 47). 30 Playing back DVDs/CDs Playing back a DVD/CD in the display window on the DVD player while the disc is stopped. • The following operations also cancel random playback. • Open the disc tray. • Turn off the power. (Only when the setting...
... button, the repeat mode changes. TRACK*4 or REPEAT TRACK Repeats the current REPEAT TRACK*4 track. NOTE • The repeat playback can also be played back (A page 47). 30 Playing back DVDs/CDs Playing back a DVD/CD in the display window on the DVD player while the disc is stopped. • The following operations also cancel random playback. • Open the disc tray. • Turn off the power. (Only when the setting...
Instructions
Page 36
... program playback settings are not saved and 3 (play) is pressed after the DVD player is turned on, the resume playback function operates and playback starts from the point where the disc was stopped. • For a JPEG/ASF/DivX/MPEG1/MPEG2 disc, you can make a variety of playback settings. 1 Slide the remote control mode selector to DVD. 2 Press CLOCK/TIMER. • The current settings for program/random/ repeat playback will be displayed...
... program playback settings are not saved and 3 (play) is pressed after the DVD player is turned on, the resume playback function operates and playback starts from the point where the disc was stopped. • For a JPEG/ASF/DivX/MPEG1/MPEG2 disc, you can make a variety of playback settings. 1 Slide the remote control mode selector to DVD. 2 Press CLOCK/TIMER. • The current settings for program/random/ repeat playback will be displayed...
Instructions
Page 40
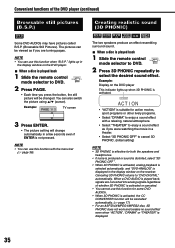
... work and creates no sound effect even when "ACTION", "DRAMA" or "THEATER" is played back 1 Slide the remote control mode selector to DVD. 2 Press 3D PHONIC repeatedly to select the desired sound effect. NOTE • You can use this function when "B.S.P." Example: Display on the DVD player. 7 When a disc is played back 1 Slide the remote control mode selector to enjoy a sound effect with the menu bar (A page 36). When a DVD AUDIO is activated...
... work and creates no sound effect even when "ACTION", "DRAMA" or "THEATER" is played back 1 Slide the remote control mode selector to DVD. 2 Press 3D PHONIC repeatedly to select the desired sound effect. NOTE • You can use this function when "B.S.P." Example: Display on the DVD player. 7 When a disc is played back 1 Slide the remote control mode selector to enjoy a sound effect with the menu bar (A page 36). When a DVD AUDIO is activated...
Instructions
Page 46
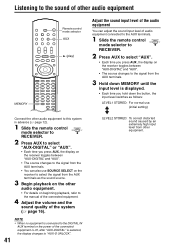
... setting) Connect the other audio equipment to this system in advance (A page 12). 1 Slide the remote control mode selector to RECEIVER. 2 Press AUX to select "AUX-DIGITAL" or "AUX". • Each time you press AUX, the display on the receiver toggles between "AUX-DIGITAL" and "AUX". • The source changes to the signal from the AUX terminals. • You can also use SOURCE SELECT on beginning playback, refer to the manual of the connected equipment. 4 Adjust the volume...
... setting) Connect the other audio equipment to this system in advance (A page 12). 1 Slide the remote control mode selector to RECEIVER. 2 Press AUX to select "AUX-DIGITAL" or "AUX". • Each time you press AUX, the display on the receiver toggles between "AUX-DIGITAL" and "AUX". • The source changes to the signal from the AUX terminals. • You can also use SOURCE SELECT on beginning playback, refer to the manual of the connected equipment. 4 Adjust the volume...
Instructions
Page 50
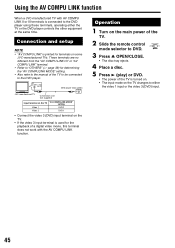
... the DVD player. Operation 1 Turn on the main power of the TV. 2 Slide the remote control mode selector to DVD. 3 Press 0 OPEN/CLOSE. • The disc tray ejects. 4 Place a disc. 5 Press 3 (play) or DVD. • The power of the TV is printed for determining the "AV COMPULINK MODE" setting. • Also refer to the DVD player using these terminals, operating either the video 1 input or the video 3 (DVD) input. 45 AV COMPU LINK II or III DVD player (rear panel) JVC-manufactured TV Connection cord (not supplied) Input...
... the DVD player. Operation 1 Turn on the main power of the TV. 2 Slide the remote control mode selector to DVD. 3 Press 0 OPEN/CLOSE. • The disc tray ejects. 4 Place a disc. 5 Press 3 (play) or DVD. • The power of the TV is printed for determining the "AV COMPULINK MODE" setting. • Also refer to the DVD player using these terminals, operating either the video 1 input or the video 3 (DVD) input. 45 AV COMPU LINK II or III DVD player (rear panel) JVC-manufactured TV Connection cord (not supplied) Input...
Instructions
Page 55
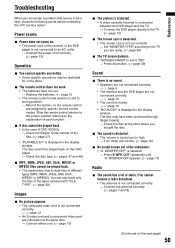
... remote control are assigned to specific remote control modes. Troubleshooting When you encounter a problem that seems to be a fault, check the following points before contacting the JVC service center: Power source 7 Power does not come on. • The power cord of the receiver or the DVD player is not connected to an AC outlet. → Connect the power cord correctly. (A page 13) Operation 7 You cannot operate any button. (A page 39) Sound 7 There is no sound. • Speakers are not connected...
... remote control are assigned to specific remote control modes. Troubleshooting When you encounter a problem that seems to be a fault, check the following points before contacting the JVC service center: Power source 7 Power does not come on. • The power cord of the receiver or the DVD player is not connected to an AC outlet. → Connect the power cord correctly. (A page 13) Operation 7 You cannot operate any button. (A page 39) Sound 7 There is no sound. • Speakers are not connected...
Instructions
Page 57
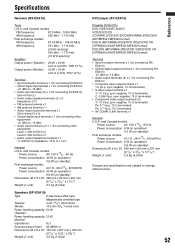
... change without notice. 52 Reference Specifications Receiver (RX-EXA10) Tuner U.S.A. EXA10) • Composite video output terminal x 1 1.0 Vp-p, sync negative, 75 C terminated • S-video output terminal x 1 Y: 1.0 Vp-p, sync negative, 75 C terminated C: 0.286 Vp-p, sync negative, 75 C terminated • Component video output terminals (3) Y: 1.0 Vp-p, sync negative, 75 C terminated PB: 0.7 Vp-p, 75 C terminated PR: 0.7 Vp-p, 75 C terminated • AV COMPU LINK terminal x 1 General U.S.A. and Canada models Power source...
... change without notice. 52 Reference Specifications Receiver (RX-EXA10) Tuner U.S.A. EXA10) • Composite video output terminal x 1 1.0 Vp-p, sync negative, 75 C terminated • S-video output terminal x 1 Y: 1.0 Vp-p, sync negative, 75 C terminated C: 0.286 Vp-p, sync negative, 75 C terminated • Component video output terminals (3) Y: 1.0 Vp-p, sync negative, 75 C terminated PB: 0.7 Vp-p, 75 C terminated PR: 0.7 Vp-p, 75 C terminated • AV COMPU LINK terminal x 1 General U.S.A. and Canada models Power source...


