Instruction Manual
Page 24
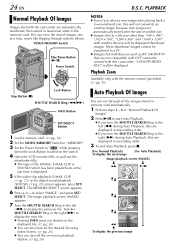
...be transferred to a PC. ● Images shot with devices (such as JVC GR-DVX70) that are displayed in descending order. ● If you turn the...at the last time is displayed. 5 If the video clip playback (E-MAIL CLIP, ੬ pg. 25) or the digital sound playback (SOUND, ੬ pg. 25) screen appears, press SET/ SELECT. The MEMORY SELECT screen appears. 6...4/9 to start Auto Playback. ● If you shoot a new image after the last-recorded one , this camcorder; Playback Zoom Available only with this will be displayed. "UNSUPPORTED FILE!" You can run through a photo album. ...
...be transferred to a PC. ● Images shot with devices (such as JVC GR-DVX70) that are displayed in descending order. ● If you turn the...at the last time is displayed. 5 If the video clip playback (E-MAIL CLIP, ੬ pg. 25) or the digital sound playback (SOUND, ੬ pg. 25) screen appears, press SET/ SELECT. The MEMORY SELECT screen appears. 6...4/9 to start Auto Playback. ● If you shoot a new image after the last-recorded one , this camcorder; Playback Zoom Available only with this will be displayed. "UNSUPPORTED FILE!" You can run through a photo album. ...
Instruction Manual
Page 92
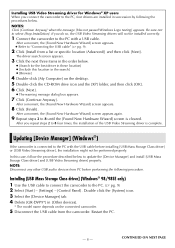
.... After you repeat steps 2 to select [Stop Installation]. Double click the [System] icon. 3 Select the [Device Manager] tab. 4 Delete [GR-DVP9*] in [Other devices]. * The model name depends on the desktop. 5 Double-click the CD-ROM drive icon and the [XP] folder, and...[Start] - [Settings] - [Control Panel]. Installing [USB Mass Storage Class driver] (Windows® 98/98SE only) 1 Use the USB cable to connect the camcorder to 8 until the [Found New Hardware Wizard] screen is connected to "Connecting the USB cable" (੬ pg. 9). 2 Click [Install from PC before installing ...
.... After you repeat steps 2 to select [Stop Installation]. Double click the [System] icon. 3 Select the [Device Manager] tab. 4 Delete [GR-DVP9*] in [Other devices]. * The model name depends on the desktop. 5 Double-click the CD-ROM drive icon and the [XP] folder, and...[Start] - [Settings] - [Control Panel]. Installing [USB Mass Storage Class driver] (Windows® 98/98SE only) 1 Use the USB cable to connect the camcorder to 8 until the [Found New Hardware Wizard] screen is connected to "Connecting the USB cable" (੬ pg. 9). 2 Click [Install from PC before installing ...
Instruction Manual
Page 93
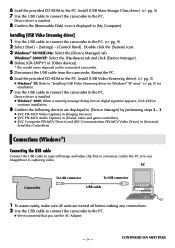
...● [JVC PIX-MCV Video Capture] in [Imaging Devices] ● [JVC PIX-MCV Audio Capture] in [Sound, video and game controllers] ● [JVC Composite PIX-MCV Device] and [JVC Communication PIX-MCV...Windows® 2000/XP: Select the [Hardware] tab and click [Device Manager]. 4 Delete [GR-DVP9*] in [My Computer]. Device driver is installed. 8 Confirm the [Removable Disk] icon is installed... dialog box on the connected camcorder. 5 Disconnect the USB cable from the camcorder. Device driver is displayed in [Other devices]. * The model name depends on digital signature appears, click [OK]...
...● [JVC PIX-MCV Video Capture] in [Imaging Devices] ● [JVC PIX-MCV Audio Capture] in [Sound, video and game controllers] ● [JVC Composite PIX-MCV Device] and [JVC Communication PIX-MCV...Windows® 2000/XP: Select the [Hardware] tab and click [Device Manager]. 4 Delete [GR-DVP9*] in [My Computer]. Device driver is installed. 8 Confirm the [Removable Disk] icon is installed... dialog box on the connected camcorder. 5 Disconnect the USB cable from the camcorder. Device driver is displayed in [Other devices]. * The model name depends on digital signature appears, click [OK]...


