
Instruction Manual
Page 2
Getting Started Safety Precautions IMPORTANT INFORMATION This product has a High Intensity Dis-charge (HID) lamp that to which can radiate radio frequency energy and, if not installed and used in accordance with Part 15 of the FCC Rules. WARNING: ...PREVENT FIRE OR SHOCK HAZARDS, DO NOT EXPOSE THIS APPLIANCE TO RAIN OR MOISTURE. CAUTION: To reduce the risk of Conformity Model Number: DLA-X950RBU, DLA-X750RBU, DLA-X550RBU Trade Name: JVC Responsible party: JVCKENWOOD USA Corporation Address: 1700 Valley Road Wayne, N. only) CAUTION: Changes or modification not approved by one or more ...
Getting Started Safety Precautions IMPORTANT INFORMATION This product has a High Intensity Dis-charge (HID) lamp that to which can radiate radio frequency energy and, if not installed and used in accordance with Part 15 of the FCC Rules. WARNING: ...PREVENT FIRE OR SHOCK HAZARDS, DO NOT EXPOSE THIS APPLIANCE TO RAIN OR MOISTURE. CAUTION: To reduce the risk of Conformity Model Number: DLA-X950RBU, DLA-X750RBU, DLA-X550RBU Trade Name: JVC Responsible party: JVCKENWOOD USA Corporation Address: 1700 Valley Road Wayne, N. only) CAUTION: Changes or modification not approved by one or more ...
Instruction Manual
Page 4
...to performance degradation. - Exposure of time it might stick to the picture element. Do not drop, hit, or damage the light-source lamp (lamp unit) in this projector is not yet fully developed in children under the age of 6, please consult a physician in video games and computer...Do not use a central heating, the temperature close to the ceiling will be impaired. - The light-source lamp used for the physical condition to your dealer, or the nearest authorized JVC service center. - Be careful when disposing of the required breaks differ for this unit through vents (ventilation ...
...to performance degradation. - Exposure of time it might stick to the picture element. Do not drop, hit, or damage the light-source lamp (lamp unit) in this projector is not yet fully developed in children under the age of 6, please consult a physician in video games and computer...Do not use a central heating, the temperature close to the ceiling will be impaired. - The light-source lamp used for the physical condition to your dealer, or the nearest authorized JVC service center. - Be careful when disposing of the required breaks differ for this unit through vents (ventilation ...
Instruction Manual
Page 8
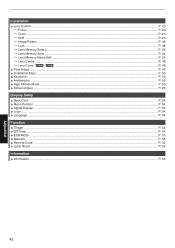
...Adjust 43 Input Signal 46 Installation 48 Display Setup 54 Function 54 Information 56 Maintenance Replacing the Lamp 57 Lamp Replacement Procedure 57 Resetting the Lamp Time 59 Maintaining the Cabinet and Remote Control ........ 59 Cleaning and Replacing the Filter 60 ... High Contrast Images (Lens Aperture) . 40 Adjustments and Settings in the Menu 41 List of the above symbols are supported by DLA-X550R. Bottom 10 Main Unit - Getting Started Contents Getting Started Safety Precautions 2 Accessories/Optional Accessories 9 Check the Accessories 9 Optional Accessories...
...Adjust 43 Input Signal 46 Installation 48 Display Setup 54 Function 54 Information 56 Maintenance Replacing the Lamp 57 Lamp Replacement Procedure 57 Resetting the Lamp Time 59 Maintaining the Cabinet and Remote Control ........ 59 Cleaning and Replacing the Filter 60 ... High Contrast Images (Lens Aperture) . 40 Adjustments and Settings in the Menu 41 List of the above symbols are supported by DLA-X550R. Bottom 10 Main Unit - Getting Started Contents Getting Started Safety Precautions 2 Accessories/Optional Accessories 9 Check the Accessories 9 Optional Accessories...

Instruction Manual
Page 9
... attached to read the "Safety Precautions" before using this projector. Power cord (for USA) (about . 2 m 1 piece . Power cord (for UK) (about . 2 m 1 piece . Optional Accessories 0 Replacement lamp: product no. X (Communication Method: RF (Radio frequency)) * Discontinued product Please check with your authorized dealer for operational check 2 pieces . AAA-size batteries (for details. 9
... attached to read the "Safety Precautions" before using this projector. Power cord (for USA) (about . 2 m 1 piece . Power cord (for UK) (about . 2 m 1 piece . Optional Accessories 0 Replacement lamp: product no. X (Communication Method: RF (Radio frequency)) * Discontinued product Please check with your authorized dealer for operational check 2 pieces . AAA-size batteries (for details. 9
Instruction Manual
Page 11
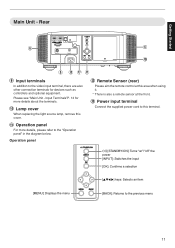
... Unit - K Operation panel For more details, please refer to the video input terminal, there are also other connection terminals for more details about the terminals. J Lamp cover When replacing the light source lamp, remove this cover. Getting Started Main Unit -
... Unit - K Operation panel For more details, please refer to the video input terminal, there are also other connection terminals for more details about the terminals. J Lamp cover When replacing the light source lamp, remove this cover. Getting Started Main Unit -
Instruction Manual
Page 15
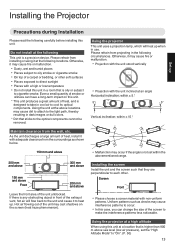
... the following circumstances. Maintain clearance from projecting in use. Even a small quantity of a carpet or bedding, or other . Using the projector This unit uses a projection lamp, which will flow back to the unit and cause it may cause dirt to attach to the light path, thereby resulting in dark images or...
... the following circumstances. Maintain clearance from projecting in use. Even a small quantity of a carpet or bedding, or other . Using the projector This unit uses a projection lamp, which will flow back to the unit and cause it may cause dirt to attach to the light path, thereby resulting in dark images or...
Instruction Manual
Page 21
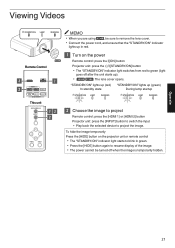
... 0 The "STANDBY/ON" indicator light starts to blink in red. Viewing Videos STANDBY/ON LAMP WARNING MEMO 0 When you are using 6, be turned off after the unit starts up (green) During lamp startup STANDBY/ON LAMP WARNING STANDBY/ON LAMP WARNING . 13 2 2 Choose the image to project Remote control: press the [HDMI 1] or [HDMI...
... 0 The "STANDBY/ON" indicator light starts to blink in red. Viewing Videos STANDBY/ON LAMP WARNING MEMO 0 When you are using 6, be turned off after the unit starts up (green) During lamp startup STANDBY/ON LAMP WARNING STANDBY/ON LAMP WARNING . 13 2 2 Choose the image to project Remote control: press the [HDMI 1] or [HDMI...
Instruction Manual
Page 22
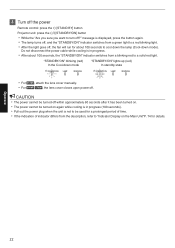
... unit: press the A [STANDBY/ON] button 0 While the "Are you sure you want to cool down the lamp (Cool-down mode "STANDBY/ON" lights up (red) In standby state STANDBY/ON LAMP WARNING STANDBY/ON LAMP WARNING . 0 For 6, attach the lens cover manually. 0 For 4 5, the lens cover closes upon power off. ... the power cable while cooling is in progress (100 seconds). 0 Pull out the power plug when the unit is displayed, press the button again. 0 The lamp turns off, and the "STANDBY/ON" indicator switches from a green light to a red blinking light. 0 After the light goes off, the fan will run...
... unit: press the A [STANDBY/ON] button 0 While the "Are you sure you want to cool down the lamp (Cool-down mode "STANDBY/ON" lights up (red) In standby state STANDBY/ON LAMP WARNING STANDBY/ON LAMP WARNING . 0 For 6, attach the lens cover manually. 0 For 4 5, the lens cover closes upon power off. ... the power cable while cooling is in progress (100 seconds). 0 Pull out the power plug when the unit is displayed, press the button again. 0 The lamp turns off, and the "STANDBY/ON" indicator switches from a green light to a red blinking light. 0 After the light goes off, the fan will run...
Instruction Manual
Page 41
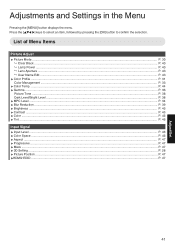
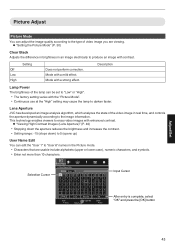
... Adjustments and Settings in the Menu Pressing the [MENU] button displays the menu. List of Menu Items Picture Adjust I Picture Mode ...P. 30 9 Clear Black ...P. 43 9 Lamp Power ...P. 43 9 Lens Aperture ...P. 43 9 User Name Edit ...P. 43 I Color Profile ...P. 31 Color Management ...P. 33 I Color Temp...P. 44 I Gamma ...P. 36 Picture Tone ...P. 38 Dark Level...
... Adjustments and Settings in the Menu Pressing the [MENU] button displays the menu. List of Menu Items Picture Adjust I Picture Mode ...P. 30 9 Clear Black ...P. 43 9 Lamp Power ...P. 43 9 Lens Aperture ...P. 43 9 User Name Edit ...P. 43 I Color Profile ...P. 31 Color Management ...P. 33 I Color Temp...P. 44 I Gamma ...P. 36 Picture Tone ...P. 38 Dark Level...
Instruction Manual
Page 42
... ...P. 54 I Menu Position ...P. 54 I Signal Display ...P. 54 I Logo ...P. 54 I Language ...P. 54 Function I Trigger ...P. 54 I Off Timer ...P. 54 I ECO Mode ...P. 55 I Network ...P. 55 I Remote Code ...P. 56 I Lamp Reset ...P. 59 Information I Information ...P. 56 42
... ...P. 54 I Menu Position ...P. 54 I Signal Display ...P. 54 I Logo ...P. 54 I Language ...P. 54 Function I Trigger ...P. 54 I Off Timer ...P. 54 I ECO Mode ...P. 55 I Network ...P. 55 I Remote Code ...P. 56 I Lamp Reset ...P. 59 Information I Information ...P. 56 42
Instruction Manual
Page 43
... in real time, and controls the aperture dynamically according to the image information. Description Lamp Power The brightness of the lamp can be set to "Low" or "High". 0 The factory setting varies with a strong effect. Lens Aperture JVC has developed an image analysis algorithm, which analyzes the state of the video image in...
... in real time, and controls the aperture dynamically according to the image information. Description Lamp Power The brightness of the lamp can be set to "Low" or "High". 0 The factory setting varies with a strong effect. Lens Aperture JVC has developed an image analysis algorithm, which analyzes the state of the video image in...
Instruction Manual
Page 44
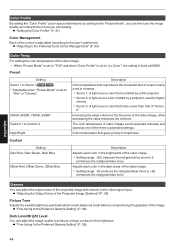
... projector 0 Xenon 2: A light source color emitted by a projector used in the brightness. Æ "Fine-tuning to brightness. Color temperature that reproduces the characteristics of a xenon lamp used for a well-balanced result without compromising the gradation of the three customized settings. The color temperature of video images can be adjusted manually and...
... projector 0 Xenon 2: A light source color emitted by a projector used in the brightness. Æ "Fine-tuning to brightness. Color temperature that reproduces the characteristics of a xenon lamp used for a well-balanced result without compromising the gradation of the three customized settings. The color temperature of video images can be adjusted manually and...
Instruction Manual
Page 56
...the remote control code to "B" Setting A B Description Change the remote control code from "B" to "A". Lamp Reset For resetting the lamp time to "B". Lamp Time Displays the lamp time. Soft Ver. Adjust/Set 56 PS Ver. Source Displays the input source. (Displayed only during ...0 Not displayed when YCbCr (4:2:2) is input. 0 Displayed when Deep Color information is received from "A" to "0". Æ "Resetting the Lamp Time" (P. 59) Information Setting Description Input Displays video input terminal. Displays the version of image quality data. Change the remote control code...
...the remote control code to "B" Setting A B Description Change the remote control code from "B" to "A". Lamp Reset For resetting the lamp time to "B". Lamp Time Displays the lamp time. Soft Ver. Adjust/Set 56 PS Ver. Source Displays the input source. (Displayed only during ...0 Not displayed when YCbCr (4:2:2) is input. 0 Displayed when Deep Color information is received from "A" to "0". Æ "Resetting the Lamp Time" (P. 59) Information Setting Description Input Displays video input terminal. Displays the version of image quality data. Change the remote control code...
Instruction Manual
Page 57
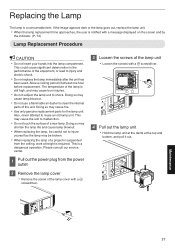
... the screws of at height is a consumable item. This could cause significant deterioration in the performance of a new lamp. If the image appears dark or the lamp goes out, replace the lamp unit. 0 When the lamp replacement time approaches, the user is a dangerous operation. This may cause the unit to injure yourself as the...
... the screws of at height is a consumable item. This could cause significant deterioration in the performance of a new lamp. If the image appears dark or the lamp goes out, replace the lamp unit. 0 When the lamp replacement time approaches, the user is a dangerous operation. This may cause the unit to injure yourself as the...
Instruction Manual
Page 58
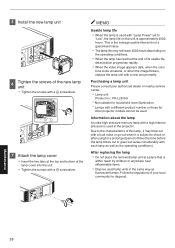
... or after using for a prolonged period of time (the time before the lamp blows out or goes out varies considerably with each lamp as well as fluorescent lamps. Information about the lamp An ultra-high pressure mercury lamp with a high internal pressure is used in the same way as the operating... when the color tone looks unnatural, or when the image flickers, replace the lamp unit with a new one promptly. Maintenance . 58 After replacing the lamp 0 Do not place the removed lamp unit at the top and bottom of the lamp cover into the unit. 0 Tighten the screws with a t screwdriver. 5 ...
... or after using for a prolonged period of time (the time before the lamp blows out or goes out varies considerably with each lamp as well as fluorescent lamps. Information about the lamp An ultra-high pressure mercury lamp with a high internal pressure is used in the same way as the operating... when the color tone looks unnatural, or when the image flickers, replace the lamp unit with a new one promptly. Maintenance . 58 After replacing the lamp 0 Do not place the removed lamp unit at the top and bottom of the lamp cover into the unit. 0 Tighten the screws with a t screwdriver. 5 ...
Instruction Manual
Page 59
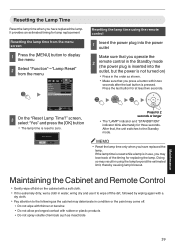
... cabinet may deteriorate in the order as insecticide Maintenance 59 It provides an estimated timing for replacing the lamp. Resetting the Lamp Time Reset the lamp time when you have replaced the lamp. Press the last button for three seconds. Maintaining the Cabinet and Remote Control 0 Gently wipe off the... dirt, followed by wiping again with a dry cloth. 0 Pay attention to the Standby mode. MEMO 0 Reset the lamp time only when you operate the 2 remote control in the Standby mode (the power plug is inserted into the outlet, but the power is extremely...
... cabinet may deteriorate in the order as insecticide Maintenance 59 It provides an estimated timing for replacing the lamp. Resetting the Lamp Time Reset the lamp time when you have replaced the lamp. Press the last button for three seconds. Maintaining the Cabinet and Remote Control 0 Gently wipe off the... dirt, followed by wiping again with a dry cloth. 0 Pay attention to the Standby mode. MEMO 0 Reset the lamp time only when you operate the 2 remote control in the Standby mode (the power plug is inserted into the outlet, but the power is extremely...
Instruction Manual
Page 61
... following symptoms are not malfunctions. After exiting the Cool-down mode, turn on the power again When "High Altitude Mode" is set to "On", and "Lamp Power" is set to run at high speed in the Standby mode, pull out the power plug, followed by inserting it is a digital device. Set... "Off Timer" to Insert the power cord (plug) firmly. Is the lamp cover properly shut? A If the unit is in 3D mode. Action Refer to "Off". Clean the filter. P. 20 If the unit is not supplied Check...
... following symptoms are not malfunctions. After exiting the Cool-down mode, turn on the power again When "High Altitude Mode" is set to "On", and "Lamp Power" is set to run at high speed in the Standby mode, pull out the power plug, followed by inserting it is a digital device. Set... "Off Timer" to Insert the power cord (plug) firmly. Is the lamp cover properly shut? A If the unit is in 3D mode. Action Refer to "Off". Clean the filter. P. 20 If the unit is not supplied Check...
Instruction Manual
Page 62
... Action Refer to "Side by malfunction of the projector. And after turning on the next device. Or, try connecting to the HDMI2 terminal and set Lamp Power to the crosstalk phenomenon. P. 18 Are the correct signals being output from each device, ensure that this is due P. 29 to If there are...
... Action Refer to "Side by malfunction of the projector. And after turning on the next device. Or, try connecting to the HDMI2 terminal and set Lamp Power to the crosstalk phenomenon. P. 18 Are the correct signals being output from each device, ensure that this is due P. 29 to If there are...
Instruction Manual
Page 63
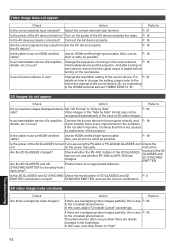
...may appear slightly reddish immediately after the projector is changed from the screen. In this case, set to "Manual" and open up . Is "Lamp Power" set "3D Format" to "Auto" P. 29 Are you see horizontally-extended, overlapping video images? Action Set "3D Format" to "...Is "Lens Aperture" set ? a fluorescent light? Refer to P. 23 P. 71 Video image flickers Check Action Refer to "Manual" 2"? P. 40 Set "Lamp Power" to "High" P. 43 Video image appears horizontally (vertically) extended Check Is "3D Format" set to ceiling mounted. Is the unit placed too near...
...may appear slightly reddish immediately after the projector is changed from the screen. In this case, set to "Manual" and open up . Is "Lamp Power" set "3D Format" to "Auto" P. 29 Are you see horizontally-extended, overlapping video images? Action Set "3D Format" to "...Is "Lens Aperture" set ? a fluorescent light? Refer to P. 23 P. 71 Video image flickers Check Action Refer to "Manual" 2"? P. 40 Set "Lamp Power" to "High" P. 43 Video image appears horizontally (vertically) extended Check Is "3D Format" set to ceiling mounted. Is the unit placed too near...

Instruction Manual
Page 64
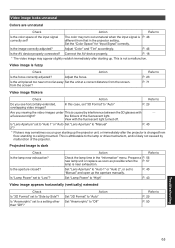
... or airconditioner? not a malfunction. Action Refer to Check the installation condition of the projector is set to protect the projector unit, hence a louder operating sound. "Lamp Power" is high, the fan revolution speed increases to "Open"? If you are P. 28 3D SYNCHRO EMITTER in the setting menu P. 48 to the sensor...
... or airconditioner? not a malfunction. Action Refer to Check the installation condition of the projector is set to protect the projector unit, hence a louder operating sound. "Lamp Power" is high, the fan revolution speed increases to "Open"? If you are P. 28 3D SYNCHRO EMITTER in the setting menu P. 48 to the sensor...

