

Instructions
Page 4
... the light is so powerful that when using the unit if the double image is broken, ask your eyes to personal injury. - If the lightsource lamp is still visible after adjustment. - otherwise, the attaching fixture of this projector is turned on . Please power it on the device. *DO NOT allow any problem concerning 3D-images if necessary. - Please watch from a broken light-source lamp...
... the light is so powerful that when using the unit if the double image is broken, ask your eyes to personal injury. - If the lightsource lamp is still visible after adjustment. - otherwise, the attaching fixture of this projector is turned on . Please power it on the device. *DO NOT allow any problem concerning 3D-images if necessary. - Please watch from a broken light-source lamp...

Instructions
Page 13
... installation 22 Installing the Projector and Screen 23 Set Angle 23 Shift 23 Fixation of the projector 24 Screen Size and Projection Distance......... 25 Effective Range of Remote Control Unit.... 25 About the connection 26 Types of possible input signals (PC compatible 27 Connection to the unit 28 Connection of the power cord (provided 34 Masking the Surrounding Area of an Image 40 Temporary turning-off of the video.......... 41 Adjustment of the keystone...
... installation 22 Installing the Projector and Screen 23 Set Angle 23 Shift 23 Fixation of the projector 24 Screen Size and Projection Distance......... 25 Effective Range of Remote Control Unit.... 25 About the connection 26 Types of possible input signals (PC compatible 27 Connection to the unit 28 Connection of the power cord (provided 34 Masking the Surrounding Area of an Image 40 Temporary turning-off of the video.......... 41 Adjustment of the keystone...

Instructions
Page 15
... air. Bottom ⑤ Inlets ⑥ Manual button for lens cover 90 70 ⑤ Inlets (at 3 points on /off. (Reference page: 66) 90 70 ③ Indicator Please see "About the indicator display" for the ceiling mount bracket. (Reference page: 24) 15 Please do not block the vents. ② Remote receiver (front) Please aim the remote control at the rear. Lens cover The lens cover opens/closes when the power supply is a projection lens...
... air. Bottom ⑤ Inlets ⑥ Manual button for lens cover 90 70 ⑤ Inlets (at 3 points on /off. (Reference page: 66) 90 70 ③ Indicator Please see "About the indicator display" for the ceiling mount bracket. (Reference page: 24) 15 Please do not block the vents. ② Remote receiver (front) Please aim the remote control at the rear. Lens cover The lens cover opens/closes when the power supply is a projection lens...

Instructions
Page 16
...; Lamp Cover ⑤ Inlets ⑧ Input terminal ⑫ Power input terminal ⑩ Operation panel ⑪ Light receiving section of the remote control (rear) Please aim the remote control at this section when using. (*) There is also a light receiving section at the rear. ⑫ Power input terminal This is connected via the supplied power cord. (Reference page: 34) ■ Operation panel STANDBY/ON INPUT OK Left button Down button To display the menu MENU BACK To turn on/off the power To switch input...
...; Lamp Cover ⑤ Inlets ⑧ Input terminal ⑫ Power input terminal ⑩ Operation panel ⑪ Light receiving section of the remote control (rear) Please aim the remote control at this section when using. (*) There is also a light receiving section at the rear. ⑫ Power input terminal This is connected via the supplied power cord. (Reference page: 34) ■ Operation panel STANDBY/ON INPUT OK Left button Down button To display the menu MENU BACK To turn on/off the power To switch input...
Instructions
Page 18
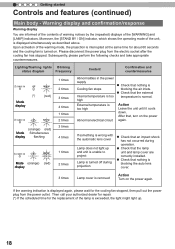
... replacement of the [WARNING] and [LAMP] indicators. Warning display and confirmation/response Warning display You are correctly installed. ● Check that nothing is blocking the air inlets. ● Check that , turn on the power again. Lighting/flashing lights Blinking status diagram Frequency STANDBY/ON LAMP WARNING Mode display (*) (red) STANDBY/ON LAMP WARNING (orange) (red) Mode Simultaneous display flashing 1 times 2 times 3 times 4 times 1 times 2 times 3 times 4 times STANDBY/ON LAMP WARNING Mode (orange) (red) display 1 times 2 times...
... replacement of the [WARNING] and [LAMP] indicators. Warning display and confirmation/response Warning display You are correctly installed. ● Check that nothing is blocking the air inlets. ● Check that , turn on the power again. Lighting/flashing lights Blinking status diagram Frequency STANDBY/ON LAMP WARNING Mode display (*) (red) STANDBY/ON LAMP WARNING (orange) (red) Mode Simultaneous display flashing 1 times 2 times 3 times 4 times 1 times 2 times 3 times 4 times STANDBY/ON LAMP WARNING Mode (orange) (red) display 1 times 2 times...

Instructions
Page 23
... (maximum) of the projected image 80 70 Lens shift correlation chart: Approximately 80% (maximum) of the projected image Left-Right Shift(%) 0% 10% 20% 30% 34% Up-Down Shift(%) 80% 66% 47% 18% 0% ● Maximum Up-Down shift varies with the amount of Left-Right shift. ENGLISH About installation (Continued) Installing the Projector and Screen While installing, please place this unit...
... (maximum) of the projected image 80 70 Lens shift correlation chart: Approximately 80% (maximum) of the projected image Left-Right Shift(%) 0% 10% 20% 30% 34% Up-Down Shift(%) 80% 66% 47% 18% 0% ● Maximum Up-Down shift varies with the amount of Left-Right shift. ENGLISH About installation (Continued) Installing the Projector and Screen While installing, please place this unit...

Instructions
Page 31
... 1 HDMI 2 RS-232-C CR/PR CB/PB Y 3D SYNCHRO PC TRIGGER REMOTE CONTROL STANDBY/ON INPUT OK MENU BACK Notebook PC To PC input terminal PC cable(sold separately) VGA output terminal ● For information on the ambient temperature and lamp usage. CAUTION ● Note that converting 2D images to 3D ones using the projector if images cannot be projected correctly. ● Before you watch 3D video images...
... 1 HDMI 2 RS-232-C CR/PR CB/PB Y 3D SYNCHRO PC TRIGGER REMOTE CONTROL STANDBY/ON INPUT OK MENU BACK Notebook PC To PC input terminal PC cable(sold separately) VGA output terminal ● For information on the ambient temperature and lamp usage. CAUTION ● Note that converting 2D images to 3D ones using the projector if images cannot be projected correctly. ● Before you watch 3D video images...

Instructions
Page 36
... button on the unit to malfunction. 2 Choose the projected image 1 Select input mode ● You can also select the input mode by pressing the up / down buttons ADJ. 2 3 4 5 90 70 X307 : The same button arrangement is used just with the following operations. 1 Turn on power source ON STANDBY/ON Light on (Green) ● You can normally be opened. 90 70 Remove the lens cover. 3 Operation Basic Operation 6 1 STAND BY ON HDMI 1 INPUT HDMI 2 3D FORMAT 3D SETTING...
... button on the unit to malfunction. 2 Choose the projected image 1 Select input mode ● You can also select the input mode by pressing the up / down buttons ADJ. 2 3 4 5 90 70 X307 : The same button arrangement is used just with the following operations. 1 Turn on power source ON STANDBY/ON Light on (Green) ● You can normally be opened. 90 70 Remove the lens cover. 3 Operation Basic Operation 6 1 STAND BY ON HDMI 1 INPUT HDMI 2 3D FORMAT 3D SETTING...
Instructions
Page 41
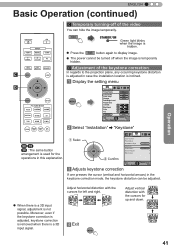
... Lens Control Pixel Adjust Installation Style Front Keystone Anamorphic Off Screen Adjust Black Level ② Confirm Exit MENU Select 3 Adjusts keystone correction Operate Back BACK If one presses the cursor (vertical and horizontal arrows) in case the installation location is a 3D 4 Exit input signal. STAND BY ON HDMI 1 INPUT HDMI 2 3D FORMAT 3D SETTING COMP. Moreover, even if the keystone correction is adjusted, keystone correction is removed when there is inclined. 1 Display the setting menu MENU Picture Adjust Picture Mode Color Profile Color Temp...
... Lens Control Pixel Adjust Installation Style Front Keystone Anamorphic Off Screen Adjust Black Level ② Confirm Exit MENU Select 3 Adjusts keystone correction Operate Back BACK If one presses the cursor (vertical and horizontal arrows) in case the installation location is a 3D 4 Exit input signal. STAND BY ON HDMI 1 INPUT HDMI 2 3D FORMAT 3D SETTING COMP. Moreover, even if the keystone correction is adjusted, keystone correction is removed when there is inclined. 1 Display the setting menu MENU Picture Adjust Picture Mode Color Profile Color Temp...
Instructions
Page 51
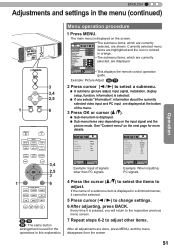
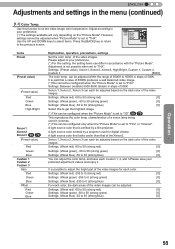
PC LENS. Menu operation procedure 1 Press MENU. Picture Adjust Picture Mode Color Profile Color Temp. This displays the remote control operation guide. Every time it cannot be selected. 5 Press cursor ( / ) to change settings. 6 After adjusting, press BACK. CONTROL LENS MEMORY ANAMO. Example: Picture Adjust 90 70 2 Press cursor ( / ) to select a submenu. ● A submenu (picture adjust, input signal, installation, display setup, function, information) is displayed. ● Sub-menu items vary depending on the input signal and the picture mode. If the name of signals...
PC LENS. Menu operation procedure 1 Press MENU. Picture Adjust Picture Mode Color Profile Color Temp. This displays the remote control operation guide. Every time it cannot be selected. 5 Press cursor ( / ) to change settings. 6 After adjusting, press BACK. CONTROL LENS MEMORY ANAMO. Example: Picture Adjust 90 70 2 Press cursor ( / ) to select a submenu. ● A submenu (picture adjust, input signal, installation, display setup, function, information) is displayed. ● Sub-menu items vary depending on the input signal and the picture mode. If the name of signals...
Instructions
Page 52
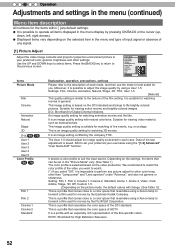
... viewing action movies and brightly colored images. Setting: Film 1, Film 2, Cinema 1, Cinema 2, Standard, Anime 1, Anime 2, Video, Vivid, Adobe, Stage, 3D, Off, Custom 1-5. [Depending on the picture mode, the default values will change. (See Table 1)] This is a profile that comes close to perform any signal. [1] Picture Adjust Adjust the video image contents and projector projection environment picture to your username using a User 1-5. This is a profile that resembles using a Xenon lamp to transmit a film used...
... viewing action movies and brightly colored images. Setting: Film 1, Film 2, Cinema 1, Cinema 2, Standard, Anime 1, Anime 2, Video, Vivid, Adobe, Stage, 3D, Off, Custom 1-5. [Depending on the picture mode, the default values will change. (See Table 1)] This is a profile that comes close to perform any signal. [1] Picture Adjust Adjust the video image contents and projector projection environment picture to your username using a User 1-5. This is a profile that resembles using a Xenon lamp to transmit a film used...
Instructions
Page 55
... Blue Offset Red Offset Green Offset Blue 6500K 0 0 0 0 0 0 Reset Items Preset (Preset value) (Preset value) Red Green Blue High Bright Xenon1 Xenon2 Xenon3 90 70 (Preset value) Red Green Blue Custom 1 Custom 2 Custom 3 Gain Red Green Blue Offset Red Green Blue Explanation, operation, precautions, settings Set the color temp. Settings: (Preset value), Xenon1, Xenon2, Xenon3, High Bright, Custom 1, Custom 2, Custom 3 [6500] The color temp. A light source color emitted by a film projector. and save your preference. (*) For this function to se the video image color temperature...
... Blue Offset Red Offset Green Offset Blue 6500K 0 0 0 0 0 0 Reset Items Preset (Preset value) (Preset value) Red Green Blue High Bright Xenon1 Xenon2 Xenon3 90 70 (Preset value) Red Green Blue Custom 1 Custom 2 Custom 3 Gain Red Green Blue Offset Red Green Blue Explanation, operation, precautions, settings Set the color temp. Settings: (Preset value), Xenon1, Xenon2, Xenon3, High Bright, Custom 1, Custom 2, Custom 3 [6500] The color temp. A light source color emitted by a film projector. and save your preference. (*) For this function to se the video image color temperature...

Instructions
Page 65
... automatically adjust the lens to the previous screen. Move the cursor using the [UP], [DOWN], [LEFT], and [RIGHT] keys on the main unit or on the remote control to adjust the above setting items. The external input signal is displayed without displaying the image pattern. Lens Control Focus Zoom Shift Image Pattern On Lock Off Lens Memory Select Lens Memory Save Lens Memory Name Edit Lens Cover Auto Items Focus Zoom Shift Image Pattern On Off Lock On Off Lens...
... automatically adjust the lens to the previous screen. Move the cursor using the [UP], [DOWN], [LEFT], and [RIGHT] keys on the main unit or on the remote control to adjust the above setting items. The external input signal is displayed without displaying the image pattern. Lens Control Focus Zoom Shift Image Pattern On Lock Off Lens Memory Select Lens Memory Save Lens Memory Name Edit Lens Cover Auto Items Focus Zoom Shift Image Pattern On Off Lock On Off Lens...
Instructions
Page 72
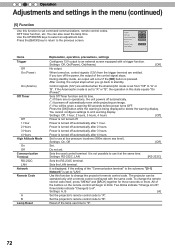
... "B". Sets the LAN terminal. When turned on the remote control will begin to blink. During standby mode, an output will be operated only with a remote control configured with a trigger function. Use this state equals "On (Power)". Power is being displayed to B"; Set to use time to "LAN". To change the projector's remote control code. Press the [OK] button while the warning is turned off automatically after 3 hours. Sets the used control terminal. Two blinks indicate "Change A to delete the warning display. Reset of the buttons on , control signals...
... "B". Sets the LAN terminal. When turned on the remote control will begin to blink. During standby mode, an output will be operated only with a remote control configured with a trigger function. Use this state equals "On (Power)". Power is being displayed to B"; Set to use time to "LAN". To change the projector's remote control code. Press the [OK] button while the warning is turned off automatically after 3 hours. Sets the used control terminal. Two blinks indicate "Change A to delete the warning display. Reset of the buttons on , control signals...

Instructions
Page 73
... Ver. : 12.011 Displays upon PC input Items Input Resolution H Frequency V Frequency Deep Color Lamp Time Soft Ver. Displays the lamp use time. Displays the lamp use time. The network settings are being done manually. Displays the color bit depth concerning an input video image signal. (*) When you input YCbCr (4:2:2), it is not displayed. (*) When there is displayed. The firmware version is displayed. ENGLISH Adjustments and settings in the menu (continued) [5-1] Network Use this function to the previous screen. Use the UP and DOWN keys...
... Ver. : 12.011 Displays upon PC input Items Input Resolution H Frequency V Frequency Deep Color Lamp Time Soft Ver. Displays the lamp use time. Displays the lamp use time. The network settings are being done manually. Displays the color bit depth concerning an input video image signal. (*) When you input YCbCr (4:2:2), it is not displayed. (*) When there is displayed. The firmware version is displayed. ENGLISH Adjustments and settings in the menu (continued) [5-1] Network Use this function to the previous screen. Use the UP and DOWN keys...
Instructions
Page 80
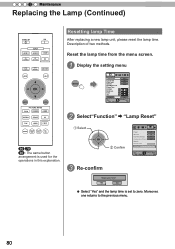
... Off Timer Off High Altitude Mode Off Communication Terminal LAN Network Remote Code A Lamp Reset Exit MENU Select Operate Back BACK 3 Re-confirm Reset Lamp Time? YES NO ● Select "Yes" and the lamp time is used for the operations in this explanation. Description of two methods. Moreover, one returns to zero. CONTROL LENS MEMORY ANAMO. 4 Maintenance Replacing the Lamp (Continued) STAND BY ON HDMI 1 INPUT HDMI 2 3D FORMAT 3D SETTING COMP. Resetting lamp Time After replacing a new lamp unit, please reset the lamp time...
... Off Timer Off High Altitude Mode Off Communication Terminal LAN Network Remote Code A Lamp Reset Exit MENU Select Operate Back BACK 3 Re-confirm Reset Lamp Time? YES NO ● Select "Yes" and the lamp time is used for the operations in this explanation. Description of two methods. Moreover, one returns to zero. CONTROL LENS MEMORY ANAMO. 4 Maintenance Replacing the Lamp (Continued) STAND BY ON HDMI 1 INPUT HDMI 2 3D FORMAT 3D SETTING COMP. Resetting lamp Time After replacing a new lamp unit, please reset the lamp time...
Instructions
Page 81
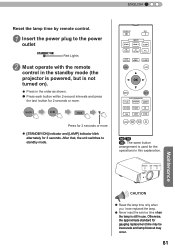
... approximate standard for 3 seconds. CONTROL LENS MEMORY ANAMO. HIDE LIGHT MENU BACK PICTURE MODE FILM CINEMA ANIME NATURAL STAGE 3D THX USER C.M.D. ENGLISH Reset the lamp time by remote control. 1 Insert the power plug to standby mode. WARNING LAMP STANDBY/ON Maintenance CAUTION ● Reset the lamp time only when you have replaced the lamp. ● Never reset the service time when the lamp is still in use. GAMMA COLOR TEMP COLOR P.FILE PIC. STAND BY ON HDMI 1 INPUT HDMI 2 3D FORMAT 3D SETTING COMP.
... approximate standard for 3 seconds. CONTROL LENS MEMORY ANAMO. HIDE LIGHT MENU BACK PICTURE MODE FILM CINEMA ANIME NATURAL STAGE 3D THX USER C.M.D. ENGLISH Reset the lamp time by remote control. 1 Insert the power plug to standby mode. WARNING LAMP STANDBY/ON Maintenance CAUTION ● Reset the lamp time only when you have replaced the lamp. ● Never reset the service time when the lamp is still in use. GAMMA COLOR TEMP COLOR P.FILE PIC. STAND BY ON HDMI 1 INPUT HDMI 2 3D FORMAT 3D SETTING COMP.
Instructions
Page 91
... no problem when playing normal video images such as the cabinet may come off the dirt. Block light using commercial blowers or lens cleaning papers for parts replacement varies greatly depending on the cabinet with cigarette smoke or oily smoke. If dirt is Unused for a Long Time Prolonged disuse of heavy soiling, soak a cloth in the air inlets, the internal temperature cannot...
... no problem when playing normal video images such as the cabinet may come off the dirt. Block light using commercial blowers or lens cleaning papers for parts replacement varies greatly depending on the cabinet with cigarette smoke or oily smoke. If dirt is Unused for a Long Time Prolonged disuse of heavy soiling, soak a cloth in the air inlets, the internal temperature cannot...
Instructions
Page 92
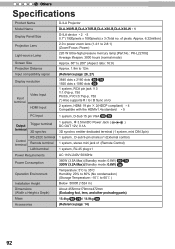
5 Others Specifications Product Name Model Name Display Panel/Size Projection Lens Light-source Lamp Screen Size Projection Distance Input compatibility signal Display resolution Input terminal. Video Input HDMI Input PC Input Output Trigger terminal terminal 3D synchro Control terminal RS-232C terminal Remote terminal LAN terminal Power Requirements Power Consumption Operation Environment Installation Height Dimensions (Width x Height x Depth) Mass Accessories D-ILA Projector DLA-X90R-B,DLA-X70R-B,DLA-X30-B,DLA-X30-W * 1 D-ILA device * 2 *3 0.7" (1920pixels x 1080pixels...
5 Others Specifications Product Name Model Name Display Panel/Size Projection Lens Light-source Lamp Screen Size Projection Distance Input compatibility signal Display resolution Input terminal. Video Input HDMI Input PC Input Output Trigger terminal terminal 3D synchro Control terminal RS-232C terminal Remote terminal LAN terminal Power Requirements Power Consumption Operation Environment Installation Height Dimensions (Width x Height x Depth) Mass Accessories D-ILA Projector DLA-X90R-B,DLA-X70R-B,DLA-X30-B,DLA-X30-W * 1 D-ILA device * 2 *3 0.7" (1920pixels x 1080pixels...
Instructions
Page 96
... Caution Page 4 Remote control Button placement Page 20 Instructions Page 25 Remote Code Page 72 See "Dry battery" section Lens [3-1] Lens Control Page 65 Focus of [3-1] Lens Control Page 65 Zoom of [3-1] Lens Control Page 65 Shift of [5] Function Page 72 How to reset the lamp time .......... 5 Others Index (continued) Message Indicator (LED) display Page 17 Meaning Page 86 Lamp Replacement Lamp Number Page 78 Recommended use time Page 78 Lamp time of [6] Information Page 73 Replacement Page 78 Lamp power of [1-2] Advanced...
... Caution Page 4 Remote control Button placement Page 20 Instructions Page 25 Remote Code Page 72 See "Dry battery" section Lens [3-1] Lens Control Page 65 Focus of [3-1] Lens Control Page 65 Zoom of [3-1] Lens Control Page 65 Shift of [5] Function Page 72 How to reset the lamp time .......... 5 Others Index (continued) Message Indicator (LED) display Page 17 Meaning Page 86 Lamp Replacement Lamp Number Page 78 Recommended use time Page 78 Lamp time of [6] Information Page 73 Replacement Page 78 Lamp power of [1-2] Advanced...


