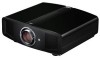
DLA-RS1U Owner's Manual (50 pages)
Page 2
... from overheating. Do not use a mount recommended by JVC could fall , causing serious injury to a child or... 2 Please read before the product is operated. - Place the projector near water. Unplug this product near a wall outlet where the ...for future reference. - In order not to defeat the safeguards incorporated into the outlet, contact your community due to environmental considerations. DLA-RS1_EN.book... Page 2 Wednesday, January 24, 2007 9:23 AM 1 Getting Started Safety Precautions IMPORTANT INFORMATION This product has a High Intensity Discharge (HID) lamp...
... from overheating. Do not use a mount recommended by JVC could fall , causing serious injury to a child or... 2 Please read before the product is operated. - Place the projector near water. Unplug this product near a wall outlet where the ...for future reference. - In order not to defeat the safeguards incorporated into the outlet, contact your community due to environmental considerations. DLA-RS1_EN.book... Page 2 Wednesday, January 24, 2007 9:23 AM 1 Getting Started Safety Precautions IMPORTANT INFORMATION This product has a High Intensity Discharge (HID) lamp...
DLA-RS1U Owner's Manual (50 pages)
Page 3
...be walked on the product. - Never spill liquid of the projector could result in a fire or electric shock. Refer all service to rain or water. d) If the product does...short out parts that are required, be impaired. - Upon completion of power supply to your home, consult your dealer to dangerous voltages and other equipment as this unit through openings as the ... Do not place combustibles behind the cooling fan. Do not defeat the safety purpose of the lightsource lamp. DLA-RS1_EN.book Page 3 Wednesday, January 24, 2007 9:23 AM ENGLISH Getting Started - Pay particular ...
...be walked on the product. - Never spill liquid of the projector could result in a fire or electric shock. Refer all service to rain or water. d) If the product does...short out parts that are required, be impaired. - Upon completion of power supply to your home, consult your dealer to dangerous voltages and other equipment as this unit through openings as the ... Do not place combustibles behind the cooling fan. Do not defeat the safety purpose of the lightsource lamp. DLA-RS1_EN.book Page 3 Wednesday, January 24, 2007 9:23 AM ENGLISH Getting Started - Pay particular ...
DLA-RS1U Owner's Manual (50 pages)
Page 8
DLA-RS1_EN.book Page 8 Wednesday, January 24, 2007 9:23 AM 1 Getting Started Contents Getting Started Safety ...via Component Video Cable 16 Connecting via SCART-RCA Cable 17 Connecting via RGB Video Cable 17 Installing the Projector and Screen 18 Screen Size and Projection Distance 19 Troubleshooting Troubleshooting 34 What to Do When These Messages ... 36 About Warning Indicators 37 Actions to Be Taken for Warning Mode 37 Replacing the Lamp 38 Procedure for Lamp Replacement 38 Resetting Lamp Time 40 Cleaning and Replacing the Filter 41 Others RS-232C Interface 42 RS-232C ...
DLA-RS1_EN.book Page 8 Wednesday, January 24, 2007 9:23 AM 1 Getting Started Contents Getting Started Safety ...via Component Video Cable 16 Connecting via SCART-RCA Cable 17 Connecting via RGB Video Cable 17 Installing the Projector and Screen 18 Screen Size and Projection Distance 19 Troubleshooting Troubleshooting 34 What to Do When These Messages ... 36 About Warning Indicators 37 Actions to Be Taken for Warning Mode 37 Replacing the Lamp 38 Procedure for Lamp Replacement 38 Resetting Lamp Time 40 Cleaning and Replacing the Filter 41 Others RS-232C Interface 42 RS-232C ...
DLA-RS1U Owner's Manual (50 pages)
Page 9
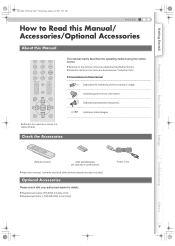
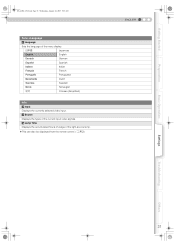
...and other printed material are described as [Button Name]. z Buttons on the menu are also included. z Replacement Lamp: BHL5009-S (Lamp Unit) z Replacement Filter: LC32058-002A (Inner Filter) Power Cord Settings Troubleshooting Others 9 Describes operational precautions. Buttons... to be used are described as ASelection ItemB. „ Conventions in a darker shade. Getting Started Preparation Basic Operation DLA-RS1_EN...
...and other printed material are described as [Button Name]. z Buttons on the menu are also included. z Replacement Lamp: BHL5009-S (Lamp Unit) z Replacement Filter: LC32058-002A (Inner Filter) Power Cord Settings Troubleshooting Others 9 Describes operational precautions. Buttons... to be used are described as ASelection ItemB. „ Conventions in a darker shade. Getting Started Preparation Basic Operation DLA-RS1_EN...

DLA-RS1U Owner's Manual (50 pages)
Page 10
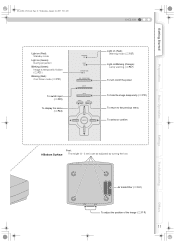
DLA-RS1_EN.book Page 10 Wednesday, January 24, 2007 9:23 AM 1 Getting Started Controls and Features To adjust the focus (pP21) To adjust the size of the image (pP21) z This unit comes with buffer material that cushions the lens. z Do not throw away the buffer material, retain for future use . Remove the buffer material before use . (pP46) „ Front Side/Left Side Remote Sensor (pP13) Air inlets Lamp Cover (pP38) Lens Cap Exhaust Vent „ Rear Side/Top Surface Remote Sensor (pP13) To connect the power cord (pP20) 10
DLA-RS1_EN.book Page 10 Wednesday, January 24, 2007 9:23 AM 1 Getting Started Controls and Features To adjust the focus (pP21) To adjust the size of the image (pP21) z This unit comes with buffer material that cushions the lens. z Do not throw away the buffer material, retain for future use . Remove the buffer material before use . (pP46) „ Front Side/Left Side Remote Sensor (pP13) Air inlets Lamp Cover (pP38) Lens Cap Exhaust Vent „ Rear Side/Top Surface Remote Sensor (pP13) To connect the power cord (pP20) 10
DLA-RS1U Owner's Manual (50 pages)
Page 11
Basic Operation Settings Troubleshooting Others Air Inlets/Filter (pP41) To adjust the position of the image (pP19) 11 Getting Started Preparation DLA-RS1_EN.book Page 11 Wednesday, January 24, 2007 9:23 AM ENGLISH Light on (Red): Standby mode Light on (Green): During projection Blinking (Green): Image... (Red): Cool Down mode (pP21) To switch input (pP20) To display the menu (pP24) Light on (Red): Warning mode (pP37) Light on/Blinking (Orange): Lamp warning (pP37) To turn on/off the power To hide the image temporarily (pP21) To return to the previous menu To select or confirm Feet...
Basic Operation Settings Troubleshooting Others Air Inlets/Filter (pP41) To adjust the position of the image (pP19) 11 Getting Started Preparation DLA-RS1_EN.book Page 11 Wednesday, January 24, 2007 9:23 AM ENGLISH Light on (Red): Standby mode Light on (Green): During projection Blinking (Green): Image... (Red): Cool Down mode (pP21) To switch input (pP20) To display the menu (pP24) Light on (Red): Warning mode (pP37) Light on/Blinking (Orange): Lamp warning (pP37) To turn on/off the power To hide the image temporarily (pP21) To return to the previous menu To select or confirm Feet...
DLA-RS1U Owner's Manual (50 pages)
Page 21
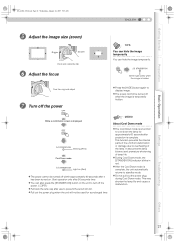
...turned off the power TIPS You can hide the image temporarily You can also press the [STANDBY/ON] button on . Getting Started Preparation Basic Operation DLA-RS1_EN.book Page 21 Wednesday, January 24, 2007 9:23 AM ENGLISH E Adjust the image size (zoom) Bigger Smaller Hold and rotate the tab ...Adjust the focus Turn the ring and adjust G Turn off when the image is hidden z Press the [HIDE] button again to cool down the lamp for a prolonged time. Green light blinks when the image is temporarily hidden. Start operation only after use to prevent the lens from deformation or ...
...turned off the power TIPS You can hide the image temporarily You can also press the [STANDBY/ON] button on . Getting Started Preparation Basic Operation DLA-RS1_EN.book Page 21 Wednesday, January 24, 2007 9:23 AM ENGLISH E Adjust the image size (zoom) Bigger Smaller Hold and rotate the tab ...Adjust the focus Turn the ring and adjust G Turn off when the image is hidden z Press the [HIDE] button again to cool down the lamp for a prolonged time. Green light blinks when the image is temporarily hidden. Start operation only after use to prevent the lens from deformation or ...
DLA-RS1U Owner's Manual (50 pages)
Page 30
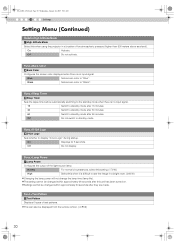
... Activate. Normal For normal circumstances, select this setting. (170 W) High Select this when using the projector in a bright room. (200 W) z Changing the lamp power will not change the lamp time (lamp life). z This can also be changed within approximately 60 seconds after they are made. z Settings...to standby mode after this unit has been turned on. z The setting cannot be changed within approximately 90 seconds after 60 minutes. DLA-RS1_EN.book Page 30 Wednesday, January 24, 2007 9:23 AM 4 Settings Setting Menu (Continued) Install.>High Altitude Mode a High ...
... Activate. Normal For normal circumstances, select this setting. (170 W) High Select this when using the projector in a bright room. (200 W) z Changing the lamp power will not change the lamp time (lamp life). z This can also be changed within approximately 60 seconds after they are made. z Settings...to standby mode after this unit has been turned on. z The setting cannot be changed within approximately 90 seconds after 60 minutes. DLA-RS1_EN.book Page 30 Wednesday, January 24, 2007 9:23 AM 4 Settings Setting Menu (Continued) Install.>High Altitude Mode a High ...
DLA-RS1U Owner's Manual (50 pages)
Page 31
... Displays the accumulated hours of usage of the current input video signals. i Source Displays the types of the light-source lamp. z This can also be displayed from the remote control. (pP12) ENGLISH Basic Operation Settings Troubleshooting Others 31 Japanese English English...231;ais French Português Portuguese Nederlands Dutch Svenska Swedish Norsk Norwegian தจ Chinese (Simplified) Info. Getting Started Preparation DLA-RS1_EN.book Page 31 Wednesday, January 24, 2007 9:23 AM Func.>Language g Language Sets the language of the menu display.
... Displays the accumulated hours of usage of the current input video signals. i Source Displays the types of the light-source lamp. z This can also be displayed from the remote control. (pP12) ENGLISH Basic Operation Settings Troubleshooting Others 31 Japanese English English...231;ais French Português Portuguese Nederlands Dutch Svenska Swedish Norsk Norwegian தจ Chinese (Simplified) Info. Getting Started Preparation DLA-RS1_EN.book Page 31 Wednesday, January 24, 2007 9:23 AM Func.>Language g Language Sets the language of the menu display.
DLA-RS1U Owner's Manual (50 pages)
Page 34
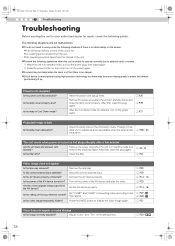
...Clean the filter. Press the [HIDE] button to display the video image again. Adjust AColorB and ATintB in standby mode and close the lamp cover properly. The following situations are not malfunctions. „ You do not need to worry under the following points. B Press the power... temporarily hidden? Is the AV device properly connected? Connect the AV device properly. Are the correct signals being output from the unit. DLA-RS1_EN.book Page 34 Wednesday, January 24, 2007 9:23 AM 5 Troubleshooting Troubleshooting Before sending the unit to your authorized dealer for repair...
...Clean the filter. Press the [HIDE] button to display the video image again. Adjust AColorB and ATintB in standby mode and close the lamp cover properly. The following situations are not malfunctions. „ You do not need to worry under the following points. B Press the power... temporarily hidden? Is the AV device properly connected? Connect the AV device properly. Are the correct signals being output from the unit. DLA-RS1_EN.book Page 34 Wednesday, January 24, 2007 9:23 AM 5 Troubleshooting Troubleshooting Before sending the unit to your authorized dealer for repair...
DLA-RS1U Owner's Manual (50 pages)
Page 36
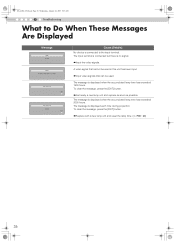
DLA-RS1_EN.book Page 36 Wednesday, January 24, 2007 9:23 AM 5 Troubleshooting What to the input terminal. Lamp replacement EXIT Lamp replacement Warning EXIT Cause (Details) No device is connected to Do When These Messages Are Displayed Message COMP No input HDMI-2 Frequency of input signal is out of range. gGet ready a new lamp...message is displayed when the accumulated lamp time has exceeded 1900 hours. gReplace with a new lamp unit and reset the lamp time. (pP38f40) 36 gInput the video signals. The message is displayed when the accumulated lamp time has exceeded 2000 hours....
DLA-RS1_EN.book Page 36 Wednesday, January 24, 2007 9:23 AM 5 Troubleshooting What to the input terminal. Lamp replacement EXIT Lamp replacement Warning EXIT Cause (Details) No device is connected to Do When These Messages Are Displayed Message COMP No input HDMI-2 Frequency of input signal is out of range. gGet ready a new lamp...message is displayed when the accumulated lamp time has exceeded 1900 hours. gReplace with a new lamp unit and reset the lamp time. (pP38f40) 36 gInput the video signals. The message is displayed when the accumulated lamp time has exceeded 2000 hours....
DLA-RS1U Owner's Manual (50 pages)
Page 37
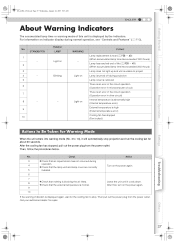
... displayed by the indicators. Getting Started Preparation Basic Operation DLA-RS1_EN.book Page 37 Wednesday, January 24, 2007 9:23 AM ENGLISH About Warning Indicators The accumulated lamp time or warning mode of life (pP38 f 40) (When accumulated lamp time has exceeded 2000 hours) Lamp does not light up and unit is unable to project...
... displayed by the indicators. Getting Started Preparation Basic Operation DLA-RS1_EN.book Page 37 Wednesday, January 24, 2007 9:23 AM ENGLISH About Warning Indicators The accumulated lamp time or warning mode of life (pP38 f 40) (When accumulated lamp time has exceeded 2000 hours) Lamp does not light up and unit is unable to project...
DLA-RS1U Owner's Manual (50 pages)
Page 38
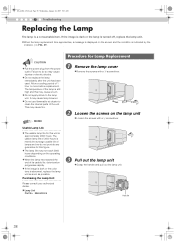
... not reach 2000 hours depending on the operating conditions. z When the lamp has reached the end of the lamp is indicated by the indicator. (pP36, 37) CAUTION z Pull the power plug from the power outlet. DLA-RS1_EN.book Page 38 Wednesday, January 24, 2007 9:23 AM 5 ...Troubleshooting Replacing the Lamp The lamp is turned off, replace the lamp unit. z Do not replace the lamp immediately after the unit has been used. Failure to the lamp unit. B Loosen the screws on...
... not reach 2000 hours depending on the operating conditions. z When the lamp has reached the end of the lamp is indicated by the indicator. (pP36, 37) CAUTION z Pull the power plug from the power outlet. DLA-RS1_EN.book Page 38 Wednesday, January 24, 2007 9:23 AM 5 ...Troubleshooting Replacing the Lamp The lamp is turned off, replace the lamp unit. z Do not replace the lamp immediately after the unit has been used. Failure to the lamp unit. B Loosen the screws on...
DLA-RS1U Owner's Manual (50 pages)
Page 39
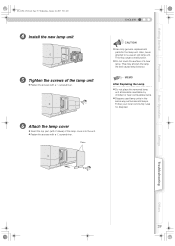
... at locations reachable by children or near combustible items. z Dispose used lamp units in the same way as fluorescent lamps. F Attach the lamp cover z Insert the top part (with a + screwdriver. Claws ENGLISH CAUTION z Use only genuine replacement parts for disposal. Getting Started Preparation DLA-RS1_EN.book Page 39 Wednesday, January 24, 2007 9:23 AM...
... at locations reachable by children or near combustible items. z Dispose used lamp units in the same way as fluorescent lamps. F Attach the lamp cover z Insert the top part (with a + screwdriver. Claws ENGLISH CAUTION z Use only genuine replacement parts for disposal. Getting Started Preparation DLA-RS1_EN.book Page 39 Wednesday, January 24, 2007 9:23 AM...
DLA-RS1U Owner's Manual (50 pages)
Page 40
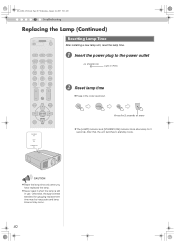
... plug to standby mode. Press for 2 seconds or more z The [LAMP] indicator and [STANDBY/ON] indicator blink alternately for gauging replacement time may be inaccurate and lamp blowout may occur. 40 CAUTION z Reset the lamp time only when you have replaced the lamp. DLA-RS1_EN.book Page 40 Wednesday, January 24, 2007 9:23 AM 5 Troubleshooting...
... plug to standby mode. Press for 2 seconds or more z The [LAMP] indicator and [STANDBY/ON] indicator blink alternately for gauging replacement time may be inaccurate and lamp blowout may occur. 40 CAUTION z Reset the lamp time only when you have replaced the lamp. DLA-RS1_EN.book Page 40 Wednesday, January 24, 2007 9:23 AM 5 Troubleshooting...
DLA-RS1U Owner's Manual (50 pages)
Page 48
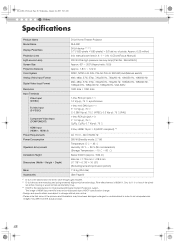
...Lamp Screen Size Projection Distance Color System Analog Video Input Format Digital Video Input Format Resolution Input Terminals Video Input (VIDEO) S-video Input (S-VIDEO) Component Video Input (COMPONENT) HDMI Input (HDMI 1, HDMI 2) Power Requirements Power Consumption Operation Environment Installation Height Dimensions (Width c Height c Depth) Mass Accessories D-ILA Home Theater Projector DLA... million) 2.0x manual zoom lens (1.4: 1 f 2.8: 1) (Zoom/Focus: Manual) 200 W Ultra-high pressure mercury lamp [Part No.: BHL5009-S] Approx. 60" f 200" (Aspect ratio: 16:9) Approx. 1.8 m f 12.2 m NTSC...
...Lamp Screen Size Projection Distance Color System Analog Video Input Format Digital Video Input Format Resolution Input Terminals Video Input (VIDEO) S-video Input (S-VIDEO) Component Video Input (COMPONENT) HDMI Input (HDMI 1, HDMI 2) Power Requirements Power Consumption Operation Environment Installation Height Dimensions (Width c Height c Depth) Mass Accessories D-ILA Home Theater Projector DLA... million) 2.0x manual zoom lens (1.4: 1 f 2.8: 1) (Zoom/Focus: Manual) 200 W Ultra-high pressure mercury lamp [Part No.: BHL5009-S] Approx. 60" f 200" (Aspect ratio: 16:9) Approx. 1.8 m f 12.2 m NTSC...


