

User Manual (English)
Page 2
...and Erasing Channels 19 Basic Operations ...20 Changing Channels ...20 Adjusting the Volume ...20 Selecting Input Source Signal 21 Selecting a Menu Language 21 Setting Picture...22 Customizing the Picture ...22 Using the Preset Picture Mode 22 Setting System...23 Setting System In TV Mode 23 Adjusting Screen Aspect...23 Reducing Picture Noise...23 VCR mode ...23 Loading Default Values...23 Setting System In VGA Mode 24 Changing the Position of Image 24 Adjusting Clock and Phase 24 Adjusting the Picture Automatically 24 Adjusting Screen Aspect...25 Displaying Resolution Information 25...
...and Erasing Channels 19 Basic Operations ...20 Changing Channels ...20 Adjusting the Volume ...20 Selecting Input Source Signal 21 Selecting a Menu Language 21 Setting Picture...22 Customizing the Picture ...22 Using the Preset Picture Mode 22 Setting System...23 Setting System In TV Mode 23 Adjusting Screen Aspect...23 Reducing Picture Noise...23 VCR mode ...23 Loading Default Values...23 Setting System In VGA Mode 24 Changing the Position of Image 24 Adjusting Clock and Phase 24 Adjusting the Picture Automatically 24 Adjusting Screen Aspect...25 Displaying Resolution Information 25...

User Manual (English)
Page 3
... default values ...29 TVPC Operations ...30 Viewing the TVPC ...30 Selecting the Signal Source for the TVPC Frame 30 Changing Channels for the TVPC Frame 30 Changing the Position of the TVPC Frame 31 Adjusting the Size of TVPC Frame 31 Viewing Picture-by-Picture 31 Using Hotkeys ...32 Setting Sleep Timer...32 Setting Audio Mode ...32 Freezing Picture...32 Viewing Closed Captions...33 Turning Closed Caption On or Off 33 Setting Closed Caption...33 Setting CC When Mute ...33 Adjusting Child Lock Settings...
... default values ...29 TVPC Operations ...30 Viewing the TVPC ...30 Selecting the Signal Source for the TVPC Frame 30 Changing Channels for the TVPC Frame 30 Changing the Position of the TVPC Frame 31 Adjusting the Size of TVPC Frame 31 Viewing Picture-by-Picture 31 Using Hotkeys ...32 Setting Sleep Timer...32 Setting Audio Mode ...32 Freezing Picture...32 Viewing Closed Captions...33 Turning Closed Caption On or Off 33 Setting Closed Caption...33 Setting CC When Mute ...33 Adjusting Child Lock Settings...
User Manual (English)
Page 4
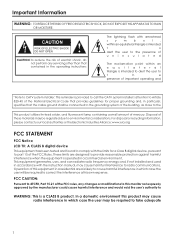
... operating instructions The lightning flash with the instruction manual, may be connected to the grounding system of this equipment in a commercial environment. FCC CAUTION: Pursuant to 47CFR, Part 15.21 of important operating and "Note to CATV system installer: This reminder is operated in a residential area is a CLASS B product. This equipment generates, uses, and can radiate radio frequency energy and, if not installed...
... operating instructions The lightning flash with the instruction manual, may be connected to the grounding system of this equipment in a commercial environment. FCC CAUTION: Pursuant to 47CFR, Part 15.21 of important operating and "Note to CATV system installer: This reminder is operated in a residential area is a CLASS B product. This equipment generates, uses, and can radiate radio frequency energy and, if not installed...

User Manual (English)
Page 6
... 19.Damage requiring service---If any of service or repair work by the manufacturer, or sold with the cart, stand, tripod, bracket, or table specified by a qualified technician. High voltage flows in any way, such as power-supply cord or plug is left unattended and unused for long periods of controls not described in the operating instructions. When the power cord or plug is spilled on...
... 19.Damage requiring service---If any of service or repair work by the manufacturer, or sold with the cart, stand, tripod, bracket, or table specified by a qualified technician. High voltage flows in any way, such as power-supply cord or plug is left unattended and unused for long periods of controls not described in the operating instructions. When the power cord or plug is spilled on...

User Manual (English)
Page 7
... can break when the product is intended to your home, consult your product dealer. If you are not sure of the type of glass. The socket outlet should be changed. Use 23.Panel protection---The LCD panel used with another power supply voltage, the power cable must be installed near the equipment and easily accessible. Therefore, it is left unattended and unused for this...
... can break when the product is intended to your home, consult your product dealer. If you are not sure of the type of glass. The socket outlet should be changed. Use 23.Panel protection---The LCD panel used with another power supply voltage, the power cable must be installed near the equipment and easily accessible. Therefore, it is left unattended and unused for this...

User Manual (English)
Page 8
Preparations Using the Remote Control
Preparations Using the Remote Control

User Manual (English)
Page 10
... mode. button to access the Menu main page. 3. MENU Press this button to adjust the value or setting of Controls Main Unit AC INPUT Power Indicator Remote Sensor A blue indicator lights when the power is on and a red indicator lights when in the CH+ CH- This 7 CH+/- VOL+ VOL- Identification of each item. 5. POWER Press this button to directly increase or decrease the sound volume level; In OSD Menu, press these buttons to turn...
... mode. button to access the Menu main page. 3. MENU Press this button to adjust the value or setting of Controls Main Unit AC INPUT Power Indicator Remote Sensor A blue indicator lights when the power is on and a red indicator lights when in the CH+ CH- This 7 CH+/- VOL+ VOL- Identification of each item. 5. POWER Press this button to directly increase or decrease the sound volume level; In OSD Menu, press these buttons to turn...

User Manual (English)
Page 11
...Video input Receive video/audio signals from external sources such as VCR or DVD player. 4. COMPONENT inputs (Y, Pb/Cb, Pr/Cr, Audio L, R) Note: 8 AV outputs (Video, Audio L, R) Connect to the VCR input jacks to connect cable or outdoor antenna. 2. Antenna input Allows you to record programs. 6. Receive a S-Video signal from external sources such as VCR or DVD player. 5. Main Unit Identification of Controls (continued) AV1 IN / S-VIDEO IN ANTENNA INPUT HEADPHONE S-VIDEO S-VIDEO AVI INPUT/ AUDIO R R S-VIDEO IN AUDIO L/MONO AUDIO L/MONO VIDEO VIDEO AV2 INPUT AUDIO R AUDIO...
...Video input Receive video/audio signals from external sources such as VCR or DVD player. 4. COMPONENT inputs (Y, Pb/Cb, Pr/Cr, Audio L, R) Note: 8 AV outputs (Video, Audio L, R) Connect to the VCR input jacks to connect cable or outdoor antenna. 2. Antenna input Allows you to record programs. 6. Receive a S-Video signal from external sources such as VCR or DVD player. 5. Main Unit Identification of Controls (continued) AV1 IN / S-VIDEO IN ANTENNA INPUT HEADPHONE S-VIDEO S-VIDEO AVI INPUT/ AUDIO R R S-VIDEO IN AUDIO L/MONO AUDIO L/MONO VIDEO VIDEO AV2 INPUT AUDIO R AUDIO...

User Manual (English)
Page 12
Identification of 9. Up, Down 13. PBP 2 10 3 11 4 12 4. CCD 14. POS 8 15 7. to adjust volume; 9 VOL+/-: Use to select menu item; P.S. 5 13 6 5. Menu 8.Enter To confirm, enter submenu or toggle the settings of Controls (continued) Remote Control 1. CH+/-: Use to switch channels; Sleep 10. Size 12. In Menu operation, use CH+/- TV/PC 7 14 Note: The TVPC function means you may view a TV program from a mini window while the main window is displaying a 6. POWER 2. DSP 15. Still 11. Auto 1 9 3.
Identification of 9. Up, Down 13. PBP 2 10 3 11 4 12 4. CCD 14. POS 8 15 7. to adjust volume; 9 VOL+/-: Use to select menu item; P.S. 5 13 6 5. Menu 8.Enter To confirm, enter submenu or toggle the settings of Controls (continued) Remote Control 1. CH+/-: Use to switch channels; Sleep 10. Size 12. In Menu operation, use CH+/- TV/PC 7 14 Note: The TVPC function means you may view a TV program from a mini window while the main window is displaying a 6. POWER 2. DSP 15. Still 11. Auto 1 9 3.

User Manual (English)
Page 14
... external device, turn the power off on the panel to connect: Connect the Audio/Video cables between the Audio (L/R)/Video jacks on your LCD TV , press Source control. button on your model. Turn on the remote Source Select VGA DVI RF Video1 Video2 SVideo YPbPr1 YPbPr2 11 Note: To play VCR 1. Connections Cautions Before Connecting Carefully check the terminals for position and type before making any issues. Connect a VCR ANTENNA INPUT HEADPHONE S-VIDEO AVI INPUT R AUDIO L/MONO VIDEO AV2 INPUT AV OUT AV1 IN / S-VIDEO IN Y WR S-video cable...
... external device, turn the power off on the panel to connect: Connect the Audio/Video cables between the Audio (L/R)/Video jacks on your LCD TV , press Source control. button on your model. Turn on the remote Source Select VGA DVI RF Video1 Video2 SVideo YPbPr1 YPbPr2 11 Note: To play VCR 1. Connections Cautions Before Connecting Carefully check the terminals for position and type before making any issues. Connect a VCR ANTENNA INPUT HEADPHONE S-VIDEO AVI INPUT R AUDIO L/MONO VIDEO AV2 INPUT AV OUT AV1 IN / S-VIDEO IN Y WR S-video cable...

User Manual (English)
Page 15
... be different and is Source Select VGA DVI RF Video1 Video2 SVideo YPbPr1 YPbPr2 12 to select Video2 and press Enter to connect: Connect the Audio/Video cables between the Audio (L/R)/Video jacks on the unit and camcorder. To playback Camcorder 1. Connect a Camcorder ANTENNA INPUT HEADPHONE S-VIDEO AVI INPUT R AUDIO L/MONO VIDEO AV2 INPUT AV OUT AV1 IN / S-VIDEO IN Y Yellow (VIDEO) W White (AUDIO L) R Red (AUDIO R ) OUT IN Y WR Connections (continued) Video cable Audio cable Y WR VIDEO R AUDIO L How to confirm. 3. Turn on the remote control. 2.
... be different and is Source Select VGA DVI RF Video1 Video2 SVideo YPbPr1 YPbPr2 12 to select Video2 and press Enter to connect: Connect the Audio/Video cables between the Audio (L/R)/Video jacks on the unit and camcorder. To playback Camcorder 1. Connect a Camcorder ANTENNA INPUT HEADPHONE S-VIDEO AVI INPUT R AUDIO L/MONO VIDEO AV2 INPUT AV OUT AV1 IN / S-VIDEO IN Y Yellow (VIDEO) W White (AUDIO L) R Red (AUDIO R ) OUT IN Y WR Connections (continued) Video cable Audio cable Y WR VIDEO R AUDIO L How to confirm. 3. Turn on the remote control. 2.
User Manual (English)
Page 16
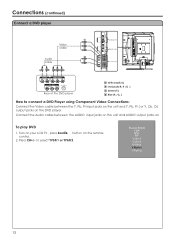
... remote control. 2. Press CH+/- Connect the Audio cable between the Y, Pb, Pr input jacks on the unit and Y, Pb, Pr ( or Y, Cb, Cr) output jacks on the DVD player. Connections (continued) Connect a DVD player Video cable G BR DVI-D IN D-Sub IN D-Sub D-Sub IN AU DI O DVI-D DVI-D IN AU DI O COMPONENT IN RW Audio cable COMPONENT IN W R RB G AUDIO L AUDIO R COMPONENT Pr Pb Y AV OUT R AUDIO L VIDEO S-VIDEO Rear of the DVD player W white (audio L) R red (audio R, Pr /Cr ) G Green (Y) B Blue (Pb/Cb ) How to select...
... remote control. 2. Press CH+/- Connect the Audio cable between the Y, Pb, Pr input jacks on the unit and Y, Pb, Pr ( or Y, Cb, Cr) output jacks on the DVD player. Connections (continued) Connect a DVD player Video cable G BR DVI-D IN D-Sub IN D-Sub D-Sub IN AU DI O DVI-D DVI-D IN AU DI O COMPONENT IN RW Audio cable COMPONENT IN W R RB G AUDIO L AUDIO R COMPONENT Pr Pb Y AV OUT R AUDIO L VIDEO S-VIDEO Rear of the DVD player W white (audio L) R red (audio R, Pr /Cr ) G Green (Y) B Blue (Pb/Cb ) How to select...
User Manual (English)
Page 19
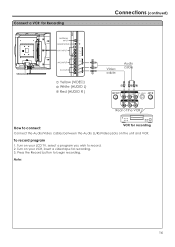
Connect a VCR for Recording Connections (continued) AV1 IN / S-VIDEO IN ANTENNA INPUT HEADPHONE S-VIDEO AVI INPUT R AUDIO L/MONO VIDEO AV2 INPUT AV OUT Y Yellow (VIDEO) W White (AUDIO L) R Red (AUDIO R ) Y WR Video cable Audio cable Y WR AV OUT ANT OUT VIDEO L AUDIO R S-VIDEO ANT IN AV IN VIDEO L AUDIO R Rear of the VCR How to connect: VCR for recording. 3. Press the Record button to record. 2. Turn on your VCR, insert a videotape for recording Connect the Audio/Video cables between the Audio (L/R)/Video jacks on your LCD TV, select a program you wish to ...
Connect a VCR for Recording Connections (continued) AV1 IN / S-VIDEO IN ANTENNA INPUT HEADPHONE S-VIDEO AVI INPUT R AUDIO L/MONO VIDEO AV2 INPUT AV OUT Y Yellow (VIDEO) W White (AUDIO L) R Red (AUDIO R ) Y WR Video cable Audio cable Y WR AV OUT ANT OUT VIDEO L AUDIO R S-VIDEO ANT IN AV IN VIDEO L AUDIO R Rear of the VCR How to connect: VCR for recording. 3. Press the Record button to record. 2. Turn on your VCR, insert a videotape for recording Connect the Audio/Video cables between the Audio (L/R)/Video jacks on your LCD TV, select a program you wish to ...

User Manual (English)
Page 22
MAIN MENU Picture Sound CH System OSD TVPC Setup TV/Cable Channel No Add/Erase Auto Search 8 MAIN MENU Picture Sound CH System OSD TVPC Setup TV/Cable Channel No Add/Erase Auto Search Erase 19 Memorizing the Channels (continued) Adding and Erasing Channels 1 2 3 4 5 You can also use number buttons to select a desired channel 6 7 When the item is set to add, the selected channel will be added. When the item is set to erase, the selected channel will be erased.
MAIN MENU Picture Sound CH System OSD TVPC Setup TV/Cable Channel No Add/Erase Auto Search 8 MAIN MENU Picture Sound CH System OSD TVPC Setup TV/Cable Channel No Add/Erase Auto Search Erase 19 Memorizing the Channels (continued) Adding and Erasing Channels 1 2 3 4 5 You can also use number buttons to select a desired channel 6 7 When the item is set to add, the selected channel will be added. When the item is set to erase, the selected channel will be erased.

User Manual (English)
Page 25
.../Video mode Option Color Function Adjusts color saturation. Adjusts image contrast. 0~100 0~100 Sharpness Tint Adjusts image sharpness and displays a sharp image. There are three preset picture modes (Bright, Soft and Nature) and one user-set picture mode (User). Bright: Select for image. Soft: Select for easier viewing of dark scenes such as night scenes and black hair. Operation VOL+ deeper Range 0~100 Brightness Contrast Adjusts screen brightness for a finely detailed picture. Each preset mode has its own picture settings. Using...
.../Video mode Option Color Function Adjusts color saturation. Adjusts image contrast. 0~100 0~100 Sharpness Tint Adjusts image sharpness and displays a sharp image. There are three preset picture modes (Bright, Soft and Nature) and one user-set picture mode (User). Bright: Select for image. Soft: Select for easier viewing of dark scenes such as night scenes and black hair. Operation VOL+ deeper Range 0~100 Brightness Contrast Adjusts screen brightness for a finely detailed picture. Each preset mode has its own picture settings. Using...

User Manual (English)
Page 31
... 0~100 0~100 Treble Adjusts Treble (high sounds). VOL-Higher volume from right speaker. Mutes the sound Use Enter to toggle On or Off Speaker Turns on or off speaker sound output Use Enter to toggle On or Off Head Phone Turns on or off headphone sound output Use Enter to toggle On or Off Using the Preset Sound Mode Use the Sound button to quickly select sound mode. Each preset mode has its own sound settings (Bass and Treble ). SRS...
... 0~100 0~100 Treble Adjusts Treble (high sounds). VOL-Higher volume from right speaker. Mutes the sound Use Enter to toggle On or Off Speaker Turns on or off speaker sound output Use Enter to toggle On or Off Head Phone Turns on or off headphone sound output Use Enter to toggle On or Off Using the Preset Sound Mode Use the Sound button to quickly select sound mode. Each preset mode has its own sound settings (Bass and Treble ). SRS...
User Manual (English)
Page 35
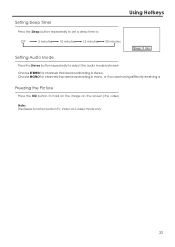
Choose MONO for channels that are broadcasting in mono, or if you are broadcasting in TV, Video or S-video mode only. 32 Setting Audio Mode Press the Stereo button repeatedly to Off 5 minutes 10 minutes 15 minutes 30 minutes Sleep: 5 min. Using Hotkeys Setting Sleep Timer Press the Sleep button repeatedly to set a sleep time to select the audio mode between Choose STEREO for channels that are having difficulty receiving a Freezing the Picture Press the Still button to hold on the image on the screen (the video Note: The freeze function works in stereo.
Choose MONO for channels that are broadcasting in mono, or if you are broadcasting in TV, Video or S-video mode only. 32 Setting Audio Mode Press the Stereo button repeatedly to Off 5 minutes 10 minutes 15 minutes 30 minutes Sleep: 5 min. Using Hotkeys Setting Sleep Timer Press the Sleep button repeatedly to set a sleep time to select the audio mode between Choose STEREO for channels that are having difficulty receiving a Freezing the Picture Press the Still button to hold on the image on the screen (the video Note: The freeze function works in stereo.

User Manual (English)
Page 36
... mode, four channels are usually subtitles for the Note: The Caption feature does not work with certain TV shows. Viewing Closed Captions The unit decodes and displays the closed captions that is independent of the picture. All VCRs record the closed caption signal from television programs, so home-recorded video tapes also provide closed captions as TV program schedule, weather forecast, etc.) that are broadcast with YPbPr, VGA,DVI. Most prerecorded commercial video tapes provide closed captions. The [CAPTION] mode...
... mode, four channels are usually subtitles for the Note: The Caption feature does not work with certain TV shows. Viewing Closed Captions The unit decodes and displays the closed captions that is independent of the picture. All VCRs record the closed caption signal from television programs, so home-recorded video tapes also provide closed captions as TV program schedule, weather forecast, etc.) that are broadcast with YPbPr, VGA,DVI. Most prerecorded commercial video tapes provide closed captions. The [CAPTION] mode...

User Manual (English)
Page 41
... poor color Poor picture Horizontal dotted line Television not responding to remote control Check item !This may !Check that the Speaker item in SOUND menu is set to ON. • Adjust the contrast, color and brightness !Sometimes, poor picture quality occurs when having activated an S-VHS camera or camcorder connected and having connected another channel. !Adjust the contrast and brightness settings. !Check the Closed Captions control. Then re-plug the power cord and turn...
... poor color Poor picture Horizontal dotted line Television not responding to remote control Check item !This may !Check that the Speaker item in SOUND menu is set to ON. • Adjust the contrast, color and brightness !Sometimes, poor picture quality occurs when having activated an S-VHS camera or camcorder connected and having connected another channel. !Adjust the contrast and brightness settings. !Check the Closed Captions control. Then re-plug the power cord and turn...

User Manual (English)
Page 44
... Video Out Audio In Audio Out Accessories RF : TV/CATV 75ohms coaxial x 1 AV : RCA 75ohms composite video x 2 S-Video : 4-pin DIN x 1 D-Sub 15 x 1 DVI-Dx1 YPbPr/YCbCr (Support HDTV): RCA for DVD, STB x 2 RCA 75 ohms x 1 L/R RCA for AV x 2 Stereo mini phone Jack for PC x 1 Stereo mini phone Jack for DVI-D x 1 L/R RCA for YPbPr/YCbCr x 2 L/R RCA for Video Out x 1 Headphone Jack : Stereo mini phone Jack x 1 1 User Manual 1 Remote Control 1 Power Cord 2 AAA Batteries Display Format Supported...
... Video Out Audio In Audio Out Accessories RF : TV/CATV 75ohms coaxial x 1 AV : RCA 75ohms composite video x 2 S-Video : 4-pin DIN x 1 D-Sub 15 x 1 DVI-Dx1 YPbPr/YCbCr (Support HDTV): RCA for DVD, STB x 2 RCA 75 ohms x 1 L/R RCA for AV x 2 Stereo mini phone Jack for PC x 1 Stereo mini phone Jack for DVI-D x 1 L/R RCA for YPbPr/YCbCr x 2 L/R RCA for Video Out x 1 Headphone Jack : Stereo mini phone Jack x 1 1 User Manual 1 Remote Control 1 Power Cord 2 AAA Batteries Display Format Supported...


