
User Manual (English)
Page 1
USER'S GUIDE April 2004 I-LC23Q1 23" LCD TV Display I-LC26Q1 26" LCD TV Display IMPORTANT: Read this guide thoroughly before using the unit.
USER'S GUIDE April 2004 I-LC23Q1 23" LCD TV Display I-LC26Q1 26" LCD TV Display IMPORTANT: Read this guide thoroughly before using the unit.

User Manual (English)
Page 3
... START...7 1-1 What's in the Box ...7 1-2 Optional Accessories 7 1-3 Inserting Batteries into the Remote Control 8 1-4 Turning ON the Power 8 2 YOUR LCD TV AT A GLANCE 9 2-1 Front Panel Controls 9 2-2 Right-side Connectors 10 2-3 Back Connectors...11 3 YOUR REMOTE CONTROL AT A GLANCE 15 3-1 Remote Control ... Box 18 4-3 Connecting Your VCR or Video Camera 19 4-4 Connecting Broadcast TV or Cable TV 21 4-5 Connecting a Computer 21 5 GETTING STARTED ...23 5-1 Plugging In Your LCD TV 23 5-2 Turning On the LCD TV 23 6 ADJUSTING SETTINGS 25 6-1 Basic Operations...25 6-2 Using the On-...
... START...7 1-1 What's in the Box ...7 1-2 Optional Accessories 7 1-3 Inserting Batteries into the Remote Control 8 1-4 Turning ON the Power 8 2 YOUR LCD TV AT A GLANCE 9 2-1 Front Panel Controls 9 2-2 Right-side Connectors 10 2-3 Back Connectors...11 3 YOUR REMOTE CONTROL AT A GLANCE 15 3-1 Remote Control ... Box 18 4-3 Connecting Your VCR or Video Camera 19 4-4 Connecting Broadcast TV or Cable TV 21 4-5 Connecting a Computer 21 5 GETTING STARTED ...23 5-1 Plugging In Your LCD TV 23 5-2 Turning On the LCD TV 23 6 ADJUSTING SETTINGS 25 6-1 Basic Operations...25 6-2 Using the On-...
User Manual (English)
Page 5
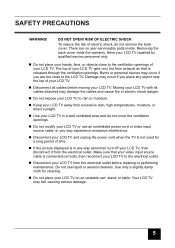
.... Do not use an unshielded power cord or video input source cable, or you may experience excessive interference. Do not place your LCD TV to the ventilation openings of time. Burns or personal injuries may damage the cables and cause fire or electric shock danger. Disconnect your LCD...-ventilated area and do not remove the back cover. Make sure that is not used for cleaning. Keep your LCD TV away from exhaust air that your LCD TV. Do not place your LCD TV repaired by qualified service personnel only. RISK OF ELECTRIC SHOCK To reduce the risk of your LCD...
.... Do not use an unshielded power cord or video input source cable, or you may experience excessive interference. Do not place your LCD TV to the ventilation openings of time. Burns or personal injuries may damage the cables and cause fire or electric shock danger. Disconnect your LCD...-ventilated area and do not remove the back cover. Make sure that is not used for cleaning. Keep your LCD TV away from exhaust air that your LCD TV. Do not place your LCD TV repaired by qualified service personnel only. RISK OF ELECTRIC SHOCK To reduce the risk of your LCD...
User Manual (English)
Page 7
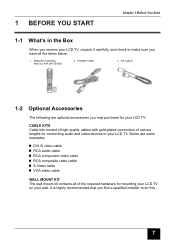
It is highly recommended that you may purchase for your LCD TV: CABLE KITS Cable kits consist of high-quality cables with gold-plated connectors of the required hardware for connecting ...find a qualified installer to do this. 7 7 1 BEFORE YOU START Chapter 1 Before You Start 1-1 What's in the Box When you receive your LCD TV, unpack it carefully, and check to make sure you have all the items below. 1 REMOTE CONTROL AND two AAA BATTERIES 2 POWER CORD 3 RF CABLE...cable VGA video cable WALL MOUNT KIT The wall mount kit contains all of various lengths for mounting your LCD TV on your LCD...
It is highly recommended that you may purchase for your LCD TV: CABLE KITS Cable kits consist of high-quality cables with gold-plated connectors of the required hardware for connecting ...find a qualified installer to do this. 7 7 1 BEFORE YOU START Chapter 1 Before You Start 1-1 What's in the Box When you receive your LCD TV, unpack it carefully, and check to make sure you have all the items below. 1 REMOTE CONTROL AND two AAA BATTERIES 2 POWER CORD 3 RF CABLE...cable VGA video cable WALL MOUNT KIT The wall mount kit contains all of various lengths for mounting your LCD TV on your LCD...

User Manual (English)
Page 8
... power cord into place. 1-4 Turning ON the Power 1. WARNING! 8 If you match the + and - Press the POWER button on the front of your LCD TV or on the back of time, turn on. 3. Insert two AAA batteries into the Remote Control Before using the remote control or front POWER button... Chapter 1 Before You Start 1-3 Inserting Batteries into the remote control. When the batteries become depleted and the remote control fails to turn off your LCD TV from the wall outlet and disconnect the antenna or cable system. Make sure that you will be away for the first time, insert two AAA...
... power cord into place. 1-4 Turning ON the Power 1. WARNING! 8 If you match the + and - Press the POWER button on the front of your LCD TV or on the back of time, turn on. 3. Insert two AAA batteries into the Remote Control Before using the remote control or front POWER button... Chapter 1 Before You Start 1-3 Inserting Batteries into the remote control. When the batteries become depleted and the remote control fails to turn off your LCD TV from the wall outlet and disconnect the antenna or cable system. Make sure that you will be away for the first time, insert two AAA...

User Manual (English)
Page 9
... current menu option. Selects the next menu option. Selects the previous menu option. 9 9 Turns the LCD TV ON/OFF. Displays the next stored channel. Increases a menu option value. Chapter 2 Your LCD TV At A Glance 2 YOUR LCD TV AT A GLANCE 2-1 Front Panel Controls BUTTON VIEWING FUNCTION (OSD OFF) Lowers the sound level Increases the...
... current menu option. Selects the next menu option. Selects the previous menu option. 9 9 Turns the LCD TV ON/OFF. Displays the next stored channel. Increases a menu option value. Chapter 2 Your LCD TV At A Glance 2 YOUR LCD TV AT A GLANCE 2-1 Front Panel Controls BUTTON VIEWING FUNCTION (OSD OFF) Lowers the sound level Increases the...

User Manual (English)
Page 10
Video/Audio-in speakers. Connect composite audio/video devices, such as camcorders or digital cameras to this jack automatically disables the built-in - Using this stereo headphone jack. Chapter 2 Your LCD TV At A Glance 2-2 Right-side Connectors CONNECTOR DESCRIPTION Headphone Jack - Connect amplified speakers or headphones to these. 10
Video/Audio-in speakers. Connect composite audio/video devices, such as camcorders or digital cameras to this jack automatically disables the built-in - Using this stereo headphone jack. Chapter 2 Your LCD TV At A Glance 2-2 Right-side Connectors CONNECTOR DESCRIPTION Headphone Jack - Connect amplified speakers or headphones to these. 10

User Manual (English)
Page 11
Chapter 2 Your LCD TV At A Glance 2-3 Back Connectors To access the connectors on the back of your LCD TV, you will need to lift up and remove the protective cover. 11 11
Chapter 2 Your LCD TV At A Glance 2-3 Back Connectors To access the connectors on the back of your LCD TV, you will need to lift up and remove the protective cover. 11 11

User Manual (English)
Page 12
Connect the power cable to a computer's audio out jack. Connects to this . 12 Audio in - DVI in - Chapter 2 Your LCD TV At A Glance CONNECTOR DESCRIPTION Main power switch - Power cord connector - Audio out - Connects to a DVI video device, such as a computer or cable/Satellite box. Turns the main power ON and OFF. VGA in - Connects to a VGA video device, such as a computer or cable/Satellite box. Connect an external amplifier or speaker to this .
Connect the power cable to a computer's audio out jack. Connects to this . 12 Audio in - DVI in - Chapter 2 Your LCD TV At A Glance CONNECTOR DESCRIPTION Main power switch - Power cord connector - Audio out - Connects to a DVI video device, such as a computer or cable/Satellite box. Turns the main power ON and OFF. VGA in - Connects to a VGA video device, such as a computer or cable/Satellite box. Connect an external amplifier or speaker to this .

User Manual (English)
Page 14
Chapter 2 Your LCD TV At A Glance This page is intentionally left blank. 14
Chapter 2 Your LCD TV At A Glance This page is intentionally left blank. 14
User Manual (English)
Page 15
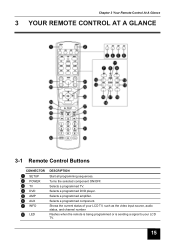
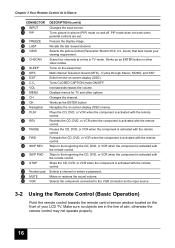
Selects a programmed amplifier. Chapter 3 Your Remote Control At A Glance 3 YOUR REMOTE CONTROL AT A GLANCE 3-1 Remote Control Buttons CONNECTOR SETUP POWER TV DVD AMP AUX INFO LED DESCRIPTION Start all programming sequences. Selects a programmed DVD player. Selects a programmed TV. Shows the current status of your LCD TV, such as the video input source, audio status, and channel number Flashes when the remote is being programmed or is sending a signal to your LCD TV. 15 15 Turns the selected component ON/OFF. Selects a programmed component.
Selects a programmed amplifier. Chapter 3 Your Remote Control At A Glance 3 YOUR REMOTE CONTROL AT A GLANCE 3-1 Remote Control Buttons CONNECTOR SETUP POWER TV DVD AMP AUX INFO LED DESCRIPTION Start all programming sequences. Selects a programmed DVD player. Selects a programmed TV. Shows the current status of your LCD TV, such as the video input source, audio status, and channel number Flashes when the remote is being programmed or is sending a signal to your LCD TV. 15 15 Turns the selected component ON/OFF. Selects a programmed component.
User Manual (English)
Page 16
...) Point the remote control towards the remote control sensor window located on and off. PIP mode does not work when parental controls are in TV mode. Recalls the last viewed channel. Pauses the CD, DVD, or VCR when the component is activated with the remote control. Freezes the... or VCR when the component is activated with the remote control. Selects the picture format (Panoramic Stretch/16:9, 4:3, Zoom) that best meets your LCD TV. Rewinds the CD, DVD, or VCR when the component is activated with the remote control. Scans four channels at a time in the line of...
...) Point the remote control towards the remote control sensor window located on and off. PIP mode does not work when parental controls are in TV mode. Recalls the last viewed channel. Pauses the CD, DVD, or VCR when the component is activated with the remote control. Freezes the... or VCR when the component is activated with the remote control. Selects the picture format (Panoramic Stretch/16:9, 4:3, Zoom) that best meets your LCD TV. Rewinds the CD, DVD, or VCR when the component is activated with the remote control. Scans four channels at a time in the line of...

User Manual (English)
Page 17
... jack on the back of your DVD player to select YPBPR. Connect the red-colored PR or CR jack on the back of your LCD TV. 3. Connect the green-colored Y jack on the back of your DVD player to the R and L audio-in (YPBPR) Subwoofer 17 17 Connect the red (R) ...and white (L) audio jacks on the back of your DVD player to the green-colored Y jack on the back of your LCD TV. 4-1 Connecting Your DVD Player 4-1-1 TO CONNECT USING COMPONENT VIDEO 1. Before connecting any external components, make sure to connect the following devices: DVD players HDTV ...
... jack on the back of your DVD player to select YPBPR. Connect the red-colored PR or CR jack on the back of your LCD TV. 3. Connect the green-colored Y jack on the back of your DVD player to the R and L audio-in (YPBPR) Subwoofer 17 17 Connect the red (R) ...and white (L) audio jacks on the back of your DVD player to the green-colored Y jack on the back of your LCD TV. 4-1 Connecting Your DVD Player 4-1-1 TO CONNECT USING COMPONENT VIDEO 1. Before connecting any external components, make sure to connect the following devices: DVD players HDTV ...

User Manual (English)
Page 18
... blue PB or CB jack on the back of your HDTV set -top box to the blue PBCB jack on the back of your LCD TV. 2. Connect the red (R) and white (L) audio jacks on the back of your HDTV set -top box to select YPBPR. 18 Connect the red (R) and white... your DVD player to the R and L audio-in (YPBPR) Subwoofer 4-2 Connecting Your HDTV Set-top Box 4-2-1 TO CONNECT USING COMPONENT VIDEO 1. Turn on your LCD TV (see 1-4 Turning ON the Power), then press the INPUT button repeatedly to one of the S-VIDEO (S1 or S2 jacks on the back of your...
... blue PB or CB jack on the back of your HDTV set -top box to the blue PBCB jack on the back of your LCD TV. 2. Connect the red (R) and white (L) audio jacks on the back of your HDTV set -top box to select YPBPR. 18 Connect the red (R) and white... your DVD player to the R and L audio-in (YPBPR) Subwoofer 4-2 Connecting Your HDTV Set-top Box 4-2-1 TO CONNECT USING COMPONENT VIDEO 1. Turn on your LCD TV (see 1-4 Turning ON the Power), then press the INPUT button repeatedly to one of the S-VIDEO (S1 or S2 jacks on the back of your...

User Manual (English)
Page 19
... or video camera to the appropriately numbered AV1 or AV2 R and L audio-in jacks on your LCD TV (see 1-4 Turning ON the Power), then press the INPUT button repeatedly to the yellow AV1 or AV2 jack... on the back of your LCD TV. 19 19 Turn on the back of your LCD TV. 3. Connect the red (R) and white (L) audio jacks on the back of your... DVD player to one of the S-VIDEO (S1 or S2 jacks on the back of your LCD TV with the correct optional cable. 2. Connect the S-Video jack on the back of your DVD player to the ...
... or video camera to the appropriately numbered AV1 or AV2 R and L audio-in jacks on your LCD TV (see 1-4 Turning ON the Power), then press the INPUT button repeatedly to the yellow AV1 or AV2 jack... on the back of your LCD TV. 19 19 Turn on the back of your LCD TV. 3. Connect the red (R) and white (L) audio jacks on the back of your... DVD player to one of the S-VIDEO (S1 or S2 jacks on the back of your LCD TV with the correct optional cable. 2. Connect the S-Video jack on the back of your DVD player to the ...

User Manual (English)
Page 20
... CONNECT USING COAXIAL (RF) 1. If you have an broadcast antenna or cable box, connect your broadcast antenna or cable TV coaxial (RF) cable to the UHF/VHF jack on your LCD TV (see 1-4 Turning ON the Power), then press the INPUT button repeatedly to select AV1/S1 or AV2/S2. Connect the... out or Antenna out) jack on the back of your VCR to the UHF/VHF connector on your LCD TV with the correct optional cable. 2. Turn on the back of your LCD TV (see 1-4 Turning ON the Power), then press the INPUT button repeatedly to your VCR. UHF/VHF (CATV) S-Video (S1...
... CONNECT USING COAXIAL (RF) 1. If you have an broadcast antenna or cable box, connect your broadcast antenna or cable TV coaxial (RF) cable to the UHF/VHF jack on your LCD TV (see 1-4 Turning ON the Power), then press the INPUT button repeatedly to select AV1/S1 or AV2/S2. Connect the... out or Antenna out) jack on the back of your VCR to the UHF/VHF connector on your LCD TV with the correct optional cable. 2. Turn on the back of your LCD TV (see 1-4 Turning ON the Power), then press the INPUT button repeatedly to your VCR. UHF/VHF (CATV) S-Video (S1...

User Manual (English)
Page 21
.../AV2) Component HDTV Video/Audio in jack. 3. If you have connected a VCR to the UHF/VHF connector on the back of your LCD TV, connect your broadcast TV or cable TV coaxial (RF) cable to select CATV. 3. WARNING! Turn on the back of this display is correctly grounded. NOTE: The DVI input of... your LCD TV with the correct optional cable. 2. Connect the DVI connector on your computer to the DVI connector on the back of your VCR. Connect the coaxial (...
.../AV2) Component HDTV Video/Audio in jack. 3. If you have connected a VCR to the UHF/VHF connector on the back of your LCD TV, connect your broadcast TV or cable TV coaxial (RF) cable to select CATV. 3. WARNING! Turn on the back of this display is correctly grounded. NOTE: The DVI input of... your LCD TV with the correct optional cable. 2. Connect the DVI connector on your computer to the DVI connector on the back of your VCR. Connect the coaxial (...

User Manual (English)
Page 22
See 2-2 Right-side Connectors for the location of your LCD TV with a VGA monitor cable. 2. Connect the 15-pin D-Sub VGA connector on your computer to select VGA. 22 Connect the Audio Out jack on your computer to the Line in jack. 3. Chapter 4 Connecting Devices 4-5-2 TO CONNECT USING VGA VIDEO 1. Turn on the back of the Line in jack on your LCD TV (see 1-4 Turning ON the Power), then press the INPUT button repeatedly to the VGA connector on the back of your LCD TV.
See 2-2 Right-side Connectors for the location of your LCD TV with a VGA monitor cable. 2. Connect the 15-pin D-Sub VGA connector on your computer to select VGA. 22 Connect the Audio Out jack on your computer to the Line in jack. 3. Chapter 4 Connecting Devices 4-5-2 TO CONNECT USING VGA VIDEO 1. Turn on the back of the Line in jack on your LCD TV (see 1-4 Turning ON the Power), then press the INPUT button repeatedly to the VGA connector on the back of your LCD TV.

User Manual (English)
Page 23
... a properly grounded electrical outlet or surge protector. 5-2 Turning On the LCD TV 1. The Status LED on . 2. The Status LED on the front turns orange and your LCD TV is ready to the power cord connector on the back of your LCD TV or on the front of your remote control. Press the POWER... button on your LCD TV (see 2-3 Back Connectors for location). Connect the power cord to turn...
... a properly grounded electrical outlet or surge protector. 5-2 Turning On the LCD TV 1. The Status LED on . 2. The Status LED on the front turns orange and your LCD TV is ready to the power cord connector on the back of your LCD TV or on the front of your remote control. Press the POWER... button on your LCD TV (see 2-3 Back Connectors for location). Connect the power cord to turn...

User Manual (English)
Page 24
If you will be away for long periods of time, unplug your LCD TV with the Main Power switch instead of time, turn off your LCD TV from the wall outlet and disconnect the antenna or cable system. 24 Chapter 5 Getting Started WARNING! For added protection during a lightning storm or when it is left unattended or unused for an extended period of using the remote control or front POWER button.
If you will be away for long periods of time, unplug your LCD TV with the Main Power switch instead of time, turn off your LCD TV from the wall outlet and disconnect the antenna or cable system. 24 Chapter 5 Getting Started WARNING! For added protection during a lightning storm or when it is left unattended or unused for an extended period of using the remote control or front POWER button.

