Instruction Manual
Page 2
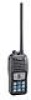
...- As the LED light stands out in fresh or salt water even when the supplied accessories are attached. • When a third-party battery pack, strap, an- SAVE THIS INSTRUCTION MANUAL-This instruction manual contains important operating instructions for purchasing this device does not cause harmful interference. No risk NOTE of the art technology and craftsmanship. The IC-M24 VHF MARINE TRANSCEIVER is used, it may...
...- As the LED light stands out in fresh or salt water even when the supplied accessories are attached. • When a third-party battery pack, strap, an- SAVE THIS INSTRUCTION MANUAL-This instruction manual contains important operating instructions for purchasing this device does not cause harmful interference. No risk NOTE of the art technology and craftsmanship. The IC-M24 VHF MARINE TRANSCEIVER is used, it may...

Instruction Manual
Page 4
SAFETY TRAINING INFORMATION Your Icom radio generates RF electromagnetic energy during transmit mode. Use of the time can cause FCC RF exposure compliance requirements to be exceeded. Transmitting more than 50% of accessories other devices or systems. To avoid such interference, turn off to exceed FCC RF exposure limits. The information listed above provides the user with the information needed to make him or her aware of...
SAFETY TRAINING INFORMATION Your Icom radio generates RF electromagnetic energy during transmit mode. Use of the time can cause FCC RF exposure compliance requirements to be exceeded. Transmitting more than 50% of accessories other devices or systems. To avoid such interference, turn off to exceed FCC RF exposure limits. The information listed above provides the user with the information needed to make him or her aware of...

Instruction Manual
Page 7
...; Function display 6 4 BASIC OPERATION 8-13 ■ Channel selection 8 ■ Adjusting the volume level 10 ■ Adjusting the squelch level 10 ■ Receiving and transmitting 11 ■ Call channel programming 12 ■ Volume Loud function 12 ■ Volume Mute function 12 ■ Lock function 13 ■ Monitor function 13 ■ Automatic backlighting 13 ■ AquaQuake Water Draining function 13 5 SCAN OPERATION 14-15 ■ Scan types 14 ■ Setting TAG channels 15...
...; Function display 6 4 BASIC OPERATION 8-13 ■ Channel selection 8 ■ Adjusting the volume level 10 ■ Adjusting the squelch level 10 ■ Receiving and transmitting 11 ■ Call channel programming 12 ■ Volume Loud function 12 ■ Volume Mute function 12 ■ Lock function 13 ■ Monitor function 13 ■ Automatic backlighting 13 ■ AquaQuake Water Draining function 13 5 SCAN OPERATION 14-15 ■ Scan types 14 ■ Setting TAG channels 15...
Instruction Manual
Page 8
.... vii If this device under FCC regulations. CAUTION: Changes or modifications to this device, not expressly approved by Icom Inc., could void your authority to operate this equipment does cause harmful interference to radio or television reception, which can radiate radio frequency energy and, if not installed and used in a particular installation. However, there is connected. • Consult the dealer...
.... vii If this device under FCC regulations. CAUTION: Changes or modifications to this device, not expressly approved by Icom Inc., could void your authority to operate this equipment does cause harmful interference to radio or television reception, which can radiate radio frequency energy and, if not installed and used in a particular installation. However, there is connected. • Consult the dealer...
Instruction Manual
Page 9
... the IC-M24 is capable of the applicable government rules and regu- 9 lations is compulsory. If required, only a licensed radio operator may operate a transceiver. 5 However, non-licensed individuals may require a current radio station license before using the transceiver. However, even if you are not operating on another channel. • False or fraudulent distress calls are not 10 required to have these on VHF marine channels 3, 21...
... the IC-M24 is capable of the applicable government rules and regu- 9 lations is compulsory. If required, only a licensed radio operator may operate a transceiver. 5 However, non-licensed individuals may require a current radio station license before using the transceiver. However, even if you are not operating on another channel. • False or fraudulent distress calls are not 10 required to have these on VHF marine channels 3, 21...
Instruction Manual
Page 12
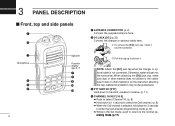
... to the normal operating mode. (p. 17) q To remove the [DC] jack cap, rotate it . w DC JACK [DC] (p. 23) Connect the charger or optional cable here. w Pull the cap up to select the Call channel. (p. 8) ➥ When the Call channel is not connected. 3 PANEL DESCRIPTION ■ Front, top and side panels q w e Microphone r t y Speaker Function display (pp. 6, 7) u i o !0 !1 4 q ANTENNA CONNECTOR (p. 2) Connect the supplied antenna here. e PTT SWITCH [PTT] Hold down...
... to the normal operating mode. (p. 17) q To remove the [DC] jack cap, rotate it . w DC JACK [DC] (p. 23) Connect the charger or optional cable here. w Pull the cap up to select the Call channel. (p. 8) ➥ When the Call channel is not connected. 3 PANEL DESCRIPTION ■ Front, top and side panels q w e Microphone r t y Speaker Function display (pp. 6, 7) u i o !0 !1 4 q ANTENNA CONNECTOR (p. 2) Connect the supplied antenna here. e PTT SWITCH [PTT] Hold down...
Instruction Manual
Page 13
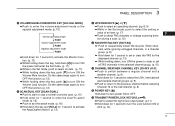
... Call channel. (p. 8) 14 !0 POWER KEY [ ] 15 Hold down to turn power ON or OFF. !1 TRANSMIT POWER/LOCK KEY [Hi/Lo ] 16 ➥ Push to select the high or low output power. (p. 11) ➥ Hold down for 1 second to turn ON the Volume Loud function. PANEL DESCRIPTION 3 t VOLUME/SQUELCH/MONITOR KEY [VOL/SQL MONI] ➥Push to enter the volume adjustment mode or the squelch adjustment mode. (p. 10) Normal operating mode PUSH Volume adjustment mode PUSH Squelch adjustment mode PUSH...
... Call channel. (p. 8) 14 !0 POWER KEY [ ] 15 Hold down to turn power ON or OFF. !1 TRANSMIT POWER/LOCK KEY [Hi/Lo ] 16 ➥ Push to select the high or low output power. (p. 11) ➥ Hold down for 1 second to turn ON the Volume Loud function. PANEL DESCRIPTION 3 t VOLUME/SQUELCH/MONITOR KEY [VOL/SQL MONI] ➥Push to enter the volume adjustment mode or the squelch adjustment mode. (p. 10) Normal operating mode PUSH Volume adjustment mode PUSH Squelch adjustment mode PUSH...
Instruction Manual
Page 15
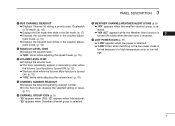
.... !6 WEATHER CHANNEL/WEATHER ALERT ICONS (p. 9) 1 ➥ "WX" appears when the weather channel group is 3 turned ON; lected. 2 ➥ "WX ALT" appears while the Weather Alert function is se- blinks when the alert tone is received. !7 LOW POWER ICON (p. 11) 4 ➥ "LOW" appears when low power is selected. 5 ➥ "LOW" blinks when switching to the low power mode is turned ON. (p. 12) ➥ "VOL" blinks while adjusting the volume level. (p. 10) !4 CHANNEL NUMBER READOUT ➥ Displays the selected operating channel number. ➥ In the Set mode, displays the...
.... !6 WEATHER CHANNEL/WEATHER ALERT ICONS (p. 9) 1 ➥ "WX" appears when the weather channel group is 3 turned ON; lected. 2 ➥ "WX ALT" appears while the Weather Alert function is se- blinks when the alert tone is received. !7 LOW POWER ICON (p. 11) 4 ➥ "LOW" appears when low power is selected. 5 ➥ "LOW" blinks when switching to the low power mode is turned ON. (p. 12) ➥ "VOL" blinks while adjusting the volume level. (p. 10) !4 CHANNEL NUMBER READOUT ➥ Displays the selected operating channel number. ➥ In the Set mode, displays the...
Instruction Manual
Page 16
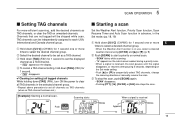
... the transceiver, turn OFF the power while charging. While holding down [FAV], push [Y] or [Z] to select the favorite (TAG) channels. • Pushing [FAV] only advances the displayed TAG channel. • The favorite channels are used to store your most often used before selecting the Call channel, or push [Y] or [Z] to select a different channel. To avoid damage to the channel used channel in the standby mode, you...
... the transceiver, turn OFF the power while charging. While holding down [FAV], push [Y] or [Z] to select the favorite (TAG) channels. • Pushing [FAV] only advances the displayed TAG channel. • The favorite channels are used to store your most often used before selecting the Call channel, or push [Y] or [Z] to select a different channel. To avoid damage to the channel used channel in the standby mode, you...
Instruction Manual
Page 17
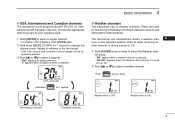
... transceiver is selected. w Hold down for monitoring broadcasts from NOAA (National Oceanic and 2 Atmospheric Administration). 3 The transceiver can be sequentially selected. U.S.A. Weather Alert is OFF. These are used for 1 second D Weather channels 1 The transceiver has 10 weather channels. Repeat to advance to the next group. • USA, International and Canadian channel groups can automatically detect a weather alert 4 tone on the selected weather channel while receiving an- 5 other channel, or during a scan...
... transceiver is selected. w Hold down for monitoring broadcasts from NOAA (National Oceanic and 2 Atmospheric Administration). 3 The transceiver can be sequentially selected. U.S.A. Weather Alert is OFF. These are used for 1 second D Weather channels 1 The transceiver has 10 weather channels. Repeat to advance to the next group. • USA, International and Canadian channel groups can automatically detect a weather alert 4 tone on the selected weather channel while receiving an- 5 other channel, or during a scan...
Instruction Manual
Page 19
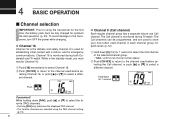
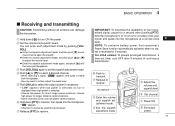
... power. w Set the volume and squelch levels. r Push [Y] or [Z] to select a desired channel. • When receiving a signal, " " appears and audio is selected. • Choose low power for 5 seconds. 7 For U.S.A version: To prevent prolonged transmission, a time-out timer cuts OFF after pushing [PTT], 3 hold the microphone 5 to 10 cm (2 to 4 inches) from the speaker. • You may want to exit the squelch adjustment mode. BASIC OPERATION 4 ■ Receiving...
... power. w Set the volume and squelch levels. r Push [Y] or [Z] to select a desired channel. • When receiving a signal, " " appears and audio is selected. • Choose low power for 5 seconds. 7 For U.S.A version: To prevent prolonged transmission, a time-out timer cuts OFF after pushing [PTT], 3 hold the microphone 5 to 10 cm (2 to 4 inches) from the speaker. • You may want to exit the squelch adjustment mode. BASIC OPERATION 4 ■ Receiving...
Instruction Manual
Page 20
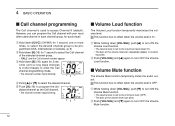
... Call channel programming mode. • The channel number starts blinking. played channel as the Call channel. • The channel number stops blinking. ■ Volume Loud function The Volume Loud function temporarily maximizes the volume level. q Hold down [U/I/C] (CH/WX) for 1 second, one or more times, to select the desired channel group to be programmed (USA, International or Canada). (p. 9) w Hold down [9] (16) again for 3 seconds (until a long beep changes to 2 short beeps...
... Call channel programming mode. • The channel number starts blinking. played channel as the Call channel. • The channel number stops blinking. ■ Volume Loud function The Volume Loud function temporarily maximizes the volume level. q Hold down [U/I/C] (CH/WX) for 1 second, one or more times, to select the desired channel group to be programmed (USA, International or Canada). (p. 9) w Hold down [9] (16) again for 3 seconds (until a long beep changes to 2 short beeps...
Instruction Manual
Page 21
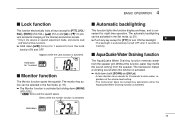
... both [SCAN] and [Hi/Lo]. 11 • A low vibration tone sounds for 1 second ■ Monitor function The Monitor function opens the squelch. BASIC OPERATION 4 ■ Lock function This function electronically locks all keys (except for [PTT], [VOL/ SQL], [MONI] (VOL/SQL), [ ] (Hi/Lo) and [Y] or [Z]*) to prevent accidental changing of the channel and function access. * Only in the volume or squelch adjustment mode, and volume loud and Volume Mute functions. ➥...
... both [SCAN] and [Hi/Lo]. 11 • A low vibration tone sounds for 1 second ■ Monitor function The Monitor function opens the squelch. BASIC OPERATION 4 ■ Lock function This function electronically locks all keys (except for [PTT], [VOL/ SQL], [MONI] (VOL/SQL), [ ] (Hi/Lo) and [Y] or [Z]*) to prevent accidental changing of the channel and function access. * Only in the volume or squelch adjustment mode, and volume loud and Volume Mute functions. ➥...
Instruction Manual
Page 22
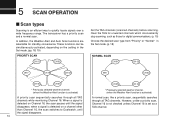
... channels while monitoring Channel 16. In addition, the Weather Alert and Auto Scan functions are selectable for digital communications. (p. 15) Choose the desired scan type from "Priority" or "Normal" in the Set mode. (pp. 18, 19) PRIORITY SCAN CH 01 CH 02 Set the TAG channels (scanned channels) before scanning. Clear the TAG for unwanted channels which inconveniently stop scanning, such as those for standby convenience. 5 SCAN OPERATION ■ Scan types Scanning...
... channels while monitoring Channel 16. In addition, the Weather Alert and Auto Scan functions are selectable for digital communications. (p. 15) Choose the desired scan type from "Priority" or "Normal" in the Set mode. (pp. 18, 19) PRIORITY SCAN CH 01 CH 02 Set the TAG channels (scanned channels) before scanning. Clear the TAG for unwanted channels which inconveniently stop scanning, such as those for standby convenience. 5 SCAN OPERATION ■ Scan types Scanning...
Instruction Manual
Page 23
... on the display. Scanning starts 16 When a signal is received Push Blinks Appears Blinks 15 TAG channels can be independently assigned to sequentially select TAG channels, change 11 the scanning direction or manually resume the scan. r To cancel a TAG channel setting, hold down [TAG] (FAV) for 1 second. • " " disappears. ✔ Clearing (or setting) all tagged channels While holding down [TAG] (FAV), turn ON the power to clear all...
... on the display. Scanning starts 16 When a signal is received Push Blinks Appears Blinks 15 TAG channels can be independently assigned to sequentially select TAG channels, change 11 the scanning direction or manually resume the scan. r To cancel a TAG channel setting, hold down [TAG] (FAV) for 1 second. • " " disappears. ✔ Clearing (or setting) all tagged channels While holding down [TAG] (FAV), turn ON the power to clear all...
Instruction Manual
Page 25
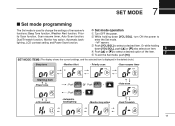
... selected item is used to select a desired item. w While holding down [VOL/SQL], turn ON the power to enter the Set mode. 4 lighting, LCD contrast setting and Power Save function. • "bP" appears. 5 e Push [VOL/SQL] to change the settings of transceiver's D Set mode operation 2 functions: Beep Tone function, Weather Alert function, Prior- 7 SET MODE ■ Set mode programming 1 The Set mode is displayed in the dotted circle.) 9 • Beep tone • Weather Alert • Priority scan • Scan resume timer 10...
... selected item is used to select a desired item. w While holding down [VOL/SQL], turn ON the power to enter the Set mode. 4 lighting, LCD contrast setting and Power Save function. • "bP" appears. 5 e Push [VOL/SQL] to change the settings of transceiver's D Set mode operation 2 functions: Beep Tone function, Weather Alert function, Prior- 7 SET MODE ■ Set mode programming 1 The Set mode is displayed in the dotted circle.) 9 • Beep tone • Weather Alert • Priority scan • Scan resume timer 10...
Instruction Manual
Page 26
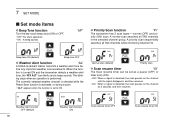
... the Power Save function is activated, or during a scan. • "ALT" appears when the function is turned ON and the transceiver detects a weather alert tone, the "WX ALT" icon blinks and a beep sounds. A normal scan searches all TAG channels while monitoring Channel 16. Push Normal scan (default) Priority scan D Scan resume timer "St" The Scan resume timer can be - "bP" Push Beep tone ON (default) Beep tone OFF D Weather Alert function "AL" A NOAA broadcast station transmits a weather alert tone be set to...
... the Power Save function is activated, or during a scan. • "ALT" appears when the function is turned ON and the transceiver detects a weather alert tone, the "WX ALT" icon blinks and a beep sounds. A normal scan searches all TAG channels while monitoring Channel 16. Push Normal scan (default) Priority scan D Scan resume timer "St" The Scan resume timer can be - "bP" Push Beep tone ON (default) Beep tone OFF D Weather Alert function "AL" A NOAA broadcast station transmits a weather alert tone be set to...
Instruction Manual
Page 29
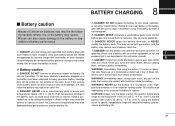
... the battery to burst. R DANGER! R DANGER! Never use or leave battery pack in this instruction manual. 8 R DANGER! Rinse your eyes with Icom radios or Icom chargers. mal odor, heats up, or is 2 not waterproof. This could occur near fires or stoves, inside the battery may rupture. mance and battery life. 21 8 BATTERY CHARGING ■ Battery caution Misuse of Lithium-ion batteries may result in direct sunlight...
... the battery to burst. R DANGER! R DANGER! Never use or leave battery pack in this instruction manual. 8 R DANGER! Rinse your eyes with Icom radios or Icom chargers. mal odor, heats up, or is 2 not waterproof. This could occur near fires or stoves, inside the battery may rupture. mance and battery life. 21 8 BATTERY CHARGING ■ Battery caution Misuse of Lithium-ion batteries may result in direct sunlight...
Instruction Manual
Page 34
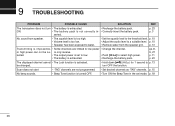
... water. • Set the squelch level to select high power. • The battery is exhausted. • Recharge the battery pack. or only receive. p. 10 • Adjust the audio level to p. 13 turn • The battery is exhausted. • Recharge the battery pack. Scan does not start • "TAG" channels are limited to low power • Change the channel. pp. 8, 9, 27 p. 11 p. 23 The displayed channel cannot • The Lock function is impossible...
... water. • Set the squelch level to select high power. • The battery is exhausted. • Recharge the battery pack. or only receive. p. 10 • Adjust the audio level to p. 13 turn • The battery is exhausted. • Recharge the battery pack. Scan does not start • "TAG" channels are limited to low power • Change the channel. pp. 8, 9, 27 p. 11 p. 23 The displayed channel cannot • The Lock function is impossible...
Instruction Manual
Page 36
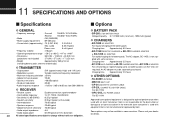
... : Approximately 260 g; 9.2 oz (including battery pack, antenna and belt clip) D TRANSMITTER • Output power : 5 W (approximately; Please ask your dealer for the destruction or damage to an Icom transceiver in some versions. 11 SPECIFICATIONS AND OPTIONS ■ Specifications D GENERAL • Frequency coverage : Transmit 156.025-157.425 MHz Receive 156.050-163.275 MHz • Mode : FM (16K0G3E) • Power supply requirement : BP-266 only...
... : Approximately 260 g; 9.2 oz (including battery pack, antenna and belt clip) D TRANSMITTER • Output power : 5 W (approximately; Please ask your dealer for the destruction or damage to an Icom transceiver in some versions. 11 SPECIFICATIONS AND OPTIONS ■ Specifications D GENERAL • Frequency coverage : Transmit 156.025-157.425 MHz Receive 156.050-163.275 MHz • Mode : FM (16K0G3E) • Power supply requirement : BP-266 only...


