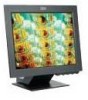
User Guide
Page 3
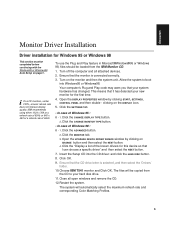
... Driver installation for Windows XP 7 Image Setup for Analog Input 8 Auto Setup ...8 AutoSetup for Windows 3.1, Windows 95, Windows 98, Windows 2000, Windows Me, Windows XP or Windows NT 9 Adjusting the image settings in DOS 10 Manually adjusting the image settings 11 Ergonomic Considerations 12 Workplace preparation 12 Working Practices 12 Adjusting the Monitor Position 13 Caring for your Monitor 13 Adjusting Your LCD Monitor 14 User controls...14 On-screen display (OSD) controls 15 Further Information 18 Display modes 18 Power Management 19 Troubleshooting ...20 Specifications...
... Driver installation for Windows XP 7 Image Setup for Analog Input 8 Auto Setup ...8 AutoSetup for Windows 3.1, Windows 95, Windows 98, Windows 2000, Windows Me, Windows XP or Windows NT 9 Adjusting the image settings in DOS 10 Manually adjusting the image settings 11 Ergonomic Considerations 12 Workplace preparation 12 Working Practices 12 Adjusting the Monitor Position 13 Caring for your Monitor 13 Adjusting Your LCD Monitor 14 User controls...14 On-screen display (OSD) controls 15 Further Information 18 Display modes 18 Power Management 19 Troubleshooting ...20 Specifications...
User Guide
Page 5
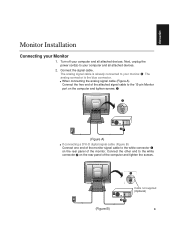
... blue connector. Connect the other end to the white connector on the rear panel of the monitor. Connect the signal cable. When connecting the analog signal cable (Figure A) Connect the free end of the attached signal cable to the 15-pin Monitor port on the computer and tighten screws. (Figure A) If connecting a DVI-D digital signal cable (Figure B) Connect one end of the monitor signal cable to the white connector on the rear panel of the computer and tighten the screws. (Figure B) Cable not supplied (Optional) 3 Turn off your monitor. ENGLISH Monitor Installation...
... blue connector. Connect the other end to the white connector on the rear panel of the monitor. Connect the signal cable. When connecting the analog signal cable (Figure A) Connect the free end of the attached signal cable to the 15-pin Monitor port on the computer and tighten screws. (Figure A) If connecting a DVI-D digital signal cable (Figure B) Connect one end of the monitor signal cable to the white connector on the rear panel of the computer and tighten the screws. (Figure B) Cable not supplied (Optional) 3 Turn off your monitor. ENGLISH Monitor Installation...
User Guide
Page 6
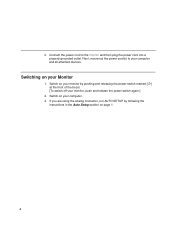
Next, reconnect the power cord(s) to the monitor and then plug the power cord into a properly grounded outlet. Connect the power cord to your Monitor 1. Switch on your computer and all attached devices. Switching on your monitor, push and release the power switch again.] 2. Switch on page 8. 4 If you are using the analog connector, run AUTO SETUP by following the instructions in the Auto Setup section on your monitor by pushing and releasing the power switch marked [ ] at the front of the bezel. [To switch off your computer. 3. 3.
Next, reconnect the power cord(s) to the monitor and then plug the power cord into a properly grounded outlet. Connect the power cord to your Monitor 1. Switch on your computer and all attached devices. Switching on your monitor, push and release the power switch again.] 2. Switch on page 8. 4 If you are using the analog connector, run AUTO SETUP by following the instructions in the Auto Setup section on your monitor by pushing and releasing the power switch marked [ ] at the front of the bezel. [To switch off your computer. 3. 3.
User Guide
Page 7
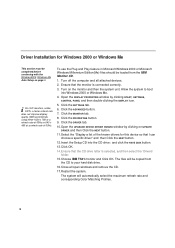
.... 1. Turn off the computer and all open windows and remove the CD. 12.Restart the system. Ensure that the monitor is selected, and then select the 'Drivers' folder. 10.Choose IBM T541 monitor and Click OK. Click the CHANGE MONITOR TYPE button. • In case of 60Hz. Click the "Display a list of Windows 95 : 6 - 1. i On LCD monitors, unlike CRTs, a faster refresh rate does not improve display quality. To use the Plug...
.... 1. Turn off the computer and all open windows and remove the CD. 12.Restart the system. Ensure that the monitor is selected, and then select the 'Drivers' folder. 10.Choose IBM T541 monitor and Click OK. Click the CHANGE MONITOR TYPE button. • In case of 60Hz. Click the "Display a list of Windows 95 : 6 - 1. i On LCD monitors, unlike CRTs, a faster refresh rate does not improve display quality. To use the Plug...
User Guide
Page 8
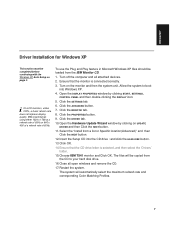
.... Turn on page 9. Click the SETTINGS tab. 6. Click the MONITOR tab. 8. i On LCD monitors, unlike CRTs, a faster refresh rate does not improve display quality. Ensure that the CD drive letter is connected correctly. 3. Click the ADVANCED button. 7. Click the PROPERTIES button. 9. The files will automatically select the maximum refresh rate and corresponding Color Matching Profiles. 6 Click the DRIVER tab. 10.Open the UPGRADE DEVICE DRIVER WIZARD window by clicking START, SETTINGS, CONTROL PANEL and...
.... Turn on page 9. Click the SETTINGS tab. 6. Click the MONITOR tab. 8. i On LCD monitors, unlike CRTs, a faster refresh rate does not improve display quality. Ensure that the CD drive letter is connected correctly. 3. Click the ADVANCED button. 7. Click the PROPERTIES button. 9. The files will automatically select the maximum refresh rate and corresponding Color Matching Profiles. 6 Click the DRIVER tab. 10.Open the UPGRADE DEVICE DRIVER WIZARD window by clicking START, SETTINGS, CONTROL PANEL and...
User Guide
Page 9
... the 'Drivers' folder. 15.Choose IBM T541 monitor and Click OK. Click the DRIVER tab. 10.Open the Hardware Update Wizard window by clicking START, SETTINGS, CONTROL PANEL and then double-clicking the DISPLAY icon. 5. Ensure that the CD drive letter is connected correctly. 3. The system will be completed before continuing with the Windows XP Auto Setup on the monitor and then the system unit. To use the Plug and...
... the 'Drivers' folder. 15.Choose IBM T541 monitor and Click OK. Click the DRIVER tab. 10.Open the Hardware Update Wizard window by clicking START, SETTINGS, CONTROL PANEL and then double-clicking the DISPLAY icon. 5. Ensure that the CD drive letter is connected correctly. 3. The system will be completed before continuing with the Windows XP Auto Setup on the monitor and then the system unit. To use the Plug and...
User Guide
Page 10
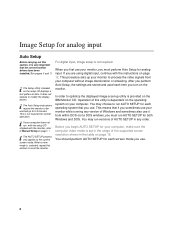
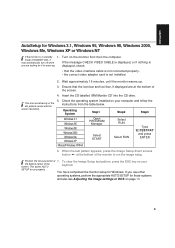
... for normal operation. This means that the correct monitor drivers have been installed.(See pages 5 and 7) i The Setup Utility included on the IBM Monitor CD. Image Setup for analog input Auto Setup Before carrying out this section to reset the monitor. This is not required for 15 minutes. i The Auto Setup instructions require the monitor to optimize the displayed image a set in the range of the supported screen resolution shown in any version of dots. When you...
... for normal operation. This means that the correct monitor drivers have been installed.(See pages 5 and 7) i The Setup Utility included on the IBM Monitor CD. Image Setup for analog input Auto Setup Before carrying out this section to reset the monitor. This is not required for 15 minutes. i The Auto Setup instructions require the monitor to optimize the displayed image a set in the range of the supported screen resolution shown in any version of dots. When you...
User Guide
Page 11
... see Adjusting the image settings in standby mode (STANDBY ON), it to run the image setup. Turn on your the bottom center of the monitor to run properly You have completed the monitor setup for it 1. Ensure that the video interface cable is not connected properly. • the correct video adapter card is displayed, check: • that the icon bar and tool bar, if displayed are waiting for Windows. i The size...
... see Adjusting the image settings in standby mode (STANDBY ON), it to run the image setup. Turn on your the bottom center of the monitor to run properly You have completed the monitor setup for it 1. Ensure that the video interface cable is not connected properly. • the correct video adapter card is displayed, check: • that the icon bar and tool bar, if displayed are waiting for Windows. i The size...
User Guide
Page 12
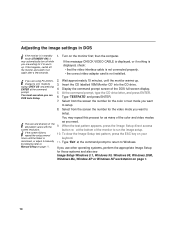
... displayed, or if nothing is displayed, check: • that the video interface cable is not connected properly. • the correct video adapter card is minimised, or adjust it manually by typing 'CHEV US' and pressing ENTER at the command prompt to return to Manual Setup on the monitor first; Insert the CD labelled 'IBM Monitor CD' into the CD drive. 4. You may automatically turn off the monitor and switch...
... displayed, or if nothing is displayed, check: • that the video interface cable is not connected properly. • the correct video adapter card is minimised, or adjust it manually by typing 'CHEV US' and pressing ENTER at the command prompt to return to Manual Setup on the monitor first; Insert the CD labelled 'IBM Monitor CD' into the CD drive. 4. You may automatically turn off the monitor and switch...
User Guide
Page 13
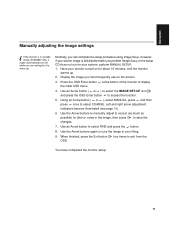
... automatically turn off while you are waiting for jitter or noise in standby mode (STANDBY ON), it to save the changes. 7. When finished, press the Exit button OSD. Normally, you can complete the setup procedure using Image Setup, however, if your screen image is in the image, then press to warm up . 2. ENGLISH Manually adjusting the image settings i If the monitor is still distorted after you perform Image Setup or the setup...
... automatically turn off while you are waiting for jitter or noise in standby mode (STANDBY ON), it to save the changes. 7. When finished, press the Exit button OSD. Normally, you can complete the setup procedure using Image Setup, however, if your screen image is in the image, then press to warm up . 2. ENGLISH Manually adjusting the image settings i If the monitor is still distorted after you perform Image Setup or the setup...
User Guide
Page 14
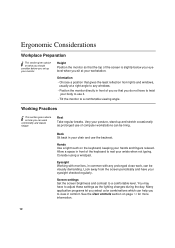
.... Screen settings Set the screen brightness and contrast to a comfortable viewing angle. Orientation - Working Practices i This section gives advice on how you can work , can be tiring. Eyesight Working with monitors, in comfort. Tilt the monitor to a comfortable level. Ergonomic Considerations Workplace Preparation i This section gives advice on what you should consider before you set up and stretch occasionally as the lighting changes during the day. Height Position...
.... Screen settings Set the screen brightness and contrast to a comfortable viewing angle. Orientation - Working Practices i This section gives advice on how you can work , can be tiring. Eyesight Working with monitors, in comfort. Tilt the monitor to a comfortable level. Ergonomic Considerations Workplace Preparation i This section gives advice on what you should consider before you set up and stretch occasionally as the lighting changes during the day. Height Position...
User Guide
Page 15
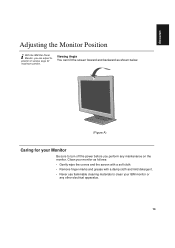
...; Gently wipe the covers and the screen with a soft cloth. • Remove finger marks and grease with a damp cloth and mild detergent. • Never use flammable cleaning materials to clean your Monitor Be sure to turn off the power before you can adjust its position in various ways for your IBM monitor or any maintenance on the monitor. ENGLISH Adjusting the Monitor Position i With the IBM Flat Panel Monitor, you perform any...
...; Gently wipe the covers and the screen with a soft cloth. • Remove finger marks and grease with a damp cloth and mild detergent. • Never use flammable cleaning materials to clean your Monitor Be sure to turn off the power before you can adjust its position in various ways for your IBM monitor or any maintenance on the monitor. ENGLISH Adjusting the Monitor Position i With the IBM Flat Panel Monitor, you perform any...
User Guide
Page 16
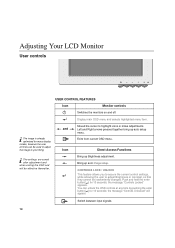
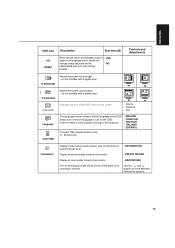
... LCD Monitor User controls USER CONTROL FEATURES Icon Monitor controls Switches the monitors on and off. Display main OSD menu and selects highlighted menu item. Moved the cursor to your liking. the message "Controls Locked" appears. Switch between input signals. 14 i The image is already optimized for many display modes, however the user controls can unlock the OSD controls at any time by pushing the enter button[ ] for 10 seconds; and Left and Right arrows pressed together bring up auto image setup...
... LCD Monitor User controls USER CONTROL FEATURES Icon Monitor controls Switches the monitors on and off. Display main OSD menu and selects highlighted menu item. Moved the cursor to your liking. the message "Controls Locked" appears. Switch between input signals. 14 i The image is already optimized for many display modes, however the user controls can unlock the OSD controls at any time by pushing the enter button[ ] for 10 seconds; and Left and Right arrows pressed together bring up auto image setup...
User Guide
Page 17
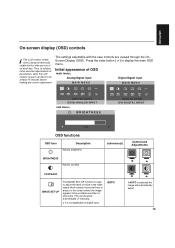
... button [ ] to digital input. Analog Signal input Digital Signal input sub menu; This can be On) for parameters, allow the LCD monitor to warm up (be done automatically or manually. AUTO If AUTO is used to adjust the level of OSD main menu; Initial appearance of noise in the video signal which causes horizontal lines or areas on each day. Thus, to achieve more accurate adjustments for at least 15 minutes before making any screen adjustment. The settings adjustable...
... button [ ] to digital input. Analog Signal input Digital Signal input sub menu; This can be On) for parameters, allow the LCD monitor to warm up (be done automatically or manually. AUTO If AUTO is used to adjust the level of OSD main menu; Initial appearance of noise in the video signal which causes horizontal lines or areas on each day. Thus, to achieve more accurate adjustments for at least 15 minutes before making any screen adjustment. The settings adjustable...
User Guide
Page 18
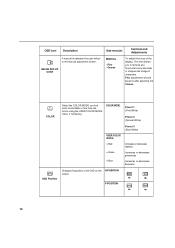
... colors using the USER COLOR MODE menu, if necessary. V-POSITION 16 Fine adjustments should be done after adjusting the Coarse . OSD Icon Description If manual is selected, the user will go to remove any horizontal noise and clear or sharpen the image of the display. IMAGE SET-UP CONT Sub-menu(s) Controls and Adjustments MANUAL • Fine • Coarse To adjust the focus of characters. COLOR MODE Preset 1 (Pink White) Preset 2 (Normal White) USER COLOR MODE• Red • Green • Blue Preset 3 (Blue White...
... colors using the USER COLOR MODE menu, if necessary. V-POSITION 16 Fine adjustments should be done after adjusting the Coarse . OSD Icon Description If manual is selected, the user will go to remove any horizontal noise and clear or sharpen the image of the display. IMAGE SET-UP CONT Sub-menu(s) Controls and Adjustments MANUAL • Fine • Coarse To adjust the focus of characters. COLOR MODE Preset 1 (Pink White) Preset 2 (Normal White) USER COLOR MODE• Red • Green • Blue Preset 3 (Blue White...
User Guide
Page 19
... and buttons to use for the OSD. The current display mode will be shown at the base of manufacture and microcode level. Is not availible with a digital input OSD SIZE Changes the size of the OSD menu on the computer. • FRANCAIS • DEUTSCH • ITALIANO • ESPANOL To select OSD display duration time. (5 - 60 seconds) Information Display model name, serial number, year of all preset modes stored in the monitor. Controls and Adjustments H-POSITION...
... and buttons to use for the OSD. The current display mode will be shown at the base of manufacture and microcode level. Is not availible with a digital input OSD SIZE Changes the size of the OSD menu on the computer. • FRANCAIS • DEUTSCH • ITALIANO • ESPANOL To select OSD display duration time. (5 - 60 seconds) Information Display model name, serial number, year of all preset modes stored in the monitor. Controls and Adjustments H-POSITION...
User Guide
Page 20
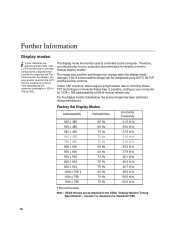
... the monitor controls. The display mode the monitor uses is inherently flicker-free. Version 1.0, Revision 0.8, Dated 09/17/98. 18 This is currently configured to minimize flicker, TFT technology is controlled by the computer. Further Information Display modes i If your computer has previously been used with a CRT monitor and is normal and the image can display, you may change display modes. For the display modes listed below, the screen image has been optimized during manufacture. Factory Set Display Modes Addressabillty Refresh Rate Horizontal Frequency...
... the monitor controls. The display mode the monitor uses is inherently flicker-free. Version 1.0, Revision 0.8, Dated 09/17/98. 18 This is currently configured to minimize flicker, TFT technology is controlled by the computer. Further Information Display modes i If your computer has previously been used with a CRT monitor and is normal and the image can display, you may change display modes. For the display modes listed below, the screen image has been optimized during manufacture. Factory Set Display Modes Addressabillty Refresh Rate Horizontal Frequency...
User Guide
Page 22
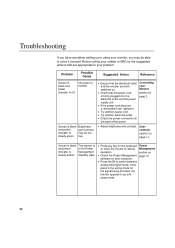
...; Check the power connection at the back of the panel. section on page 3. • Adjust brightness and contrast. If the panel is the wrong mode for the signal being provided, the monitor appears to monitor. Screen is blank Brightness and power and Contrast indicator is firmly plugged into sleep mode. 20 No power to go into the electrical outlet and the power supply unit. • If the power cord plug has a removalble fuse, replace it yourself. User controls...
...; Check the power connection at the back of the panel. section on page 3. • Adjust brightness and contrast. If the panel is the wrong mode for the signal being provided, the monitor appears to monitor. Screen is blank Brightness and power and Contrast indicator is firmly plugged into sleep mode. 20 No power to go into the electrical outlet and the power supply unit. • If the power cord plug has a removalble fuse, replace it yourself. User controls...
User Guide
Page 23
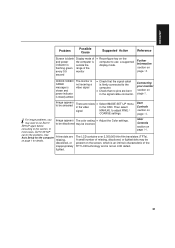
... problems. See Auto Setup for the computer on page 3. to be present on page 14. CHECK VIDEO The monitor is CABLE not receving a message is video signal shown and power indicator is steady amber. • Check that the signal cabel is outside the flashing green range of the every 0.5 monitor second • Reconfigure key on the computer to use a supported display mode. User Controls section on page 18. Image appears The color setting • Adjust the Color settings. ENGLISH Problem...
... problems. See Auto Setup for the computer on page 3. to be present on page 14. CHECK VIDEO The monitor is CABLE not receving a message is video signal shown and power indicator is steady amber. • Check that the signal cabel is outside the flashing green range of the every 0.5 monitor second • Reconfigure key on the computer to use a supported display mode. User Controls section on page 18. Image appears The color setting • Adjust the Color settings. ENGLISH Problem...
User Guide
Page 24
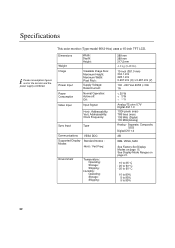
... Digital-DVI 1.0 2B IBM, VESA, MAC See Factory Set Display Modes on page 23. 10 to 35° C - 20 to 60° C - 20 to 60° C 10 to 80% 5 to 95% 5 to 95% 22 This color monitor (Type-model 9512-Hxx) uses a 15-inch TFT LCD. Specifications i Power consumption figures are for the monitor and the power supply combined. Addressability: Vert. See Display Mode Ranges on page 18. Dimensions Weight Image Power Input Power Consumption Video Input Sync Input Width: Depth: Height: Viewable Image Size: Maximum Height...
... Digital-DVI 1.0 2B IBM, VESA, MAC See Factory Set Display Modes on page 23. 10 to 35° C - 20 to 60° C - 20 to 60° C 10 to 80% 5 to 95% 5 to 95% 22 This color monitor (Type-model 9512-Hxx) uses a 15-inch TFT LCD. Specifications i Power consumption figures are for the monitor and the power supply combined. Addressability: Vert. See Display Mode Ranges on page 18. Dimensions Weight Image Power Input Power Consumption Video Input Sync Input Width: Depth: Height: Viewable Image Size: Maximum Height...


