
User Manual
Page 1
Digital Personal Video Recorder User's Manual PVR-9300T The default password is 0000. Please read this manual carefully before setting up your Personal Video Recorder PVR-9300T.
Digital Personal Video Recorder User's Manual PVR-9300T The default password is 0000. Please read this manual carefully before setting up your Personal Video Recorder PVR-9300T.
User Manual
Page 2
... programmes set both parts to record is being broadcast. Some channels may not support all services. Freeview Playback explained: • Accurate recording The start and end times of the programmes later that, day or week, on channels where the correct and accurate data is in a series, you for purchasing a Humax PVR-9300T product. If the programme changes to a different day or time the PVR-9300T...
... programmes set both parts to record is being broadcast. Some channels may not support all services. Freeview Playback explained: • Accurate recording The start and end times of the programmes later that, day or week, on channels where the correct and accurate data is in a series, you for purchasing a Humax PVR-9300T product. If the programme changes to a different day or time the PVR-9300T...
User Manual
Page 3
... to change without HUMAX's prior consent in this user's manual next to safely install, use and maintain the installation. This symbol indicates dangerous voltage inside . This symbol indicates important instructions accompanying the product. Warnings, Cautions and Notes Throughout the whole manual, pay special attention to the following marks that presents a risk of any importance to qualified service personnel. No user serviceable parts inside...
... to change without HUMAX's prior consent in this user's manual next to safely install, use and maintain the installation. This symbol indicates dangerous voltage inside . This symbol indicates important instructions accompanying the product. Warnings, Cautions and Notes Throughout the whole manual, pay special attention to the following marks that presents a risk of any importance to qualified service personnel. No user serviceable parts inside...
User Manual
Page 7
... VCR GB21 2.4 Connecting the Audio System GB23 2.5 Powering On GB24 3. PVR GB34 5.1 Time Shifted Recording (TSR GB34 5.2 Recording GB36 5.3 Programme Playback in -Picture) Screen GB32 4.8 Game GB33 5. Contents 1. Programme Guide GB40 6.1 Viewing Programme Guide Information GB40 6.2 Selecting Channel Group GB41 6.3 Using Time Bar GB42 6.4 Schedule GB42 6.5 Finding Programmes GB43 7. Record GB44 7.1 Recorded Programme GB44 7.2 Recording Schedule GB47 7.3 HDD Control GB50 7.4 Recording's Start/End Time GB50 GB6 User's Manual Installation Wizard GB25...
... VCR GB21 2.4 Connecting the Audio System GB23 2.5 Powering On GB24 3. PVR GB34 5.1 Time Shifted Recording (TSR GB34 5.2 Recording GB36 5.3 Programme Playback in -Picture) Screen GB32 4.8 Game GB33 5. Contents 1. Programme Guide GB40 6.1 Viewing Programme Guide Information GB40 6.2 Selecting Channel Group GB41 6.3 Using Time Bar GB42 6.4 Schedule GB42 6.5 Finding Programmes GB43 7. Record GB44 7.1 Recorded Programme GB44 7.2 Recording Schedule GB47 7.3 HDD Control GB50 7.4 Recording's Start/End Time GB50 GB6 User's Manual Installation Wizard GB25...
User Manual
Page 8
... 13.6 Service and Support GB77 GB7 User's Manual Edit Channels GB58 9.1 Edit Channel Lists GB58 9.2 Edit Favourite Channels GB59 10. Preferences GB51 8.1 Parental Control GB51 8.2 Language Setting GB52 8.3 Time Setting GB53 8.4 A/V Control GB54 8.5 Miscellaneous Settings GB56 9. Installation GB60 10.1 Automatic Search GB60 10.2 Manual Search GB61 10.3 Default Setting GB62 10.4 Antenna Power GB62 11. Appendix GB68 13.1 Menu Map GB68 13.2 Trouble Shooting GB69 13.3 Error Message GB73 13.4. Software Update GB63 11...
... 13.6 Service and Support GB77 GB7 User's Manual Edit Channels GB58 9.1 Edit Channel Lists GB58 9.2 Edit Favourite Channels GB59 10. Preferences GB51 8.1 Parental Control GB51 8.2 Language Setting GB52 8.3 Time Setting GB53 8.4 A/V Control GB54 8.5 Miscellaneous Settings GB56 9. Installation GB60 10.1 Automatic Search GB60 10.2 Manual Search GB61 10.3 Default Setting GB62 10.4 Antenna Power GB62 11. Appendix GB68 13.1 Menu Map GB68 13.2 Trouble Shooting GB69 13.3 Error Message GB73 13.4. Software Update GB63 11...
User Manual
Page 16
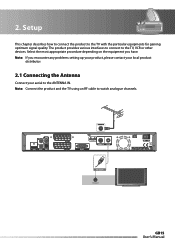
.... Note: If you have. Note: Connect the product and the TV using an RF cable to the TV, VCR or other devices. The product provides various interfaces to connect to watch analogue channels. RF Cable TV Antenna IN GB15 User's Manual 2. Select the most appropriate procedure depending on the equipment you encounter any problems setting up your product, please contact...
.... Note: If you have. Note: Connect the product and the TV using an RF cable to the TV, VCR or other devices. The product provides various interfaces to connect to watch analogue channels. RF Cable TV Antenna IN GB15 User's Manual 2. Select the most appropriate procedure depending on the equipment you encounter any problems setting up your product, please contact...

User Manual
Page 30
... button on the remote control. • You can select the language for the subtitle. 1. Basic Operation 2. Soundtrack If the current programme is available in multiple audio languages, you can select a default subtitle language in MENU-Preferences-Language Setting-Audio Language. • If your receiver is connected to exit the soundtrack list. Select the audio language using the / button and press the OK or button. 3. Press the OPT+ button. 2. The subtitles will be displayed...
... button on the remote control. • You can select the language for the subtitle. 1. Basic Operation 2. Soundtrack If the current programme is available in multiple audio languages, you can select a default subtitle language in MENU-Preferences-Language Setting-Audio Language. • If your receiver is connected to exit the soundtrack list. Select the audio language using the / button and press the OK or button. 3. Press the OPT+ button. 2. The subtitles will be displayed...
User Manual
Page 37
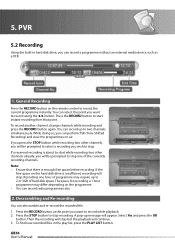
PVR 5.2 Recording Using the built-in the play list, press the PLAY LIST button. To record another channel, change channels while recording and press the RECORD button again. To find new recorded files in hard disk drive, you will stop . If you press the STOP button while recording two other channels already, you can perform TSR (Time Shifted Recording) and view the programmes on the hard disk drive is enough free space before recording. Recording one of hard disk space. Then the recording will...
PVR 5.2 Recording Using the built-in the play list, press the PLAY LIST button. To record another channel, change channels while recording and press the RECORD button again. To find new recorded files in hard disk drive, you will stop . If you press the STOP button while recording two other channels already, you can perform TSR (Time Shifted Recording) and view the programmes on the hard disk drive is enough free space before recording. Recording one of hard disk space. Then the recording will...
User Manual
Page 38
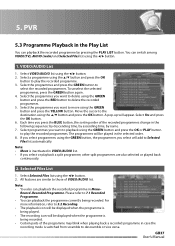
... User's Manual Select the programmes you want to move using the GREEN button and press the OK or PLAY button to playback using the GREEN button and press the YELLOW button. Select programmes you want to play the recorded programme. 3. All features are also selected or played back continuously. 2. Select a programme using the / button. 2. For more information, refer to play the recorded programmes. Select VIDEO/AUDIO list using the / button and press the OK button to 5.2 Recording...
... User's Manual Select the programmes you want to move using the GREEN button and press the OK or PLAY button to playback using the GREEN button and press the YELLOW button. Select programmes you want to play the recorded programme. 3. All features are also selected or played back continuously. 2. Select a programme using the / button. 2. For more information, refer to play the recorded programmes. Select VIDEO/AUDIO list using the / button and press the OK button to 5.2 Recording...
User Manual
Page 39
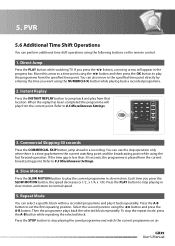
... view using the playback control buttons. While recording two channels simultaneously, you have selected. 3. Note: The bookmark function is simultaneously being recorded after adding a bookmark. 2. Press the BOOKMARK LIST button after it has been recorded for recorded programmes. Select the location you want to set a bookmark while playing back a recorded programme. GB38 User's Manual Bookmark List 1. Note: You can jump to delete and press the ADD BOOKMARK button. Use...
... view using the playback control buttons. While recording two channels simultaneously, you have selected. 3. Note: The bookmark function is simultaneously being recorded after adding a bookmark. 2. Press the BOOKMARK LIST button after it has been recorded for recorded programmes. Select the location you want to set a bookmark while playing back a recorded programme. GB38 User's Manual Bookmark List 1. Note: You can jump to delete and press the ADD BOOKMARK button. Use...
User Manual
Page 40
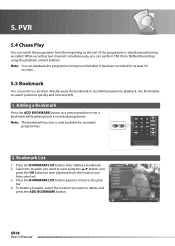
... directly by entering the time you want using the NUMERIC(0-9) button while playing back a recorded programme. 2. Repeat Mode You can perform additional time shift operations using the fast forward operation. GB39 User's Manual 5. PVR 5.6 Additional Time Shift Operations You can select a specific block within a recorded programme and play the programme from the current point. You can use the skip operation only when there...
... directly by entering the time you want using the NUMERIC(0-9) button while playing back a recorded programme. 2. Repeat Mode You can perform additional time shift operations using the fast forward operation. GB39 User's Manual 5. PVR 5.6 Additional Time Shift Operations You can select a specific block within a recorded programme and play the programme from the current point. You can use the skip operation only when there...

User Manual
Page 49
.... • The Power On/Off time can overlap the recording schedule. • The recording icon will be displayed when the programme is 0000. Press the button to save the changes. 7. To change the time using the / button. 6. Select Save and press the OK button to display channel and date lists and select one item using the NUMERIC(0-9) buttons. 3. 7. Select a programme and press the GREEN button. GB48 User's Manual Record 1. You...
.... • The Power On/Off time can overlap the recording schedule. • The recording icon will be displayed when the programme is 0000. Press the button to save the changes. 7. To change the time using the / button. 6. Select Save and press the OK button to display channel and date lists and select one item using the NUMERIC(0-9) buttons. 3. 7. Select a programme and press the GREEN button. GB48 User's Manual Record 1. You...

User Manual
Page 52
... will only work if the required information is displayed to exit from the menu screen. • You can change the password. 1. Enter New Password using the / button and press the OK button. GB51 User's Manual 8. Press the MENU or EXIT button to ask password, enter the password using the assigned number for each programme and change the current password. 1. Press the MENU button. 2. Select the required age level using the NUMERIC(0-9) buttons, select OK...
... will only work if the required information is displayed to exit from the menu screen. • You can change the password. 1. Enter New Password using the / button and press the OK button. GB51 User's Manual 8. Press the MENU or EXIT button to ask password, enter the password using the assigned number for each programme and change the current password. 1. Press the MENU button. 2. Select the required age level using the NUMERIC(0-9) buttons, select OK...
User Manual
Page 63
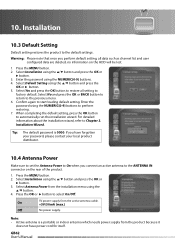
... User's Manual Installation 10.3 Default Setting Default setting restores the product to the previous menu. 6. Warning: Please note that once you have power cord for itself. Installation Wizard. Select Yes and press the OK button to restore all data such as channel list and user configured data are deleted, no information on the rear of the product. 1. Enter the password using the / button and press the OK or button...
... User's Manual Installation 10.3 Default Setting Default setting restores the product to the previous menu. 6. Warning: Please note that once you have power cord for itself. Installation Wizard. Select Yes and press the OK button to restore all data such as channel list and user configured data are deleted, no information on the rear of the product. 1. Enter the password using the / button and press the OK or button...

User Manual
Page 65
Press the MENU button. 2. Automatic Update You can set the product to start updating. Automatically search for new software. Select Yes and press the OK button to find HUMAX software update site and update software automatically. 1. Tip: The default password is not found by automatic update, use manual update. 4. If new software is 0000. Select No and press the OK button to return to finish search. 3. Enter the password using the / button and press the...
Press the MENU button. 2. Automatic Update You can set the product to start updating. Automatically search for new software. Select Yes and press the OK button to find HUMAX software update site and update software automatically. 1. Tip: The default password is not found by automatic update, use manual update. 4. If new software is 0000. Select No and press the OK button to return to finish search. 3. Enter the password using the / button and press the...
User Manual
Page 70
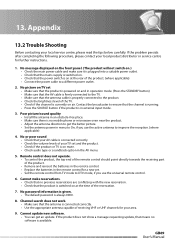
... remote control. • Replace the batteries in an obstacle-free place. • Make sure there is on air. Cannot update new software. • You can get the better picture. • Set the antenna power in the AV menu. 5. No password information is given. • The default password is currently on at the time of the TV. • Check if the channel is always 0000. 8. GB69 User's Manual...
... remote control. • Replace the batteries in an obstacle-free place. • Make sure there is on air. Cannot update new software. • You can get the better picture. • Set the antenna power in the AV menu. 5. No password information is given. • The default password is currently on at the time of the TV. • Check if the channel is always 0000. 8. GB69 User's Manual...
User Manual
Page 71
... User Manual. • The PVR remote has a slide down section on the PVR and TV is finished. 13. Make sure that are displayed in the Installation menu : 1. 13. The product makes a humming noise. • The noise is connected to Mute. This kind of the functions that the Scart cable to the TV set to the "TV" scart connection on your password (Default = 0000) 4. If channels change channel...
... User Manual. • The PVR remote has a slide down section on the PVR and TV is finished. 13. Make sure that are displayed in the Installation menu : 1. 13. The product makes a humming noise. • The noise is connected to Mute. This kind of the functions that the Scart cable to the TV set to the "TV" scart connection on your password (Default = 0000) 4. If channels change channel...
User Manual
Page 72
...; If the problem is experienced when the PVR-9300T is only several ways to carry out a Default Setting. see the Channel Change instructions for 2 minutes and then power on the PVR to access the menu. 24. If the record option is in Standby mode. 29. buttons on the remote control. 2. If the time is placed in standby or powered off the PVR from the PC to download the software via my...
...; If the problem is experienced when the PVR-9300T is only several ways to carry out a Default Setting. see the Channel Change instructions for 2 minutes and then power on the PVR to access the menu. 24. If the record option is in Standby mode. 29. buttons on the remote control. 2. If the time is placed in standby or powered off the PVR from the PC to download the software via my...
User Manual
Page 73
....uk). GB72 User's Manual I am playing back a recording • The EPG is working on my exiting TV without problems but I receive the message "Antenna Power has short-circuited". • To resolve this problem please access MENU INSTALLATION (enter your password as 0000 if you wish to view, press the EXIT button on the remote control to I press the TEXT or RED button the digital Telextext/Interactive menu does not appear...
....uk). GB72 User's Manual I am playing back a recording • The EPG is working on my exiting TV without problems but I receive the message "Antenna Power has short-circuited". • To resolve this problem please access MENU INSTALLATION (enter your password as 0000 if you wish to view, press the EXIT button on the remote control to I press the TEXT or RED button the digital Telextext/Interactive menu does not appear...
User Manual
Page 77
... the software for the users to view channels or services without any subscription. 5. PVR (Personal Video Recorder) Video recorder that can record and play . SCART A 21-pin connector standard to and from one or more aluminum or glass platters, coated with high frequency 3. a cable with different or same content. 7. GB76 User's Manual To-Air) An unscrambled broadcast allowing customers to configure monitor or TV settings. Network The collection of software for connecting...
... the software for the users to view channels or services without any subscription. 5. PVR (Personal Video Recorder) Video recorder that can record and play . SCART A 21-pin connector standard to and from one or more aluminum or glass platters, coated with high frequency 3. a cable with different or same content. 7. GB76 User's Manual To-Air) An unscrambled broadcast allowing customers to configure monitor or TV settings. Network The collection of software for connecting...


