
User Manual
Page 9
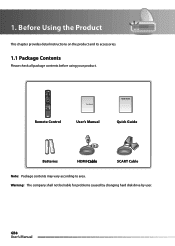
GB8 User's Manual 1. User's Manual Remote Control User's Manual Quick Guide Quick Guide Batteries HDMI Cable SCART Cable Note: Package contents may vary according to area. Before Using the Product This chapter provides detail instructions on the product and its accessories. 1.1 Package Contents Please check all package contents before using your product. Warning: The company shall not be liable for problems caused by changing hard disk drive by user.
GB8 User's Manual 1. User's Manual Remote Control User's Manual Quick Guide Quick Guide Batteries HDMI Cable SCART Cable Note: Package contents may vary according to area. Before Using the Product This chapter provides detail instructions on the product and its accessories. 1.1 Package Contents Please check all package contents before using your product. Warning: The company shall not be liable for problems caused by changing hard disk drive by user.

User Manual
Page 12
... cable. 10. Note: The rear of the TV or VCR using a TV SCART cable. 7. RS-232C Connects to the PC to the TV using an HDMI cable. 2. ON/OFF Powers on/off. Before Using the Product 1.4 Rear Panel 12 34 5 6 7 8 9 10 1. GB11 User's Manual TV SCART Connects to change without notice... cable. 9. S/PDIF Connects to the VCR or DVD using an S/PDIF cable. (digital audio) 5. 1. VCR SCART Connects to the audio system using a VCR SCART cable. 6. HDMI Connects to update software. 8.
... cable. 10. Note: The rear of the TV or VCR using a TV SCART cable. 7. RS-232C Connects to the PC to the TV using an HDMI cable. 2. ON/OFF Powers on/off. Before Using the Product 1.4 Rear Panel 12 34 5 6 7 8 9 10 1. GB11 User's Manual TV SCART Connects to change without notice... cable. 9. S/PDIF Connects to the VCR or DVD using an S/PDIF cable. (digital audio) 5. 1. VCR SCART Connects to the audio system using a VCR SCART cable. 6. HDMI Connects to update software. 8.
User Manual
Page 17
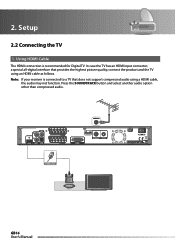
2. Note: If your receiver is recommended for Digital TV. In case the TV has an HDMI input connector, a special all-digital interface that does not support compressed audio using an HDMI cable as follows. Press the SOUNDTRACK button and select another audio option other than compressed audio. Using HDMI Cable The HDMI connection is connected to a TV that provides the highest picture quality, connect the product and the TV using a HDMI cable, the audio may not function. Setup 2.2 Connecting the TV 1. HDMI Cable GB16 User's Manual
2. Note: If your receiver is recommended for Digital TV. In case the TV has an HDMI input connector, a special all-digital interface that does not support compressed audio using an HDMI cable as follows. Press the SOUNDTRACK button and select another audio option other than compressed audio. Using HDMI Cable The HDMI connection is connected to a TV that provides the highest picture quality, connect the product and the TV using a HDMI cable, the audio may not function. Setup 2.2 Connecting the TV 1. HDMI Cable GB16 User's Manual

User Manual
Page 18
2. In case the TV has a DVI input connector, connect the product to the TV with an A/V receiver Connect one end of the HDMI cable to the HDMI input on the product and the other end to the HDMI to the TV. Connect the product and the audio receiver that functions as follows. 1. When equipped with an HDMI cable using an HDMI to DVI converter as a digital audio decoder using an HDMI to DVI converter is recommended for Digital TV. Connect the DVI converter to DVI converter. HDMI Cable GB17 User's Manual Using DVI Converter The DVI connection using an S/PDIF cable. Setup 2.
2. In case the TV has a DVI input connector, connect the product to the TV with an A/V receiver Connect one end of the HDMI cable to the HDMI input on the product and the other end to the HDMI to the TV. Connect the product and the audio receiver that functions as follows. 1. When equipped with an HDMI cable using an HDMI to DVI converter as a digital audio decoder using an HDMI to DVI converter is recommended for Digital TV. Connect the DVI converter to DVI converter. HDMI Cable GB17 User's Manual Using DVI Converter The DVI connection using an S/PDIF cable. Setup 2.

User Manual
Page 19
Connect one end of the HDMI cable to the HDMI input on the product and the other end to the HDMI to the TV. Connect the product and the TV using an audio cable as follows. 1. HDMI Cable GB18 User's Manual 2. When there is no A/V receiver available In case you are not equipped with an A/V receiver, connect the product and the TV using an RCA cable. 2. Connect the DVI converter to DVI converter. 3. Setup 2. Caution: DO NOT CONNECT TO HEAD PHONE CONNECTOR ON TV! Note: You can also connect the product to the TV using the 3.5 Stereo Jack Cable to 2 RCA Y Cable.
Connect one end of the HDMI cable to the HDMI input on the product and the other end to the HDMI to the TV. Connect the product and the TV using an audio cable as follows. 1. HDMI Cable GB18 User's Manual 2. When there is no A/V receiver available In case you are not equipped with an A/V receiver, connect the product and the TV using an RCA cable. 2. Connect the DVI converter to DVI converter. 3. Setup 2. Caution: DO NOT CONNECT TO HEAD PHONE CONNECTOR ON TV! Note: You can also connect the product to the TV using the 3.5 Stereo Jack Cable to 2 RCA Y Cable.

User Manual
Page 30
... language that does not support compressed audio using the / button and press the OK or button. 3. Basic Operation 2. Press the OPT+ button. 2. Select Subtitle using a HDMI cable, the audio may not function. Subtitle If the current programme provides subtitle information, you can select a default subtitle language in MENU-Preferences-Language Setting...
... language that does not support compressed audio using the / button and press the OK or button. 3. Basic Operation 2. Press the OPT+ button. 2. Select Subtitle using a HDMI cable, the audio may not function. Subtitle If the current programme provides subtitle information, you can select a default subtitle language in MENU-Preferences-Language Setting...

User Manual
Page 56
HDMI Resolution You can select the display format according to 4:3, you can select an option among 16:9 Letter Box, 14:9 Letter Box and Centre Cut-Out ... may also need to adjust your TV set to the TV screen ratio. 1. Display Format You can set to its 16:9/Auto /Wide format. 6. Select HDMI Resolution using the OK or button. Select from 576p and 720p using the / button. 2. If the screen ratio is set the...
HDMI Resolution You can select the display format according to 4:3, you can select an option among 16:9 Letter Box, 14:9 Letter Box and Centre Cut-Out ... may also need to adjust your TV set to the TV screen ratio. 1. Display Format You can set to its 16:9/Auto /Wide format. 6. Select HDMI Resolution using the OK or button. Select from 576p and 720p using the / button. 2. If the screen ratio is set the...