
User Manual
Page 4
... satellite/cable service information has been changed Network Information is automatically done when changing NIT. Other channels have the number from 101 in sequence as the receiver searchs the signal. • Specifications are scrambled. Warning HUMAX cannot be held responsible for NA-FOX models. And it , the message may suddenly appear during AV playback and simultaneously updating will re-organize the service information based on the screen. So that only the formal software...
... satellite/cable service information has been changed Network Information is automatically done when changing NIT. Other channels have the number from 101 in sequence as the receiver searchs the signal. • Specifications are scrambled. Warning HUMAX cannot be held responsible for NA-FOX models. And it , the message may suddenly appear during AV playback and simultaneously updating will re-organize the service information based on the screen. So that only the formal software...
User Manual
Page 6
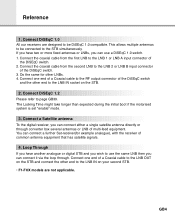
... 1.0 compatible. Connect the coaxial cable from the second LNB to the LNB 2 or LNB B input connector of the DiSEqC switch and the other LNBs. 4. Connect a Satellite antenna To the digital receiver, you can connect either a single satellite antenna directly or through . Connect one end of a Coaxial cable to the LNB IN socket on the STB. 2. The Locking Time might take longer than expected during the initial boot if the motorised system is set "enable" mode. 3. Connect DiSEqC...
... 1.0 compatible. Connect the coaxial cable from the second LNB to the LNB 2 or LNB B input connector of the DiSEqC switch and the other LNBs. 4. Connect a Satellite antenna To the digital receiver, you can connect either a single satellite antenna directly or through . Connect one end of a Coaxial cable to the LNB IN socket on the STB. 2. The Locking Time might take longer than expected during the initial boot if the motorised system is set "enable" mode. 3. Connect DiSEqC...
User Manual
Page 7
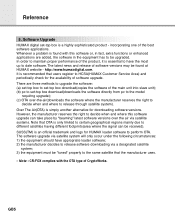
... release through satellite system). Software Upgrade HUMAX digital set -top box download(downloads the software directly from pc to the model requiring upgrade); (c) OTA over the air via a designated satellite system; 3) the equipment must be received). However, the manufacturer reserves the right to decide when and where this software or, in fact, extra functions or enhanced applications are three methods to upgrade the software: (a) set-top box to set-top box download(copies the software of...
... release through satellite system). Software Upgrade HUMAX digital set -top box download(downloads the software directly from pc to the model requiring upgrade); (c) OTA over the air via a designated satellite system; 3) the equipment must be received). However, the manufacturer reserves the right to decide when and where this software or, in fact, extra functions or enhanced applications are three methods to upgrade the software: (a) set-top box to set-top box download(copies the software of...

User Manual
Page 10
Rear Panel F1-FOX VA-FOX, CR-FOX, NA-FOX • LNB IN Use to connect an antenna. • LNB OUT Use it when connecting to another STB. • RS-232C Use it when connecting to your PC. • TV SCART For the audio/video input of the TV. • VCR SCART For the VCR. • AUDIO OUTPUT Audio signal from your STB to Hi-Fi system. GB8
Rear Panel F1-FOX VA-FOX, CR-FOX, NA-FOX • LNB IN Use to connect an antenna. • LNB OUT Use it when connecting to another STB. • RS-232C Use it when connecting to your PC. • TV SCART For the audio/video input of the TV. • VCR SCART For the VCR. • AUDIO OUTPUT Audio signal from your STB to Hi-Fi system. GB8
User Manual
Page 14
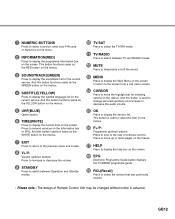
... Electronic Programme Guide button displays the TV/RADIO programme guide. 19 RCL(Recall) Press to reserve services on the Information box or EPG. 1 NUMERIC BUTTONS Press to select a service, enter your PIN code or Numerics on the menu. 2 INFORMATION(RED) Press to display the service list. And this button is used to change services(up or down ) and increase or decrease the audio volume. 15 OK Press to display the programme information box on the screen.
... Electronic Programme Guide button displays the TV/RADIO programme guide. 19 RCL(Recall) Press to reserve services on the Information box or EPG. 1 NUMERIC BUTTONS Press to select a service, enter your PIN code or Numerics on the menu. 2 INFORMATION(RED) Press to display the service list. And this button is used to change services(up or down ) and increase or decrease the audio volume. 15 OK Press to display the programme information box on the screen.
User Manual
Page 17
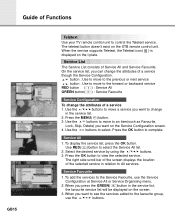
... change the attributes of a service 1. Guide of Functions GB15 Teletext Use your TV remote control unit to the Service Favourite, use the buttons. button : Use to move to the previous or next service button : Use to move to the forward or backward service RED button ( ) : Service All GREEN button( ) : Service Favourite Service Configuration To change in the service list, the favourite service list will be displayed on the Service Configuration screen. 4. Use RED( )button to All services. The right side scroll-bar of the screen displays the location...
... change the attributes of a service 1. Guide of Functions GB15 Teletext Use your TV remote control unit to the Service Favourite, use the buttons. button : Use to move to the previous or next service button : Use to move to the forward or backward service RED button ( ) : Service All GREEN button( ) : Service Favourite Service Configuration To change in the service list, the favourite service list will be displayed on the Service Configuration screen. 4. Use RED( )button to All services. The right side scroll-bar of the screen displays the location...
User Manual
Page 18
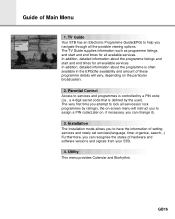
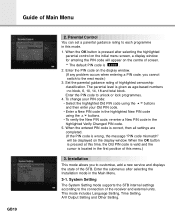
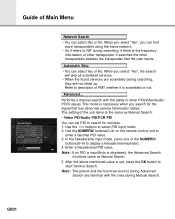
... services. In addition, detailed information about the programme listings and start and end times for all services(or lock programmes by a PIN code (i.e., a 4-digit secret code that is often available in the EPG(the availability and amount of Main Menu 1. Parental Control Access to have the information of setting services and newly set services(language, time, organise, search,..) Furthermore, you can recognise the states of hardware and software versions and signals from your STB. 4. Installation The Installation mode...
... services. In addition, detailed information about the programme listings and start and end times for all services(or lock programmes by a PIN code (i.e., a 4-digit secret code that is often available in the EPG(the availability and amount of Main Menu 1. Parental Control Access to have the information of setting services and newly set services(language, time, organise, search,..) Furthermore, you can recognise the states of hardware and software versions and signals from your STB. 4. Installation The Installation mode...
User Manual
Page 21
... Changed PIN code. 5. Enter the submenus after selecting the highlighted parental control on the initial menu screen, a display window for entering the PIN code will be displayed on the centre of the receiver and external units. When the OK button is pressed at this mode. 1. The parental level is wrong, the message "PIN code mismatch" will appear on the display window. System Setting The System Setting mode supports the STB internal settings according to unlock or lock programmes. 4. When the entered PIN code...
... Changed PIN code. 5. Enter the submenus after selecting the highlighted parental control on the initial menu screen, a display window for entering the PIN code will be displayed on the centre of the receiver and external units. When the OK button is pressed at this mode. 1. The parental level is wrong, the message "PIN code mismatch" will appear on the display window. System Setting The System Setting mode supports the STB internal settings according to unlock or lock programmes. 4. When the entered PIN code...
User Manual
Page 23
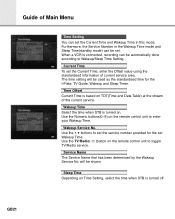
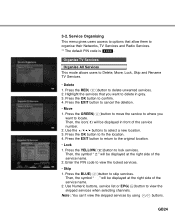
... turned on Time Setting, select the time when STB is connected, recording can be set Wakeup Time. Furthermore, the Service Number in this mode. When a VCR is turned off. will be shown. Service Name The Service Name that has been determined by the Wakeup Service No. Guide of Main Menu Time Setting You can set the Current Time, enter the Offset value using the standardised information of the current service. Wakeup Service No. Use the TV/Radio( )button on the remote control...
... turned on Time Setting, select the time when STB is connected, recording can be set Wakeup Time. Furthermore, the Service Number in this mode. When a VCR is turned off. will be shown. Service Name The Service Name that has been determined by the Wakeup Service No. Guide of Main Menu Time Setting You can set the Current Time, enter the Offset value using the standardised information of the current service. Wakeup Service No. Use the TV/Radio( )button on the remote control...
User Manual
Page 24
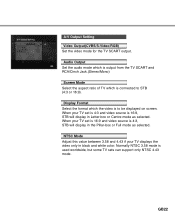
... TV set is 16:9 and video source is connected to be displayed on screen. A/V Output Setting Video Output(CVBS/S-Video/RGB) Set the video mode for the TV SCART output. Display Format Select the format which is 4:3, STB will display in Letter-box or Centre mode as selected. NTSC Mode Adjust this value between 3.58 and 4.43 if your TV set is 4:3 and video source is to STB (4:3 or 16:9). When your TV displays the video only...
... TV set is 16:9 and video source is connected to be displayed on screen. A/V Output Setting Video Output(CVBS/S-Video/RGB) Set the video mode for the TV SCART output. Display Format Select the format which is 4:3, STB will display in Letter-box or Centre mode as selected. NTSC Mode Adjust this value between 3.58 and 4.43 if your TV set is 4:3 and video source is to STB (4:3 or 16:9). When your TV displays the video only...
User Manual
Page 26
... the service number. 2. Use Numeric buttons, service list or EPG( )button to lock services. Press the YELLOW( )button to view the skipped services when selecting channels. Press the BLUE( )button to the original location. • Lock 1. Press the EXIT button to return to skip services. Note : You can't view the skipped services by using buttons. Press the OK button to view the locked services. • Skip 1. Enter the PIN code to fix the location. 4. Organise TV Services Organise All Services This mode allows users to delete unwanted services...
... the service number. 2. Use Numeric buttons, service list or EPG( )button to lock services. Press the YELLOW( )button to view the skipped services when selecting channels. Press the BLUE( )button to the original location. • Lock 1. Press the EXIT button to return to skip services. Note : You can't view the skipped services by using buttons. Press the OK button to view the locked services. • Skip 1. Enter the PIN code to fix the location. 4. Organise TV Services Organise All Services This mode allows users to delete unwanted services...
User Manual
Page 29
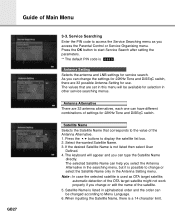
... the buttons to start Service Search after setting the parameters. ** The default PIN code is used as you can be available for service search. The keyboard will be changed according to the value of Main Menu GB27 3-3. Note : In case the selected satellite is 0 0 0 0 . Antenna Setting Selects the antenna and LNB settings for selection in this menu will appear and you access the Parental Control or Service Organising menu. Press the OK button to display the satellite list box. 2. The...
... the buttons to start Service Search after setting the parameters. ** The default PIN code is used as you can be available for service search. The keyboard will be changed according to the value of Main Menu GB27 3-3. Note : In case the selected satellite is 0 0 0 0 . Antenna Setting Selects the antenna and LNB settings for selection in this menu will appear and you access the Parental Control or Service Organising menu. Press the OK button to display the satellite list box. 2. The...
User Manual
Page 30
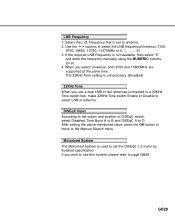
... the LNB frequency(Universal, 5150, 9750, 10600, 10750, 11475MHz or 0, 1, ......., 9). 3. Motorised System The Motorised System is not available, then select "0" and enter the frequency manually using the NUMERIC buttons (0~9). 4. If you select Universal, both 9750 and 10600MHz are supported at the same time. Select the L.O. When you wish to use a dual LNB or two antennas connected to a 22KHz Tone switch box, make 22KHz Tone switch Enable or Disable to the Manual Search menu.
... the LNB frequency(Universal, 5150, 9750, 10600, 10750, 11475MHz or 0, 1, ......., 9). 3. Motorised System The Motorised System is not available, then select "0" and enter the frequency manually using the NUMERIC buttons (0~9). 4. If you select Universal, both 9750 and 10600MHz are supported at the same time. Select the L.O. When you wish to use a dual LNB or two antennas connected to a 22KHz Tone switch box, make 22KHz Tone switch Enable or Disable to the Manual Search menu.
User Manual
Page 33
... value. 3. Use the NUMERIC buttons(0~9) on the remote control unit to enter PID(Video/Audio/ PCR) values. Note : The picture and the found services are scrambled during Manual Search. Advanced... The setting of the sub items is necessary when you search for services. 1. Enter a hexadecimal PID value. When you can set , press the OK button to search for the signal that the user inputs. This mode is the same as Manual Search. • Video PID/Audio PID...
... value. 3. Use the NUMERIC buttons(0~9) on the remote control unit to enter PID(Video/Audio/ PCR) values. Note : The picture and the found services are scrambled during Manual Search. Advanced... The setting of the sub items is necessary when you search for services. 1. Enter a hexadecimal PID value. When you can set , press the OK button to search for the signal that the user inputs. This mode is the same as Manual Search. • Video PID/Audio PID...
User Manual
Page 37
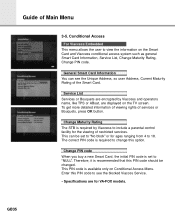
... detailed information of viewing rights of Main Menu 3-5. This can see the blocked Viacces Service. • Specifications are displayed on the TV screen. GB35 General Smart Card Information You can be changed. Change PIN code When you buy a new Smart Card, the initial PIN code is available only on the Smart Card and Viaccess conditional access system such as general Smart Card Information, Service List, Change Maturity Rating, Change PIN code. This PIN code is set to change this option. Change Maturity Rating The STB...
... detailed information of viewing rights of Main Menu 3-5. This can see the blocked Viacces Service. • Specifications are displayed on the TV screen. GB35 General Smart Card Information You can be changed. Change PIN code When you buy a new Smart Card, the initial PIN code is available only on the Smart Card and Viaccess conditional access system such as general Smart Card Information, Service List, Change Maturity Rating, Change PIN code. This PIN code is set to change this option. Change Maturity Rating The STB...
User Manual
Page 39
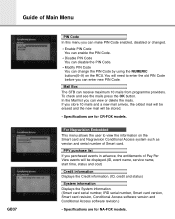
... button. If you can enter new PIN Code. Guide of Main Menu GB37 PIN Code In this menu you can view or delete the mails. You will be displayed.(ID, event name, service name, start time, status and cost) Credit information Displays the Credit information. (ID, credit and status) System information Displays the System information. (Smart card serial number, IRD serial number, Smart card version, Smart card revision, Conditional Access software version and Conditional Access software revision.) • Specifications are for NA-FOX models...
... button. If you can enter new PIN Code. Guide of Main Menu GB37 PIN Code In this menu you can view or delete the mails. You will be displayed.(ID, event name, service name, start time, status and cost) Credit information Displays the Credit information. (ID, credit and status) System information Displays the System information. (Smart card serial number, IRD serial number, Smart card version, Smart card revision, Conditional Access software version and Conditional Access software revision.) • Specifications are for NA-FOX models...

User Manual
Page 41
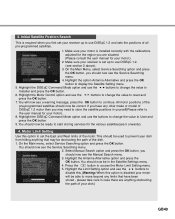
... for DiSEqC 1.2 You must set your receiver up a separate antenna alternative for the services(STAB Rotor Sat motor recommended). 1. Select Service Searching option and press OK button, to use DiSEqC 1.2. In Installer mode this is used to the 0 position.(Installer mode only) DiSEqC Command Mode Changes the current mode between Installer and User. 2. The following options are using the buttons. 8. If the satellite name you can be disabled. Guide of Main Menu DiSEqC 1.2 User Instructions If you have a DiSEqC...
... for DiSEqC 1.2 You must set your receiver up a separate antenna alternative for the services(STAB Rotor Sat motor recommended). 1. Select Service Searching option and press OK button, to use DiSEqC 1.2. In Installer mode this is used to the 0 position.(Installer mode only) DiSEqC Command Mode Changes the current mode between Installer and User. 2. The following options are using the buttons. 8. If the satellite name you can be disabled. Guide of Main Menu DiSEqC 1.2 User Instructions If you have a DiSEqC...
User Manual
Page 42
... the pre-programmed satellites should now see the Manual Search menu. 3. All motor positions of the dish. 1. Highlight the DiSEqC Command Mode option and use the buttons to disable this.(Warning: When this option to start storing services for the region you first set the East and West limits of your motor). 8. You should now see the Service Searching menu. 2. Press the button to display the Satellite Setting menu. 5. Make sure your dish from hitting...
... the pre-programmed satellites should now see the Manual Search menu. 3. All motor positions of the dish. 1. Highlight the DiSEqC Command Mode option and use the buttons to disable this.(Warning: When this option to start storing services for the region you first set the East and West limits of your motor). 8. You should now see the Service Searching menu. 2. Press the button to display the Satellite Setting menu. 5. Make sure your dish from hitting...

User Manual
Page 43
... the position of the screen to the satellite you exit the menu. 14. Select the Manual Search option and press the OK button, to display the Satellite Settings menu. 5. Select the Antenna Alternative option and press the OK button, to display the Manual Search menu. When you have selected the satellite you have the best position of the dish go down to the Movement option and again using the buttons select store and press...
... the position of the screen to the satellite you exit the menu. 14. Select the Manual Search option and press the OK button, to display the Satellite Settings menu. 5. Select the Antenna Alternative option and press the OK button, to display the Manual Search menu. When you have selected the satellite you have the best position of the dish go down to the Movement option and again using the buttons select store and press...

User Manual
Page 44
...-tuning, you must access the Satellite Settings menu. Now enter the Frequency and Symbol Rate using the buttons. 5. Next enter the Polarisation and FEC values using the NUMERIC buttons(0~9). Moving to a pre-set to view. 6. Do as follows ; 1. Select the Manual Search option and press the OK button, to display the Service Searching menu. 2. Move the motor to the position of the satellites you want(see section 6 above) 2. play the Manual Search menu. 4. Select Service Searching from the relevant satellite...
...-tuning, you must access the Satellite Settings menu. Now enter the Frequency and Symbol Rate using the buttons. 5. Next enter the Polarisation and FEC values using the NUMERIC buttons(0~9). Moving to a pre-set to view. 6. Do as follows ; 1. Select the Manual Search option and press the OK button, to display the Service Searching menu. 2. Move the motor to the position of the satellites you want(see section 6 above) 2. play the Manual Search menu. 4. Select Service Searching from the relevant satellite...


