
User Manual
Page 3
... provided instructions. Notice ** Read this manual carefully and make the user aware of possible problems and information of any importance to help the user to understand, to use and to the following marks that presents a risk of electric shock, do not remove cover (or back). Warnings, Cautions and Notes Throughout the whole manual, pay special attention to maintain the installation. ** ** To...
... provided instructions. Notice ** Read this manual carefully and make the user aware of possible problems and information of any importance to help the user to understand, to use and to the following marks that presents a risk of electric shock, do not remove cover (or back). Warnings, Cautions and Notes Throughout the whole manual, pay special attention to maintain the installation. ** ** To...
User Manual
Page 6
Before Using the Receiver ** 1.1 Package Contents 1.2 Front Panel 1.3 Rear Panel 1.4 Remote Control 2. Installation Wizard ** 3.1 Language 3.2 Area Setting 3.3 Antenna Setting 3.4 Automatic Search 3.5 Time Setting 4. Channel List ** 5.1 Displaying and Switching Channel List 5.2 Changing Channel List Group 5.3 Edit Channels 5.4 Edit Favourite Channels 5.5 Channel Change Mode 6. Programme Guide ** 6.1 Viewing Programme Guide Information 6.2 Finding a Programme 6.3 Viewing Reserved Programme GB7 GB7 GB8 GB9 GB10 GB12 GB12 GB13 GB14 GB14 GB14 GB14 GB16 GB16 GB17 GB17 GB17 GB17 GB17 GB18 GB18 ...
Before Using the Receiver ** 1.1 Package Contents 1.2 Front Panel 1.3 Rear Panel 1.4 Remote Control 2. Installation Wizard ** 3.1 Language 3.2 Area Setting 3.3 Antenna Setting 3.4 Automatic Search 3.5 Time Setting 4. Channel List ** 5.1 Displaying and Switching Channel List 5.2 Changing Channel List Group 5.3 Edit Channels 5.4 Edit Favourite Channels 5.5 Channel Change Mode 6. Programme Guide ** 6.1 Viewing Programme Guide Information 6.2 Finding a Programme 6.3 Viewing Reserved Programme GB7 GB7 GB8 GB9 GB10 GB12 GB12 GB13 GB14 GB14 GB14 GB14 GB16 GB16 GB17 GB17 GB17 GB17 GB17 GB18 GB18 ...
User Manual
Page 7
.... Service and Support GB 6 GB36 ** GB36 GB38 GB39 GB41 GB41 GB43 GB44 GB46 ** GB46 GB49 GB51 GB54 GB57 GB63 GB64 ** GB64 GB68 GB69 ** GB69 GB69 GB70 GB71 GB72 ** GB72 GB73 GB74 GB76 GB77 Contents ** 7. Menu Map 13. Trouble Shooting 13.1 Trouble Shooting 13.2 Error Message 14. Specification 15. Games 12. Setting Preferences 7.1 Parental Control 7.2 Language Setting 7.3 Time Setting 7.4 Schedule 7.5 A/V Control 7.6 UHF Tuning 7.7 Miscellaneous Settings 8. Installation 8.1 Antenna Setting 8.2 Automatic Search 8.3 Manual Search 8.4 Other Search 8.5 Motor Antenna 8.6 Default...
.... Service and Support GB 6 GB36 ** GB36 GB38 GB39 GB41 GB41 GB43 GB44 GB46 ** GB46 GB49 GB51 GB54 GB57 GB63 GB64 ** GB64 GB68 GB69 ** GB69 GB69 GB70 GB71 GB72 ** GB72 GB73 GB74 GB76 GB77 Contents ** 7. Menu Map 13. Trouble Shooting 13.1 Trouble Shooting 13.2 Error Message 14. Specification 15. Games 12. Setting Preferences 7.1 Parental Control 7.2 Language Setting 7.3 Time Setting 7.4 Schedule 7.5 A/V Control 7.6 UHF Tuning 7.7 Miscellaneous Settings 8. Installation 8.1 Antenna Setting 8.2 Automatic Search 8.3 Manual Search 8.4 Other Search 8.5 Motor Antenna 8.6 Default...

User Manual
Page 11
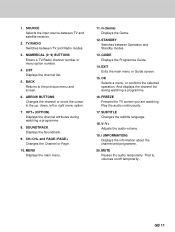
Before Using the Receiver ** 1.4 Remote Control ** ** 1. SOURCE 2. NUMERICAL BUTTONS 4. OPT+ (OPTION) 8. G (Game) 12. GUIDE 14. V-/V+ 19. ARROW BUTTONS 7. MENU 11. SUBTITLE 18. GB 10 TV/RADIO 3. BACK 6. CH-/CH+ and PAGE-/PAGE+ 10. FREEZE 17. LIST 5. OK 16. MUTE Note: The available remote controller may vary depending on the regions and models. 1. EXIT 15. SOUNDTRACK 9. STANDBY 13. i (Information) 20.
Before Using the Receiver ** 1.4 Remote Control ** ** 1. SOURCE 2. NUMERICAL BUTTONS 4. OPT+ (OPTION) 8. G (Game) 12. GUIDE 14. V-/V+ 19. ARROW BUTTONS 7. MENU 11. SUBTITLE 18. GB 10 TV/RADIO 3. BACK 6. CH-/CH+ and PAGE-/PAGE+ 10. FREEZE 17. LIST 5. OK 16. MUTE Note: The available remote controller may vary depending on the regions and models. 1. EXIT 15. SOUNDTRACK 9. STANDBY 13. i (Information) 20.
User Manual
Page 12
...menu or Guide screen. ** 15. V-/V+ ** Adjusts the audio volume. ** 19. LIST ** Displays the channel list. ** 5. FREEZE ** Freezes the TV screen you are watching. STANDBY ** Switches between TV and satellite receiver. ** 2. SUBTITLE ** Changes the subtitle language. ** 18. NUMERICAL (0~9) BUTTONS ** Enters a TV/Radio channel number or menu option number. ** 4. SOUNDTRACK ** Displays the Soundtrack. ** 9. SOURCE ** Selects the input source between Operation and Standby modes. ** 13. MENU ** Displays the main menu. ** 11. And displays the channel list during watching...
...menu or Guide screen. ** 15. V-/V+ ** Adjusts the audio volume. ** 19. LIST ** Displays the channel list. ** 5. FREEZE ** Freezes the TV screen you are watching. STANDBY ** Switches between TV and satellite receiver. ** 2. SUBTITLE ** Changes the subtitle language. ** 18. NUMERICAL (0~9) BUTTONS ** Enters a TV/Radio channel number or menu option number. ** 4. SOUNDTRACK ** Displays the Soundtrack. ** 9. SOURCE ** Selects the input source between Operation and Standby modes. ** 13. MENU ** Displays the main menu. ** 11. And displays the channel list during watching...
User Manual
Page 16
... button to display LNB Frequency List. Select DiSEqC Input item using the button, and press the OK or button to start Automatic Search. ** Note: • If the antenna is correctly set up, the level at signal strength bar and quality bar, which are located at the bottom of the screen, are generally moved up. • If you cannot find the LNB Frequency value from the list, select User Define, manually enter the frequency using...
... button to display LNB Frequency List. Select DiSEqC Input item using the button, and press the OK or button to start Automatic Search. ** Note: • If the antenna is correctly set up, the level at signal strength bar and quality bar, which are located at the bottom of the screen, are generally moved up. • If you cannot find the LNB Frequency value from the list, select User Define, manually enter the frequency using...

User Manual
Page 18
... Subtitle information, you can switch the current channel using the NUMERICAL (0~9) buttons to move to adjust the audio volume. Press the FREEZE button again to Chapter 5 and 6 for the Subtitle. 1. Preferences - Enter your desired subtitle language using Programme Guide or Channel List. Press the MUTE buttons to the channel directly. 3. Select OFF from the screen. 4. Note: You can select a default subtitle language by selecting MENU - Press the V-/V+ 2. Press the SUBTITLE list. button to display subtitle from the subtitle...
... Subtitle information, you can switch the current channel using the NUMERICAL (0~9) buttons to move to adjust the audio volume. Press the FREEZE button again to Chapter 5 and 6 for the Subtitle. 1. Preferences - Enter your desired subtitle language using Programme Guide or Channel List. Press the MUTE buttons to the channel directly. 3. Select OFF from the screen. 4. Note: You can select a default subtitle language by selecting MENU - Press the V-/V+ 2. Press the SUBTITLE list. button to display subtitle from the subtitle...
User Manual
Page 24
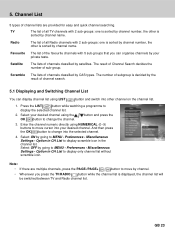
The number of subgroup is sorted by going to MENU - Enter the channel numeric directly using NUMERICAL (0~9) buttons to move by channel. • Whenever you can display channel list using the OK button to display only channel list without scramble icon. ** Note: • If there are provided for easy and quick channel searching. Option in CH List to display scramble icon in CH List to change the channel. Select ON by the result of channel lists are...
The number of subgroup is sorted by going to MENU - Enter the channel numeric directly using NUMERICAL (0~9) buttons to move by channel. • Whenever you can display channel list using the OK button to display only channel list without scramble icon. ** Note: • If there are provided for easy and quick channel searching. Option in CH List to display scramble icon in CH List to change the channel. Select ON by the result of channel lists are...
User Manual
Page 32
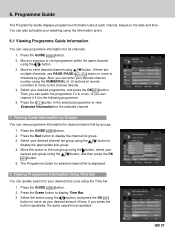
.... button to display the channel list group. 3. The Programme Guide for your desired channel list group using the Time bar. 1. Viewing Programme Information Using Time Bar You can enter your desired amount of time. Press the i button in the selected programme to display Time Bar. 3. Press the Green button to view Extended Information for the selected channel. 1. If you can quickly search for selected channel list is repeated. Move to move as your desired channel number using the button, select...
.... button to display the channel list group. 3. The Programme Guide for your desired channel list group using the Time bar. 1. Viewing Programme Information Using Time Bar You can enter your desired amount of time. Press the i button in the selected programme to display Time Bar. 3. Press the Green button to view Extended Information for the selected channel. 1. If you can quickly search for selected channel list is repeated. Move to move as your desired channel number using the button, select...
User Manual
Page 47
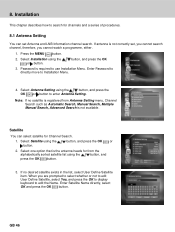
... the OK to display keyboard to search for channels and a series of procedures. 8.1 Antenna Setting You can select satellite for from the alphabetically sorted satellite list using the button. If no satellite is registered from Antenna Setting menu, Channel Search such as Automatic Search, Manual Search, Multiple Manual Search, Advanced Search is the antenna heads for Channel Search. 1. If antenna is required to use Installation Menu. button, and press the OK 3. When you cannot watch a programme, either. 1. GB 46 Enter Satellite Name directly, select OK and...
... the OK to display keyboard to search for channels and a series of procedures. 8.1 Antenna Setting You can select satellite for from the alphabetically sorted satellite list using the button. If no satellite is registered from Antenna Setting menu, Channel Search such as Automatic Search, Manual Search, Multiple Manual Search, Advanced Search is the antenna heads for Channel Search. 1. If antenna is required to use Installation Menu. button, and press the OK 3. When you cannot watch a programme, either. 1. GB 46 Enter Satellite Name directly, select OK and...

User Manual
Page 49
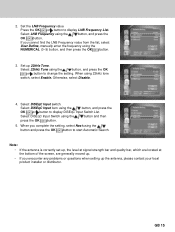
... when the distance between antenna and receiver is further than 60m. If you change the setting value to High a message will prompt you set to High , 1V higher than LNB voltage is further than 60m 3. You can select one option among Tone burst A~B, DiSEqC A~D, DiSEqC A~D for 2.0 and Disable. ** LNB Voltage You can select DiSEqC switch. 1. 8. Select DiSEqC Input using the button, and press the...
... when the distance between antenna and receiver is further than 60m. If you change the setting value to High a message will prompt you set to High , 1V higher than LNB voltage is further than 60m 3. You can select one option among Tone burst A~B, DiSEqC A~D, DiSEqC A~D for 2.0 and Disable. ** LNB Voltage You can select DiSEqC switch. 1. 8. Select DiSEqC Input using the button, and press the...
User Manual
Page 58
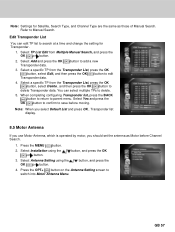
... search at a time and change the setting for Satellite, Search Type, and Channel Type are the same as Motor before moving. Press the OPT+ button on the Antenna Setting screen to add a new 3. button to switch into Motor Antenna Menu. Press the MENU button. 2. Select TP List Edit from the Transponder List, press the OK button, select Edit, and then press the OK button to parent menu. Select Add and press the OK Transponder data. You can edit TP list...
... search at a time and change the setting for Satellite, Search Type, and Channel Type are the same as Motor before moving. Press the OPT+ button on the Antenna Setting screen to add a new 3. button to switch into Motor Antenna Menu. Press the MENU button. 2. Select TP List Edit from the Transponder List, press the OK button, select Edit, and then press the OK button to parent menu. Select Add and press the OK Transponder data. You can edit TP list...
User Manual
Page 63
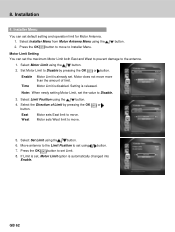
... set default setting and operation limit for Motor Antenna. 1. Select Set Limit using the button. 2. Press the OK button to set Limit. 8. Select Limit Position using the button. 2. Press the OK ** Motor Limit Setting button to move . 5. Note: When newly setting Motor Limit, set the maximum Motor Limit both East and West to prevent damage to move to Disable. 3. Installer Menu You can set the value to Installer Menu. 8. Select Installer Menu from Motor Antenna Menu using...
... set default setting and operation limit for Motor Antenna. 1. Select Set Limit using the button. 2. Press the OK button to set Limit. 8. Select Limit Position using the button. 2. Press the OK ** Motor Limit Setting button to move . 5. Note: When newly setting Motor Limit, set the maximum Motor Limit both East and West to prevent damage to move to Disable. 3. Installer Menu You can set the value to Installer Menu. 8. Select Installer Menu from Motor Antenna Menu using...
User Manual
Page 64
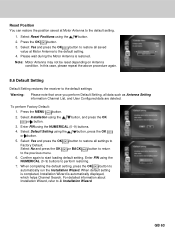
... perform Default Setting, all settings to or BACK button to the default setting. 4. button to restore all data such as Antenna Setting information Channel List, and User Configured data are deleted. Please wait during the Motor Antenna is automatically displayed, which helps Channel Search. Press the MENU button. 2. Select Default Setting using the NUMERICAL (0~9) buttons to perform restoring. 7. Select Yes and press the OK Factory Default. When default setting is completed, Installation Wizard is restored. Note: Motor Antenna may not be reset depending on Antenna...
... perform Default Setting, all settings to or BACK button to the default setting. 4. button to restore all data such as Antenna Setting information Channel List, and User Configured data are deleted. Please wait during the Motor Antenna is automatically displayed, which helps Channel Search. Press the MENU button. 2. Select Default Setting using the NUMERICAL (0~9) buttons to perform restoring. 7. Select Yes and press the OK Factory Default. When default setting is completed, Installation Wizard is restored. Note: Motor Antenna may not be reset depending on Antenna...
User Manual
Page 65
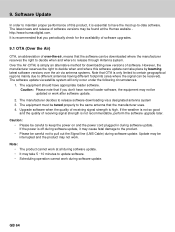
... through Antenna system. Upgrade software when the quality of receiving signal strength is high. Update may be interrupted and the product may not be downloaded where the manufacturer reserves the right to decide when and where to -date software. Caution: Please note that the software can be updated or work after software update. 2. If the power is essential to pull out the Signal line (LNB Cable) during software update. •...
... through Antenna system. Upgrade software when the quality of receiving signal strength is high. Update may be interrupted and the product may not be downloaded where the manufacturer reserves the right to decide when and where to -date software. Caution: Please note that the software can be updated or work after software update. 2. If the power is essential to pull out the Signal line (LNB Cable) during software update. •...
User Manual
Page 67
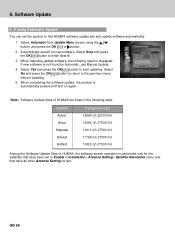
... the Software Update Sites of HUMAX are listed in Installation - Software Update ** 4. Select Automatic from Update Menu screen using Automatic Update You can set to Enable in the following result is not found by Automatic, use Manual Update. 4. When detecting update software, the following table. GB 66 If using the button, and press the OK or button. 2. Select Stop and press the OK button to start updating. When completing the software update, the product is automatically powered...
... the Software Update Sites of HUMAX are listed in Installation - Software Update ** 4. Select Automatic from Update Menu screen using Automatic Update You can set to Enable in the following result is not found by Automatic, use Manual Update. 4. When detecting update software, the following table. GB 66 If using the button, and press the OK or button. 2. Select Stop and press the OK button to start updating. When completing the software update, the product is automatically powered...
User Manual
Page 68
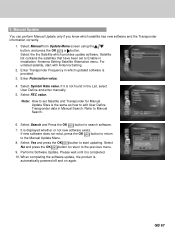
... and press the OK button to return to the Manual Update Menu. 8. Enter Transponder Frequency in the List, select User Define and enter manually. 5. It is the same as how to edit User Define Transponder data in Installation -Antenna Setting-Satellite Alternative menu. Select the the Satellite which satellite has new software and the Transponder information correctly. 1. Enter Polarisation value. 4. Select FEC value. ** Note: How to set to start with Antenna Setting. 2. Refer to search software. 7. Please wait until...
... and press the OK button to return to the Manual Update Menu. 8. Enter Transponder Frequency in the List, select User Define and enter manually. 5. It is the same as how to edit User Define Transponder data in Installation -Antenna Setting-Satellite Alternative menu. Select the the Satellite which satellite has new software and the Transponder information correctly. 1. Enter Polarisation value. 4. Select FEC value. ** Note: How to set to start with Antenna Setting. 2. Refer to search software. 7. Please wait until...
User Manual
Page 73
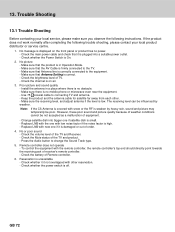
... instructions. No message is correct. - Check the main power cable and check that Antenna Setting is displayed on air. 3. No picture - Make sure that it is firmly connected to the equipment. - Poor picture and sound quality - No or poor sound - Remote controller does not operate - Check whether it it is small. - Check whether the power switch is unavailable - Check the brightness level of receiver's remote controller. - Install the antenna in Operation Mode. - Use 75 coaxial cable to change the Sound...
... instructions. No message is correct. - Check the main power cable and check that Antenna Setting is displayed on air. 3. No picture - Make sure that it is firmly connected to the equipment. - Poor picture and sound quality - No or poor sound - Remote controller does not operate - Check whether it it is small. - Check whether the power switch is unavailable - Check the brightness level of receiver's remote controller. - Install the antenna in Operation Mode. - Use 75 coaxial cable to change the Sound...
User Manual
Page 74
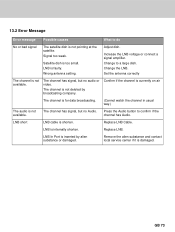
....2 Error Message Error message Possible causes What to do No or bad signal The satellite dish is damaged. Change the LNB. GB 73 Adjust dish. ** Increase the LNB voltage or connect a signal amplifier. Change to confirm if the channel has Audio. Remove the alien substance and contact local service center if it is not pointing at the satellite. Confirm if the channel is currently on air The channel is for data broadcasting. (Cannot watch the channel...
....2 Error Message Error message Possible causes What to do No or bad signal The satellite dish is damaged. Change the LNB. GB 73 Adjust dish. ** Increase the LNB voltage or connect a signal amplifier. Change to confirm if the channel has Audio. Remove the alien substance and contact local service center if it is not pointing at the satellite. Confirm if the channel is currently on air The channel is for data broadcasting. (Cannot watch the channel...
User Manual
Page 77
... high frequency. The DiSEqC uses the 22KHz signal to control the switching device. ** Programme Guide (Electronic Programme Guide, EPG) A electronic program guide (EPG) that comes with the broadcast to signals that receives amplifies and retransmits a signal on the satellite dish. OSD information includes brightness, contrast, tuning, RGB adjustment, and screen size and positions (top, left, width, and height), and so on. ** OTA (Over The Air) Means that software downloads where...
... high frequency. The DiSEqC uses the 22KHz signal to control the switching device. ** Programme Guide (Electronic Programme Guide, EPG) A electronic program guide (EPG) that comes with the broadcast to signals that receives amplifies and retransmits a signal on the satellite dish. OSD information includes brightness, contrast, tuning, RGB adjustment, and screen size and positions (top, left, width, and height), and so on. ** OTA (Over The Air) Means that software downloads where...


