User Guide
Page 1
Rev C - 02/11 UltraKey Touch DVR and PTZ Keyboard Controller HJC4000 Installation and User Guide Document 800-06554 -
Rev C - 02/11 UltraKey Touch DVR and PTZ Keyboard Controller HJC4000 Installation and User Guide Document 800-06554 -
User Guide
Page 5
...13 Europe 14 Important Safety Instructions 14 Warranty and Service 15 Finding More Information 15 Typographical Conventions 15 1 UltraKey Touch Overview 17 Shipping Checklist 17 UltraKey Touch Port Connections and Descriptions 18 DC Power Port 18 Ethernet Port 18 RS232, RS485 Serial Port 19 ...RJ45 Box 19 UltraKey Touch Specifications 20 2 Using the UltraKey Touch Controller 21 Logging Onto the Controller 21 Using the UltraKey Touch to Navigate the LCD Menus 21 3 Connecting UltraKey Touch to a DVR 25 Navigating the LCD Configuration Menus ...
...13 Europe 14 Important Safety Instructions 14 Warranty and Service 15 Finding More Information 15 Typographical Conventions 15 1 UltraKey Touch Overview 17 Shipping Checklist 17 UltraKey Touch Port Connections and Descriptions 18 DC Power Port 18 Ethernet Port 18 RS232, RS485 Serial Port 19 ...RJ45 Box 19 UltraKey Touch Specifications 20 2 Using the UltraKey Touch Controller 21 Logging Onto the Controller 21 Using the UltraKey Touch to Navigate the LCD Menus 21 3 Connecting UltraKey Touch to a DVR 25 Navigating the LCD Configuration Menus ...

User Guide
Page 6
...the Controller for PTZ 54 Step 3: Configure Serial Port of the Controller 54 Configuring UltraKey Touch Using the Web Browser (Optional 56 Logging into the Web Browser 56 Step 1: Configure UltraKey Touch to System Configurations 56 Step 2: Standalone Configuration for PTZ Settings 57 Step ...Hardware 66 System Administration Using the Web Browser 67 Logging into the Web Browser 67 Upgrading the UltraKey Touch Firmware 67 Rebooting UltraKey Touch 68 Changing the UltraKey Touch Password 68 Appendix A DVR Operation Commands 71 Fusion Operation Commands 71 HRXD/HRSD Operation ...
...the Controller for PTZ 54 Step 3: Configure Serial Port of the Controller 54 Configuring UltraKey Touch Using the Web Browser (Optional 56 Logging into the Web Browser 56 Step 1: Configure UltraKey Touch to System Configurations 56 Step 2: Standalone Configuration for PTZ Settings 57 Step ...Hardware 66 System Administration Using the Web Browser 67 Logging into the Web Browser 67 Upgrading the UltraKey Touch Firmware 67 Rebooting UltraKey Touch 68 Changing the UltraKey Touch Password 68 Appendix A DVR Operation Commands 71 Fusion Operation Commands 71 HRXD/HRSD Operation ...
User Guide
Page 7
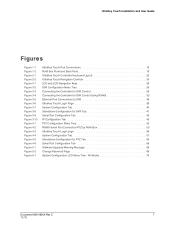
...26 Connecting the Controller for DVR Control 28 Connecting the Controller for DVR Control Using RS485 32 Ethernet Port Connections to DVR 36 UltraKey Touch Login Page 39 System Configuration Tab 40 Standalone Configuration for DVR Tab 41 Serial Port Configuration Tab 42 IP Configuration Tab ...43 PTZ Configuration Menu Tree 52 RS485 Serial Port Connection PTZ by RJ45 Box 53 UltraKey Touch Login page 56 System Configuration Tab 57 Standalone Configuration for PTZ Tab 58 Serial Port Configuration Tab 59 Software Upgrade Warning ...
...26 Connecting the Controller for DVR Control 28 Connecting the Controller for DVR Control Using RS485 32 Ethernet Port Connections to DVR 36 UltraKey Touch Login Page 39 System Configuration Tab 40 Standalone Configuration for DVR Tab 41 Serial Port Configuration Tab 42 IP Configuration Tab ...43 PTZ Configuration Menu Tree 52 RS485 Serial Port Connection PTZ by RJ45 Box 53 UltraKey Touch Login page 56 System Configuration Tab 57 Standalone Configuration for PTZ Tab 58 Serial Port Configuration Tab 59 Software Upgrade Warning ...
User Guide
Page 9
... 2-1 Table 2-2 Table 3-1 Table 3-2 Table 3-3 Table 3-4 Table 3-5 Table 3-6 Table 3-7 Table 3-8 Table 3-9 Table 3-10 Table 3-11 Table 4-1 Table 4-2 Table 4-3 Table A-1 Table A-2 Table A-3 Shipping Checklist 17 UltraKey Touch Specifications 20 UltraKey Touch Controller Keys and Controls 22 LCD Menu Navigation During Setup 24 Serial Port Com2 (RS232) Pin Assignments 27 Serial Port Com2 (RS232) Configurations...
... 2-1 Table 2-2 Table 3-1 Table 3-2 Table 3-3 Table 3-4 Table 3-5 Table 3-6 Table 3-7 Table 3-8 Table 3-9 Table 3-10 Table 3-11 Table 4-1 Table 4-2 Table 4-3 Table A-1 Table A-2 Table A-3 Shipping Checklist 17 UltraKey Touch Specifications 20 UltraKey Touch Controller Keys and Controls 22 LCD Menu Navigation During Setup 24 Serial Port Com2 (RS232) Pin Assignments 27 Serial Port Com2 (RS232) Configurations...
User Guide
Page 11
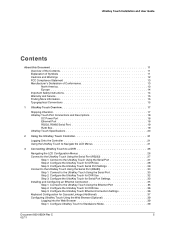
... Contents This document contains the following chapters and appendixes: • Chapter 1, UltraKey Touch Overview, introduces the UltraKey Touch controller. • Chapter 2, Using the UltraKey Touch Controller, provides procedures for logging on with the Ultrakey Touch controller and using it to navigate the LCD menus. • Chapter ..., covers system administration using the controller LCD or the web browser. • Appendix A, DVR Operation Commands, lists UltraKey Touch DVR operation commands and provides a menu tree for the controller's LCD menus. Document 800-06554 Rev C 11 02/11
... Contents This document contains the following chapters and appendixes: • Chapter 1, UltraKey Touch Overview, introduces the UltraKey Touch controller. • Chapter 2, Using the UltraKey Touch Controller, provides procedures for logging on with the Ultrakey Touch controller and using it to navigate the LCD menus. • Chapter ..., covers system administration using the controller LCD or the web browser. • Appendix A, DVR Operation Commands, lists UltraKey Touch DVR operation commands and provides a menu tree for the controller's LCD menus. Document 800-06554 Rev C 11 02/11

User Guide
Page 13
... antenna • Increase the separation between the equipment and receiver • Connect the equipment to UL 60950-1 and CSA C22.2 No. 60950-1. Honeywell shall not be determined by one of the FCC Rules, these limits are responsible for help. Cet appareil numérique de la Classe B ...est conforme à la norme NMB-003 du Canada. UltraKey Touch Installation and User Guide FCC Compliance Statement Information to the User: This equipment has been tested and found to operate the equipment. Caution Changes...
... antenna • Increase the separation between the equipment and receiver • Connect the equipment to UL 60950-1 and CSA C22.2 No. 60950-1. Honeywell shall not be determined by one of the FCC Rules, these limits are responsible for help. Cet appareil numérique de la Classe B ...est conforme à la norme NMB-003 du Canada. UltraKey Touch Installation and User Guide FCC Compliance Statement Information to the User: This equipment has been tested and found to operate the equipment. Caution Changes...

User Guide
Page 15
...Minute:Seconds. Syntax (object) entered Document 800-06554 Rev C 15 02/11 Be sure to have a problem with any Honeywell product, please call Customer Service at its sole option, free of a procedure Text strings displayed on the Product warranty, during the warranty... obtained for all returns, exchanges, or credits. Items shipped to Honeywell without a clearly identified Return Merchandise Authorization (RMA) number may be entered as part of charge, any defective products returned prepaid. UltraKey Touch Installation and User Guide Warranty and Service Subject to the terms...
...Minute:Seconds. Syntax (object) entered Document 800-06554 Rev C 15 02/11 Be sure to have a problem with any Honeywell product, please call Customer Service at its sole option, free of a procedure Text strings displayed on the Product warranty, during the warranty... obtained for all returns, exchanges, or credits. Items shipped to Honeywell without a clearly identified Return Merchandise Authorization (RMA) number may be entered as part of charge, any defective products returned prepaid. UltraKey Touch Installation and User Guide Warranty and Service Subject to the terms...
User Guide
Page 17
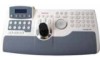
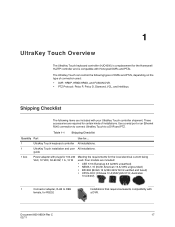
... . Table 1-1 Shipping Checklist Quantity Part Use for the Honeywell HJZTP controller and is a replacement for ... 1 UltraKey Touch keyboard controller All installations. 1 UltraKey Touch installation and user All installations. Document 800-06554 Rev C 17 02/11 1 UltraKey Touch Overview The UltraKey Touch keyboard controller (HJC4000) is compatible with your UltraKey Touch controller shipment. Australian 10 A/240V). 1 Connector adapter...
... . Table 1-1 Shipping Checklist Quantity Part Use for the Honeywell HJZTP controller and is a replacement for ... 1 UltraKey Touch keyboard controller All installations. 1 UltraKey Touch installation and user All installations. Document 800-06554 Rev C 17 02/11 1 UltraKey Touch Overview The UltraKey Touch keyboard controller (HJC4000) is compatible with your UltraKey Touch controller shipment. Australian 10 A/240V). 1 Connector adapter...
User Guide
Page 18
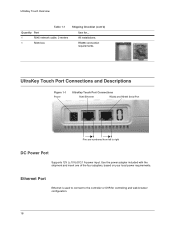
... Port Connections RJ45 Ethernet RS232 and RS485 Serial Port 1 8 1 8 Pins are numbered from left to the controller or DVR for ... UltraKey Touch Overview Table 1-1 Quantity Part 1 RJ45 network cable, 2 meters 1 RJ45 box Shipping Checklist (cont'd) Use for controlling and web browser configuration. 18 RS485 connection requirements. ...
... Port Connections RJ45 Ethernet RS232 and RS485 Serial Port 1 8 1 8 Pins are numbered from left to the controller or DVR for ... UltraKey Touch Overview Table 1-1 Quantity Part 1 RJ45 network cable, 2 meters 1 RJ45 box Shipping Checklist (cont'd) Use for controlling and web browser configuration. 18 RS485 connection requirements. ...
User Guide
Page 19
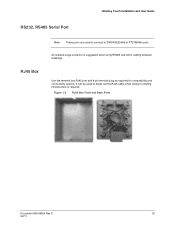
Figure 1-2 RJ45 Box Front and Back Ports Document 800-06554 Rev C 19 02/11 It can be used to connect to existing infrastructure is suggested when using RS485 and when cabling between buildings. UltraKey Touch Installation and User Guide RS232, RS485 Serial Port RJ45 Box Note These ports are used to break out the RJ45 cable when wiring to DVR RS232/485 or PTZ RS485 ports. An isolated surge protector is required. Use the terminal box RJ45 port and 8-pin terminal plug as required for compatibility and connectivity options.
Figure 1-2 RJ45 Box Front and Back Ports Document 800-06554 Rev C 19 02/11 It can be used to connect to existing infrastructure is suggested when using RS485 and when cabling between buildings. UltraKey Touch Installation and User Guide RS232, RS485 Serial Port RJ45 Box Note These ports are used to break out the RJ45 cable when wiring to DVR RS232/485 or PTZ RS485 ports. An isolated surge protector is required. Use the terminal box RJ45 port and 8-pin terminal plug as required for compatibility and connectivity options.
User Guide
Page 20
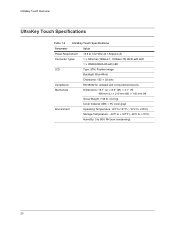
UltraKey Touch Overview UltraKey Touch Specifications Table 1-2 UltraKey Touch Specifications Parameter Value Power Requirement 10.8 to 13.2 VDC @ 1 Ampere (A) Connector Types 1 × Ethernet (10Base-T, 100Base-TX) RJ45 with LED 1 × RS232/485 RJ45 ...
UltraKey Touch Overview UltraKey Touch Specifications Table 1-2 UltraKey Touch Specifications Parameter Value Power Requirement 10.8 to 13.2 VDC @ 1 Ampere (A) Connector Types 1 × Ethernet (10Base-T, 100Base-TX) RJ45 with LED 1 × RS232/485 RJ45 ...

User Guide
Page 21
...Figure 2-2 for specific methods of the three main navigation options. This section covers: • Logging Onto the Controller on page 21 • Using the UltraKey Touch to log in. Note If an invalid password is entered, a message displays and the controller buzzes. See Table 2-2 for a brief overview of...Menus on the keyboard. 3. Connect the keyboard with a power adapter (12V [±10%] DC/1 A included). 2. Enter the password, 1234. 4. Using the UltraKey Touch to Navigate the LCD Menus There are a variety of ways to navigate the LCD menus during installation and set up.
...Figure 2-2 for specific methods of the three main navigation options. This section covers: • Logging Onto the Controller on page 21 • Using the UltraKey Touch to log in. Note If an invalid password is entered, a message displays and the controller buzzes. See Table 2-2 for a brief overview of...Menus on the keyboard. 3. Connect the keyboard with a power adapter (12V [±10%] DC/1 A included). 2. Enter the password, 1234. 4. Using the UltraKey Touch to Navigate the LCD Menus There are a variety of ways to navigate the LCD menus during installation and set up.
User Guide
Page 22
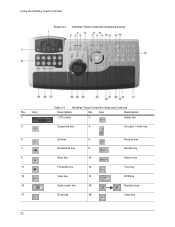
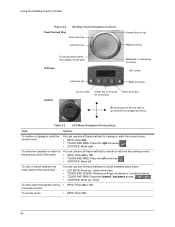
Icon Description LCD screen 2 Alarm key Sequence key 4 Iris open / close key Set key 6 Backwards key 8 Stop key 10 Forwards key 12 View key 14 Split screen key 16 Enter key 18 Recycle key Review key Search key Tour key DVR key Number keys Clear key Icon 1 3 5 7 9 11 13 15 17 22 Table 2-1 UltraKey Touch Controller Keys and Controls Description No. Using the UltraKey Touch Controller Figure 2-1 UltraKey Touch Controller Keyboard Layout No.
Icon Description LCD screen 2 Alarm key Sequence key 4 Iris open / close key Set key 6 Backwards key 8 Stop key 10 Forwards key 12 View key 14 Split screen key 16 Enter key 18 Recycle key Review key Search key Tour key DVR key Number keys Clear key Icon 1 3 5 7 9 11 13 15 17 22 Table 2-1 UltraKey Touch Controller Keys and Controls Description No. Using the UltraKey Touch Controller Figure 2-1 UltraKey Touch Controller Keyboard Layout No.
User Guide
Page 23
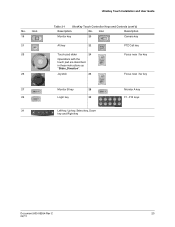
No. Joystick 26 Focus near / far key Focus near / far key Monitor B key 28 Login key 30 Left key, Up key, Select key, Down key and Right key Monitor A key F1-F10 keys Document 800-06554 Rev C 23 02/11 Icon 19 21 23 25 27 29 31 UltraKey Touch Installation and User Guide Table 2-1 UltraKey Touch Controller Keys and Controls (cont'd) Description No. Icon Description Monitor key 20 Camera key Alt key 22 PTZ Call key Touch pad slider 24 Operations with the touch pad are described in these instructions as "Slider_Direction".
No. Joystick 26 Focus near / far key Focus near / far key Monitor B key 28 Login key 30 Left key, Up key, Select key, Down key and Right key Monitor A key F1-F10 keys Document 800-06554 Rev C 23 02/11 Icon 19 21 23 25 27 29 31 UltraKey Touch Installation and User Guide Table 2-1 UltraKey Touch Controller Keys and Controls (cont'd) Description No. Icon Description Monitor key 20 Camera key Alt key 22 PTZ Call key Touch pad slider 24 Operations with the touch pad are described in these instructions as "Slider_Direction".
User Guide
Page 24
Using the UltraKey Touch Controller Figure 2-2 UltraKey Touch Navigation Controls Touch Pad and Ring Touch pad ring Left arrow key Forward key (or up) Right arrow key Touch pad slider (used like a ...
Using the UltraKey Touch Controller Figure 2-2 UltraKey Touch Navigation Controls Touch Pad and Ring Touch pad ring Left arrow key Forward key (or up) Right arrow key Touch pad slider (used like a ...

User Guide
Page 25
...Slider_Left (on page 48 Note For all connections, refer to the applicable DVR user guides for Cascade Linkage (Additional) on page 37 • Configuring UltraKey Touch Using the Web Browser (Optional) on page 39 • Controlling a FUSION DVR on page 43 • Controlling an HRXD/HRSD DVR on... Installing and Configuring an Ethernet Connection on page 35 • Keyboard Configuration for more information. This section explains how to connect the UltraKey Touch controller to a DVR and how to enter the basic configuration settings specific to that DVR. Document 800-06554 Rev C 25 02/11
...Slider_Left (on page 48 Note For all connections, refer to the applicable DVR user guides for Cascade Linkage (Additional) on page 37 • Configuring UltraKey Touch Using the Web Browser (Optional) on page 39 • Controlling a FUSION DVR on page 43 • Controlling an HRXD/HRSD DVR on... Installing and Configuring an Ethernet Connection on page 35 • Keyboard Configuration for more information. This section explains how to connect the UltraKey Touch controller to a DVR and how to enter the basic configuration settings specific to that DVR. Document 800-06554 Rev C 25 02/11

User Guide
Page 26
Connecting UltraKey Touch to a DVR Navigating the LCD Configuration Menus Figure 3-1 LCD and LCD Navigation Keys Left arrow key Up arrow key Right arrow key Down arrow key Figure 3-2 DVR Configuration Menu Tree System Configuration Numeric keypad and Ent key Standalone Settings Serial Port Network DVR PTZ COM2 (RS232) Show Net Infor Manual Settings DHCP DVR Selection HRDP / FUSION / HRXD Basic Set DVR / CAM PORT SELECT Serial Settings Baud Rate Data Bit Parity Stop Bit IP Address Gateway NetMask DNS RS232/RS485 26
Connecting UltraKey Touch to a DVR Navigating the LCD Configuration Menus Figure 3-1 LCD and LCD Navigation Keys Left arrow key Up arrow key Right arrow key Down arrow key Figure 3-2 DVR Configuration Menu Tree System Configuration Numeric keypad and Ent key Standalone Settings Serial Port Network DVR PTZ COM2 (RS232) Show Net Infor Manual Settings DHCP DVR Selection HRDP / FUSION / HRXD Basic Set DVR / CAM PORT SELECT Serial Settings Baud Rate Data Bit Parity Stop Bit IP Address Gateway NetMask DNS RS232/RS485 26
User Guide
Page 27
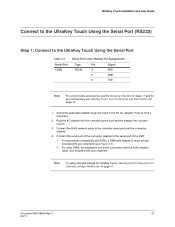
Connect the RJ45 network cable to click it into the AC adapter. UltraKey Touch Installation and User Guide Connect to the UltraKey Touch Using the Serial Port (RS232) Step 1: Connect to the UltraKey Touch Using the Serial Port Table 3-1 Serial Port COM2 Serial Port Com2 (RS232) Pin ...the serial port of cable accessories, see the Shipping Checklist on page 17 and for port connections see Keyboard Configuration for UltraKey Touch, see UltraKey Touch Port Connections and Descriptions on page 37. Push to the controller serial port and the connector adapter. 4. Select ...
Connect the RJ45 network cable to click it into the AC adapter. UltraKey Touch Installation and User Guide Connect to the UltraKey Touch Using the Serial Port (RS232) Step 1: Connect to the UltraKey Touch Using the Serial Port Table 3-1 Serial Port COM2 Serial Port Com2 (RS232) Pin ...the serial port of cable accessories, see the Shipping Checklist on page 17 and for port connections see Keyboard Configuration for UltraKey Touch, see UltraKey Touch Port Connections and Descriptions on page 37. Push to the controller serial port and the connector adapter. 4. Select ...
User Guide
Page 28
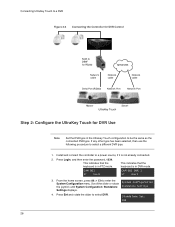
.... This indicates that the keyboard is not already connected. 2. CAM 001 ST User2 CAM 001 DVR 1 ST User2 3. Connecting UltraKey Touch to a DVR Figure 3-3 Connecting the Controller for DVR Control RJ45 to DB9F for RS232 Network cable NETWORK Network cable Network cable... Serial Port (RS232) Network Port Network Port Master UltraKey Touch Slave1 Step 2: Configure the UltraKey Touch for DVR Use Note Set the DVR type in the Ultrakey Touch configuration to enter the System Configuration menu. Install and connect the controller ...
.... This indicates that the keyboard is not already connected. 2. CAM 001 ST User2 CAM 001 DVR 1 ST User2 3. Connecting UltraKey Touch to a DVR Figure 3-3 Connecting the Controller for DVR Control RJ45 to DB9F for RS232 Network cable NETWORK Network cable Network cable... Serial Port (RS232) Network Port Network Port Master UltraKey Touch Slave1 Step 2: Configure the UltraKey Touch for DVR Use Note Set the DVR type in the Ultrakey Touch configuration to enter the System Configuration menu. Install and connect the controller ...

